Page 1640 of 2177
(8) Remove ring gear-to-differential case bolts and
floating pinion shaft retainers (Fig. 182).(9) Separate ring gear from differential case (Fig.
183).
(10) Separate differential cover from case using
suitable screwdrivers at position shown in (Fig. 184)
Fig. 181 Remove Bearing Cup
1 - SPECIAL TOOL 6062A
2 - DIFFERENTIAL BEARING RETAINER
Fig. 182 Ring Gear-to-Case Bolts
1 - DIFFERENTIAL CASE
2 - PINION SHAFT RETAINER
3 - RING GEAR
4 - RING GEAR-TO-CASE BOLT
Fig. 183 Ring Gear Removal
1 - DIFFERENTIAL CASE
2 - RING GEAR
Fig. 184 Separating Differential Support with
Screwdrivers
1 - DIFFERENTIAL SUPPORT
2 - DIFFERENTIAL CASE
3 - SCREWDRIVER
4 - RELIEF (2 @ 180É APART)
RS41TE AUTOMATIC TRANSAXLE21 - 193
FINAL DRIVE (Continued)
ProCarManuals.com
Page 1641 of 2177
(11) Lift support from case (Fig. 185).
(12) Remove side gear thrust washer (Fig. 186).(13) Remove side gear (Fig. 187).
(14) Remove pinion shaft (Fig. 188).
Fig. 185 Differential Support Removal
1 - DIFFERENTIAL SUPPORT
2 - DIFFERENTIAL CASE
Fig. 186 Side Gear Thrust Washer Removal
1 - SIDE GEAR THRUST WASHER
Fig. 187 Side Gear Removal
1 - DIFFERENTIAL SIDE GEAR
Fig. 188 Pinion Shaft Removal
1 - PINION SHAFT
21 - 194 41TE AUTOMATIC TRANSAXLERS
FINAL DRIVE (Continued)
ProCarManuals.com
Page 1642 of 2177
(15) Remove pinion gears and tabbed washers
(Fig. 189).
(16) Remove differential side gear (Fig. 190).
(17) Remove side gear thrust washer (Fig. 191).
(18) Inspect all components for excessive wear.
ASSEMBLY
NOTE: The differential is serviced as an assembly.
Differential service is limited to bearing cups and
cones. Any other differential component failure
must be remedied by differential assembly and
transfer shaft replacement.
(1) Install side gear thrust washer to differential
case (Fig. 192).
Fig. 189 Pinion Gear and Washer Removal
1 - PINION GEAR
2 - TABBED WASHER
3 - LOCATING TAB
4 - NOTCH
Fig. 190 Side Gear Removal
1 - DIFFERENTIAL SIDE GEAR
Fig. 191 Side Gear Thrust Washer Removal
1 - THRUST WASHER
Fig. 192 Thrust Washer Installation
1 - THRUST WASHER
RS41TE AUTOMATIC TRANSAXLE21 - 195
FINAL DRIVE (Continued)
ProCarManuals.com
Page 1643 of 2177
(2) Install side gear to differential case (Fig. 193).
(3) Install both pinion gears and washers to case,
while orientating washer tabs to notch in case (Fig.
194).(4) Install pinion shaft (Fig. 195).
(5) Install side gear to case (Fig. 196).
Fig. 193 Side Gear Installation
1 - DIFFERENTIAL SIDE GEAR
Fig. 194 Pinion Gear and Washer Installation
1 - PINION GEAR
2 - TABBED WASHER
3 - LOCATING TAB
4 - NOTCH
Fig. 195 Pinion Shaft Installation
1 - PINION SHAFT
Fig. 196 Side Gear Installation
1 - DIFFERENTIAL SIDE GEAR
21 - 196 41TE AUTOMATIC TRANSAXLERS
FINAL DRIVE (Continued)
ProCarManuals.com
Page 1644 of 2177
(6) Install side gear thrust washer to case (Fig.
197).
(7) Install differential support into position, while
aligning through-holes (Fig. 198).(8) Install differential ring gear to case (Fig. 199).
(9) Install ring gear-to-case bolts, with pinion shaft
retainers (Fig. 200), and torque bolts to 95 N´m (70
ft. lbs.).
Fig. 197 Side Gear Thrust Washer
1 - SIDE GEAR THRUST WASHER
Fig. 198 Diff Support Installation
1 - DIFFERENTIAL SUPPORT
2 - DIFFERENTIAL CASE
Fig. 199 Ring Gear Installation
1 - DIFFERENTIAL CASE
2 - RING GEAR
Fig. 200 Ring Gear-to-Case Bolts
1 - DIFFERENTIAL CASE
2 - PINION SHAFT RETAINER
3 - RING GEAR
4 - RING GEAR-TO-CASE BOLT
RS41TE AUTOMATIC TRANSAXLE21 - 197
FINAL DRIVE (Continued)
ProCarManuals.com
Page 1645 of 2177

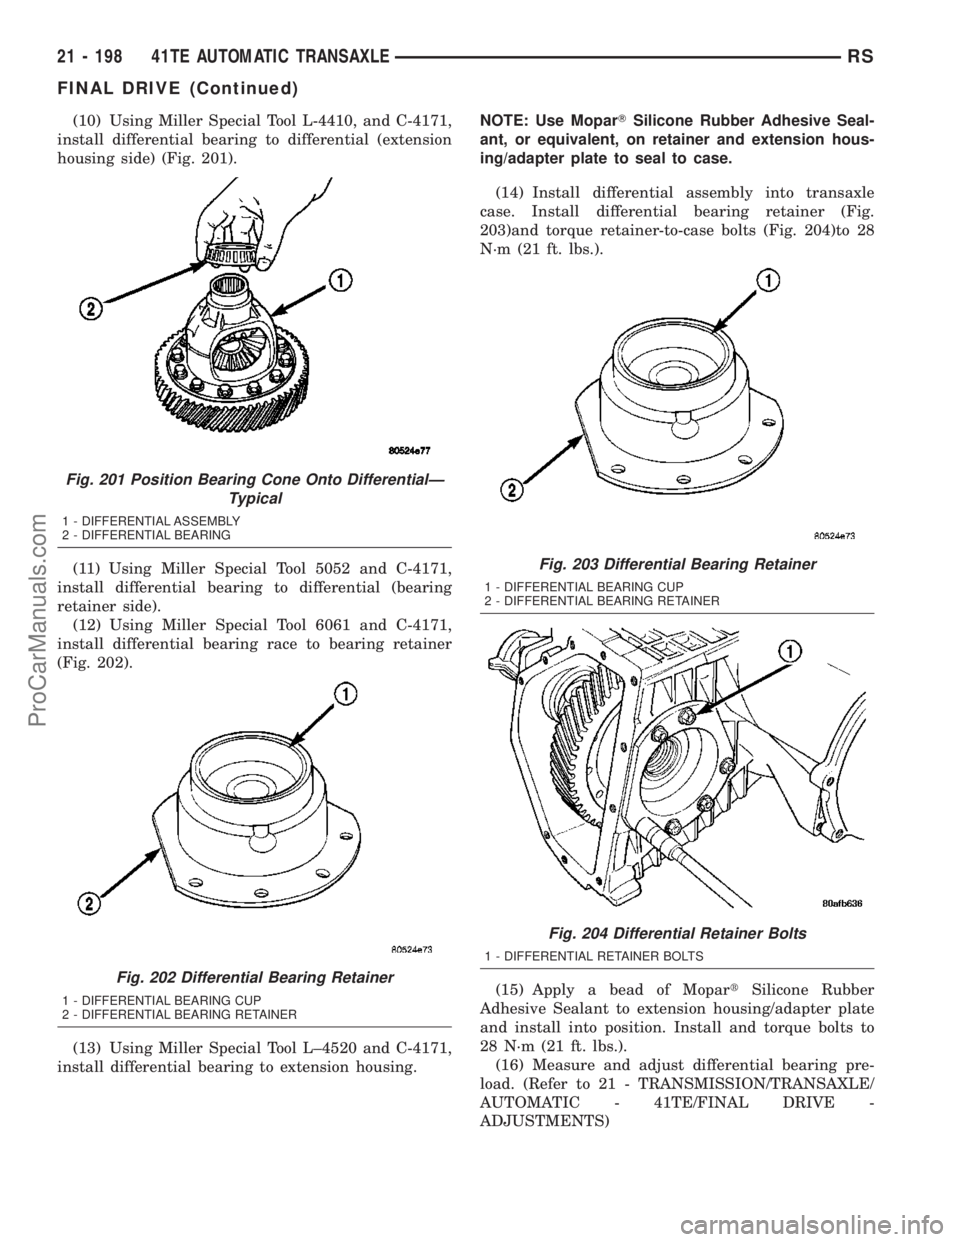
(10) Using Miller Special Tool L-4410, and C-4171,
install differential bearing to differential (extension
housing side) (Fig. 201).
(11) Using Miller Special Tool 5052 and C-4171,
install differential bearing to differential (bearing
retainer side).
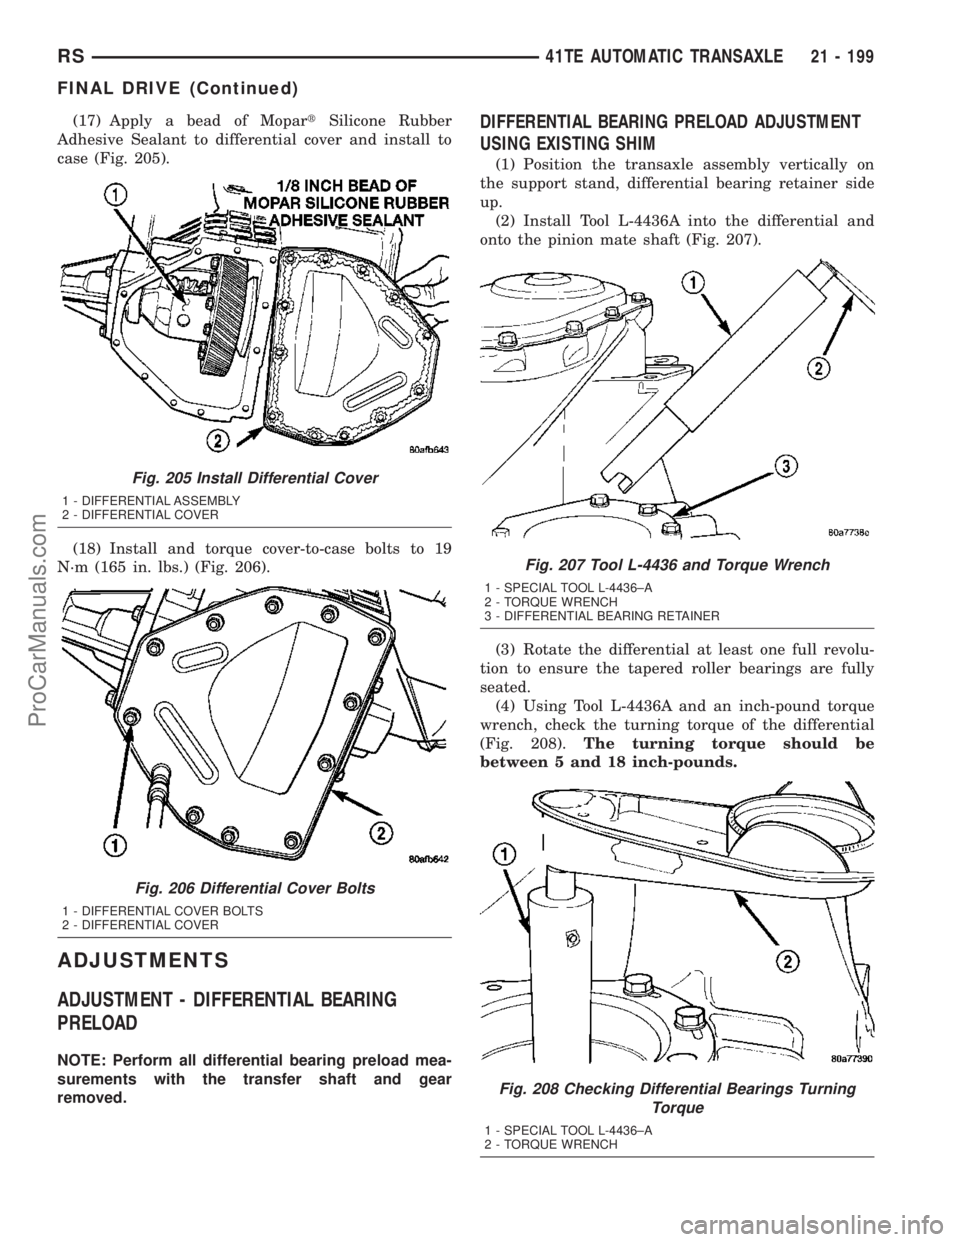
(12) Using Miller Special Tool 6061 and C-4171,
install differential bearing race to bearing retainer
(Fig. 202).
(13) Using Miller Special Tool L±4520 and C-4171,
install differential bearing to extension housing.NOTE: Use MoparTSilicone Rubber Adhesive Seal-
ant, or equivalent, on retainer and extension hous-
ing/adapter plate to seal to case.
(14) Install differential assembly into transaxle
case. Install differential bearing retainer (Fig.
203)and torque retainer-to-case bolts (Fig. 204)to 28
N´m (21 ft. lbs.).
(15) Apply a bead of MopartSilicone Rubber
Adhesive Sealant to extension housing/adapter plate
and install into position. Install and torque bolts to
28 N´m (21 ft. lbs.).
(16) Measure and adjust differential bearing pre-
load. (Refer to 21 - TRANSMISSION/TRANSAXLE/
AUTOMATIC - 41TE/FINAL DRIVE -
ADJUSTMENTS)
Fig. 201 Position Bearing Cone Onto DifferentialÐ
Typical
1 - DIFFERENTIAL ASSEMBLY
2 - DIFFERENTIAL BEARING
Fig. 202 Differential Bearing Retainer
1 - DIFFERENTIAL BEARING CUP
2 - DIFFERENTIAL BEARING RETAINER
Fig. 203 Differential Bearing Retainer
1 - DIFFERENTIAL BEARING CUP
2 - DIFFERENTIAL BEARING RETAINER
Fig. 204 Differential Retainer Bolts
1 - DIFFERENTIAL RETAINER BOLTS
21 - 198 41TE AUTOMATIC TRANSAXLERS
FINAL DRIVE (Continued)
ProCarManuals.com
Page 1646 of 2177

(17) Apply a bead of MopartSilicone Rubber
Adhesive Sealant to differential cover and install to
case (Fig. 205).
(18) Install and torque cover-to-case bolts to 19
N´m (165 in. lbs.) (Fig. 206).
ADJUSTMENTS
ADJUSTMENT - DIFFERENTIAL BEARING
PRELOAD
NOTE: Perform all differential bearing preload mea-
surements with the transfer shaft and gear
removed.
DIFFERENTIAL BEARING PRELOAD ADJUSTMENT
USING EXISTING SHIM
(1) Position the transaxle assembly vertically on
the support stand, differential bearing retainer side
up.
(2) Install Tool L-4436A into the differential and
onto the pinion mate shaft (Fig. 207).
(3) Rotate the differential at least one full revolu-
tion to ensure the tapered roller bearings are fully
seated.
(4) Using Tool L-4436A and an inch-pound torque
wrench, check the turning torque of the differential
(Fig. 208).The turning torque should be
between 5 and 18 inch-pounds.
Fig. 205 Install Differential Cover
1 - DIFFERENTIAL ASSEMBLY
2 - DIFFERENTIAL COVER
Fig. 206 Differential Cover Bolts
1 - DIFFERENTIAL COVER BOLTS
2 - DIFFERENTIAL COVER
Fig. 207 Tool L-4436 and Torque Wrench
1 - SPECIAL TOOL L-4436±A
2 - TORQUE WRENCH
3 - DIFFERENTIAL BEARING RETAINER
Fig. 208 Checking Differential Bearings Turning
Torque
1 - SPECIAL TOOL L-4436±A
2 - TORQUE WRENCH
RS41TE AUTOMATIC TRANSAXLE21 - 199
FINAL DRIVE (Continued)
ProCarManuals.com
Page 1647 of 2177

(5) If the turning torque is within specifications,
remove tools. Setup is complete.
(6) If turning torque is not within specifications
proceed with the following steps.
(a) Remove differential bearing retainer from
the transaxle case.
(b) Remove the bearing cup from the differential
bearing retainer using Tool 6062A.
(c) Remove the existing shim from under the
cup.
(d) Measure the existing shim.
(e) If the turning torque was too high when mea-
sured, install a 0.05 mm (0.002 inch) thinner shim.
If the turning torque is was too low, install a 0.05
mm (0.002 inch) thicker shim. Repeat until 5-18
inch-pounds turning torque is obtained. Oil Baffle
is not required to be installed when making shim
selection.
(f) Install the proper shim under the bearing
cup. Make sure the oil baffle is installed properlyin the bearing retainer, below the bearing shim
and cup.
(g) Install the differential bearing retainer using
Tool 5052 and C-4171. Seal the retainer to the
housing with MOPARtSilicone Rubber Adhesive
Sealant and torque bolts to 28 N´m (250 in. lbs.).
(7) Using Tool L-4436A and an inch-pound torque
wrench, recheck the turning torque of the differential
(Fig. 208).The turning torque should be within
5-18 inch-pounds.
Shim thickness need be determined only if any of
the following parts are replaced:
²Transaxle case
²Differential carrier
²Differential bearing retainer
²Extension housing
²Differential bearing cups and cones
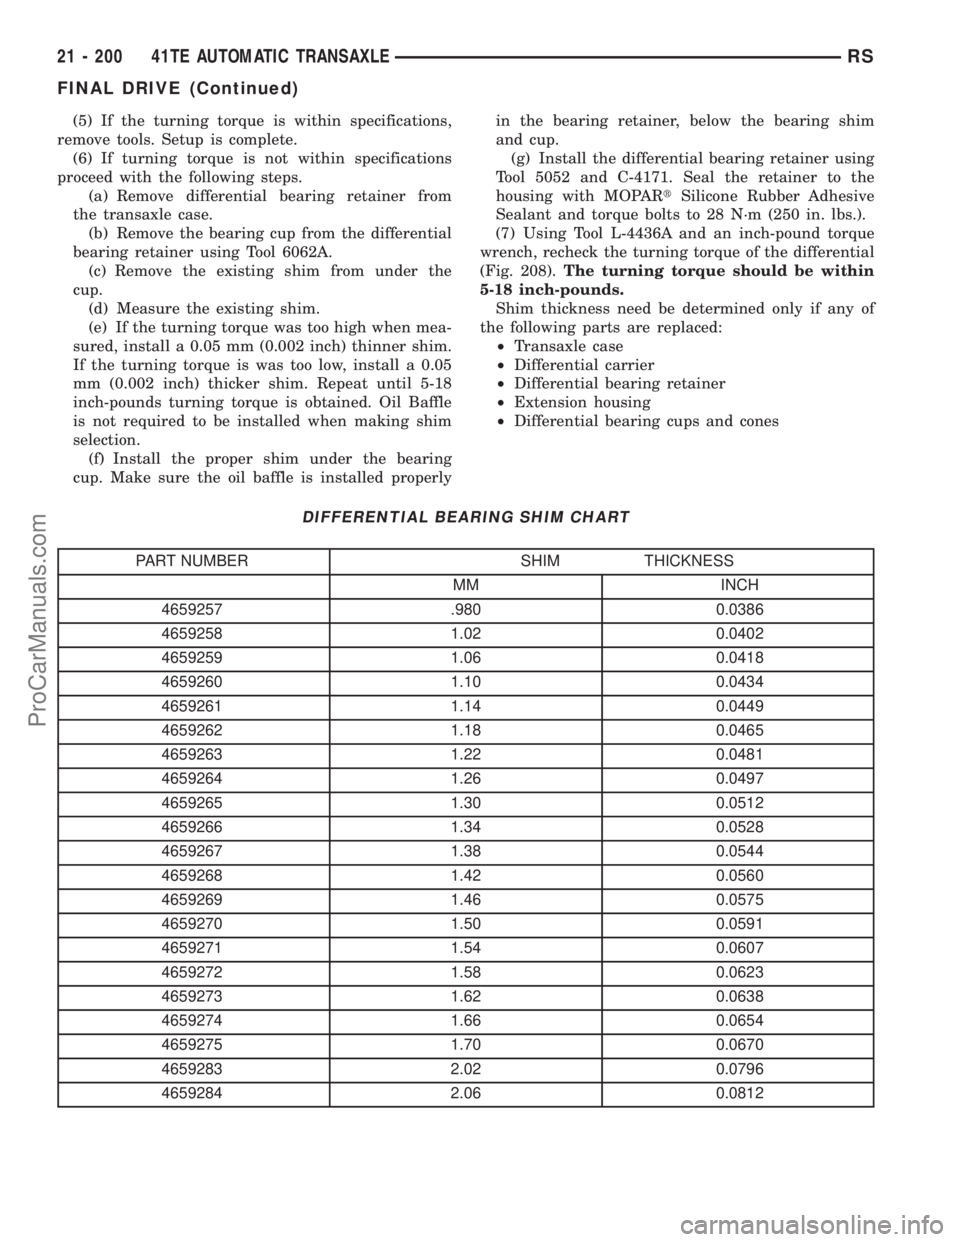
DIFFERENTIAL BEARING SHIM CHART
PART NUMBER SHIM THICKNESS
MM INCH
4659257 .980 0.0386
4659258 1.02 0.0402
4659259 1.06 0.0418
4659260 1.10 0.0434
4659261 1.14 0.0449
4659262 1.18 0.0465
4659263 1.22 0.0481
4659264 1.26 0.0497
4659265 1.30 0.0512
4659266 1.34 0.0528
4659267 1.38 0.0544
4659268 1.42 0.0560
4659269 1.46 0.0575
4659270 1.50 0.0591
4659271 1.54 0.0607
4659272 1.58 0.0623
4659273 1.62 0.0638
4659274 1.66 0.0654
4659275 1.70 0.0670
4659283 2.02 0.0796
4659284 2.06 0.0812
21 - 200 41TE AUTOMATIC TRANSAXLERS
FINAL DRIVE (Continued)
ProCarManuals.com