Page 329 of 486

When You Are Ready to Leave After
Parking on a Hill
1. Apply your regular brakes and hold the pedal down
while you:
·start your engine,
·shift into a gear, and
·release the parking brake.
2. Let up on the brake pedal.
3. Drive slowly until the trailer is clear of the chocks.
4. Stop and have someone pick up and store the
chocks.
Maintenance When Trailer Towing
Your vehicle will need service more often when you're
pulling a trailer. See the Maintenance Schedule for more
on this. Things that are especially important in trailer
operation are automatic transaxle ¯uid (don't over®ll),
engine oil, belts, cooling system and brake system. Each
of these is covered in this manual, and the Index will help
you ®nd them quickly. If you're trailering, it's a good idea
to review these sections before you start your trip.
Check periodically to see that all hitch nuts and bolts
are tight.
Trailer Wiring Harness
Your vehicle has a trailer wiring harness located at the
rear of your vehicle. To use the trailer wiring harness
you need a converter kit. Contact your dealer for more
information.
4-43
Page 331 of 486

Service............................................................5-3
Doing Your Own Service Work.........................5-3
Adding Equipment to the Outside of
Your Vehicle..............................................5-4
Fuel................................................................5-4
Gasoline Octane............................................5-4
Gasoline Speci®cations....................................5-5
California Fuel...............................................5-5
Additives.......................................................5-6
Fuels in Foreign Countries...............................5-6
Filling Your Tank............................................5-7
Filling a Portable Fuel Container.......................5-9
Checking Things Under the Hood....................5-10
Hood Release..............................................5-10
Engine Compartment Overview.......................5-12
Engine Oil...................................................5-13
Engine Air Cleaner/Filter................................5-18
Automatic Transaxle Fluid..............................5-20
Engine Coolant.............................................5-23
Radiator Pressure Cap..................................5-26
Engine Overheating.......................................5-26
Cooling System............................................5-29
Power Steering Fluid.....................................5-37
Windshield Washer Fluid................................5-38
Brakes........................................................5-40Battery........................................................5-43
Jump Starting...............................................5-44
All-Wheel Drive..............................................5-50
Bulb Replacement..........................................5-52
Halogen Bulbs..............................................5-52
Headlamps..................................................5-52
Front Turn Signal, Sidemarker and
Parking Lamps..........................................5-54
Taillamps, Turn Signal, Stoplamps and
Back-up Lamps.........................................5-56
Replacement Bulbs.......................................5-57
Windshield Wiper Blade Replacement..............5-58
Tires..............................................................5-60
In¯ation - Tire Pressure.................................5-61
Tire Inspection and Rotation...........................5-62
When It Is Time for New Tires.......................5-63
Buying New Tires.........................................5-64
Uniform Tire Quality Grading..........................5-65
Wheel Alignment and Tire Balance..................5-66
Wheel Replacement......................................5-66
Tire Chains..................................................5-67
Accessory In¯ator.........................................5-68
If a Tire Goes Flat........................................5-70
Changing a Flat Tire.....................................5-71
Compact Spare Tire......................................5-86
Section 5 Service and Appearance Care
5-1
Page 336 of 486

Additives
To provide cleaner air, all gasolines in the United States
are now required to contain additives that will help
prevent engine and fuel system deposits from forming,
allowing your emission control system to work
properly. You should not have to add anything to your
fuel. Gasolines containing oxygenates, such as
ethers and ethanol, and reformulated gasolines may be
available in your area to contribute to clean air.
General Motors recommends that you use these
gasolines, particularly if they comply with the
speci®cations described earlier.
Notice:Your vehicle was not designed for fuel that
contains methanol. Do not use fuel containing
methanol. It can corrode metal parts in your fuel
system and also damage the plastic and rubber
parts. That damage would not be covered under
your warranty.
Some gasolines that are not reformulated for
low emissions may contain an octane-enhancing
additive called methylcyclopentadienyl manganesetricarbonyl (MMT); ask the attendant where you buy
gasoline whether the fuel contains MMT. General Motors
does not recommend the use of such gasolines.
Fuels containing MMT can reduce the life of spark plugs
and the performance of the emission control system
may be affected. The malfunction indicator lamp
may turn on. If this occurs, return to your authorized GM
dealer for service.
Fuels in Foreign Countries
If you plan on driving in another country outside the
United States or Canada, the proper fuel may be hard
to ®nd. Never use leaded gasoline or any other fuel
not recommended in the previous text on fuel. Costly
repairs caused by use of improper fuel would not
be covered by your warranty.
To check the fuel availability, ask an auto club, or
contact a major oil company that does business in the
country where you will be driving.
5-6
Page 340 of 486
Checking Things Under
the Hood
{CAUTION:
An electric fan under the hood can start up
and injure you even when the engine is not
running. Keep hands, clothing and tools away
from any underhood electric fan.
{CAUTION:
Things that burn can get on hot engine parts
and start a ®re. These include liquids like fuel,
oil, coolant, brake ¯uid, windshield washer and
other ¯uids, and plastic or rubber. You or
others could be burned. Be careful not to drop
or spill things that will burn onto a hot engine.
Hood Release
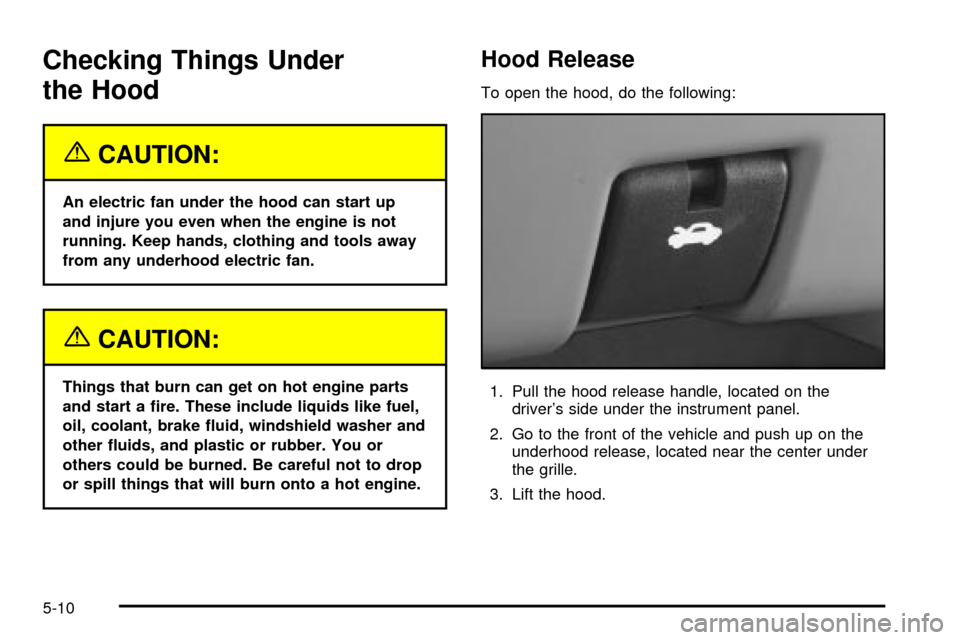
To open the hood, do the following:
1. Pull the hood release handle, located on the
driver's side under the instrument panel.
2. Go to the front of the vehicle and push up on the
underhood release, located near the center under
the grille.
3. Lift the hood.
5-10
Page 343 of 486

A. Underhood Fuse Block. SeeFuses and Circuit
Breakers on page 5-96.
B. Remote Positive (+) Terminal. See
Jump Starting on
page 5-44.
C. Windshield Washer Fluid Reservoir. See
Windshield
Washer Fluid on page 5-38.
D. Radiator Pressure Cap. See
Radiator Pressure Cap
on page 5-26.
E. Power Steering Fluid Reservoir. See
Power Steering
Fluid on page 5-37.
F. Engine Oil Fill Cap. See
Engine Oil on page 5-13.
G. Engine Oil Dipstick. See
Engine Oil on page 5-13.
H. Transaxle Fluid Dipstick. See
Automatic Transaxle
Fluid on page 5-20.
I. Brake Master Cylinder Reservoir. See
Brakes on
page 5-40.
J. Engine Air Cleaner/Filter. See
Engine Air
Cleaner/Filter on page 5-18.
K. Coolant Recovery Tank. See
Cooling System on
page 5-29.
Engine Oil
If the low engine oil level message appears on the
instrument cluster, it means you need to check your
engine oil level right away. For more information,
see
Low Engine Oil Level Message on page 3-53.
You should check your engine oil level regularly; this is
an added reminder.United States
Canada
5-13
Page 344 of 486
Checking Engine Oil
It's a good idea to check your engine oil every time you
get fuel. In order to get an accurate reading, the oil
must be warm and the vehicle must be on level ground.
The engine oil dipstick is
located at the front of the
engine compartment,
near the center. The
dipstick handle has a
bright, yellow loop design
for easy identi®cation.
See
Engine Compartment
Overview on page 5-12
for more information
on location.Turn off the engine and give the oil several minutes to
drain back into the oil pan. If you don't, the oil
dipstick might not show the actual level.
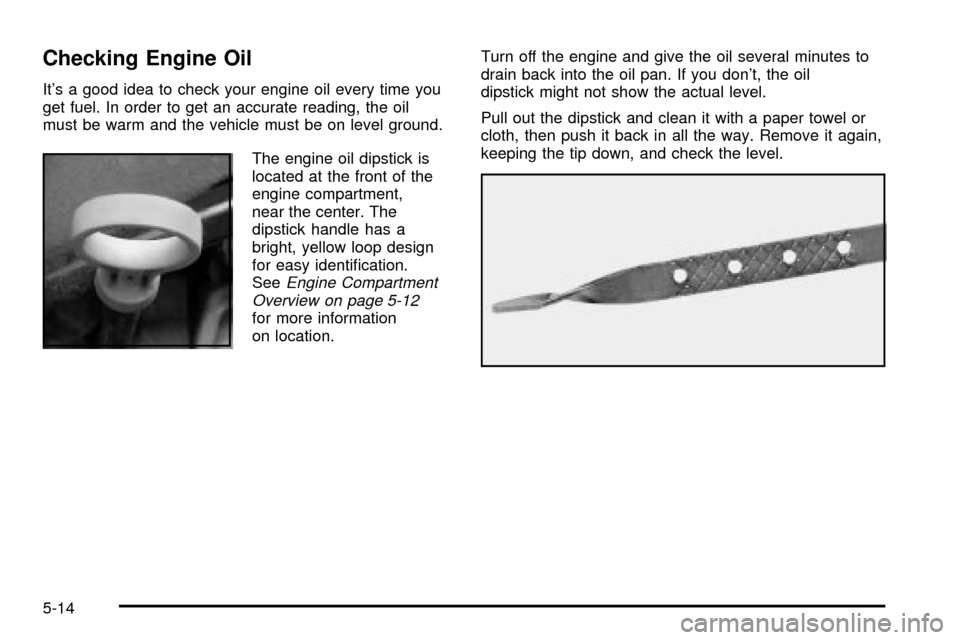
Pull out the dipstick and clean it with a paper towel or
cloth, then push it back in all the way. Remove it again,
keeping the tip down, and check the level.
5-14
Page 345 of 486
When to Add Engine Oil
If the oil is at or below the cross-hatched area at the tip
of the dipstick, then you'll need to add at least one
quart of oil. But you must use the right kind. This part
explains what kind of oil to use. For engine oil crankcase
capacity, see
Capacities and Speci®cations on
page 5-103.
Notice:Don't add too much oil. If your engine has
so much oil that the oil level gets above the
cross-hatched area that shows the proper operating
range, your engine could be damaged.The engine oil ®ll cap is
located behind the engine
oil dipstick. See
Engine
Compartment Overview on
page 5-12
for more
information on location.
Be sure to ®ll it enough to put the level somewhere in
the proper operating range in the cross-hatched
area. Push the dipstick all the way back in when you're
through.
5-15
Page 346 of 486
What Kind of Engine Oil to Use
Oils recommended for your vehicle can be identi®ed by
looking for the starburst symbol.
This symbol indicates that the oil has been certi®ed by
the American Petroleum Institute (API). Do not use
any oil which does not carry this starburst symbol.
If you choose to perform
the engine oil change
service yourself, be sure
the oil you use has
the starburst symbol on
the front of the oil
container. If you have your
oil changed for you, be
sure the oil put into
your engine is American
Petroleum Institute certi®ed
for gasoline engines.
You should also use the proper viscosity oil for your
vehicle, as shown in the viscosity chart.
5-16