2003 CHEVROLET TRAIL BLAZER AUX
[x] Cancel search: AUXPage 138 of 436
Accessory Power Outlets
Your vehicle may have accessory power outlets. With
the accessory power outlets, you can plug in auxiliary
electrical equipment such as a cellular telephone or
CB radio.
The ®rst outlet is located to the right of the cigarette
lighter on the instrument panel. The second outlet
is located on the rear of the center console.
Remove the cover from the outlet to use the outlet.
Be sure to put the cover back on when not using the
accessory power outlet.
Certain electrical accessories may not be compatible
with the accessory power outlet and could result
in blown vehicle or adaptor fuses. If you experience a
problem, see your dealer for additional information
on the accessory power outlets.
Notice:Adding any electrical equipment to your
vehicle may damage it or keep other components
from working as they should. The repairs would not
be covered by your warranty. Check with your
dealer before adding electrical equipment.
When adding electrical equipment, be sure to follow the
proper installation instructions included with the
equipment.
Notice:Improper use of the power outlet can cause
damage not covered by your warranty. Do not
hang any type of accessory or accessory bracket
from the plug because the power outlets are
designed for accessory power plugs only.
Ashtrays and Cigarette Lighter
Your vehicle may have this feature. The ashtray is
removable and ®ts into the front cupholder.
Notice:If you put papers or other ¯ammable items
in the ashtray, hot cigarettes or other smoking
materials could ignite them and possibly damage
your vehicle. Never put ¯ammable items in the
ashtray.
To remove the ashtray, pull the covered bin out of the
cupholder.
To use the lighter, press it in all the way, and let go.
When it's ready, it will pop back out by itself.
Notice:Holding a cigarette lighter in while it is
heating will not allow the lighter to back away from
the heating element when it is hot. Damage from
overheating may occur to the lighter or heating
element, or a fuse could be blown. Do not hold a
cigarette lighter in while it is heating.
3-20
Page 189 of 436
4 FWD (Forward):Press and hold this pushbutton to
advance quickly within a track. Press and hold this
pushbutton for less than two seconds to advance
at six times the normal playing speed. Press and hold
it for more than two seconds to advance at 17 times the
normal playing speed. Release it to play the passage.
The display will show ET and the
elapsed time.
6 RDM (Random):Press this pushbutton to hear the
tracks in random, rather than sequential, order. RDM ON
will appear on the display. RDM T and the track
number will appear on the display when each track
starts to play. Press this pushbutton again to turn
off random play. RDM OFF will appear on the display.
qSEEKr:Press the left arrow to go to the start
of the current or to the previous track. Press the
right arrow to go to the start of the next track. If either
arrow is held or pressed more than once, the player will
continue moving backward or forward through the CD.
DISP (Display):Press this knob to see how long
the current track has been playing. ET and the elapsed
time will appear on the display. To change the default
on the display (track or elapsed time), push the
knob until you see the display you want, then hold the
knob for two seconds. The radio will produce one
beep and selected display will now be the default.
AM FM:Press this button to listen to the radio when a
CD is playing. The disc will stop but remain in the player.CD AUX (Auxiliary):Press this button to play a CD
when listening to the radio.
ZEJT (Eject):Press this button to eject a CD. Eject
may be activated with either the ignition or radio off.
CDs may be loaded with the radio and ignition off if this
button is pressed ®rst.
Compact Disc Messages
If the disc comes out, it could be for one of the following
reasons:
·You're driving on a very rough road. When the road
becomes smoother, the disc should play.
·It's very hot. When the temperature returns to
normal, the disc should play.
·The disc is dirty, scratched, wet or upside down.
·The air is very humid. If so, wait about an hour and
try again.
·There may have been a problem while burning
the CD.
·The label may be caught in the CD player.
If the CD is not playing correctly, for any other reason,
try a known good CD.
If any error occurs repeatedly or if an error can't be
corrected, contact your dealer.
3-71
Page 207 of 436
Playing a Speci®c Loaded Compact
Disc
For every CD loaded, a number will appear on the radio
display. To play a speci®c CD, ®rst press the CD AUX
button to start playing a CD. Then press the numbered
pushbutton that corresponds to the CD you want to
play. A small bar will appear under the CD number that
is playing, and the track number will appear.
If an error appears on the radio display, see ªCompact
Disc Messagesº later in this section.
LOAD CD
Z(Eject):Pressing the CD eject side of
this button will eject a single disc or multiple discs.
To eject the disc that is currently playing, press
and release this button. To eject multiple discs, press
and hold this button for two seconds. You will hear
a beep and the light will ¯ash to let you know when a
disc is being ejected.
REMOVE CD will be displayed. You can now remove
the disc. If the disc is not removed, after 25 seconds, the
disc will be automatically pulled back into the receiver.
If you try to push the disc back into the receiver,
before the 25 second time period is complete, the
receiver will sense an error and will try to eject the disc
several times before stopping.Do not repeatedly press the CD eject side of the
LOAD CD eject button to eject a disc after you have
tried to push it in manually. The receivers 25-second
eject timer will reset at each press of eject, which
will cause the receiver to not eject the disc until the
25-second time period has elapsed.
Once the player stops and the disc is ejected, remove
the disc. After removing the disc, press the PWR
knob off and then on again. This will clear the
disc-sensing feature and enable discs to be loaded into
the player again.{REV (Reverse):Press and hold this button to
reverse quickly within a track. You will hear sound at a
reduced volume. Release it to play the passage.
The display will show elapsed time.
FWD
|(Forward):Press and hold this button to
advance quickly within a track. You will hear sound at a
reduced volume. Release it to play the passage. The
display will show elapsed time.
3-89
Page 212 of 436
Battery Replacement
To change the batteries, do the following:
1. Loosen the screw on the battery compartment door
located on the left side of the headphones.
2. Replace the two AAA batteries in the compartment.
Make sure that they are installed correctly.
3. Tighten the screws to close the compartment door.
If the headphones are to be stored for a long period
of time, remove the batteries and keep them in a cool,
dry place.
Stereo RCA Jacks
The RCA jacks and the mini-headphone jacks are
located behind the video screen on the overhead
console. The RCA jacks allow you to hook up an
auxiliary device such as a camcorder or a video game
unit. The yellow RCA jack is used for video and the
red and white RCA jacks are used for audio. You may
require adapter connectors or cables to connect
your auxiliary device to the RCA jacks. Refer to the
manufacturer's instructions for proper usage. The
mini-headphone jacks allow you to hook up
two customer provided wired headphones.To use the auxiliary audio and video inputs on the RSE,
connect an external auxiliary device such as a
camcorder to the RCA jacks and turn on both the
auxiliary device power and the power on the front of the
RSE player. If a disc is not present in the player, the
auxiliary signal will immediately be displayed on
the RSE. If a disc is present when the RSE power is
turned on, the player will automatically begin playing the
disc and the user will need to press the AUX button
on the remote control to display and/or hear the auxiliary
input signals. Each press of the AUX button on the
remote control will switch the system between disc and
auxiliary input. The wired headphone volume control
will only operate when the DVD player power is turned
on and it controls both wired headphone jacks at
the same time. SeeRemote Controllater in this section
for more information.
Audio Speakers
Audio from the DVD player can only be heard either
through the IR headphones or wired headphones
(not included). The sound will not come through the
vehicle's speakers.
3-94
Page 215 of 436
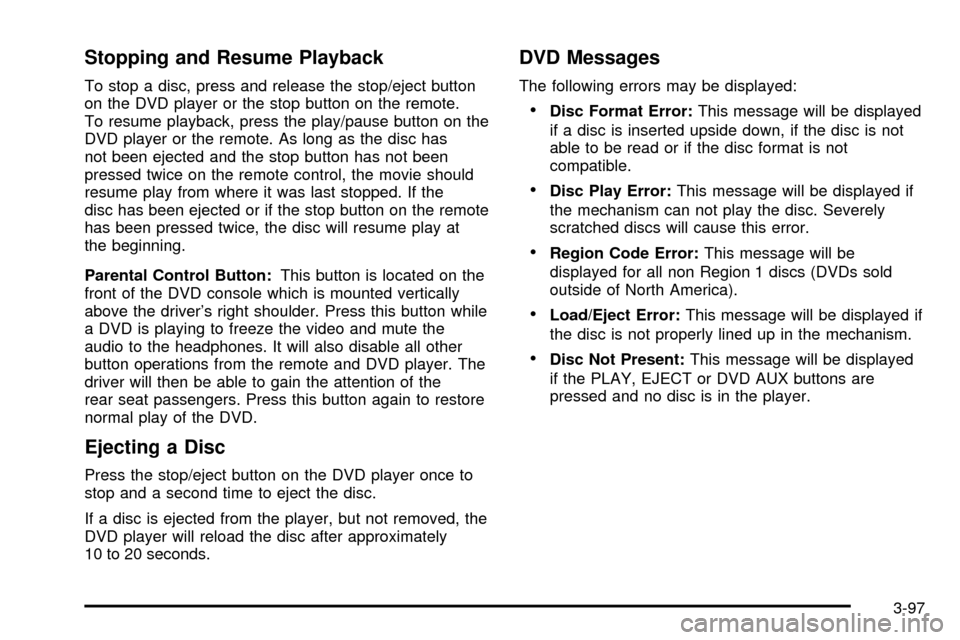
Stopping and Resume Playback
To stop a disc, press and release the stop/eject button
on the DVD player or the stop button on the remote.
To resume playback, press the play/pause button on the
DVD player or the remote. As long as the disc has
not been ejected and the stop button has not been
pressed twice on the remote control, the movie should
resume play from where it was last stopped. If the
disc has been ejected or if the stop button on the remote
has been pressed twice, the disc will resume play at
the beginning.
Parental Control Button:This button is located on the
front of the DVD console which is mounted vertically
above the driver's right shoulder. Press this button while
a DVD is playing to freeze the video and mute the
audio to the headphones. It will also disable all other
button operations from the remote and DVD player. The
driver will then be able to gain the attention of the
rear seat passengers. Press this button again to restore
normal play of the DVD.
Ejecting a Disc
Press the stop/eject button on the DVD player once to
stop and a second time to eject the disc.
If a disc is ejected from the player, but not removed, the
DVD player will reload the disc after approximately
10 to 20 seconds.
DVD Messages
The following errors may be displayed:
·Disc Format Error:This message will be displayed
if a disc is inserted upside down, if the disc is not
able to be read or if the disc format is not
compatible.
·Disc Play Error:This message will be displayed if
the mechanism can not play the disc. Severely
scratched discs will cause this error.
·Region Code Error:This message will be
displayed for all non Region 1 discs (DVDs sold
outside of North America).
·Load/Eject Error:This message will be displayed if
the disc is not properly lined up in the mechanism.
·Disc Not Present:This message will be displayed
if the PLAY, EJECT or DVD AUX buttons are
pressed and no disc is in the player.
3-97
Page 218 of 436
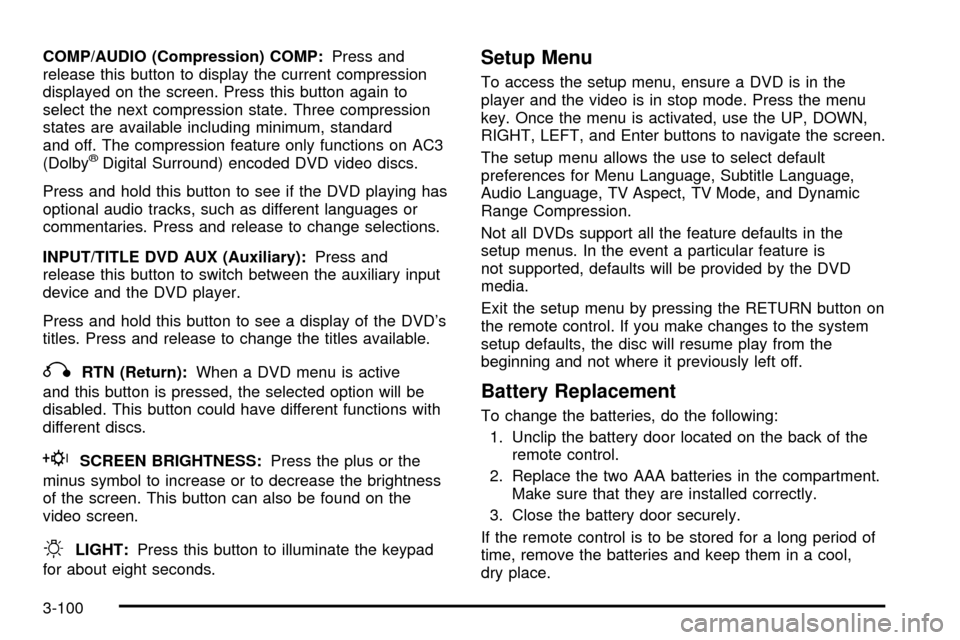
COMP/AUDIO (Compression) COMP:Press and
release this button to display the current compression
displayed on the screen. Press this button again to
select the next compression state. Three compression
states are available including minimum, standard
and off. The compression feature only functions on AC3
(Dolby
žDigital Surround) encoded DVD video discs.
Press and hold this button to see if the DVD playing has
optional audio tracks, such as different languages or
commentaries. Press and release to change selections.
INPUT/TITLE DVD AUX (Auxiliary):Press and
release this button to switch between the auxiliary input
device and the DVD player.
Press and hold this button to see a display of the DVD's
titles. Press and release to change the titles available.
qRTN (Return):When a DVD menu is active
and this button is pressed, the selected option will be
disabled. This button could have different functions with
different discs.
ESCREEN BRIGHTNESS:Press the plus or the
minus symbol to increase or to decrease the brightness
of the screen. This button can also be found on the
video screen.
OLIGHT:Press this button to illuminate the keypad
for about eight seconds.
Setup Menu
To access the setup menu, ensure a DVD is in the
player and the video is in stop mode. Press the menu
key. Once the menu is activated, use the UP, DOWN,
RIGHT, LEFT, and Enter buttons to navigate the screen.
The setup menu allows the use to select default
preferences for Menu Language, Subtitle Language,
Audio Language, TV Aspect, TV Mode, and Dynamic
Range Compression.
Not all DVDs support all the feature defaults in the
setup menus. In the event a particular feature is
not supported, defaults will be provided by the DVD
media.
Exit the setup menu by pressing the RETURN button on
the remote control. If you make changes to the system
setup defaults, the disc will resume play from the
beginning and not where it previously left off.
Battery Replacement
To change the batteries, do the following:
1. Unclip the battery door located on the back of the
remote control.
2. Replace the two AAA batteries in the compartment.
Make sure that they are installed correctly.
3. Close the battery door securely.
If the remote control is to be stored for a long period of
time, remove the batteries and keep them in a cool,
dry place.
3-100
Page 219 of 436
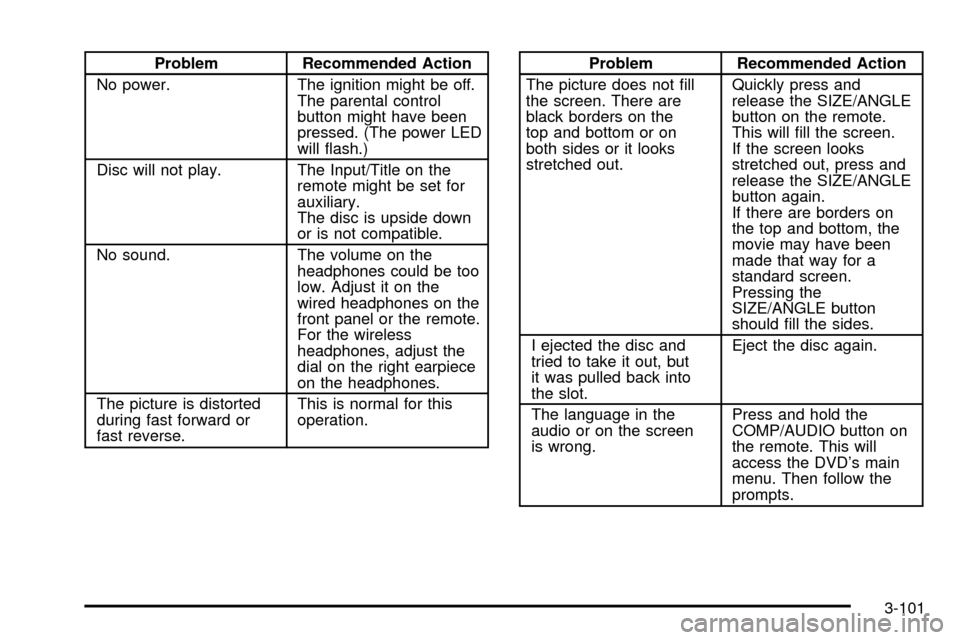
Problem Recommended Action
No power. The ignition might be off.
The parental control
button might have been
pressed. (The power LED
will ¯ash.)
Disc will not play. The Input/Title on the
remote might be set for
auxiliary.
The disc is upside down
or is not compatible.
No sound. The volume on the
headphones could be too
low. Adjust it on the
wired headphones on the
front panel or the remote.
For the wireless
headphones, adjust the
dial on the right earpiece
on the headphones.
The picture is distorted
during fast forward or
fast reverse.This is normal for this
operation.Problem Recommended Action
The picture does not ®ll
the screen. There are
black borders on the
top and bottom or on
both sides or it looks
stretched out.Quickly press and
release the SIZE/ANGLE
button on the remote.
This will ®ll the screen.
If the screen looks
stretched out, press and
release the SIZE/ANGLE
button again.
If there are borders on
the top and bottom, the
movie may have been
made that way for a
standard screen.
Pressing the
SIZE/ANGLE button
should ®ll the sides.
I ejected the disc and
tried to take it out, but
it was pulled back into
the slot.Eject the disc again.
The language in the
audio or on the screen
is wrong.Press and hold the
COMP/AUDIO button on
the remote. This will
access the DVD's main
menu. Then follow the
prompts.
3-101
Page 220 of 436
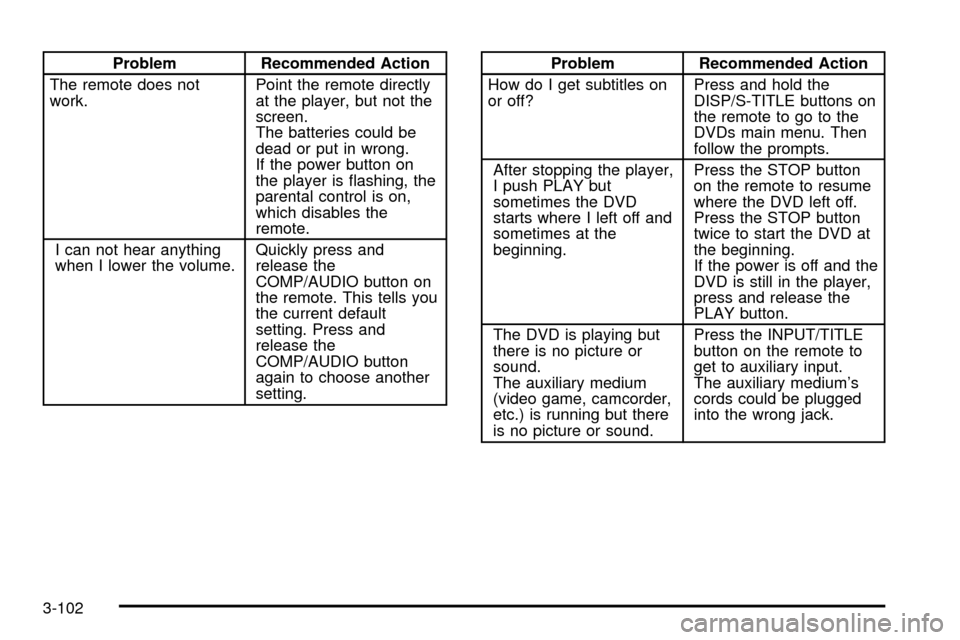
Problem Recommended Action
The remote does not
work.Point the remote directly
at the player, but not the
screen.
The batteries could be
dead or put in wrong.
If the power button on
the player is ¯ashing, the
parental control is on,
which disables the
remote.
I can not hear anything
when I lower the volume.Quickly press and
release the
COMP/AUDIO button on
the remote. This tells you
the current default
setting. Press and
release the
COMP/AUDIO button
again to choose another
setting.Problem Recommended Action
How do I get subtitles on
or off?Press and hold the
DISP/S-TITLE buttons on
the remote to go to the
DVDs main menu. Then
follow the prompts.
After stopping the player,
I push PLAY but
sometimes the DVD
starts where I left off and
sometimes at the
beginning.Press the STOP button
on the remote to resume
where the DVD left off.
Press the STOP button
twice to start the DVD at
the beginning.
If the power is off and the
DVD is still in the player,
press and release the
PLAY button.
The DVD is playing but
there is no picture or
sound.
The auxiliary medium
(video game, camcorder,
etc.) is running but there
is no picture or sound.Press the INPUT/TITLE
button on the remote to
get to auxiliary input.
The auxiliary medium's
cords could be plugged
into the wrong jack.
3-102