2003 CHEVROLET SUBURBAN turn signal
[x] Cancel search: turn signalPage 178 of 552

Exterior Lamps
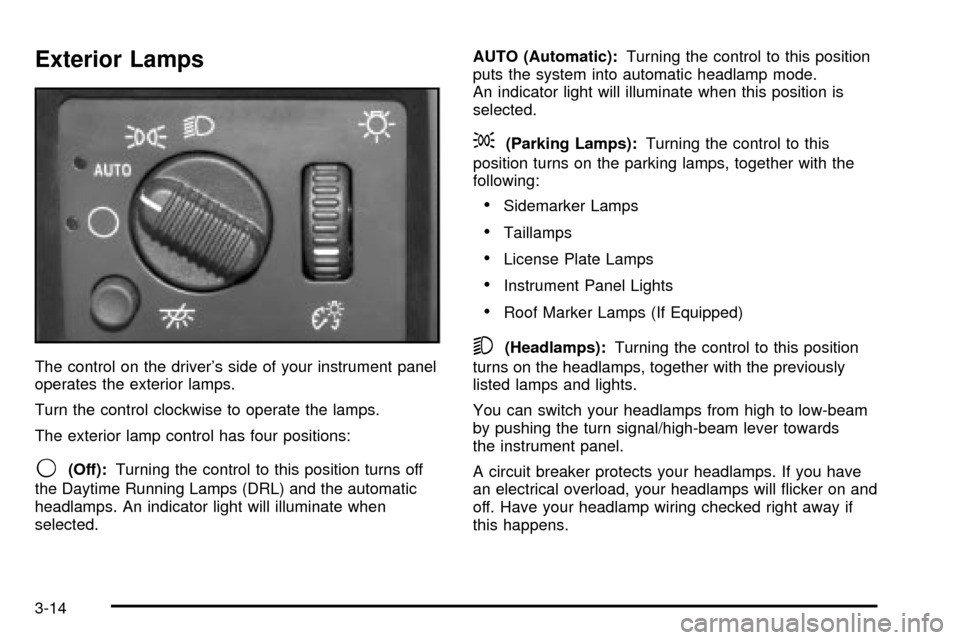
The control on the driver's side of your instrument panel
operates the exterior lamps.
Turn the control clockwise to operate the lamps.
The exterior lamp control has four positions:
9(Off):Turning the control to this position turns off
the Daytime Running Lamps (DRL) and the automatic
headlamps. An indicator light will illuminate when
selected.AUTO (Automatic):Turning the control to this position
puts the system into automatic headlamp mode.
An indicator light will illuminate when this position is
selected.
;(Parking Lamps):Turning the control to this
position turns on the parking lamps, together with the
following:
·Sidemarker Lamps
·Taillamps
·License Plate Lamps
·Instrument Panel Lights
·Roof Marker Lamps (If Equipped)
5(Headlamps):Turning the control to this position
turns on the headlamps, together with the previously
listed lamps and lights.
You can switch your headlamps from high to low-beam
by pushing the turn signal/high-beam lever towards
the instrument panel.
A circuit breaker protects your headlamps. If you have
an electrical overload, your headlamps will ¯icker on and
off. Have your headlamp wiring checked right away if
this happens.
3-14
Page 215 of 552

{CAUTION:
Do not keep driving if the oil pressure is low. If
you do, your engine can become so hot that it
catches ®re. You or others could be burned.
Check your oil as soon as possible and have
your vehicle serviced.
Notice:Damage to your engine from neglected oil
problems can be costly and is not covered by
your warranty.
Cruise Control Light
The cruise light comes on
whenever you set your
cruise control. See ªCruise
Controlº under
Turn
Signal/Multifunction Lever
on page 3-7
.
Four-Wheel-Drive Light
The four-wheel drive
indicator will light up when
you shift a manual
transfer case into
four-wheel drive and the
front axle engages.
Some delay between shifting and the indicator's lighting
is normal.
See
Four-Wheel Drive on page 2-29for more
information.
3-51
Page 235 of 552

TRACTION ACTIVE
When the traction control system has detected that any
of the vehicle's wheels are spinning, the traction
control system will activate and this message will appear
on the DIC. For more information see
Traction Assist
System (TAS) on page 4-10
TRANSMISSION HOT
If the transmission ¯uid temperature becomes high, the
message center will display this message.
When the transmission enters the protection mode, you
may notice a change in the transmission shifting
patterns. When the transmission ¯uid temperature
returns to normal, the display will turn off and the
transmission shifting patterns will return to normal.
Notice:If you keep driving your vehicle with the
transmission TRANS FLUID HOT message
displayed, you can damage the transmission. This
could lead to costly repairs that may not be covered
under your warranty.
The following situations can cause the transmission to
operate at higher temperatures:
·Towing a trailer
·Hot outside air temperatures
·Hauling a large or heavy load
·Low transmission ¯uid level
·High transmission ¯uid level
·Restricted air ¯ow to the radiator and the auxiliary
transmission oil cooler.
A temporary solution to hotter transmission operating
temperatures may be to let the transmission cool down.
If the transmission is operated at higher temperatures
on a frequent basis, see
Scheduled Maintenance
on page 6-5for the proper transmission maintenance
intervals.
TRACTION SYS LIMITED
Text under development.
TURN SIGNAL ON
If a turn signal is left on for 3/4 of a mile (1.2 km), this
message will appear on the display and you will
hear a chime. Move the turn signal/multifunction lever to
the off position. Press the select button to acknowledge
the message and clear it from the DIC display.
3-71
Page 238 of 552

Finding a Station
AM FM:Press this button to switch the display between
time and radio station frequency. Time display is
available with the ignition turned off.
TUNE:Turn this knob to tune in radio stations.
oSEEKp:Press the right or the left arrow to seek
to the next or to the previous station and stay there.
To scan stations, press and hold one of the SEEK
arrows for two seconds until you hear a beep. The radio
will go to a station, play for a few seconds and ¯ash
the station frequency, then go on to the next station.
Press one of the SEEK arrows again to stop scanning.
To scan preset stations, press and hold one of the
SEEK arrows for more than four seconds until you hear
two beeps. The radio will go to the ®rst preset station
stored on the pushbuttons, play for a few seconds
and ¯ash the station frequency, then go on to the next
preset station. Press one of the SEEK arrows again
to stop scanning presets.
This radio will seek and scan only to stations that are in
the selected band and only to those with a strong signal.
Setting Preset Stations
The six numbered pushbuttons let you return to your
favorite stations. You can set up to 18 stations (six AM,
six FM1 and six FM2) by performing the following steps:
1. Turn the radio on.
2. Press AM FM to select AM, FM1 or FM2.
3. Tune in the desired station.
4. Press and hold one of the six numbered
pushbuttons until you hear a beep. Whenever you
press that numbered pushbutton, the station
you set will return.
5. Repeat the steps for each pushbutton.
Setting the Tone (Bass/Treble)
AUDIO:To adjust bass and treble, press and release
AUDIO repeatedly until BAS or TRE appears on
the display. Then press and hold the up or the down
arrow to increase or to decrease. If a station is weak or
noisy, you may want to decrease the treble.
3-74
Page 242 of 552

Finding a Station
BAND:Press this button to switch between AM, FM1,
FM2, or XM1, XM2 (USA only, if equipped). The
display will show your selection.
TUNE:Turn this knob to choose radio stations.
qSEEKr:Press the right or the left arrow to seek
to the next or to the previous station and stay there.
The radio will seek only to stations that are in the
selected band and only to those with a strong signal.
qSCANr:Press and hold one of the arrows for
more than two seconds. The radio will produce one beep.
The radio will scan to a station, play for a few seconds,
then go on to the next station. SCAN will be displayed.
Press one of the arrows again to stop scanning.
The radio will scan only to stations that are in the selected
band and only to those with a strong signal.
To scan preset stations, press and hold one of the arrows
for more than four seconds. The radio will produce two
beeps. The radio will scan to the ®rst preset station, play
for a few seconds, then go on to the next preset station.
PSCN will be displayed. Press one of the arrows again or
one of the pushbuttons to stop scanning.
The radio will scan only to preset stations that are in the
selected band and only to those with a strong signal.
Setting Preset Stations
The six numbered pushbuttons let you return to your
favorite stations. You can set up to 30 stations (six AM,
six FM1 and six FM2, six XM1 and six XM2 (USA
only, if equipped), by performing the following steps:
1. Turn the radio on.
2. Press BAND to select AM, FM1, FM2, or XM1,
or XM2.
3. Tune in the desired station.
4. Press AUTO EQ to choose the bass and treble
equalization that best suits the type of station
you are listening to.
5. Press and hold one of the six numbered
pushbuttons. The radio will produce one beep.
Whenever you press that numbered pushbutton, the
station you set will return and the bass and treble
equalization that you selected will also be
automatically selected for that pushbutton.
6. Repeat the steps for each pushbutton.
3-78
Page 247 of 552

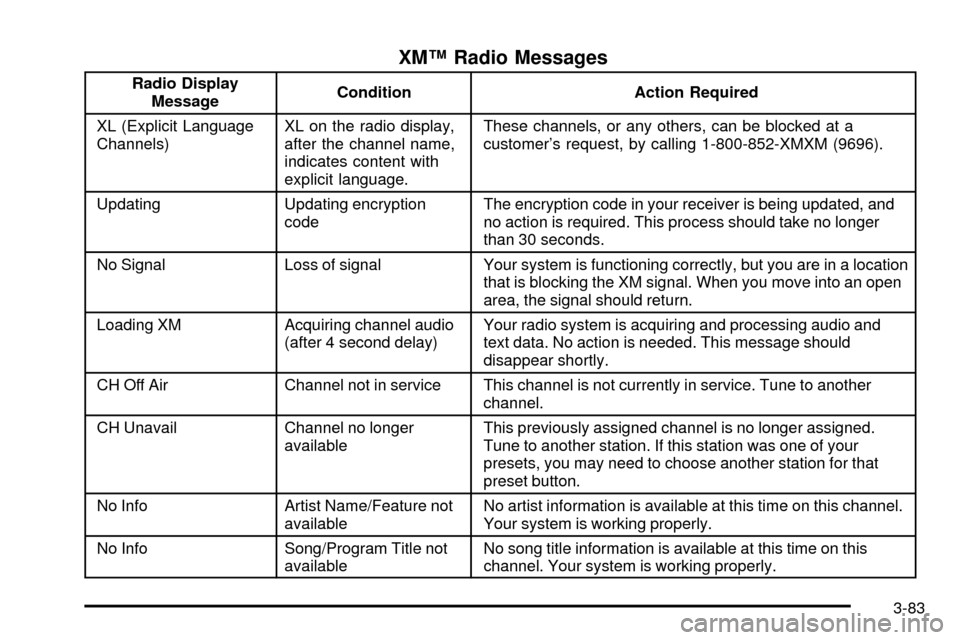
XMŸ Radio Messages
Radio Display
MessageCondition Action Required
XL (Explicit Language
Channels)XL on the radio display,
after the channel name,
indicates content with
explicit language.These channels, or any others, can be blocked at a
customer's request, by calling 1-800-852-XMXM (9696).
Updating Updating encryption
codeThe encryption code in your receiver is being updated, and
no action is required. This process should take no longer
than 30 seconds.
No Signal Loss of signal Your system is functioning correctly, but you are in a location
that is blocking the XM signal. When you move into an open
area, the signal should return.
Loading XM Acquiring channel audio
(after 4 second delay)Your radio system is acquiring and processing audio and
text data. No action is needed. This message should
disappear shortly.
CH Off Air Channel not in service This channel is not currently in service. Tune to another
channel.
CH Unavail Channel no longer
availableThis previously assigned channel is no longer assigned.
Tune to another station. If this station was one of your
presets, you may need to choose another station for that
preset button.
No Info Artist Name/Feature not
availableNo artist information is available at this time on this channel.
Your system is working properly.
No Info Song/Program Title not
availableNo song title information is available at this time on this
channel. Your system is working properly.
3-83
Page 253 of 552

Finding a Station
BAND:Press this button to switch between AM, FM1,
FM2, or XM1, XM2 (USA only, if equipped). The
display will show your selection.
TUNE:Turn this knob to choose radio stations.
qSEEKr:Press the right or the left arrow to seek
to the next or to the previous station and stay there.
The radio will seek only to stations that are in the
selected band and only to those with a strong signal.
qSCANr:Press and hold one of the arrows for
more than two seconds. The radio will produce one beep.
The radio will scan to a station, play for a few seconds,
then go on to the next station. SCAN will be displayed.
Press one of the arrows again to stop scanning.
The radio will scan only to stations that are in the selected
band and only to those with a strong signal.
To scan preset stations, press and hold one of the arrows
for more than four seconds. The radio will produce two
beeps. The radio will scan to the ®rst preset station, play
for a few seconds, then go on to the next preset station.
PSCN will be displayed. Press one of the arrows again or
one of the pushbuttons to stop scanning.
The radio will scan only to preset stations that are in the
selected band and only to those with a strong signal.
Setting Preset Stations
The six numbered pushbuttons let you return to your
favorite stations. You can set up to 30 stations (six AM,
six FM1 and six FM2, or six XM1 and six XM2 (USA
only, if equipped), by performing the following steps:
1. Turn the radio on.
2. Press BAND to select AM, FM1, FM2, or XM1,
or XM2.
3. Tune in the desired station.
4. Press AUTO EQ to choose the bass and treble
equalization that best suits the type of station
you are listening to.
5. Press and hold one of the six numbered
pushbuttons. The radio will produce one beep.
Whenever you press that numbered pushbutton, the
station you set will return and the bass and treble
equalization that you selected will also be
automatically selected for that pushbutton.
6. Repeat the steps for each pushbutton.
3-89
Page 257 of 552

If TRAF is on the display you can press the TRAF
button to turn off the traffic announcements.
Your radio will play the traffic announcement even if the
volume is muted or interrupt the play of a cassette
tape or a CD if the last tuned station broadcasts traffic
announcements.
This function does not apply to XMŸ Satellite Radio
Service.Radio Messages
CAL ERR (Calibration Error):This message is
displayed when the radio has not been calibrated
properly for the vehicle. You must return to the
dealership for service.
LOCKED:This message is displayed when the
THEFTLOCK
žsystem has locked up. You must return
to the dealership for service.
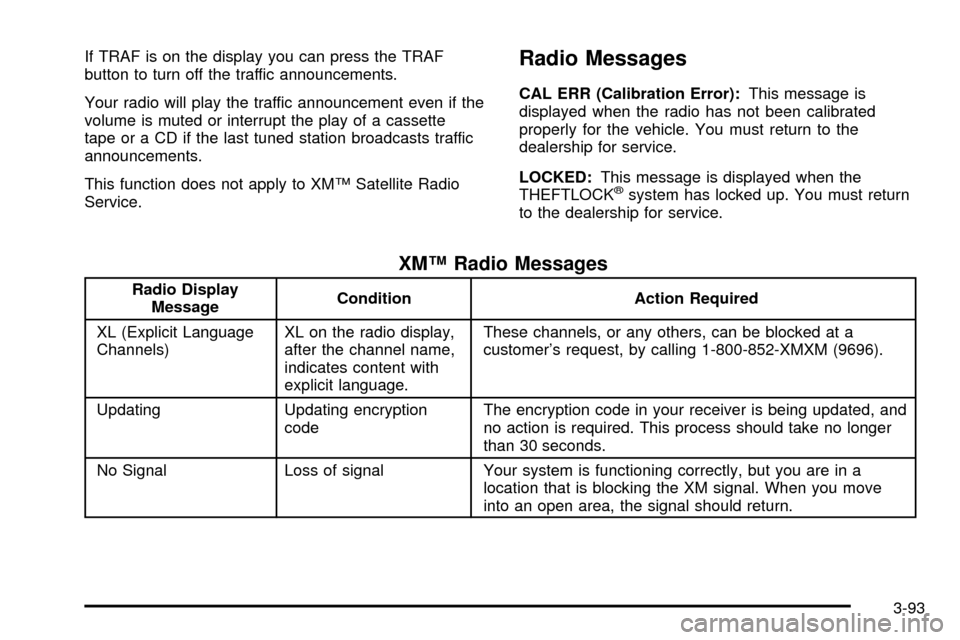
XMŸ Radio Messages
Radio Display
MessageCondition Action Required
XL (Explicit Language
Channels)XL on the radio display,
after the channel name,
indicates content with
explicit language.These channels, or any others, can be blocked at a
customer's request, by calling 1-800-852-XMXM (9696).
Updating Updating encryption
codeThe encryption code in your receiver is being updated, and
no action is required. This process should take no longer
than 30 seconds.
No Signal Loss of signal Your system is functioning correctly, but you are in a
location that is blocking the XM signal. When you move
into an open area, the signal should return.
3-93