2003 CHEVROLET S10 radio
[x] Cancel search: radioPage 200 of 432

Theft-Deterrent Feature
(Non-RDS Radios)
THEFTLOCKžis designed to discourage theft of your
radio. The feature works automatically by learning
a portion of the Vehicle Identi®cation Number (VIN). If
the radio is moved to a different vehicle, it will not
operate and LOC will be displayed.
With THEFTLOCK
žactivated, your radio will not
operate if stolen.
Theft-Deterrent Feature
(RDS Radios)
THEFTLOCKžis designed to discourage theft of your
radio. The feature works automatically by learning
a portion of the Vehicle Identi®cation Number (VIN). If
the radio is moved to a different vehicle, it will not
operate and LOCKED will be displayed.When the radio and vehicle are turned off, the blinking
red light indicates that THEFTLOCK
žis armed.
With THEFTLOCK
žactivated, your radio will not operate
if stolen.
Understanding Radio Reception
AM
The range for most AM stations is greater than for FM,
especially at night. The longer range, however, can
cause stations to interfere with each other. AM can pick
up noise from things like storms and power lines. Try
reducing the treble to reduce this noise if you ever get it.
FM
FM stereo will give you the best sound, but FM signals
will reach only about 10 to 40 miles (16 to 65 km).
Tall buildings or hills can interfere with FM signals,
causing the sound to come and go.
3-74
Page 201 of 432

Care of Your Cassette Tape Player
A tape player that is not cleaned regularly can cause
reduced sound quality, ruined cassettes or a damaged
mechanism. Cassette tapes should be stored in their
cases away from contaminants, direct sunlight and
extreme heat. If they aren't, they may not operate
properly or may cause failure of the tape player.
Your tape player should be cleaned regularly after every
50 hours of use. Your radio may display CLEAN to
indicate that you have used your tape player for
50 hours without resetting the tape clean timer. If this
message appears on the display, your cassette
tape player needs to be cleaned. It will still play tapes,
but you should clean it as soon as possible to
prevent damage to your tapes and player. If you notice
a reduction in sound quality, try a known good
cassette to see if the tape or the tape player is at fault.
If this other cassette has no improvement in sound
quality, clean the tape player.
For best results, use a scrubbing action, non-abrasive
cleaning cassette with pads which scrub the tape
head as the hubs of the cleaner cassette turn. The
recommended cleaning cassette is available through
your dealership.The broken tape detection feature of your cassette tape
player may identify the cleaning cassette as a
damaged tape, in error. To prevent the cleaning cassette
from being ejected, use the following steps:
1. Turn the ignition on.
2. Turn the radio off.
3. Press and hold the TAPE CD button for ®ve
seconds. READY will appear on the display and a
cassette symbol will ¯ash for ®ve seconds.
4. Insert the scrubbing action cleaning cassette.
5. Eject the cleaning cassette after the manufacturer's
recommended cleaning time.
After the cleaning cassette is ejected, the broken tape
detection feature will be active again.
You may also choose a non-scrubbing action, wet-type
cleaner which uses a cassette with a fabric belt to
clean the tape head. This type of cleaning cassette will
not eject on its own. A non-scrubbing action cleaner
may not clean as thoroughly as the scrubbing type
cleaner. The use of a non-scrubbing action, dry-type
cleaning cassette is not recommended.
After you clean the player, press and hold the EJT
button for ®ve seconds to reset the CLEAN indicator.
The radio will display CLEANED to show the indicator
was reset.
3-75
Page 312 of 432

Vehicle Storage
If you're not going to drive your vehicle for 25 days or
more, remove the black, negative (-) cable from
the battery. This will help keep your battery from
running down.
{CAUTION:
Batteries have acid that can burn you and gas
that can explode. You can be badly hurt if you
are not careful. See
Jump Starting on
page 5-46 for tips on working around a battery
without getting hurt.
Contact your dealer to learn how to prepare your
vehicle for longer storage periods.
Also, for your audio system, see
Theft-Deterrent
Feature (Non-RDS Radios) on page 3-74orTheft-Deterrent Feature (RDS Radios) on page 3-74.
Jump Starting
If your battery has run down, you may want to use
another vehicle and some jumper cables to start your
vehicle. Be sure to follow the steps below to do it safely.
{CAUTION:
Batteries can hurt you. They can be dangerous
because:
·They contain acid that can burn you.
·They contain gas that can explode or
ignite.
·They contain enough electricity to
burn you.
If you do not follow these steps exactly, some
or all of these things can hurt you.
Notice:Ignoring these steps could result in costly
damage to your vehicle that wouldn't be covered
by your warranty.
Trying to start your vehicle by pushing or pulling it
won't work, and it could damage your vehicle.
5-46
Page 313 of 432

1. Check the other vehicle. It must have a
12±volt battery with a negative ground system.
Notice:If the other system isn't a 12-volt system
with a negative ground, both vehicles can be
damaged.
2. Get the vehicles close enough so the jumper cables
can reach, but be sure the vehicles aren't touching
each other. If they are, it could cause a ground
connection you don't want. You wouldn't be able to
start your vehicle, and the bad grounding could
damage the electrical systems.
To avoid the possibility of the vehicles rolling, set
the parking brake ®rmly on both vehicles involved in
the jump start procedure. Put an automatic
transmission in PARK (P) or a manual transmission
in NEUTRAL before setting the parking brake. If
you have a four-wheel-drive vehicle, be sure
the transfer case is not in NEUTRAL (N).
Notice:If you leave your radio on, it could be badly
damaged. The repairs wouldn't be covered by
your warranty.
3. Turn off the ignition on both vehicles. Unplug
unnecessary accessories plugged into the cigarette
lighter or in the accessory power outlets. Turn off
the radio and all lamps that aren't needed. This will
avoid sparks and help save both batteries. And it
could save your radio!4. Open the hoods and locate the batteries. Find the
positive (+) and negative (-) terminal locations on
each vehicle. See
Engine Compartment Overview
on page 5-12for more information on location of the
battery.
{CAUTION:
Using a match near a battery can cause battery
gas to explode. People have been hurt doing
this, and some have been blinded. Use a
¯ashlight if you need more light.
Be sure the batteries have enough water. You
don't need to add water to the ACDelco
ž
battery (or batteries) installed in your new
vehicle. But if a battery has ®ller caps, be sure
the right amount of ¯uid is there. If it is low,
add water to take care of that ®rst. If you don't,
explosive gas could be present.
Battery ¯uid contains acid that can burn you.
Don't get it on you. If you accidentally get it in
your eyes or on your skin, ¯ush the place with
water and get medical help immediately.
5-47
Page 360 of 432

If you ever have a problem on the road and don't have
a spare fuse, you can borrow one that has the same
amperage. Just pick some feature of your vehicle
that you can get along withoutÐ like the radio or
cigarette lighterÐand use its fuse, if it is the correct
amperage. Replace it as soon as you can.
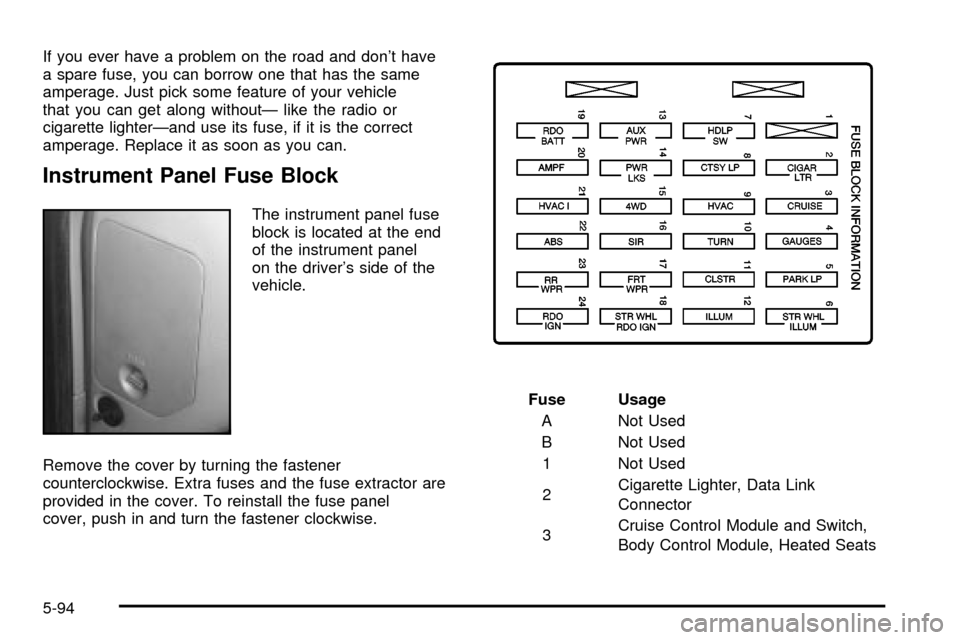
Instrument Panel Fuse Block
The instrument panel fuse
block is located at the end
of the instrument panel
on the driver's side of the
vehicle.
Remove the cover by turning the fastener
counterclockwise. Extra fuses and the fuse extractor are
provided in the cover. To reinstall the fuse panel
cover, push in and turn the fastener clockwise.Fuse Usage
A Not Used
B Not Used
1 Not Used
2Cigarette Lighter, Data Link
Connector
3Cruise Control Module and Switch,
Body Control Module, Heated Seats
5-94
Page 361 of 432

Fuse Usage
4Gages, Body Control Module,
Instrument Panel Cluster
5Parking Lamps, Power Window
Switch, Body Control Module,
Ashtray Lamp
6 Steering Wheel Radio Controls
7Headlamps Switch, Body Control
Module, Headlamp Relay
8Courtesy Lamps, Battery Run-Down
Protection
9Heating, Ventilation, Air Cooling
Control Head (Manual)
10 Turn Signal
11 Cluster, Engine Control Module
12 Interior Lights
13 Auxiliary Power
14 Power Locks MotorFuse Usage
154WD Switch, Engine Controls (VCM,
PCM, Transmission)
16 Supplemental In¯atable Restraint
17 Front Wiper
18 Steering Wheel Radio Controls
19 Radio, Battery
20 Ampli®er
21Heating, Ventilation, Air Cooling
(Manual), Heating,Ventilation, Air
Cooling (Automatic), Heating,
Ventilation, Air Cooling Sensors
(Automatic)
22 Anti-Lock Brakes
23 Rear Wiper
24 Radio, Ignition
5-95
Page 417 of 432

A
Accessory Power Outlets.................................3-17
Adding Equipment to Your Air Bag-Equipped
Vehicle.......................................................1-65
Adding Washer Fluid.......................................5-40
Additional Program Information........................... 7-9
Additives, Fuel................................................. 5-6
Add-On Electrical Equipment............................5-93
Add-On Equipment..........................................4-50
Adjusting the Speakers
(Balance/Fade)....................3-43, 3-47, 3-55, 3-65
After Off-Road Driving.....................................4-28
Air Bag System..............................................1-55
Adding Equipment to Your Air Bag-Equipped
Vehicle...................................................1-65
Air Bag Off Switch.......................................1-61
How Does an Air Bag Restrain?....................1-59
Servicing Your Air Bag-Equipped Vehicle.........1-64
What Makes an Air Bag In¯ate?....................1-59
What Will You See After an Air Bag In¯ates? . . 1-60
When Should an Air Bag In¯ate?...................1-59
Where Are the Air Bags?..............................1-57
Air Bag .........................................................3-28
Off Light.....................................................3-28
Readiness Light..........................................3-27
Air Cleaner/Filter, Engine.................................5-19
AM-FM Radio.................................................3-41
AM ...............................................................3-74
Antenna, Fixed Mast.......................................3-76Anti-Lock Brake, System Warning Light..............3-32
Anti-lock Brake System..................................... 4-7
Appearance Care............................................5-83
Care of Safety Belts....................................5-86
Chemical Paint Spotting...............................5-90
Cleaning the Inside of Your Vehicle................5-84
Cleaning the Outside of Your Vehicle..............5-87
Finish Damage............................................5-89
Sheet Metal Damage...................................5-89
Underbody Maintenance...............................5-90
Vehicle Care/Appearance Materials................5-90
Weatherstrips..............................................5-87
Approaching a Hill..........................................4-19
Ashtrays........................................................3-18
Assist Handles...............................................2-49
Audio System(s).............................................3-40
AM-FM Radio.............................................3-41
Care of Your Cassette Tape Player................3-75
Care of Your CD Player...............................3-76
Care of Your CDs........................................3-76
Fixed Mast Antenna.....................................3-76
Radio with Cassette and CD.........................3-52
Radio with CD............................................3-44
Radio with Six-Disc CD................................3-62
Setting the Time for Radios with Radio Data
Systems (RDS)........................................3-41
Setting the Time for Radios without Radio
Data Systems (RDS)................................3-40
Theft-Deterrent Feature................................3-74
Understanding Radio Reception.....................3-74
1
Page 427 of 432

Playing a Cassette Tape..................................3-58
Playing a Compact Disc..................3-50, 3-60, 3-68
Playing a Speci®c Loaded
Compact Disc.............................................3-70
Playing the Radio...................3-41, 3-44, 3-52, 3-62
Power Steering................................................ 4-9
Power...........................................................3-17
Accessory Outlets........................................3-17
Door Locks.................................................. 2-9
Electrical System.........................................5-93
Lumbar Controls........................................... 1-5
Seat............................................................ 1-4
Steering Fluid.............................................5-39
Windows....................................................2-15
Programmable Automatic Door Locks.................. 2-9
Q
Questions and Answers About Safety Belts.........1-15
R
Radiator Pressure Cap....................................5-29
Radio Messages.............................3-44, 3-50, 3-58
Radios..........................................................3-40
AM-FM Radio.............................................3-41
Care of Your Cassette Tape Player................3-75
Care of Your CD Player...............................3-76
Care of Your CDs........................................3-76Radios (cont.)
Radio with Cassette and CD.........................3-52
Radio with CD............................................3-44
Radio with Six-Disc CD................................3-62
Setting the Time for Radios with Radio Data
Systems (RDS)........................................3-41
Setting the Time for Radios without Radio
Data Systems (RDS)................................3-40
Theft-Deterrent............................................3-74
Understanding Reception..............................3-74
RDS Messages..............................3-49, 3-57, 3-67
Rear Axle......................................................5-51
Locking........................................................ 4-9
Rear Door Security Locks................................2-11
Rear Seat Operation......................................... 1-9
Rear Seat Outside Passenger Positions.............1-26
Rear Seat Passengers, Safety Belts..........1-25, 1-26
Rearview Mirror, Automatic Dimming..................2-39
Rearview Mirrors.............................................2-39
Reclining Seatbacks.......................................... 1-6
Recreational Vehicle Towing.............................4-44
Regular Cab and Extended Cab Models.............1-61
Remote Keyless Entry System, Operation............ 2-6
Remote Keyless Entry System............................ 2-5
Removing the Flat Tire and Installing the
Spare Tire..................................................5-76
Removing the Spare Tire and Tools...................5-73
Removing Wheel Covers..................................5-75
Replacement Bulbs.........................................5-59
Replacing Brake System Parts..........................5-45
11