2003 CHEVROLET MALIBU buttons
[x] Cancel search: buttonsPage 97 of 326

The main components of your instrument panel are the
following:
A. Side Window Defogger Vents. See ªDefogging and
Defrostingº in
Climate Control System on
page 3-17.
B. Vent Outlets. See
Outlet Adjustment on page 3-21.
C. Instrument Panel Brightness Thumbwheel. See
Interior Lamps on page 3-15.
D. Fog Lamp Button (If Equipped). See ªFog Lampsº in
Exterior Lamps on page 3-12.
E. Turn Signal/Multifunction Lever. See
Turn
Signal/Multifunction Lever on page 3-5.
F. Cruise Control Buttons (If Equipped). See ªCruise
Controlº in
Turn Signal/Multifunction Lever on
page 3-5.
G. Instrument Panel Cluster. See
Instrument Panel
Cluster on page 3-23.
H. Windshield Wiper/Washer Lever. See ªWindshield
Wipersº in
Turn Signal/Multifunction Lever on
page 3-5.
I. Ignition Switch. See
Ignition Positions on
page 2-17.J. Hazard Warning Flashers Button. See
Hazard
Warning Flashers on page 3-4.
K. Instrument Panel Fuse Blocks. See
Fuses and
Circuit Breakers on page 5-77.
L. Instrument Panel Cupholder. See
Cupholder(s) on
page 2-30.
M. Remote Trunk Release Button. See ªRemote Trunk
Releaseº in
Trunk on page 2-11.
N. Hood Release. See
Hood Release on page 5-10.
O. Tilt Wheel Lever. See
Tilt Wheel on page 3-5.
P. Parking Brake. See
Parking Brake on page 2-23.
Q. Horn. See
Horn on page 3-5.
R. Audio System. See
Audio System(s) on page 3-36.
S. Cigarette Lighter. See
Ashtrays and Cigarette
Lighter on page 3-17.
T. Ashtray. See
Ashtrays and Cigarette Lighter on
page 3-17.
U. Accessory Power Outlet. See
Accessory Power
Outlets on page 3-16.
V. Climate Control System. See
Climate Control
System on page 3-17.
3-3
Page 104 of 326

Setting Cruise Control
{CAUTION:
If you leave your cruise control on when you're
not using cruise, you might hit a button and go
into cruise when you don't want to. You could
be startled and even lose control. Keep the
cruise control switch off until you want to use
cruise control.
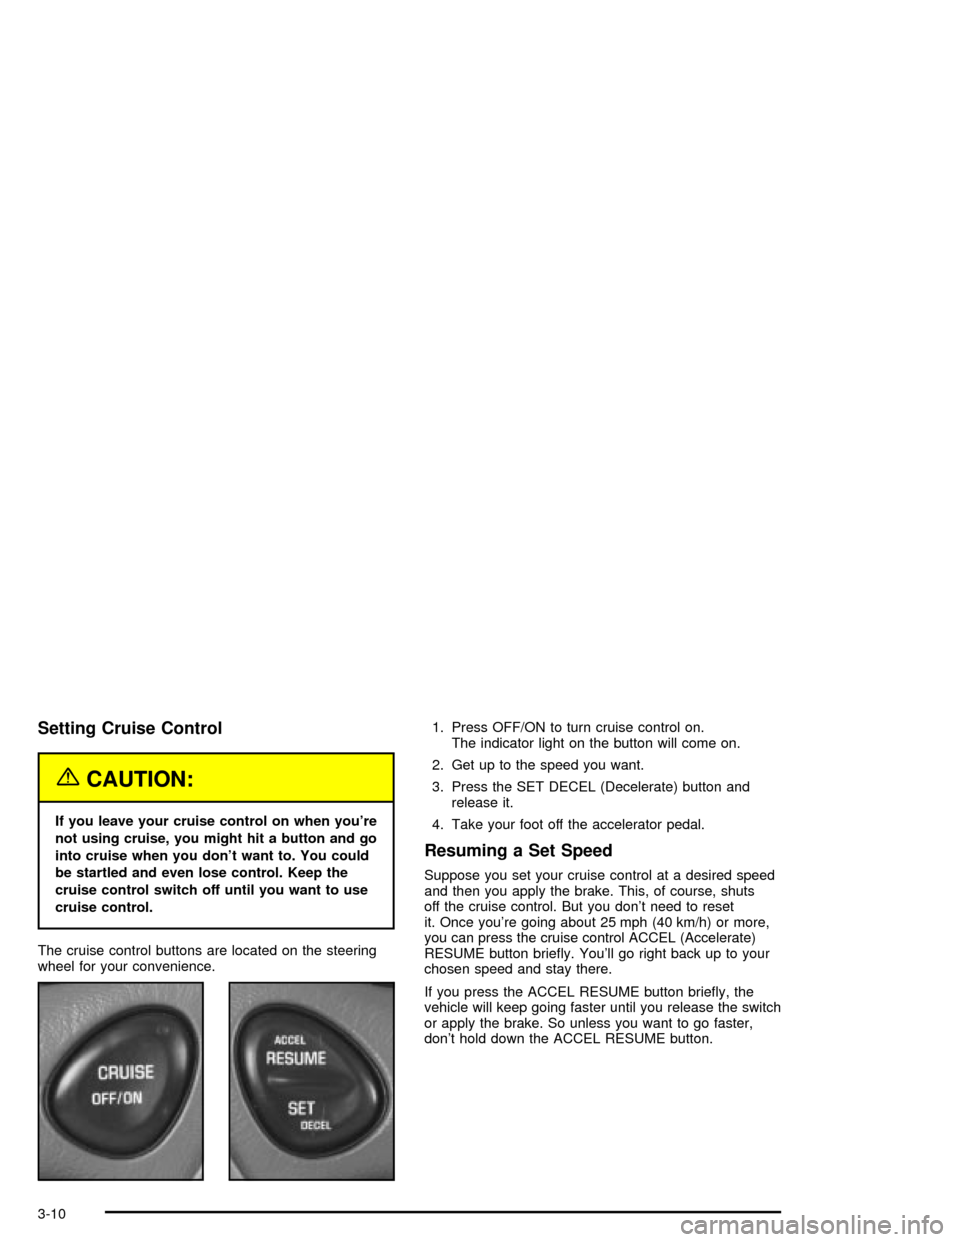
The cruise control buttons are located on the steering
wheel for your convenience.1. Press OFF/ON to turn cruise control on.
The indicator light on the button will come on.
2. Get up to the speed you want.
3. Press the SET DECEL (Decelerate) button and
release it.
4. Take your foot off the accelerator pedal.
Resuming a Set Speed
Suppose you set your cruise control at a desired speed
and then you apply the brake. This, of course, shuts
off the cruise control. But you don't need to reset
it. Once you're going about 25 mph (40 km/h) or more,
you can press the cruise control ACCEL (Accelerate)
RESUME button brie¯y. You'll go right back up to your
chosen speed and stay there.
If you press the ACCEL RESUME button brie¯y, the
vehicle will keep going faster until you release the switch
or apply the brake. So unless you want to go faster,
don't hold down the ACCEL RESUME button.
3-10
Page 131 of 326

Setting the Time for Radios with
Radio Data Systems (RDS)
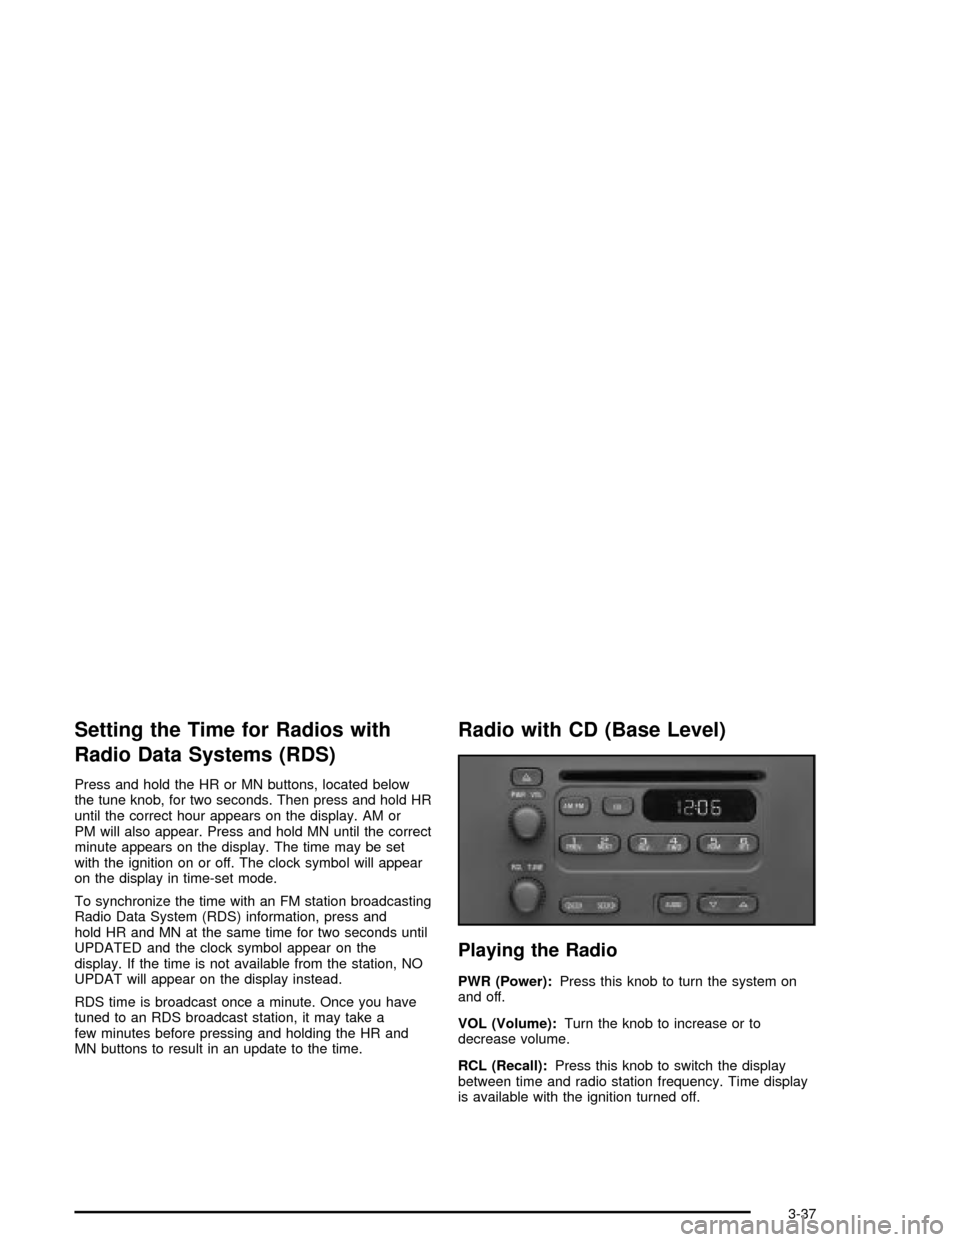
Press and hold the HR or MN buttons, located below
the tune knob, for two seconds. Then press and hold HR
until the correct hour appears on the display. AM or
PM will also appear. Press and hold MN until the correct
minute appears on the display. The time may be set
with the ignition on or off. The clock symbol will appear
on the display in time-set mode.
To synchronize the time with an FM station broadcasting
Radio Data System (RDS) information, press and
hold HR and MN at the same time for two seconds until
UPDATED and the clock symbol appear on the
display. If the time is not available from the station, NO
UPDAT will appear on the display instead.
RDS time is broadcast once a minute. Once you have
tuned to an RDS broadcast station, it may take a
few minutes before pressing and holding the HR and
MN buttons to result in an update to the time.
Radio with CD (Base Level)
Playing the Radio
PWR (Power):Press this knob to turn the system on
and off.
VOL (Volume):Turn the knob to increase or to
decrease volume.
RCL (Recall):Press this knob to switch the display
between time and radio station frequency. Time display
is available with the ignition turned off.
3-37
Page 132 of 326

Finding a Station
AM FM:Press this button to switch between FM1,
FM2, and AM. The display will show your selection.
TUNE:Turn this knob to choose radio stations.
oSEEKp:Press the right or the left arrow to tune
to the next or to the previous station and stay there.
To scan stations, press and hold one of the SEEK
arrows for two seconds until you hear a beep. The radio
will go to a station, play for a few seconds and ¯ash
the station frequency, then go on to the next station.
Press one of the SEEK arrows again to stop scanning.
To scan preset stations, press and hold one of the
SEEK arrows for more than four seconds until you hear
two beeps. The radio will go to the ®rst preset station
stored on your pushbuttons, play for a few seconds and
¯ash the station frequency, then go on to the next
preset station. Press one of the SEEK arrows again to
stop scanning presets.
The radio will seek and scan only to stations that are in
the selected band and only to those with a strong
signal.
Setting Preset Stations
The six numbered pushbuttons let you return to your
favorite stations. You can set up to 18 stations
(six FM1, six FM2, and six AM) by performing the
following steps:
1. Turn the radio on.
2. Press AM FM to select FM1, FM2, or AM.
3. Tune in the desired station.
4. Press and hold one of the six numbered
pushbuttons until you hear a beep. Whenever you
press that numbered pushbutton, the station
you set will return.
5. Repeat the steps for each pushbutton.
Setting the Tone (Bass/Treble)
AUDIO:To adjust the bass or the treble, press and
release the AUDIO button repeatedly until BAS or TRE
appears on the display. Then press and hold the up or the
down arrow to increase or to decrease. If a station is
weak or noisy, you may want to decrease the treble.
To adjust bass or treble to the middle position, select BAS
or TRE. Then press and hold the AUDIO button for more
than two seconds until you hear a beep. B and a zero
or T and a zero will appear on the display.
3-38
Page 136 of 326

Then as you drive, automatic volume increases the
volume as necessary to overcome noise at any speed.
The volume level should always sound the same to
you as you drive. NONE will appear on the display if the
radio cannot determine the vehicle speed. If you don't
want to use automatic volume, select OFF.
DISPL (Display):Press this knob to switch the display
between radio station frequency and time. Time
display is available with the ignition turned off.
Finding a Station
BAND:Press this button to switch between AM,
FM1 and FM2. The display will show your selection.
TUNE:Turn this knob to choose radio stations.
qSEEKr:Press the right or the left arrow to seek
to the next or to the previous station and stay there.
The radio will seek only to stations that are in the
selected band and only to those with a strong signal.
qPSCAN (Preset Scan)r:Press and hold one of
the arrows for more than two seconds and the radio
will produce one beep. The radio will scan to the
®rst preset station stored on the pushbuttons, play for a
few seconds and ¯ash the station frequency, then go
on to the next preset station. SCAN will be displayed.
Press one of the arrows again or one of the pushbuttons
to stop scanning presets.The radio will scan only to the preset stations that are in
the selected band and only to those with a strong
signal.
Setting Preset Stations
The six numbered pushbuttons let you return to your
favorite stations. You can set up to 18 stations
(six AM, six FM1 and six FM2) by performing the
following steps:
1. Turn the radio on.
2. Press BAND to select AM, FM1 or FM2.
3. Tune in the desired station.
4. Press AUTO TONE to choose the bass and treble
equalization that best suits the type of station you
are listening to.
5. Press and hold one of the six numbered
pushbuttons. The radio will produce one beep.
Whenever you press that numbered pushbutton,
the station you set will return and the bass
and treble equalization that you selected will also
be automatically selected for that pushbutton.
6. Repeat the steps for each pushbutton.
3-42
Page 142 of 326

Radio with Cassette and CD
Playing the Radio
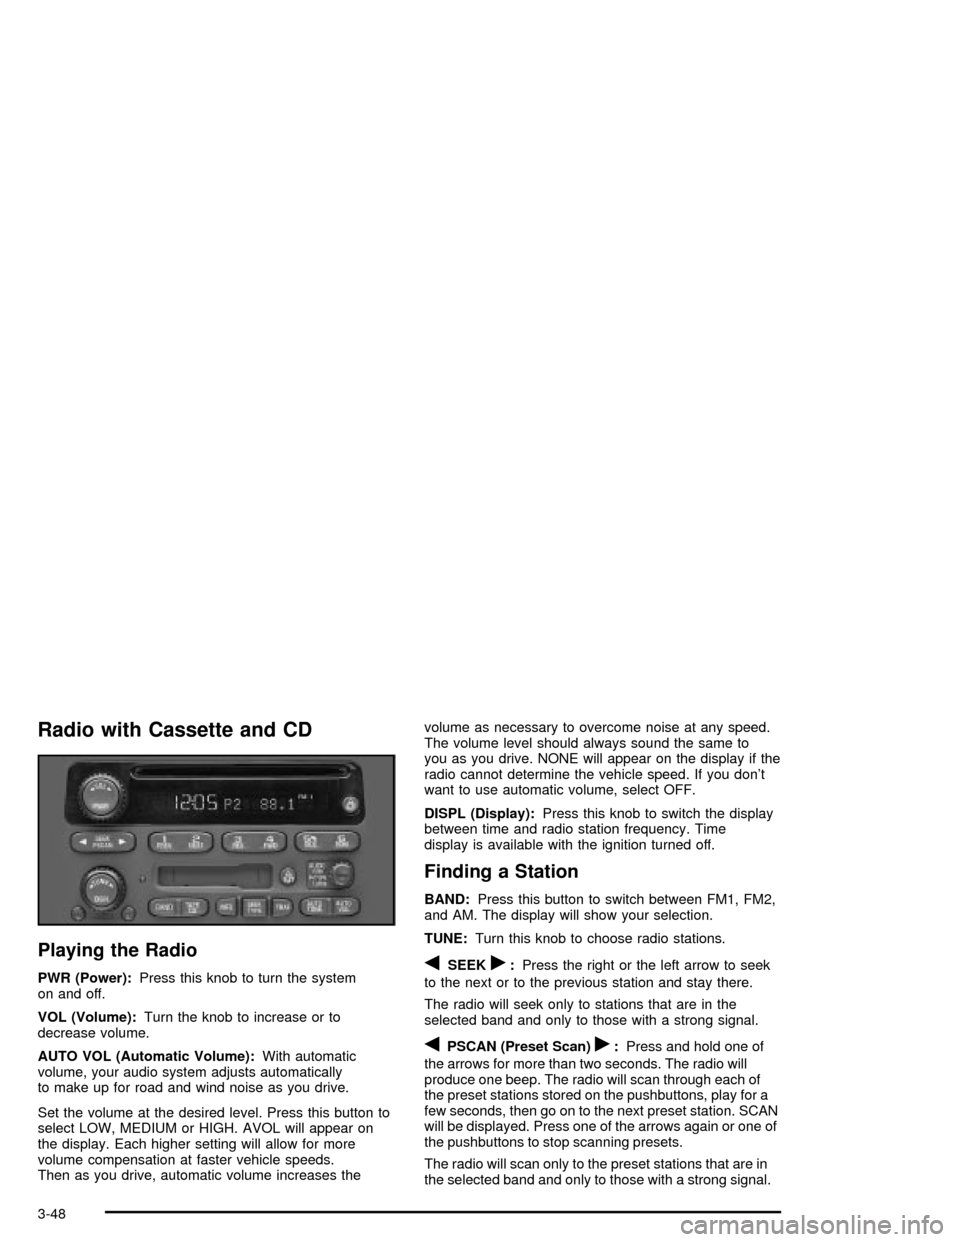
PWR (Power):Press this knob to turn the system
on and off.
VOL (Volume):Turn the knob to increase or to
decrease volume.
AUTO VOL (Automatic Volume):With automatic
volume, your audio system adjusts automatically
to make up for road and wind noise as you drive.
Set the volume at the desired level. Press this button to
select LOW, MEDIUM or HIGH. AVOL will appear on
the display. Each higher setting will allow for more
volume compensation at faster vehicle speeds.
Then as you drive, automatic volume increases thevolume as necessary to overcome noise at any speed.
The volume level should always sound the same to
you as you drive. NONE will appear on the display if the
radio cannot determine the vehicle speed. If you don't
want to use automatic volume, select OFF.
DISPL (Display):Press this knob to switch the display
between time and radio station frequency. Time
display is available with the ignition turned off.
Finding a Station
BAND:Press this button to switch between FM1, FM2,
and AM. The display will show your selection.
TUNE:Turn this knob to choose radio stations.
qSEEKr:Press the right or the left arrow to seek
to the next or to the previous station and stay there.
The radio will seek only to stations that are in the
selected band and only to those with a strong signal.
qPSCAN (Preset Scan)r:Press and hold one of
the arrows for more than two seconds. The radio will
produce one beep. The radio will scan through each of
the preset stations stored on the pushbuttons, play for a
few seconds, then go on to the next preset station. SCAN
will be displayed. Press one of the arrows again or one of
the pushbuttons to stop scanning presets.
The radio will scan only to the preset stations that are in
the selected band and only to those with a strong signal.
3-48
Page 143 of 326

Setting Preset Stations
The six numbered pushbuttons let you return to your
favorite stations. You can set up to 18 stations
(six FM1, six FM2, and six AM) by performing the
following steps:
1. Turn the radio on.
2. Press BAND to select FM1, FM2, or AM.
3. Tune in the desired station.
4. Press AUTO TONE to choose the bass and treble
equalization that best suits the type of station you
are listening to.
5. Press and hold one of the six numbered
pushbuttons. The radio will produce one beep.
Whenever you press that numbered pushbutton,
the station you set will return and the bass
and treble equalization that you selected will also
be automatically selected for that pushbutton.
6. Repeat the steps for each pushbutton.
Setting the Tone (Bass/Treble)
AUDIO:Push and release the AUDIO knob until BASS
or TREB appears on the display. Turn the knob to
increase or to decrease. The display will show the bass
or the treble level. If a station is weak or noisy, you
may want to decrease the treble.
To adjust bass and treble to the middle position, push
and hold the AUDIO knob. The radio will produce
one beep and adjust the display level to the middle
position.
To adjust all tone and speaker controls to the middle
position, push and hold the AUDIO knob when no tone
or speaker control is displayed. The radio will produce
one beep and display ALL with the level display in
the middle position.
AUTO TONE (Automatic Tone):Press this button to
choose bass and treble equalization settings designed
for country/western, jazz, talk, pop, rock and classical
stations.
To return the bass and treble to the manual mode,
push and release the AUTO TONE button until MANUAL
is displayed.
3-49