2003 CHEVROLET EXPRESS CARGO VAN oil
[x] Cancel search: oilPage 346 of 386
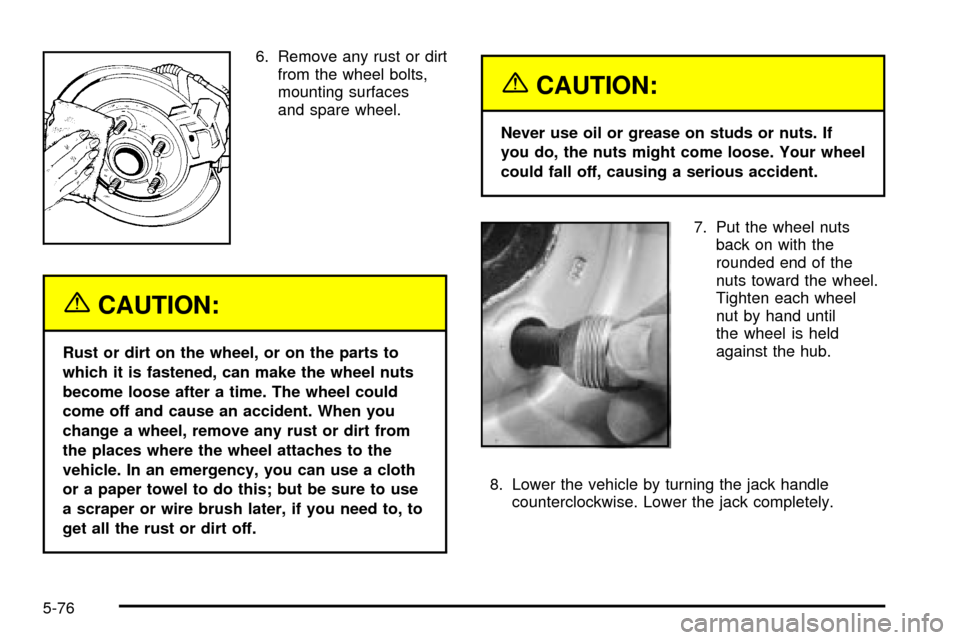
6. Remove any rust or dirt
from the wheel bolts,
mounting surfaces
and spare wheel.
{CAUTION:
Rust or dirt on the wheel, or on the parts to
which it is fastened, can make the wheel nuts
become loose after a time. The wheel could
come off and cause an accident. When you
change a wheel, remove any rust or dirt from
the places where the wheel attaches to the
vehicle. In an emergency, you can use a cloth
or a paper towel to do this; but be sure to use
a scraper or wire brush later, if you need to, to
get all the rust or dirt off.
{CAUTION:
Never use oil or grease on studs or nuts. If
you do, the nuts might come loose. Your wheel
could fall off, causing a serious accident.
7. Put the wheel nuts
back on with the
rounded end of the
nuts toward the wheel.
Tighten each wheel
nut by hand until
the wheel is held
against the hub.
8. Lower the vehicle by turning the jack handle
counterclockwise. Lower the jack completely.
5-76
Page 351 of 386
Here are some cleaning tips:
·Always read the instructions on the cleaner label.
·Clean up stains as soon as you can ± before
they set.
·Carefully scrape off any excess stain.
·Use a clean cloth or sponge, and change to a clean
area often. A soft brush may be used if stains are
stubborn.
·If a ring forms on fabric after spot cleaning, clean
the entire area immediately or it will set.
Using Cleaner on Fabric
1. Vacuum and brush the area to remove any
loose dirt.
2. Always clean a whole trim panel or section. Mask
surrounding trim along stitch or welt lines.
3. Follow the directions on the container label.
4. Apply cleaner with a clean sponge. Don't saturate
the material and don't rub it roughly.
5. As soon as you've cleaned the section, use a
sponge to remove any excess cleaner.
6. Wipe cleaned area with a clean, water-dampened
towel or cloth.
7. Wipe with a clean cloth and let dry.
Special Fabric Cleaning Problems
Stains caused by such things as catsup, coffee (black),
egg, fruit, fruit juice, milk, soft drinks, vomit, urine
and blood can be removed as follows:
1. Carefully scrape off excess stain, then sponge the
soiled area with cool water.
2. If a stain remains, follow the cleaner instructions
described earlier.
3. If an odor lingers after cleaning vomit or urine,
treat the area with a water/baking soda solution:
1 teaspoon (5 ml) of baking soda to 1 cup (250 ml)
of lukewarm water.
4. Let dry.
Stains caused by candy, ice cream, mayonnaise, chili
sauce and unknown stains can be removed as follows:
1. Carefully scrape off excess stain.
2. Clean with cool water and allow to dry completely.
3. If a stain remains, follow the cleaner instructions
described earlier.
5-81
Page 352 of 386
Cleaning Vinyl
Use warm water and a clean cloth.
·Rub with a clean, damp cloth to remove dirt. You
may have to do this more than once.
·Things like tar, asphalt and shoe polish will stain if
you don't get them off quickly. Use a clean cloth
and vinyl cleaner. See your dealer for this product.
Cleaning Leather
Use a soft cloth with lukewarm water and a mild soap or
saddle soap and wipe dry with a soft cloth. Then, let
the leather dry naturally. Do not use heat to dry.
·For stubborn stains, use a leather cleaner.
·Neveruse oils, varnishes, solvent-based or abrasive
cleaners, furniture polish or shoe polish on leather.
·Soiled or stained leather should be cleaned
immediately. If dirt is allowed to work into the ®nish,
it can harm the leather.
Cleaning the Top of the Instrument
Panel
Use only mild soap and water to clean the top surfaces
of the instrument panel. Sprays containing silicones
or waxes may cause annoying re¯ections in the
windshield and even make it difficult to see through the
windshield under certain conditions.
Cleaning Interior Plastic Components
Use only a mild soap and water solution on a soft cloth
or sponge. Commercial cleaners may affect the
surface ®nish.
Cleaning Glass Surfaces
Glass should be cleaned often. GM Glass Cleaner or a
liquid household glass cleaner will remove normal
tobacco smoke and dust ®lms on interior glass. See
Vehicle Care/Appearance Materials on page 5-88.
Notice:Don't use abrasive cleaners on glass,
because they may cause scratches. Avoid placing
decals on the inside rear window, since they
may have to be scraped off later. If abrasive cleaners
are used on the inside of the rear window, an
electric defogger element may be damaged. Any
temporary license should not be attached across the
defogger grid.
5-82
Page 354 of 386
Cleaning Exterior Lamps/Lenses
Use only lukewarm or cold water, a soft cloth and a car
washing soap to clean exterior lamps and lenses.
Follow instructions under ªWashing Your Vehicle.º
Finish Care
Occasional waxing or mild polishing of your vehicle by
hand may be necessary to remove residue from the
paint ®nish. You can get GM-approved cleaning products
from your dealer. See
Vehicle Care/Appearance
Materials on page 5-88.
If your vehicle has a ªbasecoat/clearcoatº paint ®nish.
The clearcoat gives more depth and gloss to the colored
basecoat. Always use waxes and polishes that are
non-abrasive and made for a basecoat/clearcoat
paint ®nish.
Notice:Machine compounding or aggressive
polishing on a basecoat/clearcoat paint ®nish may
dull the ®nish or leave swirl marks.Foreign materials such as calcium chloride and other
salts, ice melting agents, road oil and tar, tree sap, bird
droppings, chemicals from industrial chimneys, etc.,
can damage your vehicle's ®nish if they remain
on painted surfaces. Wash the vehicle as soon as
possible. If necessary, use non-abrasive cleaners that
are marked safe for painted surfaces to remove
foreign matter.
Exterior painted surfaces are subject to aging, weather
and chemical fallout that can take their toll over a
period of years. You can help to keep the paint ®nish
looking new by keeping your vehicle garaged or covered
whenever possible.
Protecting Exterior Bright Metal Parts
Bright metal parts should be cleaned regularly to keep
their luster. Washing with water is all that is usually
needed. However, you may use chrome polish on
chrome or stainless steel trim, if necessary.
Use special care with aluminum trim. To avoid damaging
protective trim, never use auto or chrome polish,
steam or caustic soap to clean aluminum. A coating of
wax, rubbed to high polish, is recommended for all
bright metal parts.
5-84
Page 358 of 386
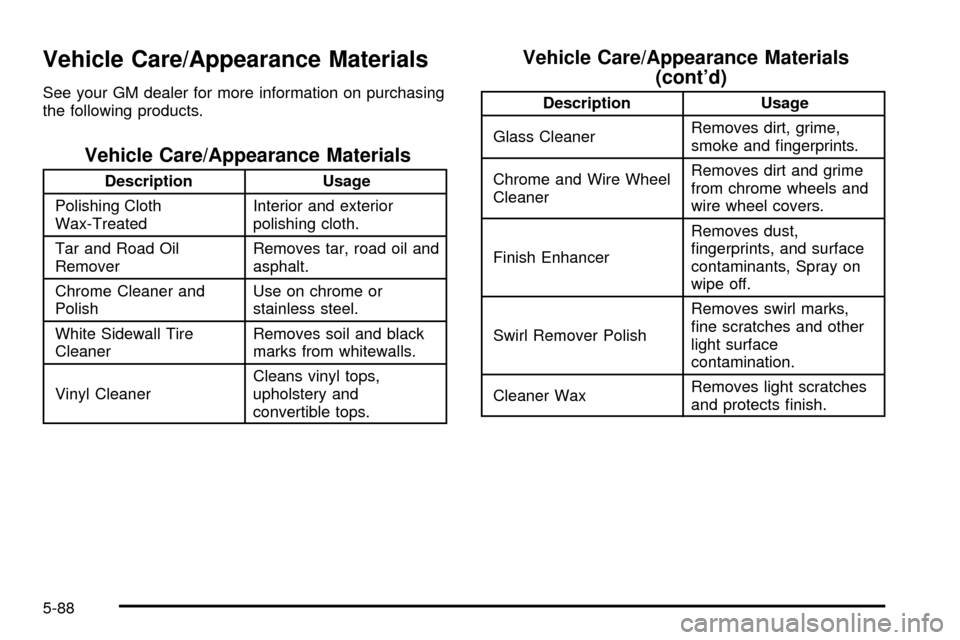
Vehicle Care/Appearance Materials
See your GM dealer for more information on purchasing
the following products.
Vehicle Care/Appearance Materials
Description Usage
Polishing Cloth
Wax-TreatedInterior and exterior
polishing cloth.
Tar and Road Oil
RemoverRemoves tar, road oil and
asphalt.
Chrome Cleaner and
PolishUse on chrome or
stainless steel.
White Sidewall Tire
CleanerRemoves soil and black
marks from whitewalls.
Vinyl CleanerCleans vinyl tops,
upholstery and
convertible tops.
Vehicle Care/Appearance Materials
(cont'd)
Description Usage
Glass CleanerRemoves dirt, grime,
smoke and ®ngerprints.
Chrome and Wire Wheel
CleanerRemoves dirt and grime
from chrome wheels and
wire wheel covers.
Finish EnhancerRemoves dust,
®ngerprints, and surface
contaminants, Spray on
wipe off.
Swirl Remover PolishRemoves swirl marks,
®ne scratches and other
light surface
contamination.
Cleaner WaxRemoves light scratches
and protects ®nish.
5-88
Page 368 of 386
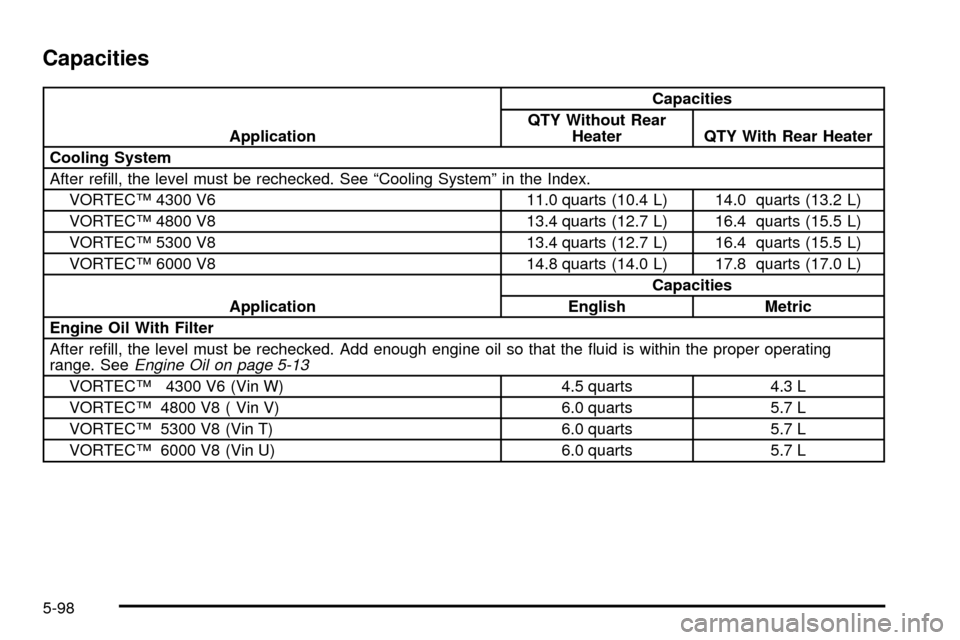
Capacities
ApplicationCapacities
QTY Without Rear
Heater QTY With Rear Heater
Cooling System
After re®ll, the level must be rechecked. See ªCooling Systemº in the Index.
VORTECŸ 4300 V6 11.0 quarts (10.4 L) 14.0 quarts (13.2 L)
VORTECŸ 4800 V8 13.4 quarts (12.7 L) 16.4 quarts (15.5 L)
VORTECŸ 5300 V8 13.4 quarts (12.7 L) 16.4 quarts (15.5 L)
VORTECŸ 6000 V8 14.8 quarts (14.0 L) 17.8 quarts (17.0 L)
ApplicationCapacities
English Metric
Engine Oil With Filter
After re®ll, the level must be rechecked. Add enough engine oil so that the ¯uid is within the proper operating
range. See
Engine Oil on page 5-13
VORTECŸ 4300 V6 (Vin W) 4.5 quarts 4.3 L
VORTECŸ 4800 V8 ( Vin V) 6.0 quarts 5.7 L
VORTECŸ 5300 V8 (Vin T) 6.0 quarts 5.7 L
VORTECŸ 6000 V8 (Vin U) 6.0 quarts 5.7 L
5-98
Page 370 of 386
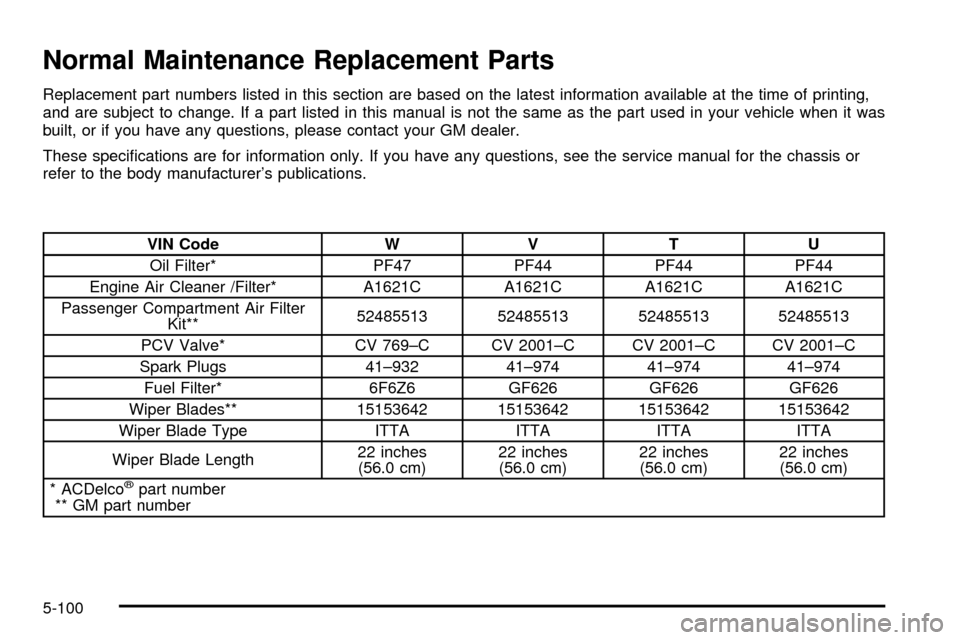
Normal Maintenance Replacement Parts
Replacement part numbers listed in this section are based on the latest information available at the time of printing,
and are subject to change. If a part listed in this manual is not the same as the part used in your vehicle when it was
built, or if you have any questions, please contact your GM dealer.
These speci®cations are for information only. If you have any questions, see the service manual for the chassis or
refer to the body manufacturer's publications.
VIN Code W V T U
Oil Filter* PF47 PF44 PF44 PF44
Engine Air Cleaner /Filter* A1621C A1621C A1621C A1621C
Passenger Compartment Air Filter
Kit**52485513 52485513 52485513 52485513
PCV Valve* CV 769±C CV 2001±C CV 2001±C CV 2001±C
Spark Plugs 41±932 41±974 41±974 41±974
Fuel Filter* 6F6Z6 GF626 GF626 GF626
Wiper Blades** 15153642 15153642 15153642 15153642
Wiper Blade Type ITTA ITTA ITTA ITTA
Wiper Blade Length22 inches
(56.0 cm)22 inches
(56.0 cm)22 inches
(56.0 cm)22 inches
(56.0 cm)
* ACDelco
žpart number
** GM part number
5-100
Page 373 of 386
Care of.........................................................5-83
Safety Belts................................................5-83
Your Cassette Tape Player............................3-74
Your CD Player...........................................3-75
Your CDs ...................................................3-75
Cargo Door Relocking....................................... 2-8
Cargo Vans and Cab and Chassis Models with
an Air Bag Off Switch..................................1-48
Cargo Vans and Cab and Chassis Models
without an Air Bag Off Switch........................1-47
Cargo Vans with a Passenger Air Bag and an
Air Bag Off Switch, Passenger Vans and Cab
and Chassis Models....................................1-37
Cargo Vans with a Passenger Air Bag and
without an Air Bag Off Switch........................1-40
Cassette Tape Messages.................................3-56
Cassette Tape Player Service...........................6-12
CD Adapter Kits.............................................3-56
Center High Mounted
Stoplamp (CHMSL)......................................5-54
Center High-Mounted Stoplamp.........................3-15
Center Passenger Position, Safety Belts.....1-25, 1-26
Chains, Tires..................................................5-63
Charging System Light....................................3-29
Check Engine Light.........................................3-33
Checking Brake Fluid......................................5-38
Checking Coolant............................................5-23
Checking Engine Oil........................................5-13
Checking Things Under the Hood....................... 5-9
Checking Your Restraint Systems......................1-74Check...........................................................3-33
Engine Light...............................................3-33
Gages Warning Light...................................3-38
Chemical Paint Spotting...................................5-87
Child Restraints..............................................1-42
Child Restraint Systems...............................1-42
Infants and Young Children...........................1-36
Lower Anchorages and Top Tethers for
Children (LATCH System)..........................1-51
Older Children.............................................1-34
Securing a Child Restraint Designed for the
LATCH System........................................1-53
Securing a Child Restraint in a Center
Seat Position...........................................1-56
Securing a Child Restraint in a Rear Outside
Seat Position...........................................1-53
Securing a Child Restraint in the Right Front
Seat Position...........................................1-58
Top Strap Anchor Location............................1-50
Top Strap...................................................1-48
Where to Put the Restraint...........................1-45
Chime Level Adjustment..................................3-75
Cigarette Lighter.............................................3-18
Cleaning Aluminum Wheels..............................5-85
Cleaning Exterior Lamps/Lenses.......................5-84
Cleaning Fabric/Carpet....................................5-80
Cleaning Glass Surfaces..................................5-82
Cleaning Interior Plastic Components.................5-82
Cleaning Leather............................................5-82
Cleaning the Top of the Instrument Panel...........5-82
3