2003 CHEVROLET EXPRESS CARGO VAN torque
[x] Cancel search: torquePage 107 of 386
{CAUTION:
Shifting into a drive gear while your engine is
ªracingº (running at high speed) is dangerous.
Unless your foot is ®rmly on the brake pedal,
your vehicle could move very rapidly. You
could lose control and hit people or objects.
Don't shift into a drive gear while your engine
is racing.
Notice:Damage to your transmission caused by
shifting out of PARK (P) or NEUTRAL (N) with
the engine racing isn't covered by your warranty.
DRIVE (D):This position is for normal driving. If
you need more power for passing, and you're:
·Going less than about 35 mph (55 km/h), push your
accelerator pedal about halfway down.
·Going about 35 mph (55 km/h) or more, push the
accelerator all the way down.
You'll shift down to the next gear and have more power.
THIRD (3):This position is also used for normal
driving, however, it offers more power and lower fuel
economy than DRIVE (D). You should use THIRD (3)
when carrying a heavy load or driving on steep hills.You should use THIRD (3) (or, as you need to, a lower
gear) when towing a trailer to minimize heat build-up
and extend the life of your transmission.
SECOND (2):This position gives you more power but
lower fuel economy than THIRD (3). You can use
SECOND (2) on hills. It can help control your speed as
you go down steep mountain roads, but then you
would also want to use your brakes off and on. If you
manually select SECOND (2), the transmission will drive
in SECOND (2). You may use this feature for reducing
torque to the rear wheels when you are trying to
start your vehicle from a stop on slippery road surfaces.
FIRST (1):This position gives you even more power but
lower fuel economy than SECOND (2). You can use it on
very steep hills, or in deep snow or mud. If the shift lever
is put in FIRST (1), the transmission won't shift into ®rst
gear until the vehicle is going slowly enough.
Notice:If your wheels won't turn, don't try to drive.
This might happen if you were stuck in very deep
sand or mud or were up against a solid object. You
could damage your transmission. Also, if you
stop when going uphill, don't hold your vehicle there
with only the accelerator pedal. This could overheat
and damage the transmission. Use your brakes
or shift into PARK (P) to hold your vehicle in
position on a hill.
2-25
Page 110 of 386
Leaving Your Vehicle With the Engine
Running
{CAUTION:
It can be dangerous to leave your vehicle with
the engine running. Your vehicle could move
suddenly if the shift lever is not fully in
PARK (P) with the parking brake ®rmly set.
And, if you leave the vehicle with the engine
running, it could overheat and even catch ®re.
You or others could be injured. Don't leave
your vehicle with the engine running.
If you have to leave your vehicle with the engine
running, be sure your vehicle is in PARK (P) and your
parking brake is ®rmly set before you leave it. After
you've moved the shift lever to PARK (P), hold
the regular brake pedal down. Then, see if you can
move the shift lever away from PARK (P) without ®rst
pulling it toward you. If you can, it means that the
shift lever wasn't fully locked into PARK (P).
Torque Lock
If you are parking on a hill and you don't shift your
transmission into PARK (P) properly, the weight of the
vehicle may put too much force on the parking pawl
in the transmission. You may ®nd it difficult to pull the
shift lever out of PARK (P). This is called ªtorque
lock.º To prevent torque lock, set the parking brake and
then shift into PARK (P) properly before you leave
the driver's seat. To ®nd out how, see
Shifting
Into Park (P) on page 2-26.
When you are ready to drive, move the shift lever out of
PARK (P)
beforeyou release the parking brake.
If torque lock does occur, you may need to have another
vehicle push yours a little uphill to take some of the
pressure from the parking pawl in the transmission, so
you can pull the shift lever out of PARK (P).
2-28
Page 249 of 386

Part B: Owner Checks and Services
Listed in this part are owner checks and services
which should be performed at the intervals speci®ed to
help ensure the safety, dependability and emission
control performance of your vehicle.
Be sure any necessary repairs are completed at once.
Whenever any ¯uids or lubricants are added to your
vehicle, make sure they are the proper ones, as shown
in Part D.
At the First 100, 1,000 and 6,000
Miles (160, 1 600 and 10 000km)
For vehicles with dual wheels, check dual wheel nut
torque. For proper torque, seeCapacities and
Speci®cations on page 5-97.
At Each Fuel Fill
It is important for you or a service station attendant to
perform these underhood checks at each fuel ®ll.
Engine Oil Level Check
Check the engine oil level and add the proper oil if
necessary. SeeEngine Oil on page 5-13for further
details.
Engine Coolant Level Check
Check the engine coolant level and add DEX-COOLž
coolant mixture if necessary. SeeEngine Coolant
on page 5-21for further details.
Windshield Washer Fluid Level Check
Check the windshield washer ¯uid level in the windshield
washer tank and add the proper ¯uid if necessary.
See
Windshield Washer Fluid on page 5-35for further
details.
At Least Once a Month
Tire In¯ation Check
Visually inspect your tires and make sure tires are
in¯ated to the correct pressures. Don't forget to check
your spare tire. See
Tires on page 5-56for further
details.
6-11
Page 309 of 386
Brake Wear
Your vehicle has four-wheel disc brakes.
Disc brake pads have built-in wear indicators that make
a high-pitched warning sound when the brake pads
are worn and new pads are needed. The sound
may come and go or be heard all the time your vehicle
is moving (except when you are pushing on the
brake pedal ®rmly).
{CAUTION:
The brake wear warning sound means that
soon your brakes won't work well. That could
lead to an accident. When you hear the brake
wear warning sound, have your vehicle
serviced.
Notice:Continuing to drive with worn-out brake
pads could result in costly brake repair.
Some driving conditions or climates may cause a brake
squeal when the brakes are ®rst applied or lightly
applied. This does not mean something is wrong with
your brakes.
Properly torqued wheel nuts are necessary to help
prevent brake pulsation. When tires are rotated, inspect
brake pads for wear and evenly tighten wheel nuts in
the proper sequence to GM torque speci®cations.
Brake linings should always be replaced as complete
axle sets.
See
Brake System Inspection on page 6-17.
Brake Pedal Travel
See your dealer if the brake pedal does not return to
normal height, or if there is a rapid increase in
pedal travel. This could be a sign of brake trouble.
Brake Adjustment
Every time you make a brake stop, your disc brakes
adjust for wear.
5-39
Page 327 of 386
·Bad wear
·Bad handling
·Bad fuel economy
If your tires have too much air (overin¯ation), you
can get the following:
·Unusual wear
·Bad handling
·Rough ride
·Needless damage from road hazards
When to Check
Check your tires once a month or more.
Also, check the tire pressure of the spare tire.
How to Check
Use a good quality pocket-type gage to check tire
pressure. You can't tell if your tires are properly in¯ated
simply by looking at them. Radial tires may look
properly in¯ated even when they're underin¯ated.
Be sure to put the valve caps back on the valve stems.
They help prevent leaks by keeping out dirt and
moisture.
Dual Tire Operation
When the vehicle is new, or whenever a wheel, wheel
bolt or wheel nut is replaced, check the wheel nut torque
after 100, 1,000 and 6,000 miles (160, 1 600 and
10 000 km) of driving. For proper torque and wheel nut
tightening information, see ªTightening the Wheel
Nutsº later in this section.
The outer tire on a dual wheel setup generally wears
faster than the inner tire. Your tires will wear more
evenly and last longer if you rotate the tires periodically.
See ªTire Inspection and Rotationº earlier in this
section. Also see ªScheduled Maintenance Servicesº in
the Index for scheduled rotation intervals
{CAUTION:
If you operate your vehicle with a tire that is
badly underin¯ated, the tire can overheat. An
overheated tire can lose air suddenly or catch
®re. You or others could be injured. Be sure all
tires (including the spare) are properly in¯ated.
See ªTiresº and ªIn¯ation ± Tire Pressureº in the Index
for more information on proper tire in¯ation.
5-57
Page 329 of 386
When you install dual wheels, be sure that vent holes in
the inner and outer wheels on each side are lined up.
After the tires have been rotated, adjust the front
and rear in¯ation pressures as shown on the
Certi®cation/Tire label. Make certain that all wheel nuts
are properly tightened. See ªWheel Nut Torqueº
under
Capacities and Speci®cations on page 5-97.
{CAUTION:
Rust or dirt on a wheel, or on the parts to
which it is fastened, can make wheel nuts
become loose after a time. The wheel could
come off and cause an accident. When you
change a wheel, remove any rust or dirt from
places where the wheel attaches to the vehicle.
In an emergency, you can use a cloth or a
paper towel to do this; but be sure to use a
scraper or wire brush later, if you need to, to
get all the rust or dirt off. See ªChanging a Flat
Tireº in the Index.
When It Is Time for New Tires
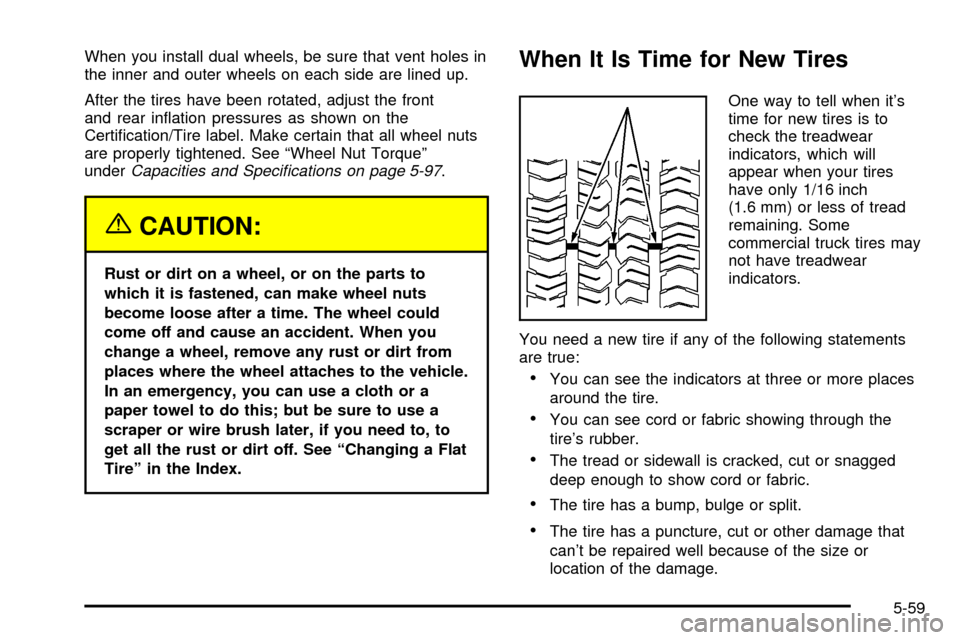
One way to tell when it's
time for new tires is to
check the treadwear
indicators, which will
appear when your tires
have only 1/16 inch
(1.6 mm) or less of tread
remaining. Some
commercial truck tires may
not have treadwear
indicators.
You need a new tire if any of the following statements
are true:
·You can see the indicators at three or more places
around the tire.
·You can see cord or fabric showing through the
tire's rubber.
·The tread or sidewall is cracked, cut or snagged
deep enough to show cord or fabric.
·The tire has a bump, bulge or split.
·The tire has a puncture, cut or other damage that
can't be repaired well because of the size or
location of the damage.
5-59
Page 333 of 386
{CAUTION:
Using the wrong replacement wheels, wheel
bolts or wheel nuts on your vehicle can be
dangerous. It could affect the braking and
handling of your vehicle, make your tires lose
air and make you lose control. You could have
a collision in which you or others could be
injured. Always use the correct wheel, wheel
bolts and wheel nuts for replacement.
Notice:The wrong wheel can also cause problems
with bearing life, brake cooling, speedometer or
odometer calibration, headlamp aim, bumper height,
vehicle ground clearance and tire or tire chain
clearance to the body and chassis.
Whenever a wheel, wheel bolt or wheel nut is replaced
on a dual wheel setup, check the wheel nut torque
after 100, 1,000 and 6,000 miles (160, 1 600 and
10 000 km) of driving. For proper torque, see ªWheel Nut
Torqueº under
Capacities and Speci®cations on
page 5-97.
See
Changing a Flat Tire on page 5-65for more
information.
Used Replacement Wheels
{CAUTION:
Putting a used wheel on your vehicle is
dangerous. You can't know how it's been used
or how far it's been driven. It could fail
suddenly and cause a crash. If you have to
replace a wheel, use a new GM original
equipment wheel.
Tire Chains
Notice:Use tire chains only where legal and only
when you must. Use chains that are the proper size
for your tires. Install them on the tires of the rear
axle. Tighten them as tightly as possible with
the ends securely fastened. Drive slowly and follow
the chain manufacturer's instructions. If you can
hear the chains contacting your vehicle, stop
and retighten them. If the contact continues, slow
down until it stops. Driving too fast or spinning the
wheels with chains on will damage your vehicle.
5-63
Page 347 of 386
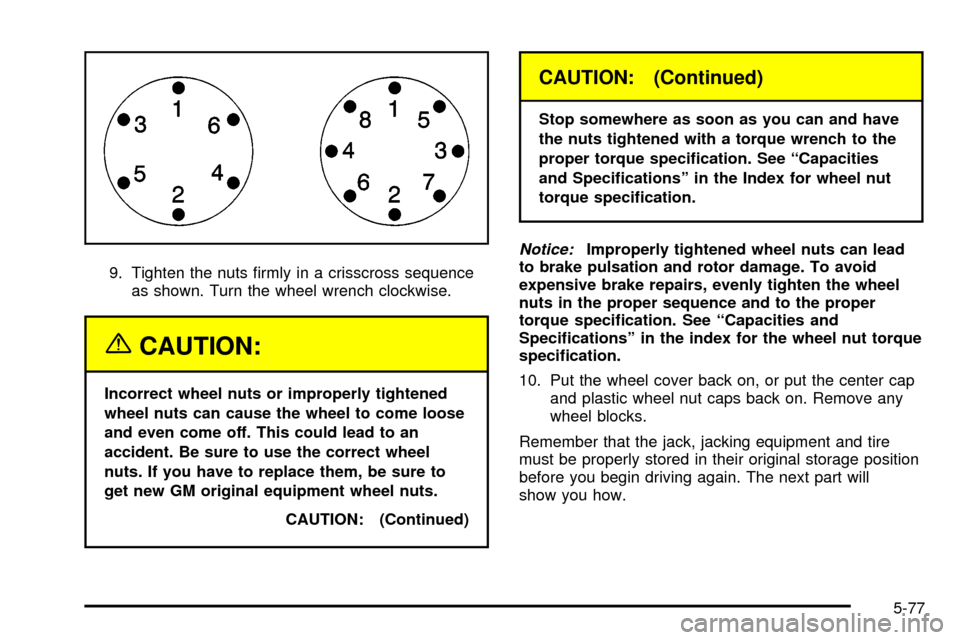
9. Tighten the nuts ®rmly in a crisscross sequence
as shown. Turn the wheel wrench clockwise.
{CAUTION:
Incorrect wheel nuts or improperly tightened
wheel nuts can cause the wheel to come loose
and even come off. This could lead to an
accident. Be sure to use the correct wheel
nuts. If you have to replace them, be sure to
get new GM original equipment wheel nuts.
CAUTION: (Continued)
CAUTION: (Continued)
Stop somewhere as soon as you can and have
the nuts tightened with a torque wrench to the
proper torque speci®cation. See ªCapacities
and Speci®cationsº in the Index for wheel nut
torque speci®cation.
Notice:Improperly tightened wheel nuts can lead
to brake pulsation and rotor damage. To avoid
expensive brake repairs, evenly tighten the wheel
nuts in the proper sequence and to the proper
torque speci®cation. See ªCapacities and
Speci®cationsº in the index for the wheel nut torque
speci®cation.
10. Put the wheel cover back on, or put the center cap
and plastic wheel nut caps back on. Remove any
wheel blocks.
Remember that the jack, jacking equipment and tire
must be properly stored in their original storage position
before you begin driving again. The next part will
show you how.
5-77