2003 CHEVROLET CORVETTE window
[x] Cancel search: windowPage 73 of 368

Testing the Alarm
To test the system, do the following:
1. Make sure the hatch/trunk lid is latched.
2. Lower the window on the driver's door.
3. Manually arm the system.
4. Close the doors and wait 15 seconds.
5. Reach through the open window and manually
unlock the driver's door.
6. Open the door. The alarm should sound.
7. Turn off the alarm.
If the alarm is inoperative, check to see if the horn
works. If not, check the horn fuse. See
Fuses and Circuit
Breakers on page 5-86. If the horn works, but the
alarm doesn't go off, see your dealer.
Disarming the System
Always use your key or the remote keyless entry
transmitter to unlock a door. Unlocking a door any other
way will set off the alarm. If your alarm sounds, listed
below are the ways you can disarm it.
·Unlock the driver's door with your key.
·Put the key in the ignition.
·Press the unlock button on the remote keyless
entry transmitter.
PASS-Keyž
Your vehicle is equipped
with the
PASS-Key
ž(Personalized
Automotive Security
System) theft-deterrent
system. PASS-Key
žis a
passive theft-deterrent
system. It works when you
insert or remove the key
from the ignition.
PASS-Key
žuses a resistor pellet in the ignition key that
matches a decoder in your vehicle.
When the PASS-Key
žsystem senses that someone is
using the wrong key, it shuts down the vehicle's
starter and fuel systems. For about three minutes, the
starter won't work and fuel won't go to the engine.
If someone tries to start your vehicle again or uses
another key during this time, the shutdown period will
start over again. This discourages someone from
randomly trying different keys with different resistor
pellets in an attempt to make a match.
2-17
Page 77 of 368

When the engine is not running, ACCESSORY and ON
allow you to operate your electrical accessories,
such as the radio.
A warning tone will sound if you open the driver's door
while the ignition is in OFF or ACCESSORY and
the key is in the ignition.
Retained Accessory Power (RAP)
With RAP, your power windows and the audio system
will continue to work for up to 15 minutes after the
ignition key is turned to OFF and neither door is opened.
If a door is opened, the power windows and audio
system will shut off.
Starting Your Engine
This vehicle has a computer system that monitors
engine speed, throttle and pedal position, and records
the current status.
Automatic Transmission
Move your shift lever to PARK (P) or NEUTRAL (N).
Your engine won't start in any other position ± that's a
safety feature. To restart when you're already moving,
use NEUTRAL (N) only.
Notice:Don't try to shift to PARK (P) if your
vehicle is moving. If you do, you could damage the
transmission. Shift to PARK (P) only when your
vehicle is stopped.
Manual Transmission
The shift lever should be in NEUTRAL and the parking
brake engaged. Hold the clutch pedal to the ¯oor
and start the engine. Your vehicle won't start if the clutch
pedal is not all the way down ± that's a safety feature.
1. With your foot off the accelerator pedal, turn
the ignition key to START. When the engine starts,
let go of the key. The idle speed will go down as
your engine gets warm.
Notice:Holding your key in START for longer than
15 seconds at a time will cause your battery to
be drained much sooner. And the excessive heat
can damage your starter motor. Wait about 15
seconds between each try to help avoid draining
your battery or damaging your starter.
2. If it doesn't start within 10 seconds, push the
accelerator pedal all the way to the ¯oor, while you
hold the ignition key in START. When the engine
starts, let go of the key and let up on the accelerator
pedal. Wait about 15 seconds between each try.
2-21
Page 91 of 368

Engine Exhaust
{CAUTION:
Engine exhaust can kill. It contains the gas
carbon monoxide (CO), which you can't see or
smell. It can cause unconsciousness and
death.
You might have exhaust coming in if:
·Your exhaust system sounds strange or
different.
·Your vehicle gets rusty underneath.
·Your vehicle was damaged in a collision.
CAUTION: (Continued)
CAUTION: (Continued)
·
Your vehicle was damaged when driving
over high points on the road or over road
debris.
·Repairs weren't done correctly.
·Your vehicle or exhaust system had been
modi®ed improperly.
If you ever suspect exhaust is coming into
your vehicle:
·Drive it only with all the windows down to
blow out any CO; and
·Have your vehicle ®xed immediately.
2-35
Page 100 of 368
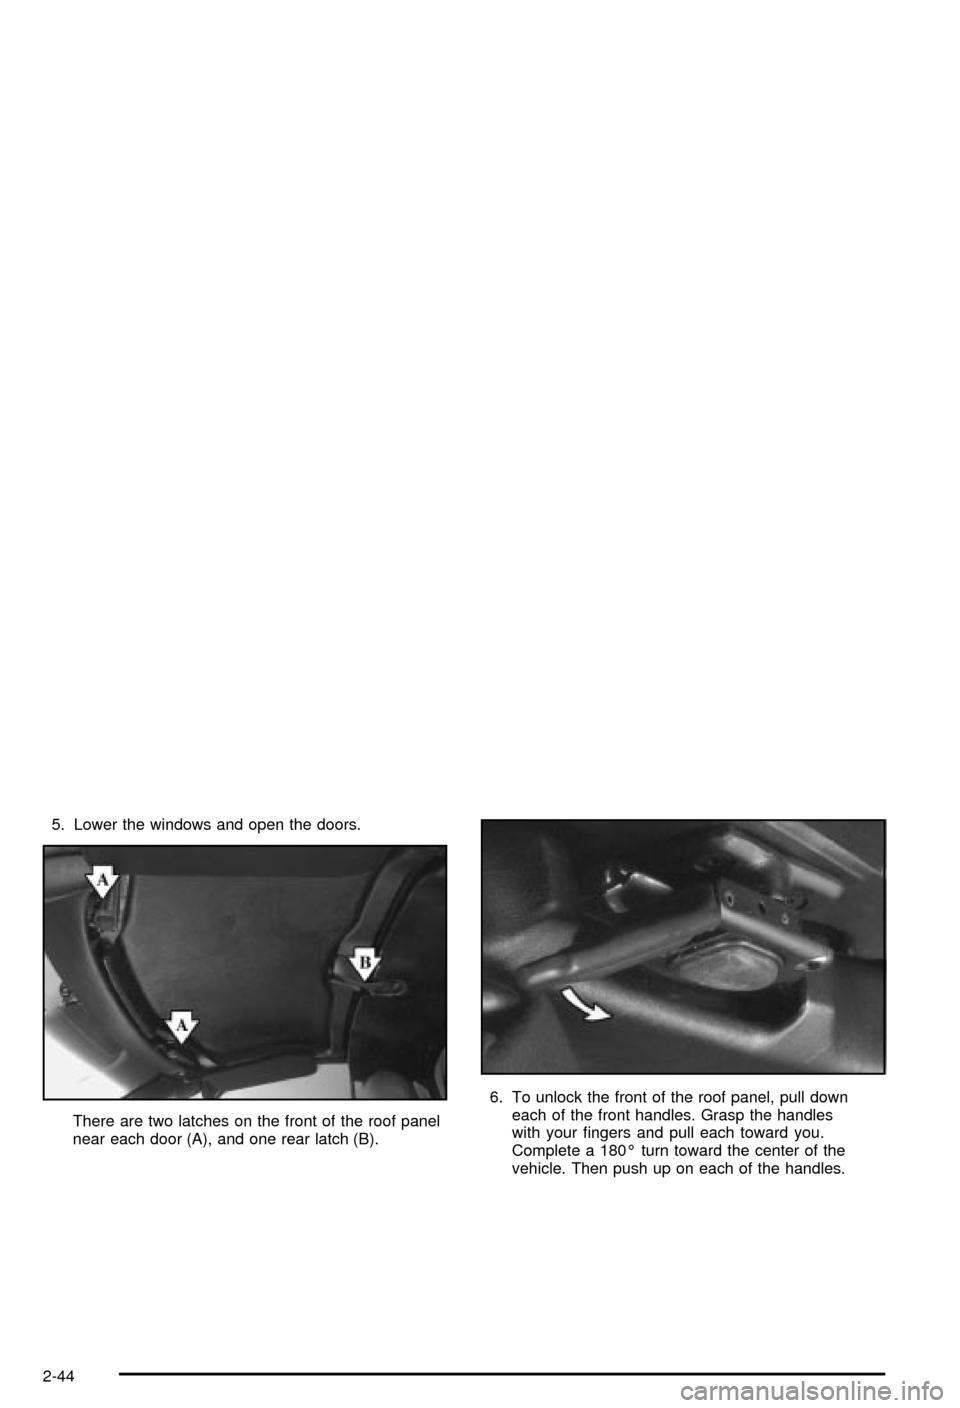
5. Lower the windows and open the doors.
There are two latches on the front of the roof panel
near each door (A), and one rear latch (B).6. To unlock the front of the roof panel, pull down
each of the front handles. Grasp the handles
with your ®ngers and pull each toward you.
Complete a 180É turn toward the center of the
vehicle. Then push up on each of the handles.
2-44
Page 109 of 368
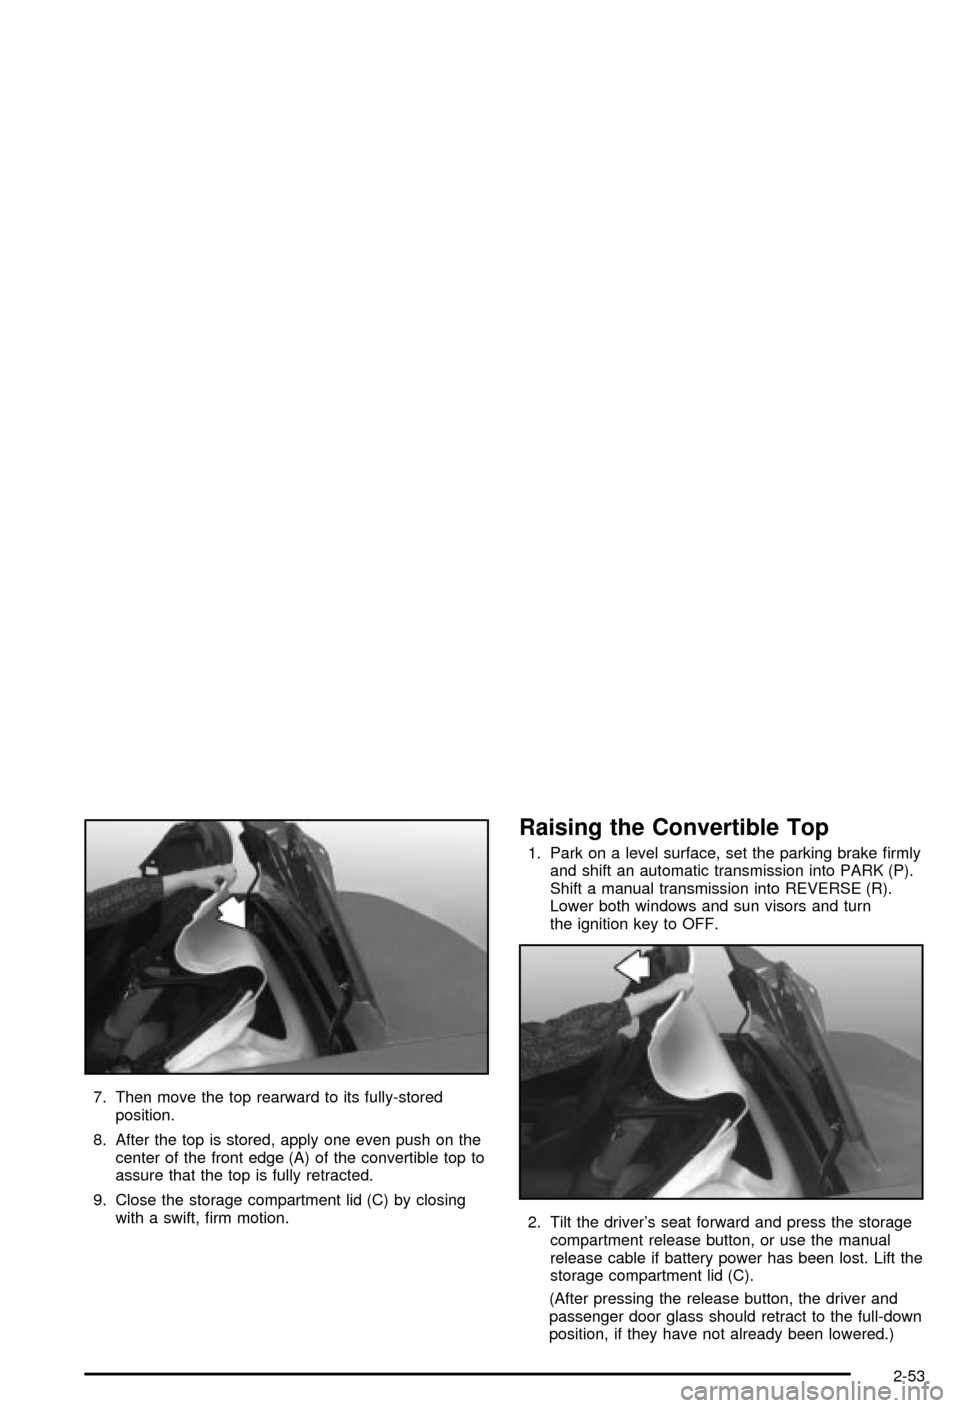
7. Then move the top rearward to its fully-stored
position.
8. After the top is stored, apply one even push on the
center of the front edge (A) of the convertible top to
assure that the top is fully retracted.
9. Close the storage compartment lid (C) by closing
with a swift, ®rm motion.
Raising the Convertible Top
1. Park on a level surface, set the parking brake ®rmly
and shift an automatic transmission into PARK (P).
Shift a manual transmission into REVERSE (R).
Lower both windows and sun visors and turn
the ignition key to OFF.
2. Tilt the driver's seat forward and press the storage
compartment release button, or use the manual
release cable if battery power has been lost. Lift the
storage compartment lid (C).
(After pressing the release button, the driver and
passenger door glass should retract to the full-down
position, if they have not already been lowered.)
2-53
Page 113 of 368

Instrument Panel Overview...............................3-2
Hazard Warning Flashers................................3-4
Other Warning Devices...................................3-4
Horn.............................................................3-5
Tilt Wheel.....................................................3-5
Turn Signal/Multifunction Lever.........................3-6
Exterior Lamps.............................................3-12
Interior Lamps..............................................3-15
Head-Up Display (HUD).................................3-17
Accessory Power Outlets...............................3-20
Ashtrays and Cigarette Lighter........................3-21
Climate Controls............................................3-22
Dual Automatic Climate Control System...........3-22
Outlet Adjustment.........................................3-28
Warning Lights, Gages and Indicators.............3-29
Instrument Panel Cluster................................3-30
Speedometer and Odometer...........................3-31
Tachometer.................................................3-31
Safety Belt Reminder Light.............................3-31
Air Bag Readiness Light................................3-32
Air Bag Off Light..........................................3-33
Voltmeter Gage............................................3-34
Brake System Warning Light..........................3-35
Anti-Lock Brake System Warning Light.............3-36
Traction Control System (TCS) Warning Light . . .3-36Active Handling System Light.........................3-37
Engine Coolant Temperature Gage..................3-38
Malfunction Indicator Lamp.............................3-38
Engine Oil Pressure Gage.............................3-41
Security Light...............................................3-42
Check Gages Warning Light...........................3-42
Fuel Gage...................................................3-42
Driver Information Center (DIC).......................3-44
DIC Controls and Displays.............................3-45
DIC Warnings and Messages.........................3-53
Other Messages...........................................3-61
Audio System(s).............................................3-62
Setting the Time...........................................3-62
Radio with Cassette......................................3-63
Radio with CD..............................................3-67
Trunk-Mounted CD Changer...........................3-71
Theft-Deterrent Feature..................................3-75
Understanding Radio Reception......................3-77
Care of Your Cassette Tape Player.................3-78
Care of Your CDs.........................................3-79
Care of Your CD Player................................3-79
Fixed Mast Antenna (Z06)..............................3-79
Power Antenna Mast Care (Convertible)...........3-79
Integrated Windshield and Rear Window
Antennas (Coupe).....................................3-80
Section 3 Instrument Panel
3-1
Page 120 of 368

INT (Intermittent):Move the lever to INT to choose a
delayed wiping cycle. Turn the INT ADJ band down
for a longer delay or up for a shorter delay. The further
the INT ADJ band is turned upward, the shorter the
delay will be and the further the INT ADJ band is turned
downward, the longer the delay will be. The wiper
speed can only be adjusted when the lever is in the INT
position. Use this position for light rain or snow.
LO (Low Speed):Move the lever up to the ®rst setting
past INT, for steady wiping at low speed.
HI (High Speed):Move the lever up to the second
setting past INT, for steady wiping at high speed.
MIST:Move the lever all the way down to MIST for a
single wiping cycle. Hold it there until the windshield
wipers start; then let go. The windshield wipers will stop
after one wipe. If you want more wipes, hold the
band on MIST longer.
Heavy snow or ice can overload the wipers. If this
occurs, a circuit breaker will stop the wipers until the
motor cools. So, be sure to clear any ice and snow from
the windshield wiper blades before using them. If the
wiper blades are frozen to the windshield, carefully
loosen them or warm the windshield before turning the
wipers on. If your blades do become worn or
damaged, get new blades or blade inserts.Windshield Washer
The lever on the right side of the steering column also
controls the windshield washer. There is a button at
the end of the lever. To spray washer ¯uid on the
windshield, press the button and hold it. The washer will
spray until you release the button. The wipers will
continue to clear the window for about six seconds after
the button is released and then stop or return to your
preset speed.
{CAUTION:
In freezing weather, don't use your washer
until the windshield is warmed. Otherwise the
washer ¯uid can form ice on the windshield,
blocking your vision.
If the ¯uid in the windshield washer ¯uid reservoir is
low, the message LOW WASHER FLUID will appear on
the Driver Information Center (DIC) display. It will
take 60 seconds after the bottle is re®lled for this
message to turn off. For information on the correct
washer ¯uid mixture to use, see
Windshield Washer
Fluid on page 5-36andPart D: Recommended Fluids
and Lubricants on page 6-14.
3-8
Page 135 of 368

After a ®ve-second display of the current settings, only
the word AUTO and the outside temperature will be
shown on the digital display unless the system is set to
full cold 60ÉF (16ÉC) or full hot 90ÉF (32ÉC), then the
word AUTO will not display. The system will operate to
achieve your comfort set temperature as quickly as
possible. The AUTO control system works best with the
windows up and the removable roof installed or the
convertible top up.
1. Press the AUTO button.
2. Adjust the temperature to a comfortable setting
between 60ÉF (16ÉC) or full hot 90ÉF (32ÉC).
Choosing the coldest or warmest temperature
setting will not cause the system to heat or cool any
faster. If you set the system at the coldest or
warmest temperature setting, the system will remain
in manual mode at that temperature and it will not
go into automatic mode.
In cold weather, the system will start at reduced fan
speeds at avoid blowing cold air into your vehicle
until warmer air is available. The system will
start out blowing air at the ¯oor but may change
modes automatically as the vehicle warms up
to maintain the chosen temperature setting. The
length of time needed for warm up will depend on
the outside temperature and the length of time
that has elapsed since your vehicle was last driven.3. Wait for the system to regulate. This may take from
10 to 30 minutes. Then adjust the temperature, if
necessary.
Do not cover the solar sensor located in the center of
the instrument panel, near the windshield. For more
information on the solar sensor, see ªSolar Sensorº later
in this section.
Manual Operation
OFF:Press this button to turn off the climate control
system. This is the only setting that fully shuts off
the fan. The digital display will show only the outside
temperature. You can still adjust the driver's set
temperature, the passenger temperature offset and the
air intake mode while in OFF.
MODE:Press this button to manually lock in the current
air delivery setting and to stop the automatic mode
control. Pressing the MODE button will delete AUTO
from the digital display and the mode graphics will
be shown. To change the setting, press the MODE
button again. The AUTO button must be pressed
to return to the automatic mode selection.
3-23