2003 CHEVROLET CORVETTE fuel cap
[x] Cancel search: fuel capPage 237 of 368

{CAUTION:
If you get fuel on yourself and then something
ignites it, you could be badly burned. Fuel can
spray out on you if you open the fuel cap too
quickly. This spray can happen if your tank is
nearly full, and is more likely in hot weather.
Open the fuel cap slowly and wait for any
ªhissº noise to stop. Then unscrew the cap all
the way.
Be careful not to spill fuel. Clean fuel from painted
surfaces as soon as possible. See
Cleaning the Outside
of Your Vehicle on page 5-78.
When you put the fuel cap back on, turn it to the right
(clockwise) until you hear a clicking sound. Make
sure you fully install the cap. The diagnostic system can
determine if the fuel cap has been left off or improperly
installed.
This would allow fuel to evaporate into the atmosphere.
See
Malfunction Indicator Lamp on page 3-38.
Notice:If you need a new fuel cap, be sure to get
the right type. Your dealer can get one for you.
If you get the wrong type, it may not ®t properly.This may cause your malfunction indicator lamp
to light and may damage your fuel tank and
emissions system. See ªMalfunction Indicator
Lampº in the Index.
Filling a Portable Fuel Container
{CAUTION:
Never ®ll a portable fuel container while it is in
your vehicle. Static electricity discharge from
the container can ignite the gasoline vapor.
You can be badly burned and your vehicle
damaged if this occurs. To help avoid injury to
you and others:
·Dispense gasoline only into approved
containers.
·Do not ®ll a container while it is inside a
vehicle, in a vehicle's trunk, pickup bed or
on any surface other than the ground.
·Bring the ®ll nozzle in contact with the
inside of the ®ll opening before operating
the nozzle. Contact should be maintained
until the ®lling is complete.
·Don't smoke while pumping gasoline.
5-9
Page 241 of 368

A. Coolant Surge Tank and Pressure Cap
B. Battery
C. Engine Oil Dipstick
D. Engine Oil Fill Cap
E. Engine Air Cleaner/Filter
F. Power Steering Fluid Reservoir
G. Brake Fluid Reservoir
H. Clutch Master Cylinder Reservoir
I. Windshield Washer Fluid Reservoir
Engine Oil
If the LOW OIL LEVEL message on the Driver
Information Center comes on, it means you need to
check your engine oil level right away. For more
information, see
Driver Information Center (DIC) on
page 3-44.
You should check your engine oil level regularly; this is
an added reminder.
Checking Engine Oil
It's a good idea to check your engine oil level every
time you get fuel. In order to get an accurate reading,
the oil must be warm and the vehicle must be on
level ground.
The engine oil dipstick
handle is a yellow ring
located near the coolant
surge tank. See
Engine
Compartment Overview on
page 5-12
for more
information on location.
Turn off the engine and give the oil a few minutes to
drain back into the oil pan. If you don't, the oil dipstick
might not show the actual level.
Pull out the dipstick and clean it with a paper towel or a
cloth, then push it back in all the way. Remove it
again, keeping the tip down.
5-13
Page 284 of 368

If you feel that winter tires are needed for your driving
conditions, Goodyear Eagle M+S EMT tires are available
in your original equipment sizes from an authorized
Goodyear EMT retailer. These tires will improve snow
traction while maintaining your vehicle's extended
mobility feature. When using winter tires on your vehicle,
be sure to use them on all four wheels. See
Buying
New Tires on page 5-59.
In¯ation -- Tire Pressure
The Tire±Loading Information label, which is on the rear
edge of the driver's door, shows the correct in¯ation
pressures for your tires when they're cold. ªColdº means
your vehicle has been sitting for at least three hours
or driven no more than 1 mile (1.6 km).
Notice:Don't let anyone tell you that underin¯ation
or overin¯ation is all right. It's not. If your tires
don't have enough air (underin¯ation), you can get
the following:
·Too much ¯exing
·Too much heat
·Tire overloading
·Bad wear
·Bad handling
·Bad fuel economyIf your tires have too much air (overin¯ation), you
can get the following:
·Unusual wear
·Bad handling
·Rough ride
·Needless damage from road hazards
When to Check
Check your tires once a month or more.
How to Check
Use a good quality pocket-type gage to check tire
pressure. You can't tell if your tires are properly in¯ated
simply by looking at them. Radial tires may look
properly in¯ated even when they're underin¯ated.
Be sure to put the valve caps back on the valve stems.
They help prevent leaks by keeping out dirt and
moisture.
If your vehicle is equipped with the Tire Pressure
Monitor, you can check tire in¯ation pressures while
driving. After you've reached a speed of 15 mph
(24 kmh) or more, press and release the GAGES button
on the Driver Information Center (DIC) until the front
tire pressures are displayed. Then, press and release
the GAGES button for the rear tire pressures.
5-56
Page 320 of 368

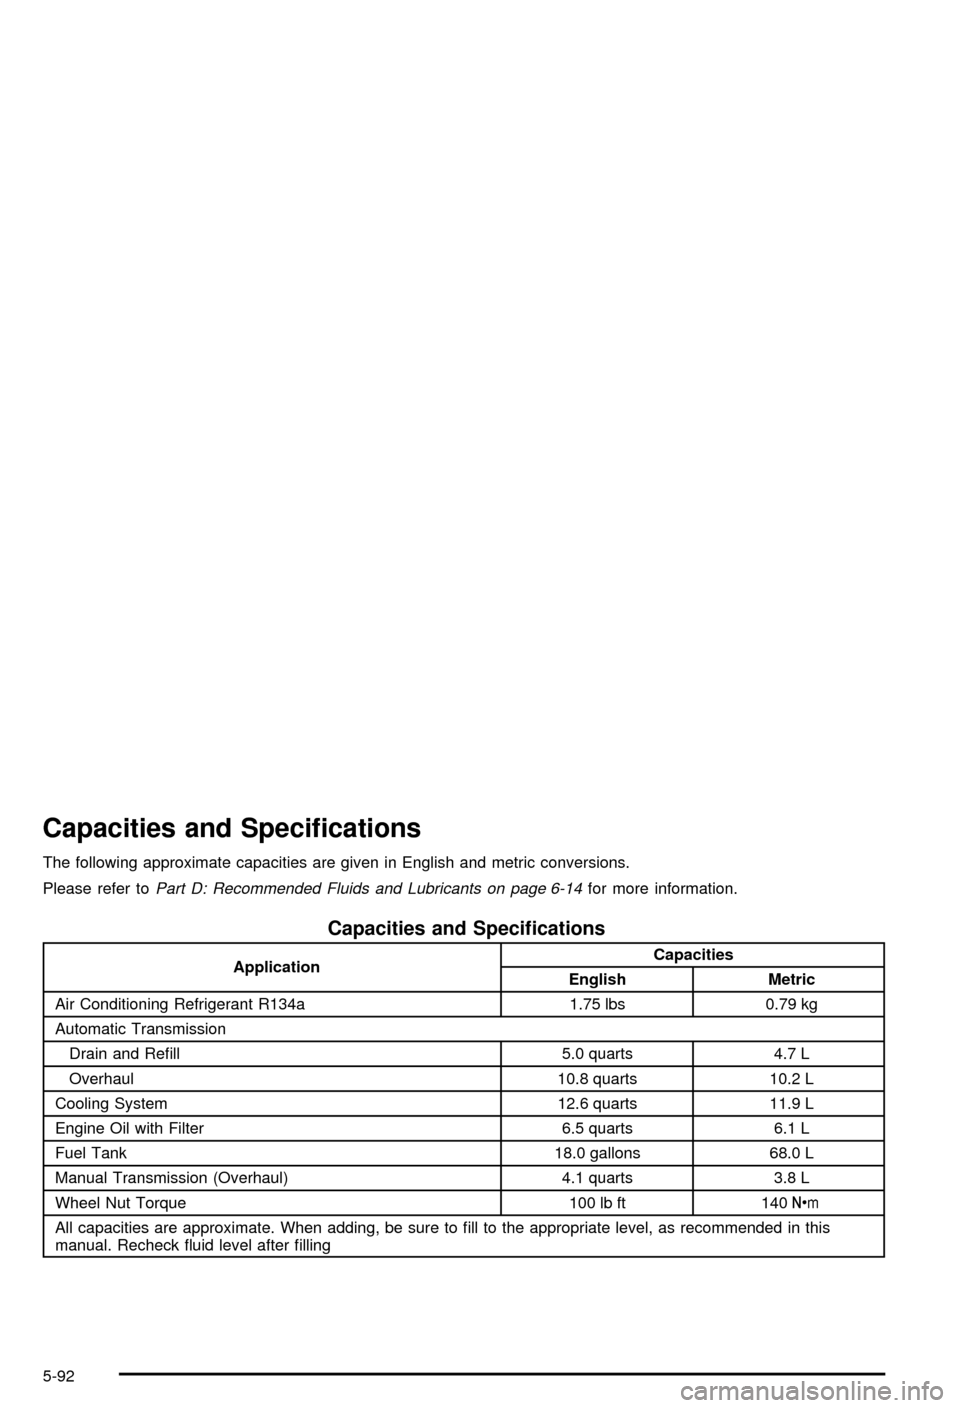
Capacities and Speci®cations
The following approximate capacities are given in English and metric conversions.
Please refer to
Part D: Recommended Fluids and Lubricants on page 6-14for more information.
Capacities and Speci®cations
ApplicationCapacities
English Metric
Air Conditioning Refrigerant R134a 1.75 lbs 0.79 kg
Automatic Transmission
Drain and Re®ll 5.0 quarts 4.7 L
Overhaul 10.8 quarts 10.2 L
Cooling System 12.6 quarts 11.9 L
Engine Oil with Filter 6.5 quarts 6.1 L
Fuel Tank 18.0 gallons 68.0 L
Manual Transmission (Overhaul) 4.1 quarts 3.8 L
Wheel Nut Torque 100 lb ft 140Y
All capacities are approximate. When adding, be sure to ®ll to the appropriate level, as recommended in this
manual. Recheck ¯uid level after ®lling
5-92
Page 337 of 368

Fuel System Inspection
Inspect the complete fuel system for damage or leaks.
Engine Cooling System Inspection
Inspect the hoses and have them replaced if they
are cracked, swollen or deteriorated. Inspect all pipes,
®ttings and clamps; replace as needed. Clean the
outside of the radiator and air conditioning condenser.
To help ensure proper operation, a pressure test of
the cooling system and pressure cap is recommended
at least once a year.
Rear Axle Service
Check the gear lubricant level in the rear axle and add if
needed. SeeRear Axle on page 5-46. A ¯uid loss
may indicate a problem. Check the axle and repair it if
needed.
Brake System Inspection
Inspect the complete system. Inspect brake lines and
hoses for proper hook-up, binding, leaks, cracks,
cha®ng, etc. Inspect disc brake pads for wear and rotors
for surface condition. Inspect other brake parts,
including calipers, parking brake, etc. You may need to
have your brakes inspected more often if your driving
habits or conditions result in frequent braking.
6-13
Page 356 of 368

Audio System(s) (cont.)
Understanding Radio Reception.....................3-77
Automatic Transmission Check........................... 6-9
Automatic Transmission Shift Lock Control
System Check.............................................6-10
Automatic Transmission...................................2-21
Fluid..........................................................5-20
Operation...................................................2-24
B
Battery Replacement......................................... 2-8
Battery Run-Down Protection............................3-17
Battery..........................................................5-40
Before Leaving on a Long Trip.........................4-24
Body Lubrication Service................................... 6-9
Brake Fluid....................................................5-37
Brake Wear...................................................5-39
Brake............................................................2-30
Parking......................................................2-30
System Inspection.......................................6-13
System Warning Light..................................3-35
Brakes..........................................................5-37
Braking in Emergencies..................................... 4-8
Braking........................................................... 4-6
Break-In, New Vehicle.....................................2-19
Bulb Replacement...........................................5-47
Back-Up Lamps...........................................5-51
Halogen Bulbs............................................5-47Bulb Replacement (cont.)
Headlamps.................................................5-47
Replacement Bulbs......................................5-51
Taillamps and Turn Signal Lamps..................5-49
Buying New Tires...........................................5-59
C
California Fuel.................................................. 5-5
Canada ± Customer Assistance.......................... 7-4
Canadian Owners................................................ ii
Canadian Roadside Assistance........................... 7-7
Capacities and Speci®cations............................5-92
Carbon Monoxide...................4-27, 4-35, 2-11, 2-35
Care of.........................................................5-77
Safety Belts................................................5-77
Your Cassette Tape Player............................3-78
Your CD Player...........................................3-79
Your CDs ...................................................3-79
Cargo Cover..................................................2-42
Cassette Tape Messages.................................3-66
Cassette Tape Player Service............................. 6-8
CD Adapter Kits.............................................3-66
CD Changer, Trunk-Mounted............................3-71
Center Console Storage Area...........................2-39
Chains, Tires..................................................5-64
Check Engine Light.........................................3-38
Checking Coolant............................................5-25
Checking Engine Oil........................................5-13
2