2003 CHEVROLET BLAZER bulb
[x] Cancel search: bulbPage 1 of 420

Seats and Restraint Systems........................... 1-1
Front Seats
............................................... 1-2
Rear Seats
............................................... 1-7
Safety Belts
.............................................. 1-9
Child Restraints
.......................................1-32
Air Bag System
.......................................1-52
Restraint System Check
............................1-58
Features and Controls..................................... 2-1
Keys
........................................................ 2-3
Doors and Locks
....................................... 2-7
Windows
.................................................2-11
Theft-Deterrent Systems
............................2-17
Starting and Operating Your Vehicle
...........2-19
Mirrors
....................................................2-41
HomeLink
žTransmitter
.............................2-44
Storage Areas
.........................................2-48
Vehicle Personalization
.............................2-61
Instrument Panel............................................. 3-1
Instrument Panel Overview
.......................... 3-2
Climate Controls
......................................3-17
Warning Lights, Gages and Indicators
.........3-21
Audio System(s)
.......................................3-37Driving Your Vehicle....................................... 4-1
Your Driving, the Road, and Your Vehicle
..... 4-2
Towing
...................................................4-45
Service and Appearance Care.......................... 5-1
Service
..................................................... 5-3
Fuel
......................................................... 5-4
Checking Things Under the Hood
................. 5-8
Rear Axle
...............................................5-45
Four-Wheel Drive
.....................................5-45
Front Axle
...............................................5-46
Bulb Replacement
....................................5-47
Windshield Wiper Blade Replacement
.........5-52
Tires
......................................................5-54
Appearance Care
.....................................5-76
Vehicle Identi®cation
.................................5-83
Electrical System
......................................5-84
Capacities and Speci®cations
.....................5-91
Normal Maintenance Replacement Parts
......5-92
Maintenance Schedule..................................... 6-1
Maintenance Schedule
................................ 6-2
Customer Assistance Information.................... 7-1
Customer Assistance Information
.................. 7-2
Reporting Safety Defects
...........................7-10
INDEX................................................................1
2003 Chevrolet Blazer Owner ManualM
Page 133 of 420

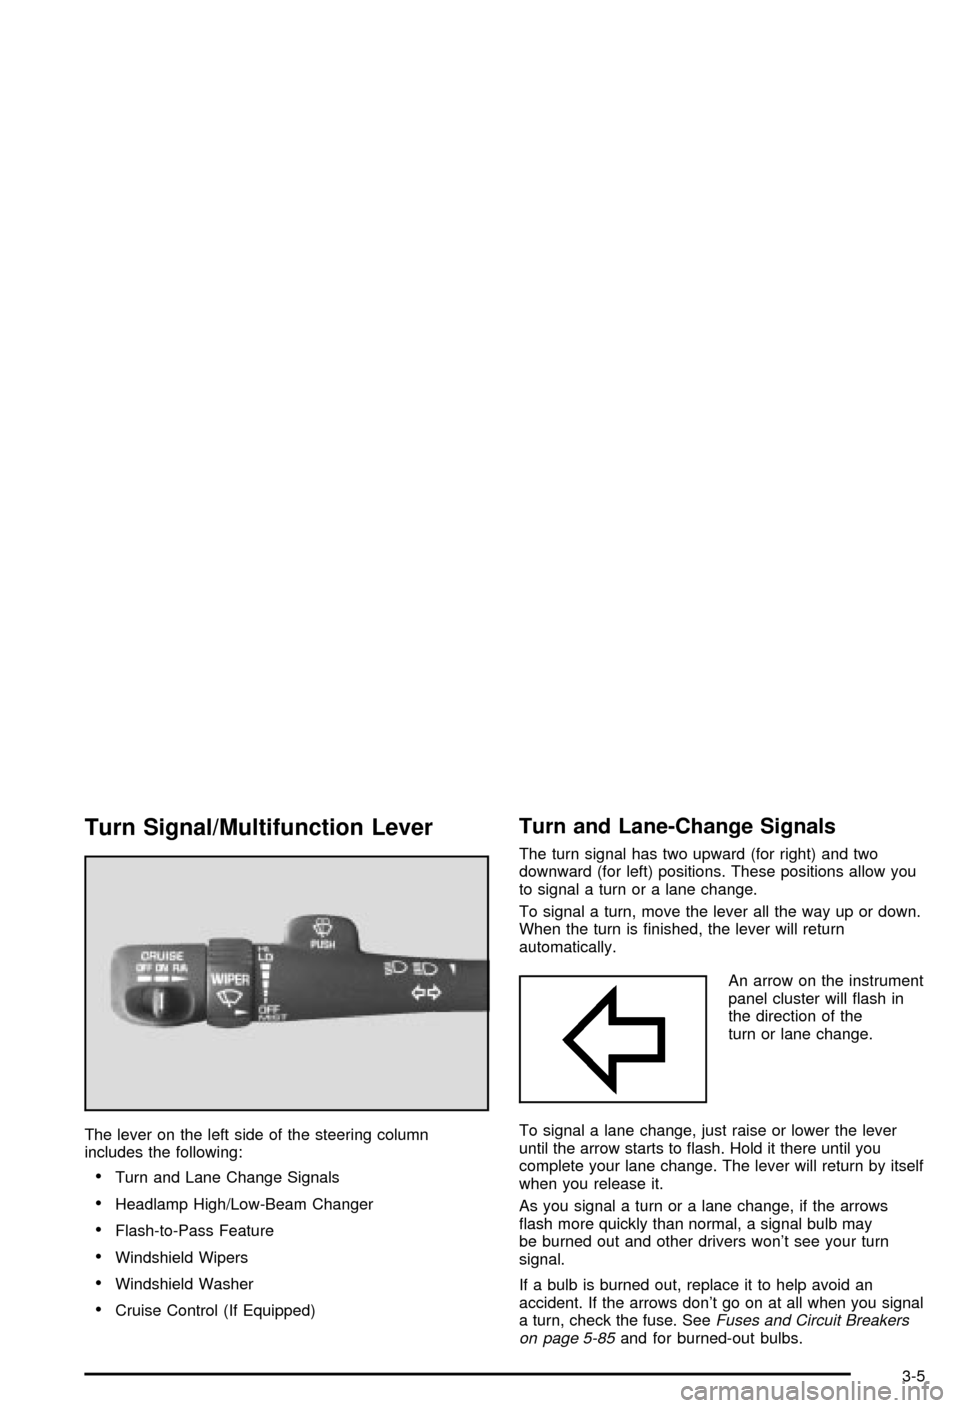
Turn Signal/Multifunction Lever
The lever on the left side of the steering column
includes the following:
·Turn and Lane Change Signals
·Headlamp High/Low-Beam Changer
·Flash-to-Pass Feature
·Windshield Wipers
·Windshield Washer
·Cruise Control (If Equipped)
Turn and Lane-Change Signals
The turn signal has two upward (for right) and two
downward (for left) positions. These positions allow you
to signal a turn or a lane change.
To signal a turn, move the lever all the way up or down.
When the turn is ®nished, the lever will return
automatically.
An arrow on the instrument
panel cluster will ¯ash in
the direction of the
turn or lane change.
To signal a lane change, just raise or lower the lever
until the arrow starts to ¯ash. Hold it there until you
complete your lane change. The lever will return by itself
when you release it.
As you signal a turn or a lane change, if the arrows
¯ash more quickly than normal, a signal bulb may
be burned out and other drivers won't see your turn
signal.
If a bulb is burned out, replace it to help avoid an
accident. If the arrows don't go on at all when you signal
a turn, check the fuse. See
Fuses and Circuit Breakers
on page 5-85and for burned-out bulbs.
3-5
Page 134 of 420

If you have a trailer towing option with added wiring for
the trailer lamps, a different turn signal ¯asher is
used. With this ¯asher installed, the signal indicator will
¯ash even if a turn signal bulb is burned out. Check
the front and rear turn signal lamps regularly to make
sure they are working.
Turn Signal On Chime
If your turn signal is left on for more than 3/4 of a mile
(1.2 km), a chime will sound at each ¯ash of the
turn signal. To turn off the chime, move the turn signal
lever to the off position.
Headlamp High/Low-Beam Changer
To change the headlamps from low beam to high or high
to low, pull the multifunction lever all the way toward
you. Then release it.
When the high beams are
on, this indicator light on
the instrument panel
cluster will also be on.
Flash-to-Pass Feature
This feature lets you use your high-beam headlamps to
signal a driver in front of you that you want to pass.
It works even if your headlamps are in the automatic
position.
To use it, pull the turn signal lever toward you, but not
so far that you hear a click.
If your headlamps are in the automatic position or on
low beam, your high-beam headlamps will turn on.
They'll stay on as long as you hold the lever toward you
and the high-beam indicator on the instrument panel
cluster will come on. Release the lever to return
to normal operation.
Windshield Wipers
To operate the windshield wipers turn the band, located
on the multifunction lever, upward or downward.
MIST:Turn the band to MIST for a single wiping cycle.
Hold it until the windshield wipers start. Then let it
go. The windshield wipers will stop after one wipe. If
you want more wipes, hold the band on MIST longer.
OFF:Turn the band to OFF to turn off the windshield
wipers.
3-6
Page 260 of 420

Turn Signals When Towing a Trailer
When you tow a trailer, your vehicle has to have extra
wiring and a heavy-duty turn signal ¯asher (included
in the optional trailering package).
The arrows on your instrument panel will ¯ash whenever
you signal a turn or lane change. Properly hooked up,
the trailer lamps will also ¯ash, telling other drivers
you're about to turn, change lanes or stop.
When towing a trailer, the arrows on your instrument
panel will ¯ash for turns even if the bulbs on the trailer
are burned out. Thus, you may think drivers behind
you are seeing your signal when they are not. It's
important to check occasionally to be sure the trailer
bulbs are still working.
Driving On Grades
Reduce speed and shift to a lower gearbeforeyou start
down a long or steep downgrade. If you don't shift
down, you might have to use your brakes so much that
they would get hot and no longer work well.If you have an automatic transmission, you can tow in
DRIVE (D). You may want to shift the transmission
to THIRD (3) or, if necessary, a lower gear selection if
the transmission shifts too often (e.g., under heavy loads
and/or hilly conditions). Or, if you have a manual
transmission and you are towing a trailer, it's better not
to use FIFTH (5) gear. Just drive in FOURTH (4)
gear (or, as you need to, a lower gear). See
Tow/Haul
Mode Light on page 3-35.
When towing at high altitude on steep uphill grades,
consider the following: Engine coolant will boil at a lower
temperature than at normal altitudes. If you turn your
engine off immediately after towing at high altitude
on steep uphill grades, your vehicle may show signs
similar to engine overheating. To avoid this, let the
engine run while parked (preferably on level ground)
with the automatic transmission in PARK (P) (or
the manual transmission out of gear and the parking
brake applied) for a few minutes before turning the
engine off. If you do get the overheat warning,
see
Engine Overheating on page 5-25.
4-62
Page 265 of 420

Service............................................................5-3
Doing Your Own Service Work.........................5-3
Adding Equipment to the Outside of Your
Vehicle......................................................5-4
Fuel................................................................5-4
Gasoline Octane............................................5-4
Gasoline Speci®cations....................................5-5
California Fuel...............................................5-5
Additives.......................................................5-5
Fuels in Foreign Countries...............................5-6
Filling Your Tank............................................5-6
Filling a Portable Fuel Container.......................5-8
Checking Things Under
the Hood......................................................5-8
Hood Release................................................5-9
Engine Compartment Overview.......................5-10
Engine Oil...................................................5-11
Engine Air Cleaner/Filter................................5-15
Automatic Transmission Fluid.........................5-17
Manual Transmission Fluid.............................5-20
Hydraulic Clutch...........................................5-21
Engine Coolant.............................................5-22
Radiator Pressure Cap..................................5-25
Engine Overheating.......................................5-25
Cooling System............................................5-27
Engine Fan Noise.........................................5-34Power Steering Fluid.....................................5-35
Windshield Washer Fluid................................5-36
Brakes........................................................5-37
Battery........................................................5-40
Jump Starting...............................................5-41
Rear Axle.......................................................5-45
Four-Wheel Drive............................................5-45
Front Axle......................................................5-46
Bulb Replacement..........................................5-47
Halogen Bulbs..............................................5-47
Headlamps..................................................5-48
One-Piece Front Turn Signal Lamps................5-50
Two-Piece Front Turn Signal Lamps................5-50
Taillamps.....................................................5-51
Replacement Bulbs.......................................5-52
Windshield Wiper Blade Replacement..............5-52
Tires..............................................................5-54
In¯ation -- Tire Pressure................................5-55
Tire Inspection and Rotation...........................5-56
When It Is Time for New Tires.......................5-57
Buying New Tires.........................................5-58
Uniform Tire Quality Grading..........................5-59
Wheel Alignment and Tire Balance..................5-60
Wheel Replacement......................................5-60
Tire Chains..................................................5-62
Section 5 Service and Appearance Care
5-1
Page 311 of 420

If the level is below the bottom of the ®ller plug hole,
you may need to add some lubricant.
When the differential is cold, add enough lubricant to
raise the level to 1/2 inch (12 mm) below the ®ller
plug hole.
When the differential is at operating temperature
(warm), add enough lubricant to raise the level to the
bottom of the ®ller plug hole.
What to Use
Refer to the Maintenance Schedule to determine what
kind of lubricant to use. SeePart D: Recommended
Fluids and Lubricants on page 6-33.
Bulb Replacement
SeeReplacement Bulbs on page 5-52for the proper
types of bulbs to use. For any bulb changing procedure
not listed in this section, contact your GM dealer.
Halogen Bulbs
{CAUTION:
Halogen bulbs have pressurized gas inside
and can burst if you drop or scratch the bulb.
You or others could be injured. Be sure to read
and follow the instructions on the bulb
package.
5-47
Page 312 of 420

Headlamps
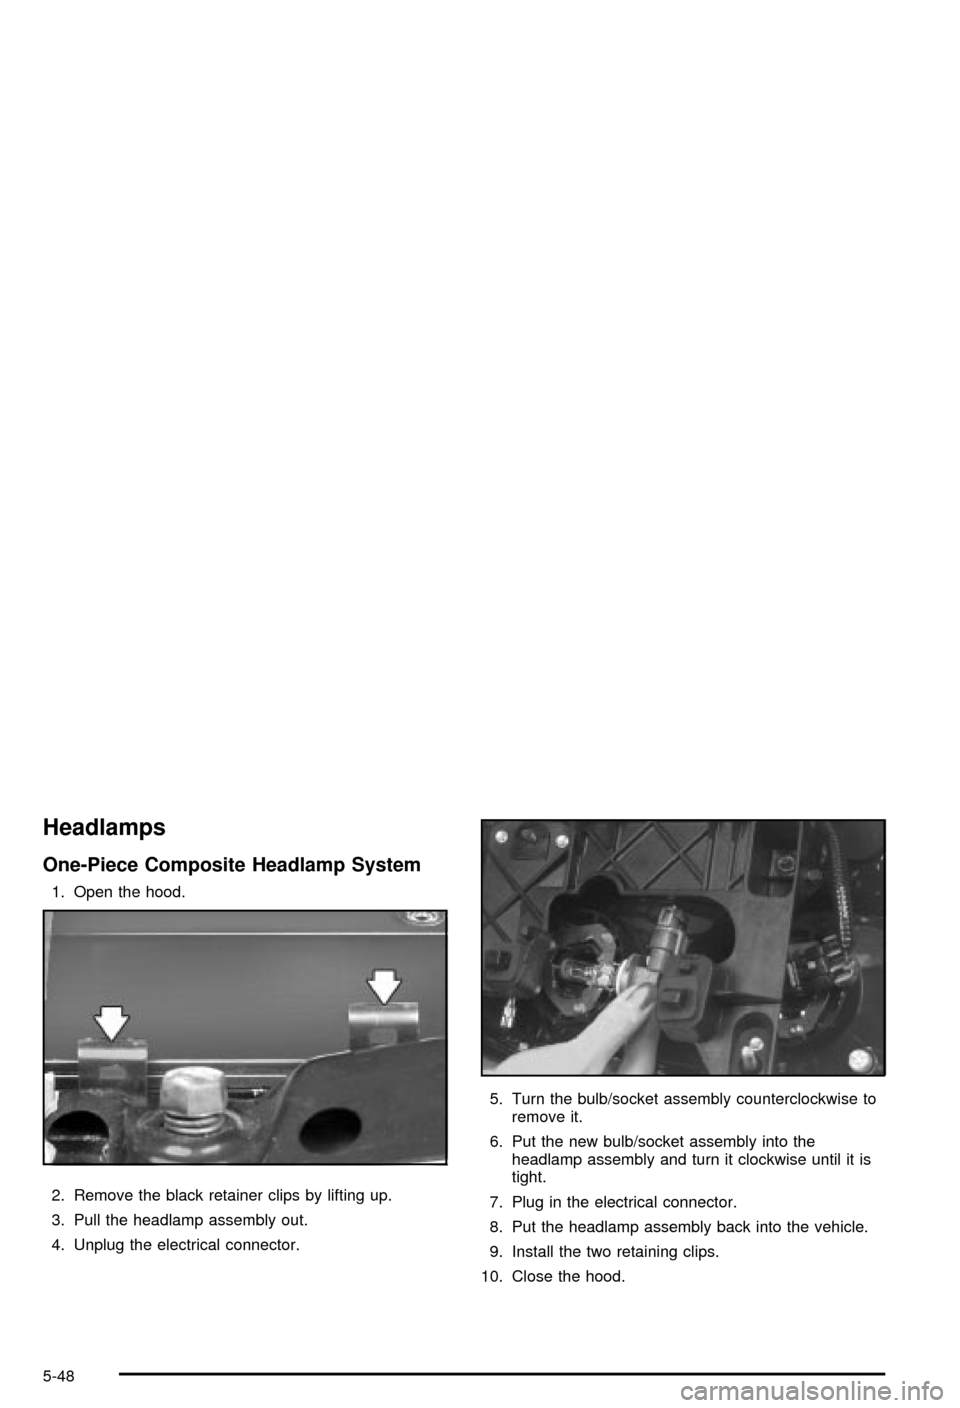
One-Piece Composite Headlamp System
1. Open the hood.
2. Remove the black retainer clips by lifting up.
3. Pull the headlamp assembly out.
4. Unplug the electrical connector.5. Turn the bulb/socket assembly counterclockwise to
remove it.
6. Put the new bulb/socket assembly into the
headlamp assembly and turn it clockwise until it is
tight.
7. Plug in the electrical connector.
8. Put the headlamp assembly back into the vehicle.
9. Install the two retaining clips.
10. Close the hood.
5-48
Page 313 of 420

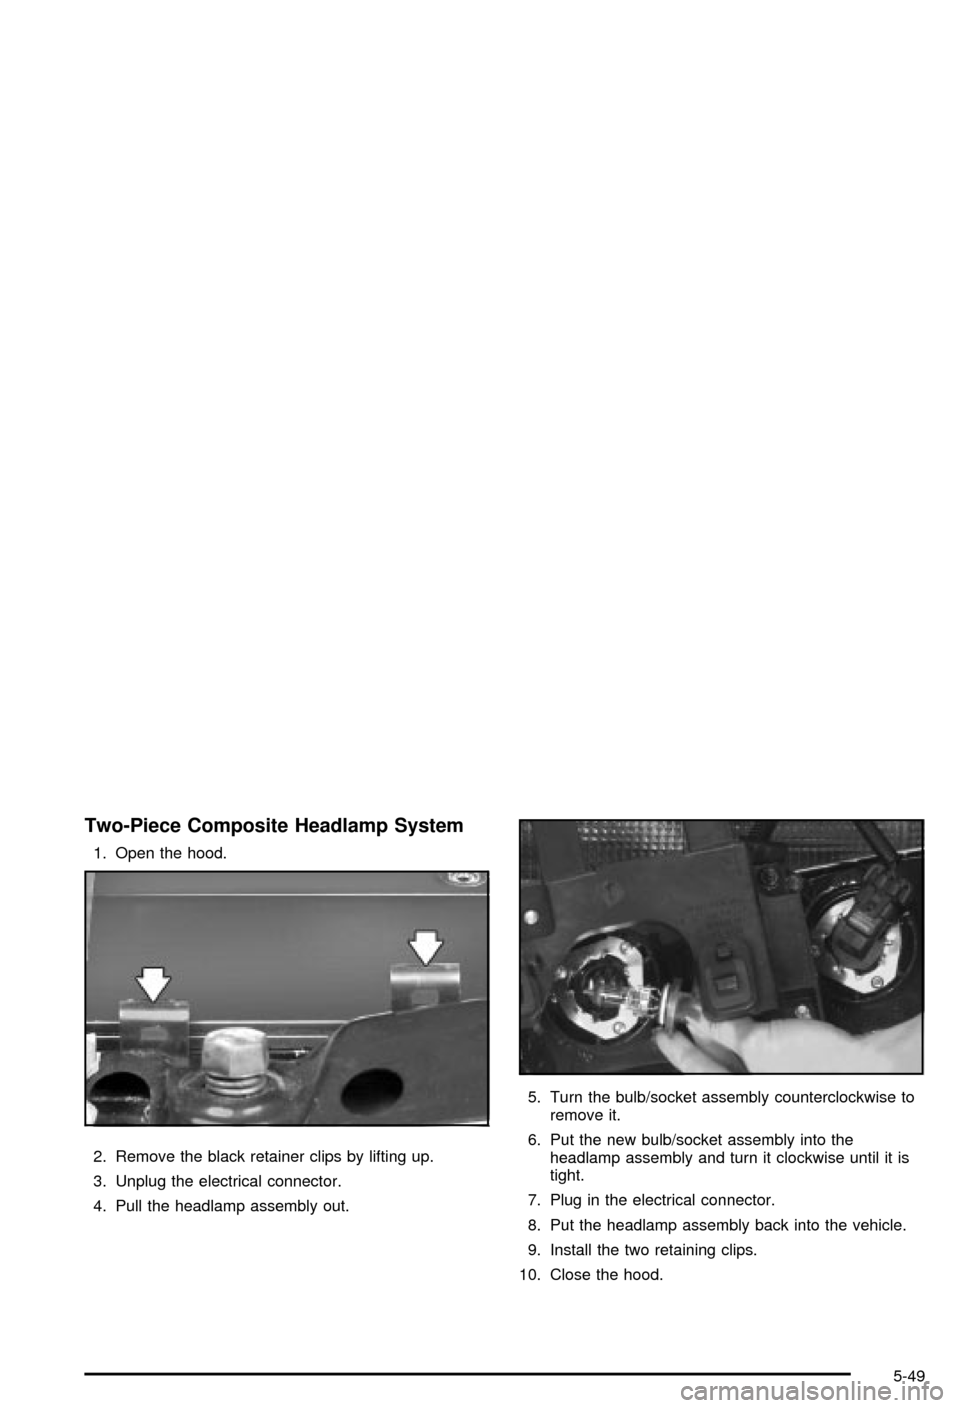
Two-Piece Composite Headlamp System
1. Open the hood.
2. Remove the black retainer clips by lifting up.
3. Unplug the electrical connector.
4. Pull the headlamp assembly out.5. Turn the bulb/socket assembly counterclockwise to
remove it.
6. Put the new bulb/socket assembly into the
headlamp assembly and turn it clockwise until it is
tight.
7. Plug in the electrical connector.
8. Put the headlamp assembly back into the vehicle.
9. Install the two retaining clips.
10. Close the hood.
5-49