2003 CHEVROLET AVALANCHE flat tire
[x] Cancel search: flat tirePage 410 of 492

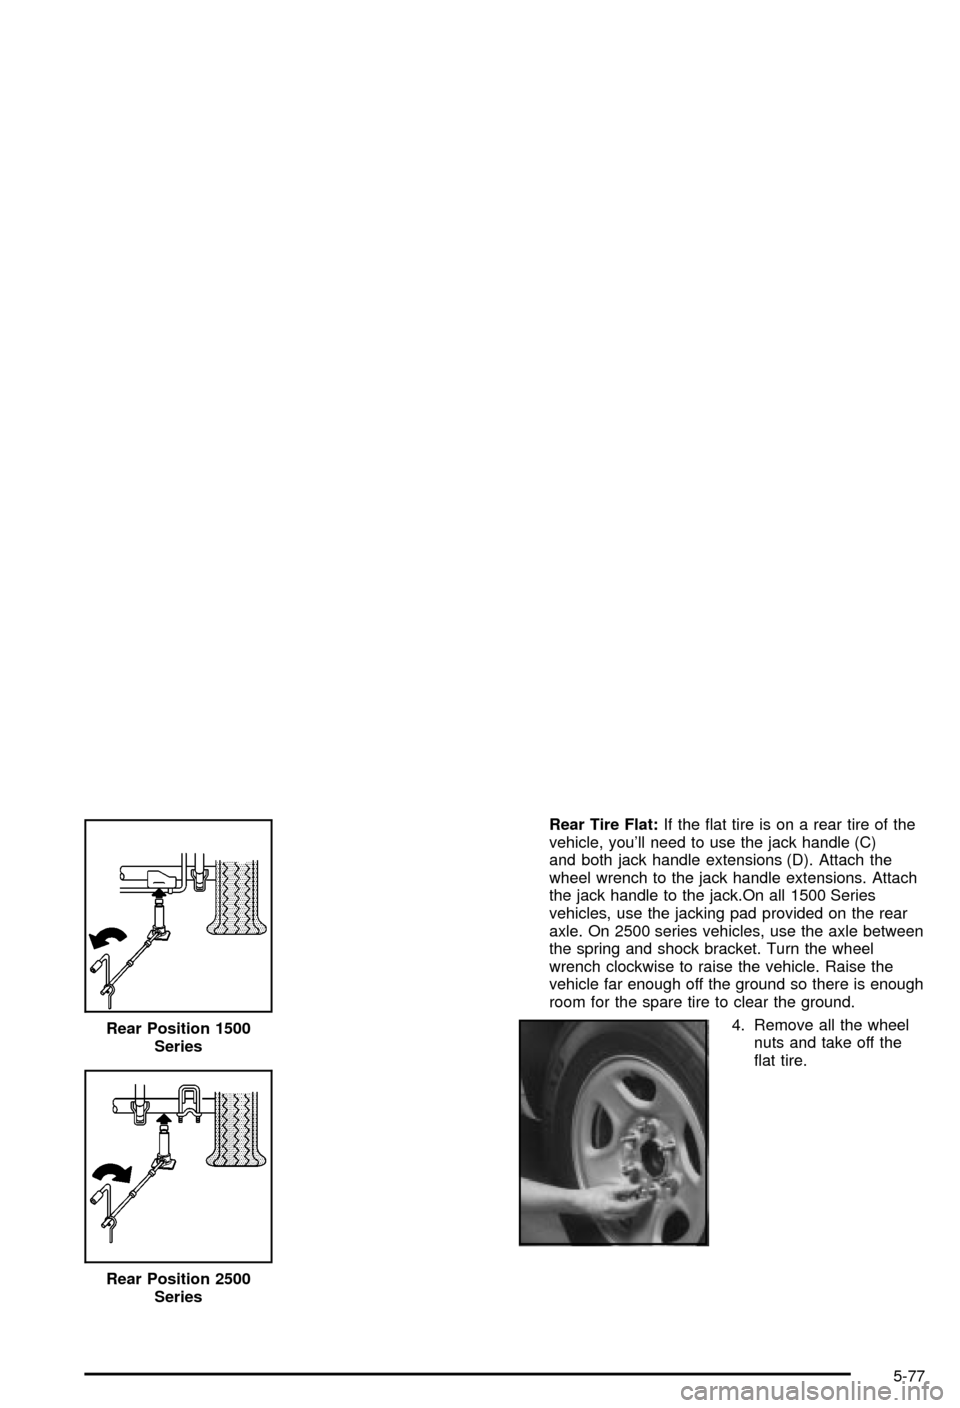
Rear Tire Flat:If the ¯at tire is on a rear tire of the
vehicle, you'll need to use the jack handle (C)
and both jack handle extensions (D). Attach the
wheel wrench to the jack handle extensions. Attach
the jack handle to the jack.On all 1500 Series
vehicles, use the jacking pad provided on the rear
axle. On 2500 series vehicles, use the axle between
the spring and shock bracket. Turn the wheel
wrench clockwise to raise the vehicle. Raise the
vehicle far enough off the ground so there is enough
room for the spare tire to clear the ground.
4. Remove all the wheel
nuts and take off the
¯at tire. Rear Position 1500
Series
Rear Position 2500
Series
5-77
Page 414 of 492

When you reinstall the full-size wheel and tire, you must
also reinstall the wheel cover with attached plastic
nuts, the plastic nut caps or the smooth center cap.
·If you are reinstalling a wheel cover with attached
plastic nuts, place it on the wheel and tighten the
nuts by hand to get them started. Then tighten
the nut caps with the wheel wrench until they are
snug. Do not overtighten the nut caps or they
may break.
·If you are reinstalling plastic nut caps, tighten the
nuts by hand to get them started. Then tighten
the nut caps with the wheel wrench until they are
snug. Do not overtighten the nut caps or they
may break.
·If you are reinstalling the smooth center cap, place
it on the wheel and tap it into place until it seats
¯ush with the wheel.
Storing a Flat or Spare Tire, Jack and
Tools
{CAUTION:
Storing a jack, a tire, or other equipment in the
passenger compartment of the vehicle could
cause injury. In a sudden stop or collision,
loose equipment could strike someone. Store
all these in the proper place.
Notice:An aluminum wheel with a ¯at tire should
always be stored under the vehicle with the
hoist. However, storing it that way for an extended
period of time could damage the wheel. To avoid
this, always stow the wheel properly with the valve
stem pointing down and have the wheel repaired
as soon as possible.
5-81
Page 417 of 492

To store the tools, follow these procedures:
1. Return the tools to the tool bag and place it back in
the Top-Box Storage unit.
2. Assemble wheel blocks and bottle jack together
with the wing nut.
3. Replace the jack cover and tighten the jack-cover
wingnuts.
Secondary Latch System
Your vehicle has an underbody mounted tire hoist
assembly equipped with a secondary latch system. It's
designed to stop the spare tire from suddenly falling
off your vehicle. For the secondary latch to work,
the spare must be installed with the valve stem pointing
down and toward the rear of the vehicle. See ªStoring
a Flat or Spare Tire, Jack and Toolsº earlier in this
section.
{CAUTION:
Before beginning this procedure read all the
instructions. Failure to read and follow the
instructions could damage the hoist assembly
and you and others could get hurt. Read and
follow the instructions listed below.To release the spare tire from the secondary latch do
the following:
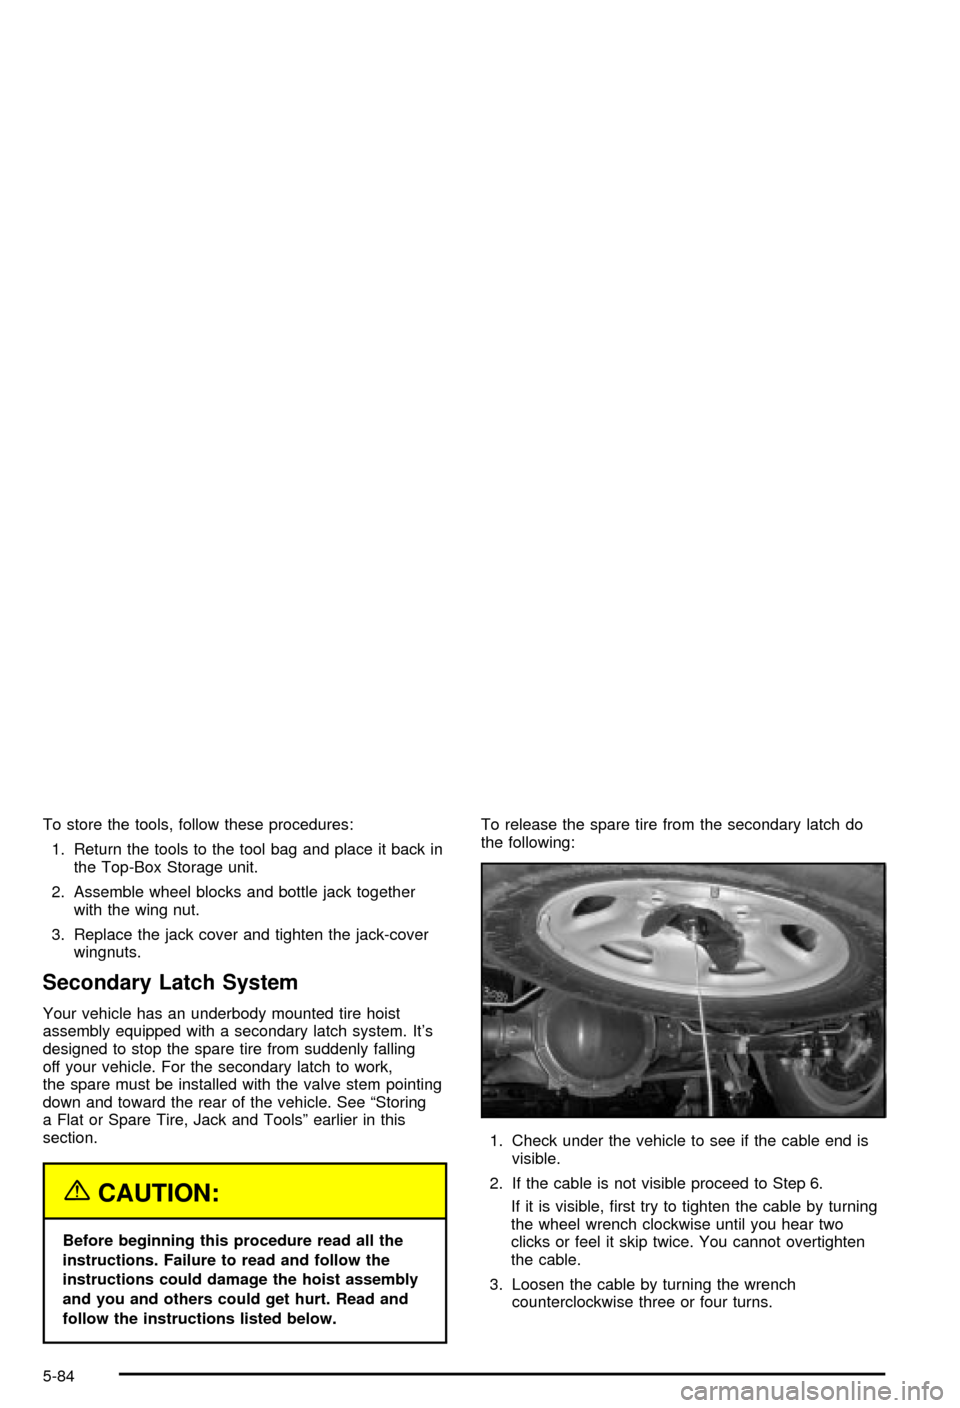
1. Check under the vehicle to see if the cable end is
visible.
2. If the cable is not visible proceed to Step 6.
If it is visible, ®rst try to tighten the cable by turning
the wheel wrench clockwise until you hear two
clicks or feel it skip twice. You cannot overtighten
the cable.
3. Loosen the cable by turning the wrench
counterclockwise three or four turns.
5-84
Page 420 of 492

13. Tilt the retainer at the
end of the cable and
pull it through the
wheel opening. Pull the
tire out from under
the vehicle.
14. If the cable is hanging under the vehicle, turn the
wheel wrench clockwise to raise the cable back up.
Have the hoist assembly inspected as soon as you can.
You will not be able to store a spare or ¯at tire using
the hoist assembly until it has been replaced.
To continue changing the ¯at tire, see ªRemoving the
Flat Tire and Installing the Spare Tireº earlier in
this section.Spare Tire
Your vehicle, when new, had a fully in¯ated spare tire.
A spare tire may lose air over time, so check its
in¯ation pressure regularly. See
In¯ation -- Tire Pressure
on page 5-62andLoading Your Vehicle on page 4-51for information regarding proper tire in¯ation and loading
your vehicle. For instruction on how to remove, install
or store a spare tire, see
Changing a Flat Tire on
page 5-70.
After installing the spare tire on your vehicle, you should
stop as soon as possible and make sure the spare is
correctly in¯ated. Have the damaged or ¯at road
tire repaired or replaced as soon as you can and
installed back onto your vehicle. This way, a spare tire
will be available in case you need it again.
If your vehicle has a spare tire that does not match your
vehicle's original road tires and wheels in size and
type, do not include the spare in the tire rotation.
5-87
Page 452 of 492

Windshield Washer Fluid Level Check
Check the windshield washer ¯uid level in the windshield
washer tank and add the proper ¯uid if necessary.
See
Windshield Washer Fluid on page 5-38for further
details.
At Least Once a Month
Tire In¯ation Check
Make sure tires are in¯ated to the correct pressures.
Don't forget to check your spare tire. SeeTires on
page 5-61for further details.
Cassette Tape Player Service
Clean cassette tape player. Cleaning should be done
every 50 hours of tape play. SeeAudio System(s)
on page 3-64for further details.
At Least Twice a Year
Restraint System Check
Make sure the safety belt reminder light and all your
belts, buckles, latch plates, retractors and anchorages
are working properly. Look for any other loose or
damaged safety belt system parts. If you see anythingthat might keep a safety belt system from doing its job,
have it repaired. Have any torn or frayed safety belts
replaced.
Also look for any opened or broken air bag coverings,
and have them repaired or replaced. (The air bag
system does not need regular maintenance.)
Wiper Blade Check
Inspect wiper blades for wear or cracking. Replace
blade inserts that appear worn or damaged or that
streak or miss areas of the windshield. Also see
Cleaning the Outside of Your Vehicle on page 5-91.
Spare Tire Check
At least twice a year, after the monthly in¯ation check of
the spare tire determines that the spare is in¯ated to
the correct tire in¯ation pressure, make sure that
the spare tire is stored securely. Push, pull, and then try
to rotate or turn the tire. If it moves, use the wheel
wrench/ratchet to tighten the cable. See
Changing a Flat
Tire on page 5-70.
6-11
Page 469 of 492

This program can also provide you with free resource
information, such as area driver assessment centers and
mobility equipment installers. The program is available
for a limited period of time from the date of vehicle
purchase/lease. See your dealer for more details or call
the GM Mobility Assistance Center at 1-800-323-9935.
Text telephone (TTY) users, call 1-800-833-9935.
GM of Canada also has a Mobility Program. Call
1-800-GM-DRIVE (463-7483) for details. All TTY users
call 1-800-263-3830.
Roadside Assistance Program
To enhance Chevrolet's strong commitment to customer
satisfaction, Chevrolet is excited to announce the
establishment of the Chevrolet Roadside Assistance
Center. As the owner of a 2003 Chevrolet, membership
in Roadside Assistance is free.
Roadside Assistance is available 24 hours a day,
365 days a year, by calling 1-800-CHEV-USA
(243-8872). This toll-free number will provide you
over-the-phone roadside assistance with minor
mechanical problems. If your problem cannot be
resolved over the phone, our advisors have access to a
nationwide network of dealer recommended service
providers. Roadside membership is free; however some
services may incur costs.Roadside offers two levels of service to the customer,
Basic CareandCourtesy Care:
RoadsideBasic Careprovides:
·Toll-free number, 1-800-CHEV-USA (243-8872),
text telephone (TTY) users, call 1-888-889-2438
·Free towing for warranty repairs
·Basic over-the-phone technical advice
·Available dealer services at reasonable costs (i.e.,
wrecker services, locksmith/key service, glass
repair, etc.)
Roadside
Courtesy Careprovides:
·RoadsideBasic Careservices (as outlined
previously)
Plus:
·FREE Non-Warranty Towing (to the closest dealer
from a legal roadway)
·FREE Locksmith/Key Service (when keys are lost
on the road or locked inside)
·FREE Flat Tire Service (spare installed on the road)
·FREE Jump Start (at home or on the road)
·FREE Fuel Delivery ($5 of fuel delivered on
the road)
7-6
Page 481 of 492

Engine (cont.)
Starting......................................................2-28
Entertainment System....................................3-103
Cleaning the Video Screen..........................3-103
DVD Distortion..........................................3-102
Entry Lighting.................................................3-17
Environmental Concerns..................................4-21
Erasing HomeLink
žButtons..............................2-58
Exit Lighting...................................................3-18
Extender, Safety Belt.......................................1-31
Exterior Lamps...............................................3-13
F
Filter.............................................................5-20
Engine Air Cleaner......................................5-20
Finding a PTY Station (RDS and XMŸ).....3-69, 3-80
Finding a Station....................................3-67, 3-78
Finish Care....................................................5-92
Finish Damage...............................................5-93
Fixed Mast Antenna.......................................3-103
Flash-to-Pass................................................... 3-8
Flat Tire, Changing.........................................5-70
Flat Tire........................................................5-69
Fluid.............................................................5-22
Automatic Transmission................................5-22
Power Steering...........................................5-36
Windshield Washer......................................5-38Fluid (cont.)
FM Stereo....................................................3-102
Fog Lamps....................................................3-15
Following Distance..........................................4-65
Footnotes........................................................ 6-5
Four-Wheel Drive....................................2-34, 5-50
Front Armrest Storage Area..............................2-59
Front Axle Locking Feature...............................2-34
Front Axle......................................................5-51
Frontal Air Bags.............................................1-57
Fuel Information Button....................................3-49
FUEL LEVEL LOW.........................................3-60
Fuel............................................................... 5-5
Additives...................................................... 5-6
California Fuel.............................................. 5-6
Filling a Portable Fuel Container..................... 5-9
Filling Your Tank........................................... 5-7
Fuels in Foreign Countries.............................. 5-7
Gage.........................................................3-45
Gasoline Octane........................................... 5-5
Gasoline Speci®cations.................................. 5-5
Low Warning Light.......................................3-45
System Inspection.......................................6-15
Fuses...........................................................5-97
Fuses and Circuit Breakers...........................5-97
Windshield Wiper.........................................5-97
6
Page 487 of 492

Reading Lamps..............................................3-18
Rear Axle......................................................5-49
Locking......................................................4-11
Rear Door Security Locks................................2-11
Rear Safety Belt Comfort Guides......................1-29
Rear Seat Audio Controls...............................3-100
Rear Seat Audio (RSA)....................................3-99
Rear Seat Entertainment System.......................3-90
Rear Seat Operation......................................... 1-8
Rear Seat Passengers, Safety Belts..................1-26
Rear Storage Area..........................................2-61
Rear Window Defogger............................3-25, 3-28
Rearview Mirror, Automatic Dimming with
Compass and Temperature Display................2-48
Rearview Mirror, Automatic Dimming with
OnStar
ž, Compass and Temperature Display . . . 2-46
Rearview Mirrors.............................................2-46
Reclining Seatbacks.......................................... 1-5
Recreational Vehicle Towing.............................4-48
REDUCED ENGINE POWER...........................3-58
Reinstalling the Cargo Cover Panels..................2-68
Remote Control..............................................3-93
Remote Keyless Entry System, Operation............ 2-5
Remote Keyless Entry System............................ 2-4
Removing the Flat Tire and Installing the
Spare Tire..................................................5-74
Removing the Front/Rear Rails and Bows..........2-81Removing the Spare Tire and Tools...................5-70
Removing the Tonneau Cover...........................2-78
Replacement Bulbs.........................................5-59
Replacing Brake System Parts..........................5-42
Replacing Restraint System Parts After a Crash.....1-67
Reporting Safety Defects.................................7-10
Canadian Government..................................7-10
General Motors...........................................7-11
United States Government............................7-10
Reprogramming a Single HomeLink
žButton.......2-58
Resetting Defaults...........................................2-58
Restraint System Check...................................6-11
Checking Your Restraint Systems...................1-67
Replacing Restraint System Parts After
a Crash..................................................1-67
Restraint Systems...........................................1-67
Checking....................................................1-67
Replacing Parts...........................................1-67
Retained Accessory Power (RAP)......................2-28
RFA # BATTERY LOW....................................3-62
Right Front Passenger Position, Safety Belts......1-24
RIGHT REAR DOOR AJAR..............................3-62
Roadside......................................................... 7-6
Assistance Program....................................... 7-6
Rocking Your Vehicle To Get It Out...................4-46
Running Your Engine While You Are Parked.......2-44
12