Page 309 of 382

Fuses and Circuit Breakers
The wiring circuits in your vehicle are protected from
short circuits by a combination of fuses, circuit breakers
and fusible thermal links. This greatly reduces the
chance of ®res caused by electrical problems.
Look at the silver-colored band inside the fuse. If the
band is broken or melted, replace the fuse. Be sure you
replace a bad fuse with a new one of the identical
size and rating.
Spare fuses and a fuse puller are located in the
underhood fuse block. You can remove fuses with the
fuse puller. Remember to replace any of the spare fuses
you use, so you will have some if you ever need them
again.
If you ever have a problem on the road and don't have
a spare fuse, you can borrow one that has the same
amperage. Just pick some feature of your vehicle
that you can get along without ± like the radio or
cigarette lighter ± and use its fuse, if it is the correct
amperage. Replace it as soon as you can.
There are two fuse blocks in your vehicle: one is inside
the vehicle and one is in the engine compartment.
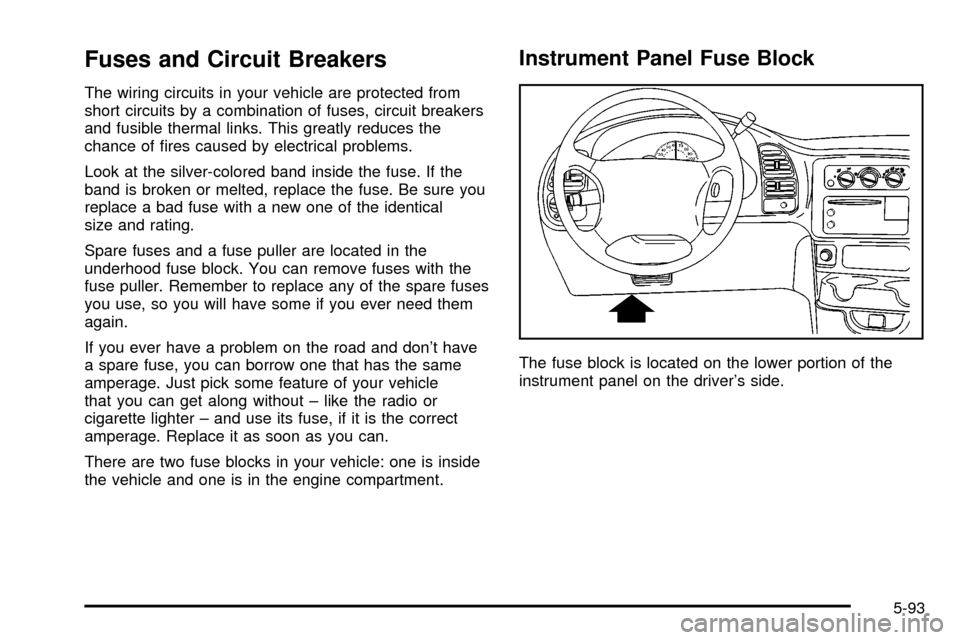
Instrument Panel Fuse Block
The fuse block is located on the lower portion of the
instrument panel on the driver's side.
5-93
Page 310 of 382
Fuse/Circuit
BreakerUsage
1Stop/Turn/Hazard Lamps, Center
High Mounted Stop Lamp, Anti-Lock
Brakes
2Radio Accy, Rear Seat Audio
ControlsFuse/Circuit
BreakerUsage
3Courtesy Lamps, Glove Box Lamp,
Dome Reading Lamps, Vanity Mirror
Lamps, Courtesy Lamps
4Daytime Running Lamps Relay,
Instrument Panel Cluster
5 Rear Defogger
6Cruise Module, Truck Body Control
Module, Instrument Panel Cluster,
Cruise Control Switch,
Electrochromic Mirror
7Power Outlets, DLC, Subwoofer
Ampli®er
8Crank Circuit Fuse, Park/Neutral
Switch, Starter Enabler Relay
9License Plate Lamp, Tailamps,
Parking Lamps, Ashtray Lamp,
Panel Lights, Trailer Taillamps, Front
and Rear Sidemarker Lamps, Door
Switch Illumination, Headlamp
Switch Illumination, Rear Seat Audio
Illumination, Truck Body
Control Module
5-94
Page 311 of 382

Fuse/Circuit
BreakerUsage
10 Air Bag System
11 Not Used
12L, M1, M2 Blower Motor, Rear Air
Conditioning Relay Coil, Front Cont.
Temp. Door Motor, HI Blower Relay,
Defogger Timer Coil
13Cigarette Lighter, Door Lock
Switches, Dutch Door Release
Module
14Cluster Illum, Climate Controls,
Chime Module, Radio Illumination,
Rear Heat Switch Illumination, Rear
Wiper/Washer Switch Illumination,
Rear Liftgate Switch Illumination,
Remote Cassette Illumination,
Overhead Console, Truck Body
Control Illumination
15Truck Body Module, Headlamp
Relay
16Front Turn Signals, Rear Turn
Signals, Trailer Turn Signals,
Back-Up Lamps, Brake
Transmission Shift Interlock SolenoidFuse/Circuit
BreakerUsage
17 Front Wipers, Front Washer Pump
18VCM-Ign 3, VCM-Brake, Cruise
Stepper Motor Signal, ATC Module
19Instrument Panel Radio: ATC (Main
Feed), 2000 Series (Standby)
20PRNDL/Odometer, TCC Enable and
PWM Solenoid, Shift A and Shift B
Solenoids, 3±2 Downshift Solenoid,
Instrument Panel Cluster, VCM
Module
21 Powr Adjust Mirrors
22 Not Used
23 Rear Wiper, Rear Washer Pump
24 Not Used
A(Circuit Breaker) Power Door Lock
Relay, 6±Way Power Seats
B (Circuit Breaker) Power Windows
5-95
Page 312 of 382
Underhood Fuse Block
The underhood fuse block is located toward the rear of
the engine compartment on the driver's side of the
vehicle.
Lift the hood and open the cover to gain access to this
fuse block.
A fuse puller is included in the underhood fuse block.
You will also ®nd spare fuses.Feed Usage
AUX B Up®tter Battery Feed
AUX A Up®tter Accessory Feed
5-96
Page 345 of 382

Wiper Blade Check
Inspect wiper blades for wear or cracking. Replace
blade inserts that appear worn or damaged or that
streak or miss areas of the windshield. Also see
Cleaning the Outside of Your Vehicle on page 5-86.
Spare Tire Check
At least twice a year, after the monthly in¯ation check of
the spare tire determines that the spare is in¯ated to
the correct tire in¯ation pressure, make sure that
the spare tire is stored securely. Push, pull, and then try
to rotate or turn the tire. If it moves, use the wheel
wrench to tighten the cable. See
Changing a Flat Tire
on page 5-71.
Weatherstrip Lubrication
Silicone grease on weatherstrips will make them last
longer, seal better, and not stick or squeak. Apply
silicone grease with a clean cloth. During very cold,
damp weather more frequent application may be
required. See
Part D: Recommended Fluids and
Lubricants on page 6-32.
Automatic Transmission Check
Check the transmission ¯uid level; add if needed. SeeAutomatic Transmission Fluid on page 5-25. A ¯uid loss
may indicate a problem. Check the system and repair
if needed.
At Least Once a Year
Key Lock Cylinders Service
Lubricate the key lock cylinders with the lubricant
speci®ed in Part D.
Body Lubrication Service
Lubricate all body door hinges, the body hood, fuel door
and rear compartment hinges, latches and locks
including interior glove box and console doors, hood
latch assembly, secondary latch, pivots, spring anchor,
release pawl and any moving seat hardware. Lubricate
the hood safety lever pivot and prop rod pivot. Part
D tells you what to use. More frequent lubrication may
be required when exposed to a corrosive environment.
6-27
Page 346 of 382

Starter Switch Check
{CAUTION:
When you are doing this check, the vehicle
could move suddenly. If it does, you or others
could be injured. Follow the steps below.
1. Before you start, be sure you have enough room
around the vehicle.
2. Firmly apply both the parking brake and the regular
brake. See
Parking Brake on page 2-26if
necessary.
Do not use the accelerator pedal, and be ready to
turn off the engine immediately if it starts.
3. Try to start the engine in each gear. The starter
should work only in PARK (P) or NEUTRAL (N).
If the starter works in any other position, your
vehicle needs service.
Automatic Transmission Shift Lock
Control System Check
{CAUTION:
When you are doing this check, the vehicle
could move suddenly. If it does, you or others
could be injured. Follow the steps below.
1. Before you start, be sure you have enough room
around the vehicle. It should be parked on a level
surface.
2. Firmly apply the parking brake. See
Parking Brake
on page 2-26if necessary.
Be ready to apply the regular brake immediately if
the vehicle begins to move.
3. With the engine off, turn the key to the RUN
position, but don't start the engine. Without applying
the regular brake, try to move the shift lever out
of PARK (P) with normal effort. If the shift lever
moves out of PARK (P), your vehicle needs service.
6-28
Page 347 of 382

Ignition Transmission Lock Check
While parked, and with the parking brake set, try to turn
the ignition key to LOCK in each shift lever position.
·The key should turn to LOCK only when the
shift lever is in PARK (P).
·The key should come out only in LOCK.
Parking Brake and Automatic
Transmission Park (P)
Mechanism Check
{CAUTION:
When you are doing this check, your vehicle
could begin to move. You or others could be
injured and property could be damaged. Make
sure there is room in front of your vehicle in
case it begins to roll. Be ready to apply the
regular brake at once should the vehicle begin
to move.Park on a fairly steep hill, with the vehicle facing
downhill. Keeping your foot on the regular brake, set the
parking brake.
·To check the parking brake's holding ability: With
the engine running and transmission in NEUTRAL
(N), slowly remove foot pressure from the regular
brake pedal. Do this until the vehicle is held by the
parking brake only.
·To check the PARK (P) mechanism's holding
ability: With the engine running, shift to PARK (P).
Then release the parking brake followed by the
regular brake.
Underbody Flushing Service
At least every spring, use plain water to ¯ush any
corrosive materials from the underbody. Take care to
clean thoroughly any areas where mud and other debris
can collect.
6-29
Page 350 of 382

Part D: Recommended Fluids
and Lubricants
Fluids and lubricants identi®ed below by name, part
number or speci®cation may be obtained from your
dealer.
Usage Fluid/Lubricant
Engine OilEngine oil with the American
Petroleum Institute Certi®ed for
Gasoline Engines starburst symbol
of the proper viscosity. To
determine the preferred viscosity for
your vehicle's engine, see
Engine
Oil on page 5-15.
Engine Coolant50/50 mixture of clean, drinkable
water and use only
DEX-COOL
žCoolant. SeeEngine
Coolant on page 5-28.
Hydraulic Brake
SystemDelco Supreme 11 Brake Fluid or
equivalent DOT-3 brake ¯uid.
Windshield
Washer SolventGM Optikleen
žWasher Solvent or
equivalent.
Parking Brake
Cable GuidesChassis Lubricant (GM Part No.
U.S. 12377985, in Canada
88901242, or equivalent) or
lubricant meeting requirements of
NLGI #2, Category LB or GC-LB.
Usage Fluid/Lubricant
Power Steering
SystemGM Power Steering Fluid (GM Part
No. U.S. 1052884, in Canada
993294, or equivalent).
Automatic
TransmissionDEXRON
ž-III Automatic
Transmission Fluid.
Key Lock
CylindersMulti-Purpose Lubricant, Superlube
(GM Part No. U.S. 12346241, in
Canada 10953474, or equivalent).
Chassis
LubricationChassis Lubricant (GM Part No.
U.S. 12377985, in Canada
88901242, or equivalent) or
lubricant meeting requirements of
NLGI #2, Category LB or GC-LB.
Front Wheel
BearingsWheel bearing lubricant meeting
requirements of NLGI #2, Category
GC or GC-LB (GM Part No. U.S.
1051344, in Canada 993037, or
equivalent).
6-32