Page 322 of 486

Tires..............................................................5-66
In¯ation -- Tire Pressure................................5-67
Tire Inspection and Rotation...........................5-68
When It Is Time for New Tires.......................5-69
Buying New Tires.........................................5-70
Uniform Tire Quality Grading..........................5-71
Wheel Alignment and Tire Balance..................5-72
Wheel Replacement......................................5-73
Tire Chains..................................................5-74
If a Tire Goes Flat........................................5-75
Changing a Flat Tire.....................................5-76
Spare Tire...................................................5-93
Appearance Care............................................5-94
Cleaning the Inside of Your Vehicle.................5-94
Care of Safety Belts......................................5-96
Weatherstrips...............................................5-96
Cleaning the Outside of Your Vehicle..............5-97Sheet Metal Damage.....................................5-99
Finish Damage...........................................5-100
Underbody Maintenance...............................5-100
Chemical Paint Spotting...............................5-100
Vehicle Care/Appearance Materials................5-100
Vehicle Identi®cation.....................................5-102
Vehicle Identi®cation Number (VIN)................5-102
Service Parts Identi®cation Label...................5-102
Electrical System..........................................5-102
Windshield Wiper Fuses...............................5-103
Power Windows and Other Power Options......5-103
Fuses and Circuit Breakers..........................5-103
Capacities and Speci®cations........................5-112
Capacities and Speci®cations........................5-112
Normal Maintenance Replacement Parts.........5-114
Section 5 Service and Appearance Care
5-2
Page 388 of 486

Tire Inspection and Rotation
Tires should be rotated every 7,500 miles (12,500 km).
Any time you notice unusual wear, rotate your tires
as soon as possible and check wheel alignment. Also
check for damaged tires or wheels. See
When It Is Time
for New Tires on page 5-69andWheel Replacement
on page 5-73for more information.
Make sure the spare tire is stored securely. Push, pull,
and then try to rotate or turn the tire. If it moves,
use the wheel wrench and jack handle extensions to
tighten the cable. See
Changing a Flat Tire on
page 5-76.
The purpose of regular rotation is to achieve more
uniform wear for all tires on the vehicle. The ®rst rotation
is the most important. See ªPart A: Scheduled
Maintenance Services,º in Section 6, for scheduled
rotation intervals.When rotating your tires, always use the correct rotation
pattern shown here.
Don't include the spare tire in your tire rotation.
After the tires have been rotated, adjust the front and
rear in¯ation pressures as shown on the
Certi®cation/Tire label. Make certain that all wheel nuts
are properly tightened. See ªWheel Nut Torqueº
under
Capacities and Speci®cations on page 5-112.
5-68
Page 390 of 486

Buying New Tires
To ®nd out what kind and size of tires you need, look at
the Certi®cation/Tire label.
The tires installed on your vehicle when it was new had
a Tire Performance Criteria Speci®cations (TPC
Spec) number on each tire's sidewall. When you get
new tires, get ones with that same TPC Spec number.
That way your vehicle will continue to have tires
that are designed to give proper endurance, handling,
speed rating, traction, ride and other things during
normal service on your vehicle. If your tires have an
all-season tread design, the TPC number will be
followed by an ªMSº (for mud and snow).
If you ever replace your tires with those not having a
TPC Spec number, make sure they are the same size,
load range, speed rating and construction type (bias,
bias-belted or radial) as your original tires.{CAUTION:
Mixing tires could cause you to lose control
while driving. If you mix tires of different sizes
or types (radial and bias-belted tires), the
vehicle may not handle properly, and you
could have a crash. Using tires of different
sizes may also cause damage to your vehicle.
Be sure to use the same size and type tires on
all wheels. If your vehicle has 17 inch road
tires (those originally installed on your vehicle)
it is all right to drive with the 16 inch spare tire
that came with your vehicle. When new, your
vehicle included a spare tire and wheel
assembly with the same overall diameter as
your vehicle's road tires and wheels. Because
this spare tire was developed for use on your
vehicle, it will not affect vehicle handling or
cause damage to your vehicle.
5-70
Page 391 of 486

{CAUTION:
If you use bias-ply tires on your vehicle, the
wheel rim ¯anges could develop cracks after
many miles of driving. A tire and/or wheel
could fail suddenly, causing a crash. Use only
radial-ply tires with the wheels on your vehicle.
Uniform Tire Quality Grading
Quality grades can be found where applicable on the
tire sidewall between tread shoulder and maximum
section width. For example:
Treadwear 200 Traction AA Temperature A
The following information relates to the system
developed by the United States National Highway
Traffic Safety Administration, which grades tires by
treadwear, traction and temperature performance. (This
applies only to vehicles sold in the United States.)
The grades are molded on the sidewalls of most
passenger car tires. The Uniform Tire Quality Grading
system does not apply to deep tread, winter-typesnow tires, space-saver or temporary use spare tires,
tires with nominal rim diameters of 10 to 12 inches
(25 to 30 cm), or to some limited-production tires.
While the tires available on General Motors passenger
cars and light trucks may vary with respect to these
grades, they must also conform to federal safety
requirements and additional General Motors Tire
Performance Criteria (TPC) standards.
Treadwear
The treadwear grade is a comparative rating based on
the wear rate of the tire when tested under controlled
conditions on a speci®ed government test course.
For example, a tire graded 150 would wear one and
a half (1.5) times as well on the government course as
a tire graded 100. The relative performance of tires
depends upon the actual conditions of their use,
however, and may depart signi®cantly from the norm
due to variations in driving habits, service practices and
differences in road characteristics and climate.
5-71
Page 397 of 486
Removing the Spare Tire and Tools
A. Tool Kit with Jack
Tools and Gloves
B. Retaining Bracket
and Wing NutC. Wing Nut Holding
Tire Blocks
D. Tire Blocks
E. Bottle JackA. Bottle Jack
B. Wheel Blocks
C. Wing Nut Holding
Tire Blocks
D. Mounting BracketE. Removable Tray
F. Retaining Hook
G. Retaining Bracket
and Wing Nut
H. Tool Kit with Jack
Tools and Gloves Escalade (Rear Access Panel)Escalade ESV
5-77
Page 398 of 486

For Escalade, the equipment is located behind the left
trim panel in the rear of the vehicle. Unlatch the release
lever to open the trim panel door. Skip the ®rst step
and follow the last three.
For Escalade ESV, the equipment you'll need is under
the storage tray in the left trim panel.
1. Remove the tray to access the tools.
2. To release the bottle jack from its holder, turn the
knob on the bottle jack counterclockwise to lower
the jack head.
3. There is a wing nut used to retain the tool kit. To
remove it, turn the wing nut counterclockwise.
4. The wheel blocks and the wheel block retainer can
be removed by turning the wing nut
counterclockwise.
You'll use the jack handle extensions and the wheel
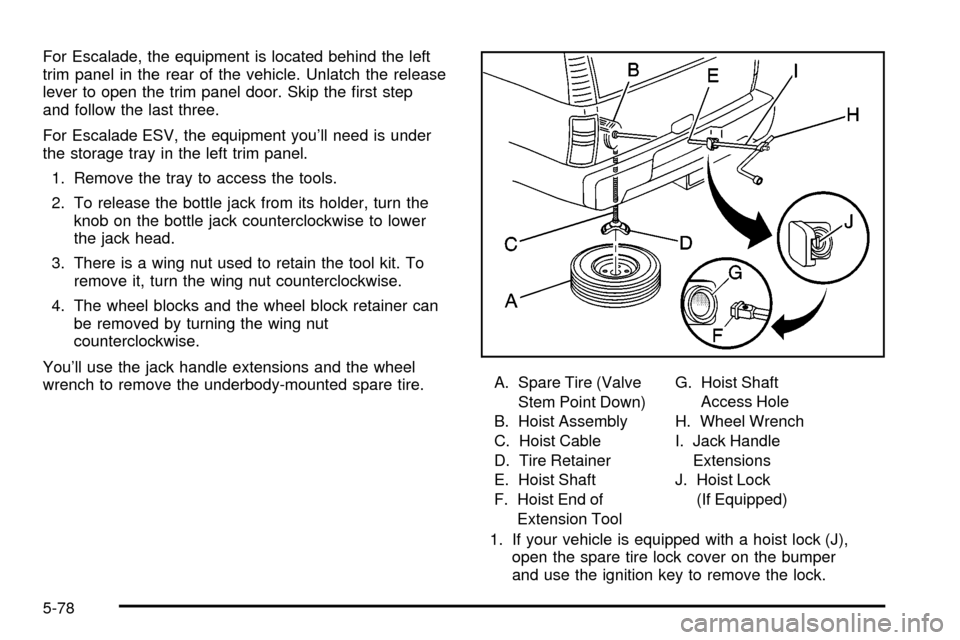
wrench to remove the underbody-mounted spare tire.A. Spare Tire (Valve
Stem Point Down)
B. Hoist Assembly
C. Hoist Cable
D. Tire Retainer
E. Hoist Shaft
F. Hoist End of
Extension ToolG. Hoist Shaft
Access Hole
H. Wheel Wrench
I. Jack Handle
Extensions
J. Hoist Lock
(If Equipped)
1. If your vehicle is equipped with a hoist lock (J),
open the spare tire lock cover on the bumper
and use the ignition key to remove the lock.
5-78
Page 399 of 486
2. Assemble the wheel wrench (H) and the two jack
handle extensions (I) as shown.3. Insert the hoist end
(open end) (F) of the
extension through
the hole (G) in the rear
bumper.
Be sure the hoist end of the extension connects to
the hoist shaft (E). The ribbed square end of the
extension is used to lower the spare tire.
4. Turn the wheel wrench (H) counterclockwise to
lower the spare tire to the ground. Continue to
turn the wheel wrench until the spare tire can be
pulled out from under the vehicle.
If the spare tire does not lower to the ground, the
secondary latch is engaged and preventing the
tire from lowering. See ªSecondary Latch Systemº
later in this section for instructions on lowering
the spare tire.
5-79
Page 400 of 486
The wheel wrench has a
hook that allows you to
pull the hoist cable towards
you to assist in reaching
the spare tire.
5. When the tire has been
lowered, tilt the
retainer (D) at the end
of the cable so it
can be pulled up
through the wheel
opening.
6. Put the spare tire near the ¯at tire.Removing the Flat Tire and Installing
the Spare Tire
Use the following pictures and instructions to remove
the ¯at tire and raise the vehicle.
The tools you'll be using include the bottle jack (A), the
wheel blocks (B), the jack handle (C), the jack handle
extensions (D), and the wheel wrench (E).
5-80