2003 BUICK PARK AVENUE height
[x] Cancel search: heightPage 38 of 372

Q:What are the different types of add-on child
restraints?
A:Add-on child restraints, which are purchased by
the vehicle's owner, are available in four basic
types. Selection of a particular restraint should take
into consideration not only the child's weight,
height, and age but also whether or not the
restraint will be compatible with the motor vehicle
in which it will be used.
For most basic types of child restraints, there are
many different models available. When purchasing a
child restraint, be sure it is designed to be used
in a motor vehicle. If it is, the restraint will have a
label saying that it meets federal motor vehicle
safety standards.
The restraint manufacturer's instructions that come
with the restraint state the weight and height
limitations for a particular child restraint. In addition,
there are many kinds of restraints available for
children with special needs.
{CAUTION:
Newborn infants need complete support,
including support for the head and neck. This
is necessary because a newborn infant's neck
is weak and its head weighs so much
compared with the rest of its body. In a crash,
an infant in a rear-facing seat settles into the
restraint, so the crash forces can be
distributed across the strongest part of an
infant's body, the back and shoulders. Infants
always should be secured in appropriate infant
restraints.
1-32
Page 107 of 372

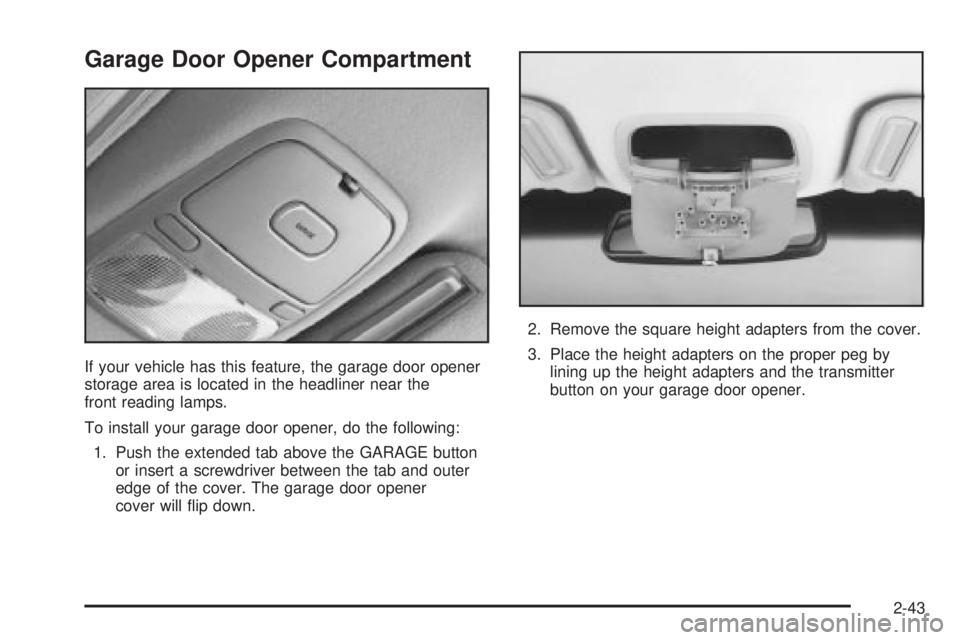
Garage Door Opener Compartment
If your vehicle has this feature, the garage door opener
storage area is located in the headliner near the
front reading lamps.
To install your garage door opener, do the following:
1. Push the extended tab above the GARAGE button
or insert a screwdriver between the tab and outer
edge of the cover. The garage door opener
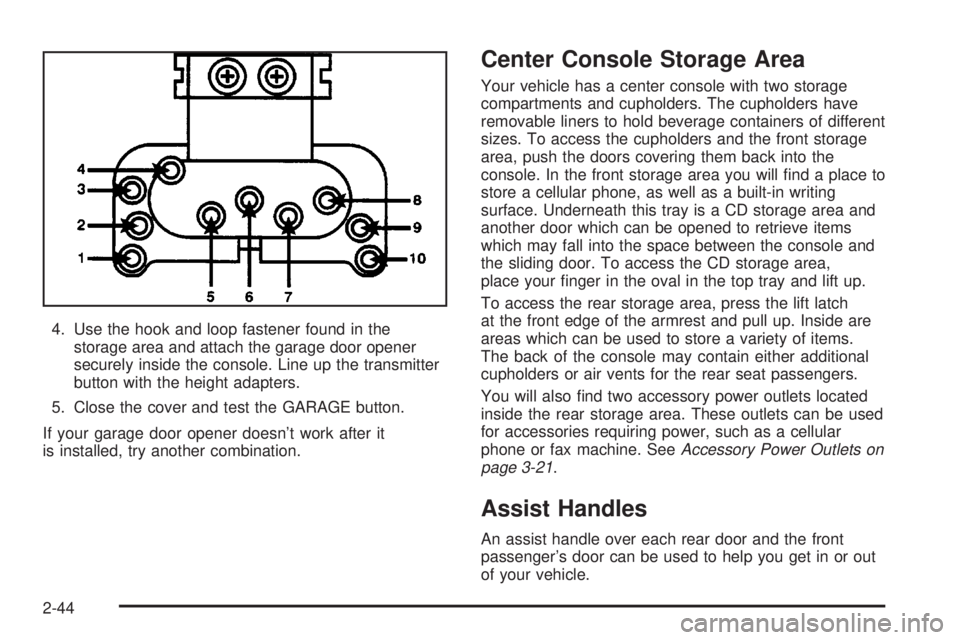
cover will ¯ip down.2. Remove the square height adapters from the cover.
3. Place the height adapters on the proper peg by
lining up the height adapters and the transmitter
button on your garage door opener.
2-43
Page 108 of 372

4. Use the hook and loop fastener found in the
storage area and attach the garage door opener
securely inside the console. Line up the transmitter
button with the height adapters.
5. Close the cover and test the GARAGE button.
If your garage door opener doesn't work after it
is installed, try another combination.
Center Console Storage Area
Your vehicle has a center console with two storage
compartments and cupholders. The cupholders have
removable liners to hold beverage containers of different
sizes. To access the cupholders and the front storage
area, push the doors covering them back into the
console. In the front storage area you will ®nd a place to
store a cellular phone, as well as a built-in writing
surface. Underneath this tray is a CD storage area and
another door which can be opened to retrieve items
which may fall into the space between the console and
the sliding door. To access the CD storage area,
place your ®nger in the oval in the top tray and lift up.
To access the rear storage area, press the lift latch
at the front edge of the armrest and pull up. Inside are
areas which can be used to store a variety of items.
The back of the console may contain either additional
cupholders or air vents for the rear seat passengers.
You will also ®nd two accessory power outlets located
inside the rear storage area. These outlets can be used
for accessories requiring power, such as a cellular
phone or fax machine. See
Accessory Power Outlets on
page 3-21.
Assist Handles
An assist handle over each rear door and the front
passenger's door can be used to help you get in or out
of your vehicle.
2-44
Page 130 of 372

The HUD shows these images when they are lighted on
the instrument panel cluster.
Be sure to continue scanning your displays, controls
and driving environment just as you would in a vehicle
without HUD. If you never look at your instrument
panel, you may not see something important, such as a
warning light.
Notice:Although the HUD image appears to be
near the front of the vehicle, do not use it as
a parking aid. The HUD was not designed for that
purpose. If you try to use it as such, you may
misjudge the distance and damage your vehicle.
The HUD controls are
located in the overhead
console.
1. Start your engine and slide the HUD dimmer switch
all the way up.
The brightness of the HUD image is determined by
whether the headlamps are on or off, and where
you have the HUD dimmer switch set.
2. Adjust the seat to a comfortable driving position.
Keep pressing the top arrow on the image height
adjuster to raise the image as far as possible.
3-18
Page 131 of 372

3. Keep pressing the bottom arrow on the image
height adjuster to move the image as low as
possible, while still keeping it in full view.
4. Slide the dimmer switch downward until the HUD
image is no brighter than necessary.
To turn the HUD display off, slide the dimmer switch all
the way down.
If the sun comes out, the sky becomes cloudy, or if you
turn your headlamps on, you may need to adjust the
HUD brightness using the dimmer switch. Polarized
sunglasses could make the HUD image harder to see.
To change the display from English to metric units,
push the ENG/MET button located to the left of
the steering column.
Care of the HUD
Clean the inside of the windshield as necessary to
remove any dirt or ®lm that reduces the sharpness or
clarity of the HUD image.
To clean the HUD lens, spray household glass cleaner
on a soft, clean cloth. Gently wipe and dry the HUD
lens. Do not spray cleaner directly on the lens to avoid
cleaner leaking inside the unit.
If You Can't See The HUD Image When
the Ignition is On
If the ignition is on and you can't see the HUD image,
check to see if:
·The headlamps are on.
·Something is covering the HUD unit.
·The HUD dimmer control is adjusted properly.
·The HUD image is adjusted to the proper height.
·A fuse is blown. SeeFuses and Circuit Breakers on
page 5-87
.
Keep in mind that your windshield is part of the HUD
system. If you ever have to have your windshield
replaced, be sure to get one that is designed for HUD
or your HUD image may look blurred or out of focus.
Ultrasonic Rear Parking
Assist (URPA)
If your vehicle has this feature, ultrasonic rear parking
assist can help you to determine how close an object is
to your rear bumper within a given area, making
parking easier.
3-19
Page 262 of 372

Some driving conditions or climates may cause a brake
squeal when the brakes are ®rst applied or lightly
applied. This does not mean something is wrong with
your brakes.
Properly torqued wheel nuts are necessary to help
prevent brake pulsation. When tires are rotated, inspect
brake pads for wear and evenly tighten wheel nuts in
the proper sequence to GM torque speci®cations.
Brake linings should always be replaced as complete
axle sets.
See
Brake System Inspection on page 6-24.
Brake Pedal Travel
See your dealer if the brake pedal does not return to
normal height, or if there is a rapid increase in
pedal travel. This could be a sign of brake trouble.
Brake Adjustment
Every time you apply the brakes, with or without the
vehicle moving, your brakes adjust for wear.
Replacing Brake System Parts
The braking system on a vehicle is complex. Its many
parts have to be of top quality and work well together if
the vehicle is to have really good braking. Your
vehicle was designed and tested with top-quality GMbrake parts. When you replace parts of your braking
system Ð for example, when your brake linings
wear down and you need new ones put in Ð be sure
you get new approved GM replacement parts. If
you don't, your brakes may no longer work properly. For
example, if someone puts in brake linings that are
wrong for your vehicle, the balance between your front
and rear brakes can change Ð for the worse. The
braking performance you've come to expect can change
in many other ways if someone puts in the wrong
replacement brake parts.
Battery
Your new vehicle comes with a maintenance free
ACDelcožbattery. When it's time for a new battery, get
one that has the replacement number shown on the
original battery's label. We recommend an ACDelco
ž
battery. SeeEngine Compartment Overview on
page 5-12for battery location.
Warning:Battery posts, terminals and related
accessories contain lead and lead compounds,
chemicals known to the State of California to cause
cancer and reproductive harm. Wash hands after
handling.
5-42
Page 287 of 372

{CAUTION:
Using the wrong replacement wheels, wheel
bolts or wheel nuts on your vehicle can be
dangerous. It could affect the braking and
handling of your vehicle, make your tires lose
air and make you lose control. You could have
a collision in which you or others could be
injured. Always use the correct wheel, wheel
bolts and wheel nuts for replacement.
Notice:The wrong wheel can also cause problems
with bearing life, brake cooling, speedometer or
odometer calibration, headlamp aim, bumper height,
vehicle ground clearance and tire or tire chain
clearance to the body and chassis.
See
Changing a Flat Tire on page 5-69for more
information.
Used Replacement Wheels
{CAUTION:
Putting a used wheel on your vehicle is
dangerous. You can't know how it's been used
or how far it's been driven. It could fail
suddenly and cause a crash. If you have to
replace a wheel, use a new GM original
equipment wheel.
5-67