2003 BUICK LESABRE clock
[x] Cancel search: clockPage 71 of 380

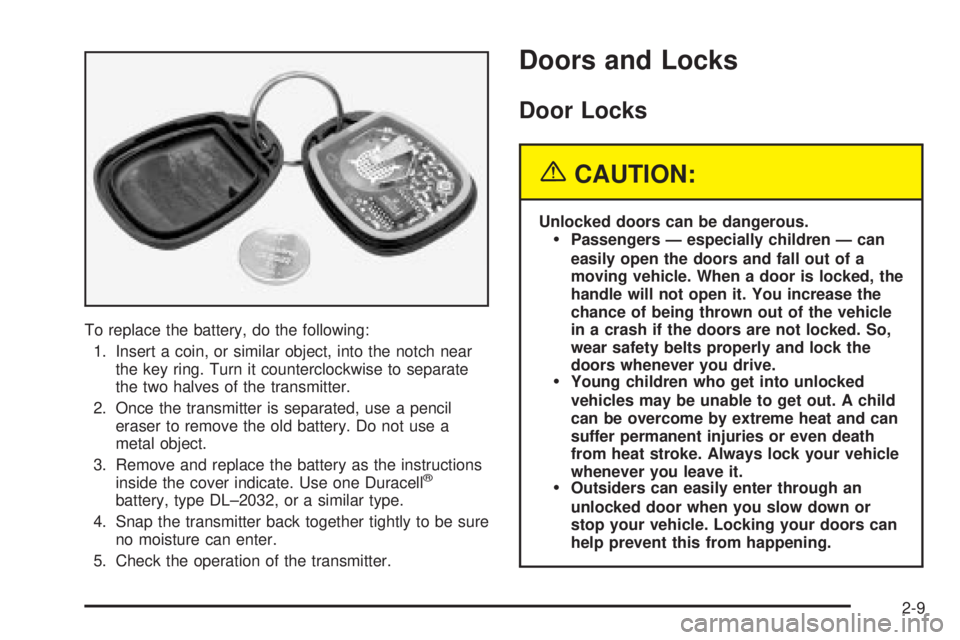
To replace the battery, do the following:
1. Insert a coin, or similar object, into the notch near
the key ring. Turn it counterclockwise to separate
the two halves of the transmitter.
2. Once the transmitter is separated, use a pencil
eraser to remove the old battery. Do not use a
metal object.
3. Remove and replace the battery as the instructions
inside the cover indicate. Use one Duracell
ž
battery, type DL±2032, or a similar type.
4. Snap the transmitter back together tightly to be sure
no moisture can enter.
5. Check the operation of the transmitter.
Doors and Locks
Door Locks
{CAUTION:
Unlocked doors can be dangerous.
·Passengers Ð especially children Ð can
easily open the doors and fall out of a
moving vehicle. When a door is locked, the
handle will not open it. You increase the
chance of being thrown out of the vehicle
in a crash if the doors are not locked. So,
wear safety belts properly and lock the
doors whenever you drive.
·Young children who get into unlocked
vehicles may be unable to get out. A child
can be overcome by extreme heat and can
suffer permanent injuries or even death
from heat stroke. Always lock your vehicle
whenever you leave it.
·Outsiders can easily enter through an
unlocked door when you slow down or
stop your vehicle. Locking your doors can
help prevent this from happening.
2-9
Page 76 of 380

Trunk
{CAUTION:
It can be dangerous to drive with the trunk lid
open because carbon monoxide (CO) gas can
come into your vehicle. You can't see or smell
CO. It can cause unconsciousness and even
death. If you must drive with the trunk lid open
or if electrical wiring or other cable
connections must pass through the seal
between the body and the trunk lid:
·Make sure all other windows are shut.
·Turn the fan on your heating or cooling
system to its highest speed and select the
control setting that will force outside air
into your vehicle. See ªClimate Control
Systemº in the Index.
·If you have air outlets on or under the
instrument panel, open them all the way.
See ªEngine Exhaustº in the Index.
Trunk Lock Release
To unlock the trunk from the outside, insert the master
key and turn it clockwise.
Remote Trunk Release Lockout
The TRUNK release button
is located on the driver's
door trim map pocket.
Push this button to open the trunk. The transaxle must
be in PARK (P) or NEUTRAL (N) for the remote
trunk release button to work.
To lock the trunk from inside your vehicle, insert the
master key and turn it clockwise to LOCK. The VALET
key will not work in this procedure.
2-14
Page 85 of 380

Key Reminder Warning
If you leave your key in OFF, you will hear a warning
chime when you open the driver's door.
Always leave your key in LOCK while the engine is off.
If you leave it in any other position, you will drain
your battery power.
Retained Accessory Power (RAP)
After you turn the ignition off and remove the key, you
will still have power to such accessories as the
power windows, audio steering wheel controls (if
equipped), clock, sunroof (if equipped) and the radio for
up to 10 minutes. The instrument panel cluster lights
will stay on for a few seconds, then will go out. Once you
open a door, the power will shut off.
Starting Your Engine
Move your shift lever to PARK (P) or NEUTRAL (N).
Your engine won't start in any other position ± that's a
safety feature. To restart when you're already moving,
use NEUTRAL (N) only.
Notice:Don't try to shift to PARK (P) if your
vehicle is moving. If you do, you could damage the
transaxle. Shift to PARK (P) only when your
vehicle is stopped.
1. With your foot off the accelerator pedal, turn your
ignition key to START. When the engine starts, let
go of the key. The idle speed will go down as
your engine gets warm.
Notice:Holding your key in START for longer than
15 seconds at a time will cause your battery to
be drained much sooner. And the excessive heat
can damage your starter motor. Wait about 15
seconds between each try to help avoid draining
your battery or damaging your starter.
2. If it doesn't start within 10 seconds, hold your key in
START for about 10 seconds at a time until your
engine starts. Wait about 15 seconds between
each try.
3. If your engine still won't start (or starts but then
stops), it could be ¯ooded with too much gasoline.
Try pushing your accelerator pedal all the way to the
¯oor and holding it there as you hold the key in
START for about three seconds. If the vehicle starts
brie¯y but then stops again, do the same thing.
This time keep the pedal down for ®ve or six
seconds to clear the extra gasoline from the engine.
After waiting about 15 seconds, repeat the normal
starting procedure.
2-23
Page 179 of 380

Cassette Tape Messages
If an error message appears while trying to play a
cassette tape, it could be for one of the following
reasons:
·TIGHT TAPE:The tape is tight and the player can't
turn the tape hubs. Remove the tape. Hold the tape
with the open end down and try to turn the right
hub counterclockwise with a pencil. Turn the tape
over and repeat. If the hubs do not turn easily, your
tape may be damaged and should not be used in
the player. Try a new tape to make sure your player
is working properly.
·BROKEN TAPE:The tape is broken. Try a
new tape.
CLEAN PLAYER:If this message appears on the
display, the cassette tape player needs to be cleaned. It
will still play tapes, but you should clean it as soon as
possible to prevent damage to the tapes and player. See
Care of Your Cassette Tape Player on page 3-79.
If any error occurs repeatedly or if an error can not be
corrected, contact your dealership. If your radio displays
an error number, write it down and provide it to your
dealership when reporting the problem.
CD Adapter Kits
It is possible to use a portable CD player adapter kit
with your cassette tape player after activating the bypass
feature on your tape player.
To activate the bypass feature, use the following steps:
1. Turn the ignition on.
2. Turn the radio off.
3. Insert the adapter into the cassette slot.
4. Press and hold the CD TAPE button until READY is
displayed.
The override feature will remain active until the eject
button is pressed.
Playing a Compact Disc
Insert a disc partway into the slot, label side up. The
player will pull it in. The disc should begin playing. If you
want to insert a CD while the ignition or the radio is
off, ®rst press the eject button or DISP.
If you turn off the ignition or radio with a disc in the
player, it will stay in the player. When you turn on the
ignition or system, the disc will start playing where
it stopped, if it was the last selected audio source.
3-71
Page 202 of 380

Steering in Emergencies
There are times when steering can be more effective
than braking. For example, you come over a hill and ®nd
a truck stopped in your lane, or a car suddenly pulls
out from nowhere, or a child darts out from between
parked cars and stops right in front of you. You
can avoid these problems by braking Ð if you can stop
in time. But sometimes you can't; there isn't room.
That's the time for evasive action Ð steering around the
problem.
Your vehicle can perform very well in emergencies like
these. First apply your brakes.
See
Braking on page 4-6. It is better to remove as much
speed as you can from a possible collision. Then
steer around the problem, to the left or right depending
on the space available.An emergency like this requires close attention and a
quick decision. If you are holding the steering wheel at
the recommended 9 and 3 o'clock positions, you
can turn it a full 180 degrees very quickly without
removing either hand. But you have to act fast, steer
quickly, and just as quickly straighten the wheel
once you have avoided the object.
The fact that such emergency situations are always
possible is a good reason to practice defensive driving
at all times and wear safety belts properly.
4-12
Page 240 of 380

While refueling, hang the tethered fuel cap from the
hook on the fuel door.
To remove the fuel cap, turn it slowly to the left
(counterclockwise). The fuel cap has a spring in it; if
you let go of the cap too soon, it will spring back to
the right.
{CAUTION:
If you get fuel on yourself and then something
ignites it, you could be badly burned. Fuel can
spray out on you if you open the fuel cap too
quickly. This spray can happen if your tank is
nearly full, and is more likely in hot weather.
Open the fuel cap slowly and wait for any
ªhissº noise to stop. Then unscrew the cap all
the way.
Be careful not to spill fuel. Clean fuel from painted
surfaces as soon as possible. See
Cleaning the Outside
of Your Vehicle on page 5-80.
5-8
Page 241 of 380

When you put the fuel cap back on, turn it to the right
(clockwise) until you hear a clicking sound. Make
sure you fully install the cap. The diagnostic system can
determine if the fuel cap has been left off or improperly
installed. This would allow fuel to evaporate into the
atmosphere. See
Malfunction Indicator Lamp on
page 3-40.
The GAS CAP LOOSE-CHECK CAP message will be
displayed on the Driver Information Center (DIC) (if
equipped) if the fuel cap is not properly installed.
Notice:If you need a new fuel cap, be sure to get
the right type. Your dealer can get one for you.
If you get the wrong type, it may not ®t properly.
This may cause your malfunction indicator lamp to
light and may damage your fuel tank and emissions
system. See ªMalfunction Indicator Lampº in the
Index.
Filling a Portable Fuel Container
{CAUTION:
Never ®ll a portable fuel container while it is in
your vehicle. Static electricity discharge from
the container can ignite the gasoline vapor.
You can be badly burned and your vehicle
damaged if this occurs. To help avoid injury to
you and others:
·Dispense gasoline only into approved
containers.
·Do not ®ll a container while it is inside a
vehicle, in a vehicle's trunk, pickup bed or
on any surface other than the ground.
·Bring the ®ll nozzle in contact with the
inside of the ®ll opening before operating
the nozzle. Contact should be maintained
until the ®lling is complete.
·Don't smoke while pumping gasoline.
5-9
Page 263 of 380

{CAUTION:
Steam and scalding liquids from a hot cooling
system can blow out and burn you badly. They
are under pressure, and if you turn the radiator
pressure cap Ð even a little Ð they can come
out at high speed. Never turn the cap when the
cooling system, including the radiator pressure
cap, is hot. Wait for the cooling system and
radiator pressure cap to cool if you ever have
to turn the pressure cap.
How to Add Coolant to the Radiator
1. You can remove the radiator pressure cap when
the cooling system, including the radiator pressure
cap and upper radiator hose, is no longer hot.
Turn the pressure cap slowly counterclockwise until
it ®rst stops. (Don't press down while turning the
pressure cap.)
If you hear a hiss, wait for that to stop. A hiss
means there is still some pressure left.
5-31