2003 BMW Z4 2.5I fuel cap
[x] Cancel search: fuel capPage 5 of 106
At a glance
Controls
Driving tips
Mobility
Reference
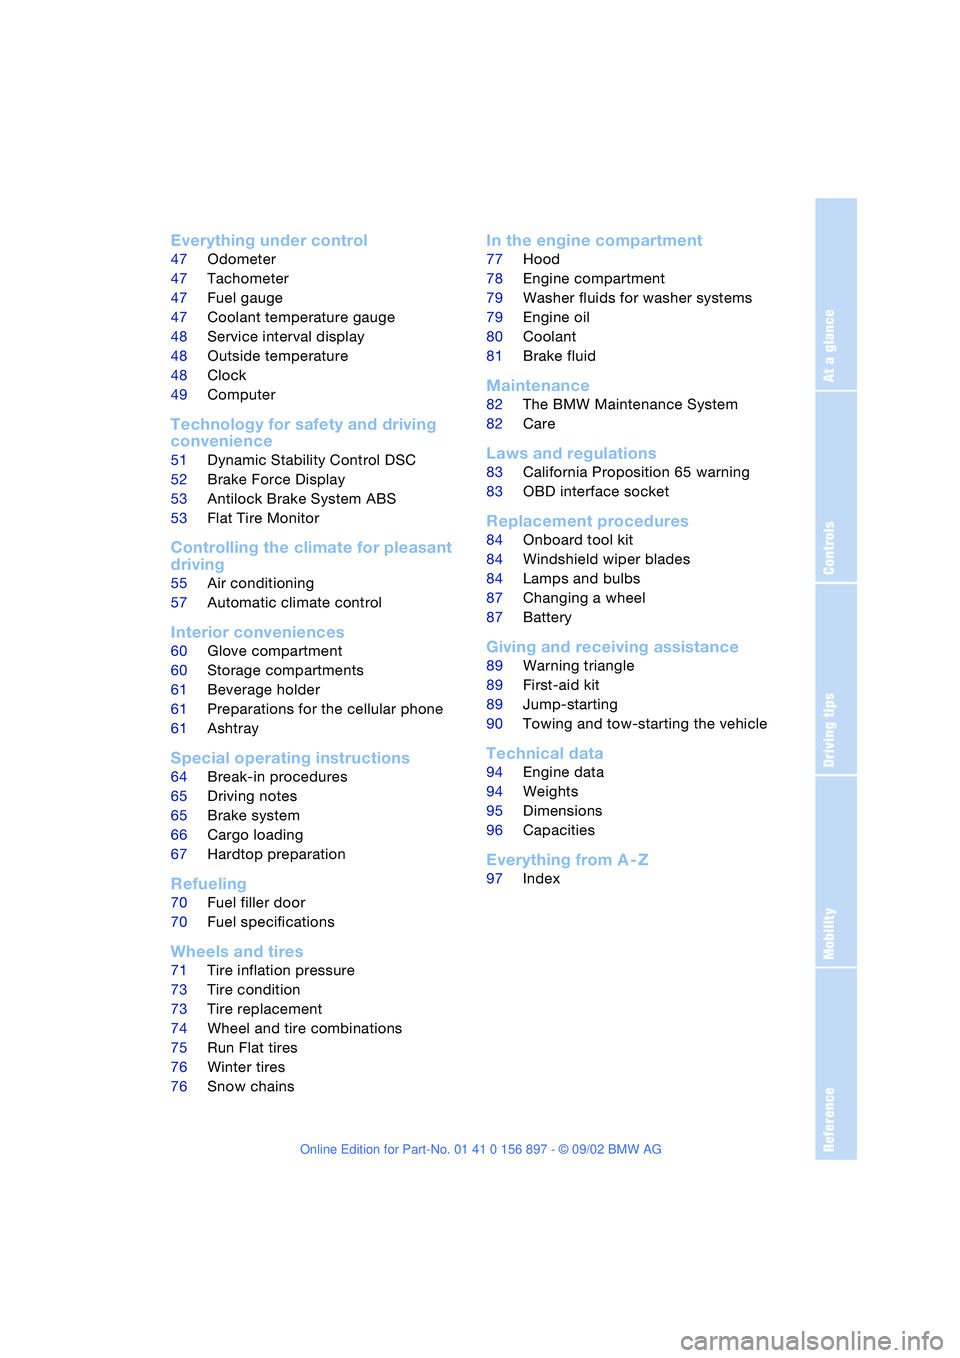
Everything under control
47Odometer
47Tachometer
47Fuel gauge
47Coolant temperature gauge
48Service interval display
48Outside temperature
48Clock
49Computer*
Technology for safety and driving
convenience
51Dynamic Stability Control DSC
52Brake Force Display
53Antilock Brake System ABS
53Flat Tire Monitor
Controlling the climate for pleasant
driving
55Air conditioning
57Automatic climate control*
Interior conveniences
60Glove compartment
60Storage compartments
61Beverage holder
61Preparations for the cellular phone*
61Ashtray*
Special operating instructions
64Break-in procedures
65Driving notes
65Brake system
66Cargo loading
67Hardtop preparation*
Refueling
70Fuel filler door
70Fuel specifications
Wheels and tires
71Tire inflation pressure
73Tire condition
73Tire replacement
74Wheel and tire combinations
75Run Flat tires
76Winter tires
76Snow chains*
In the engine compartment
77Hood
78Engine compartment
79Washer fluids for washer systems
79Engine oil
80Coolant
81Brake fluid
Maintenance
82The BMW Maintenance System
82Care
Laws and regulations
83California Proposition 65 warning
83OBD interface socket
Replacement procedures
84Onboard tool kit
84Windshield wiper blades
84Lamps and bulbs
87Changing a wheel
87Battery
Giving and receiving assistance
89Warning triangle*
89First-aid kit*
89Jump-starting
90Towing and tow-starting the vehicle
Technical data
94Engine data
94Weights
95Dimensions
96Capacities
Everything from A - Z
97Index
Page 47 of 106
At a glance
Controls
Driving tips
Mobility
Reference
47
Everything under control
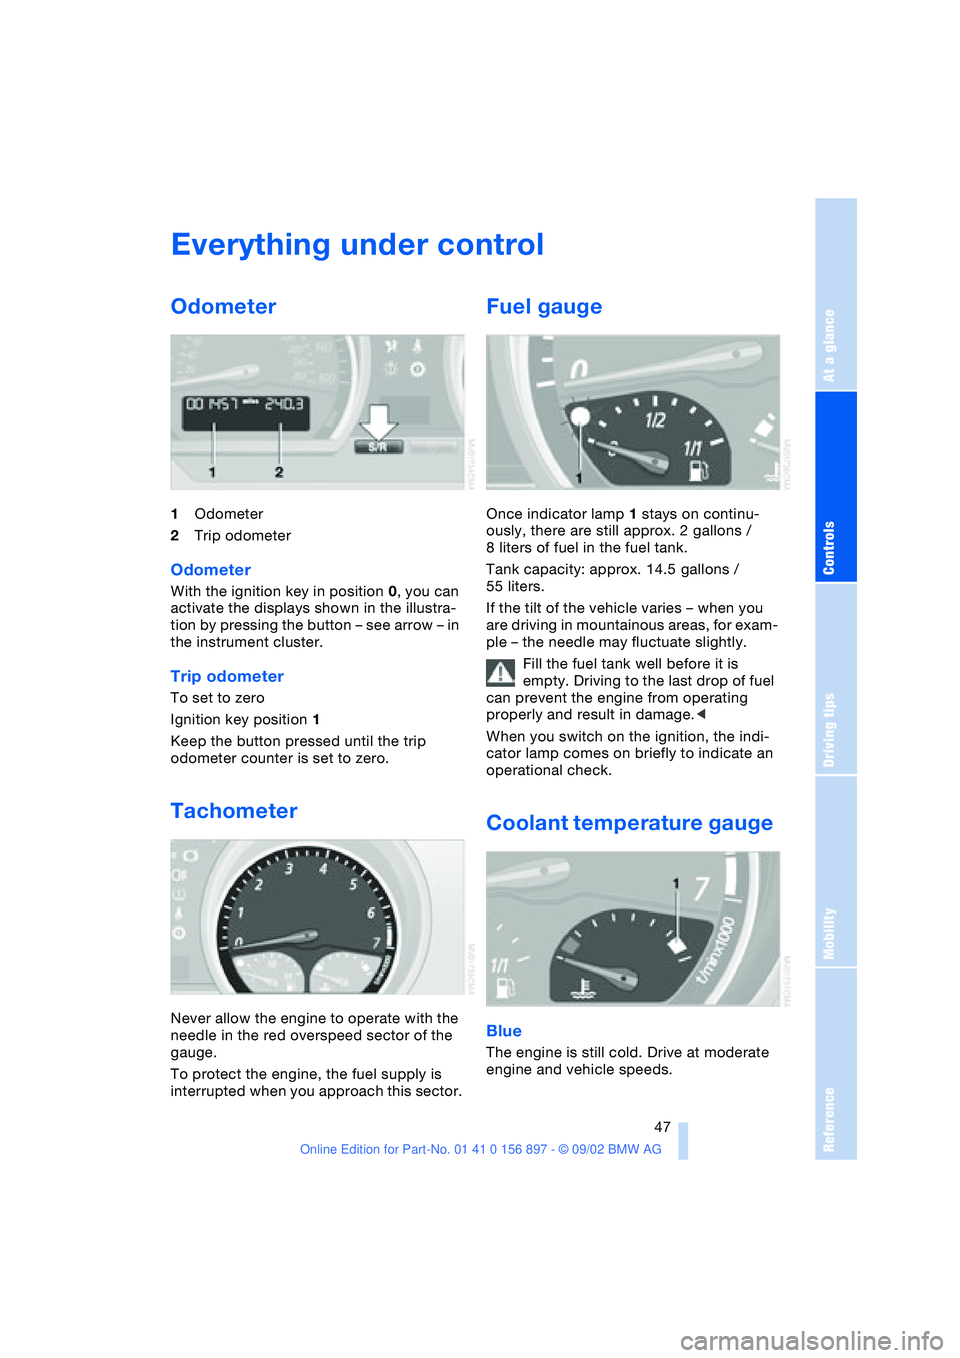
Odometer
1Odometer
2Trip odometer
Odometer
With the ignition key in position 0, you can
activate the displays shown in the illustra-
tion by pressing the button – see arrow – in
the instrument cluster.
Trip odometer
To set to zero
Ignition key position 1
Keep the button pressed until the trip
odometer counter is set to zero.
Tachometer
Never allow the engine to operate with the
needle in the red overspeed sector of the
gauge.
To protect the engine, the fuel supply is
interrupted when you approach this sector.
Fuel gauge
Once indicator lamp 1 stays on continu-
ously, there are still approx. 2 gallons /
8 liters of fuel in the fuel tank.
Tank capacity: approx. 14.5 gallons /
55 liters.
If the tilt of the vehicle varies – when you
are driving in mountainous areas, for exam-
ple – the needle may fluctuate slightly.
Fill the fuel tank well before it is
empty. Driving to the last drop of fuel
can prevent the engine from operating
properly and result in damage.<
When you switch on the ignition, the indi-
cator lamp comes on briefly to indicate an
operational check.
Coolant temperature gauge
Blue
The engine is still cold. Drive at moderate
engine and vehicle speeds.
Page 70 of 106

Refueling
70
Refueling
Fuel filler door
1.Open fuel filler door
2.Turn the filler cap in a counter-clock-
wise direction
3.Place the filler cap in the bracket on the
filler door.
Releasing manually
If an electrical malfunction occurs, you can
unlock the fuel filler door manually.
1.Remove the covers of the tail lamps by
turning the lock to the right; refer also to
page 87
2.Pull the luggage compartment trim
panel slightly toward the interior.
The green button with the fuel pump
symbol is revealed
3.Undo the adhesive strip and pull off
4.Pull on the knob
Fuel filler cap is released.
Fuel gas cap
Close the gas cap carefully after refu-
eling until a "click" is heard. While closing, be sure not to squeeze the strap
which is fastened to the cap. A loose or
missing cap will activate the "Check gas
cap" lamp.<
Check gas cap
This indicator lamp comes on when
the fuel gas cap is loose or missing.
Close the gas cap tightly as described
above.
Tank capacity: approx. 14.5 gallons /
55 liters, of which approx. 2.1 gallons /
8 liters are reserve capacity.
Simple and environmentally friendly
When handling fuels, comply with all
of the applicable safety precautions
posted at the service station.<
When refueling, insert the filler nozzle com-
pletely into the filler pipe. Pulling the nozzle
out of the pipe during refueling
>results in premature shutoff
>and will reduce the effect of the vapor
recovery system on the pump.
The fuel tank is full when the filler nozzle
shuts off the first time.
Fill the fuel tank before it is com-
pletely empty. Driving to the last drop
of fuel can prevent the engine from operat-
ing properly and result in damage.<
Fuel specifications
The engine uses lead-free gasoline only.
Required fuel:
>Premium Unleaded Gasoline,
min. 91 AKI.
AKI = Anti Knock Index.
Do not use leaded fuels. The use of
leaded fuels will cause permanent
damage to the system's oxygen sensor and
the catalytic converter.<
Page 79 of 106

At a glance
Controls
Driving tips
Mobility
Reference
79
Washer fluids for washer
systems
Headlamp* and windshield washer
system
Capacity of windshield washer system:
approx. 3.2 US quarts / 3 liters.
Capacity when equipped with headlamp
washer system: approx. 5.3 US quarts /
5 liters.
Fill with water and – if required – with an
antifreeze agent according to the manufac-
turer's recommendations.
We recommend that you mix the
washer fluid before adding it to the
reservoir.<
Antifreeze agent for the washer sys-
tems is flammable. For this reason,
keep it away from sources of flame and
store it only in its original container. Store it
so that it is inaccessible to children. Com-
ply with the instructions on the contain-
ers.<
Engine oil
Engine oil pressure
The red engine oil warning lamp
lights up:
Stop the vehicle immediately and
switch off the engine. Check the engine oil
level and top off as required. If the oil level
is correct, please contact the nearest BMW
center.
Do not continue driving, as the engine
could sustain serious damage from
inadequate lubrication.<
Engine oil level
The yellow engine oil indicator lamp
lights up while driving:
The oil level is at the absolute mini-
mum; refill as soon as possible. Do not
drive more than approx. 30 miles / 50 km
until you do.
The yellow engine oil indicator lamp
lights up after the engine is
switched off: add engine oil at the
earliest opportunity, when you stop to
refuel.
Engine oil sensor
The yellow engine oil indicator lamp
lights up within 20 seconds after
the engine is started:
The oil level sensor is defective. Please
have it checked by a BMW center.
Checking the oil level
1.Park the vehicle on a level surface
2.Switch the engine off after it has
reached normal operating temperature
3.After approx. 5 minutes, pull the dip-
stick out and wipe it off with a clean lint-
free cloth, paper towel, or similar mate-
rial
4.Carefully push the dipstick all the way
into the guide tube and pull it out again
5.The oil level should be between the two
marks on the dipstick
6.Return the dipstick to the guide tube,
inserting it as far as it will go.
As with fuel economy, oil consumption is
directly influenced by your driving style and
vehicle operating conditions.
Page 83 of 106

At a glance
Controls
Driving tips
Mobility
Reference
83
Laws and regulations
California Proposition 65
warning
California laws require us to state the fol-
lowing warning:
Engine exhaust, some of its constitu-
ents, and certain vehicle components
contain or emit chemicals known to the
State of California to cause cancer and
birth defects and reproductive harm. In
addition, certain fluids contained in vehi-
cles and certain products of component
wear contain or emit chemicals known to
the State of California to cause cancer and
birth defects or other reproductive harm.
Battery posts, terminals and related acces-
sories contain lead and lead compounds.
Wash your hands after handling. Used
engine oil contains chemicals that have
caused cancer in laboratory animals.
Always protect your skin by washing thor-
oughly with soap and water.<
OBD interface socket
The Onboard Diagnostic OBD interface
socket is located on the left of the driver's
side behind a specially marked cover
located beneath the instrument panel. The
cover has the letters OBD on it.
This interface makes it possible to access
data on emissions – related components
using special equipment.If the Service Engine Soon indicator
lamp comes on either continuously
or intermittently, this indicates a
fault in the emissions-related electronic
systems. Although the vehicle remains
operational, you should have the systems
checked by your BMW center at the earli-
est possible opportunity.
The illuminated indicator informs you of the
need for service, not that you need to stop
the vehicle. However, the systems should
be checked by your BMW center at the
next opportunity.
If the indicator blinks or flashes, this indi-
cates a high level of engine misfire. Reduce
speed and contact the nearest BMW center
immediately. Severe engine misfiring over
even a short period of time can seriously
damage emission control system compo-
nents, especially the catalytic converter.
Service Engine Soon
warning lamp for Canadian
models.
If the fuel filler cap is not on tight
enough, the OBD system can detect
leaking vapor and the indicator will light up.
If the fuel filler cap is then tightened, the
indicator will usually go out after a short
period of time.<
Page 94 of 106
Technical data
94
Technical data
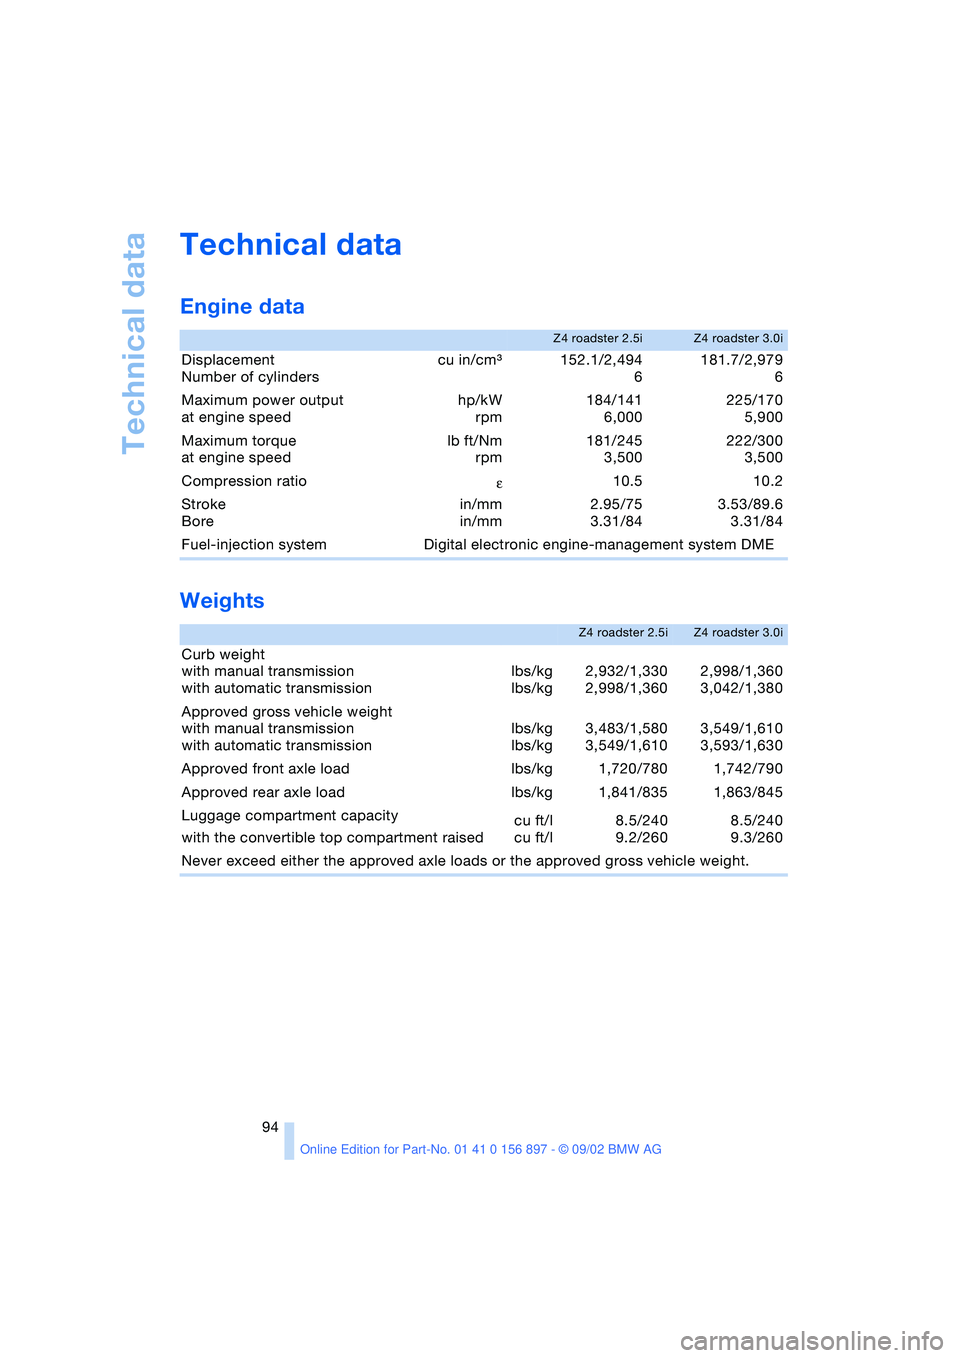
Engine data
Weights
Z4 roadster 2.5iZ4 roadster 3.0i
Displacement
Number of cylinderscu in/cmµ152.1/2,494
6181.7/2,979
6
Maximum power output
at engine speedhp/kW
rpm184/141
6,000225/170
5,900
Maximum torque
at engine speedlb ft/Nm
rpm181/245
3,500222/300
3,500
Compression ratio
ε10.5 10.2
Stroke
Borein/mm
in/mm2.95/75
3.31/843.53/89.6
3.31/84
Fuel-injection system Digital electronic engine-management system DME
Z4 roadster 2.5iZ4 roadster 3.0i
Curb weight
with manual transmission
with automatic transmissionlbs/kg
lbs/kg2,932/1,330
2,998/1,3602,998/1,360
3,042/1,380
Approved gross vehicle weight
with manual transmission
with automatic transmissionlbs/kg
lbs/kg3,483/1,580
3,549/1,6103,549/1,610
3,593/1,630
Approved front axle load lbs/kg 1,720/780 1,742/790
Approved rear axle load lbs/kg 1,841/835 1,863/845
Luggage compartment capacity
with the convertible top compartment raisedcu ft/l
cu ft/l8.5/240
9.2/2608.5/240
9.3/260
Never exceed either the approved axle loads or the approved gross vehicle weight.
Page 96 of 106
Technical data
96
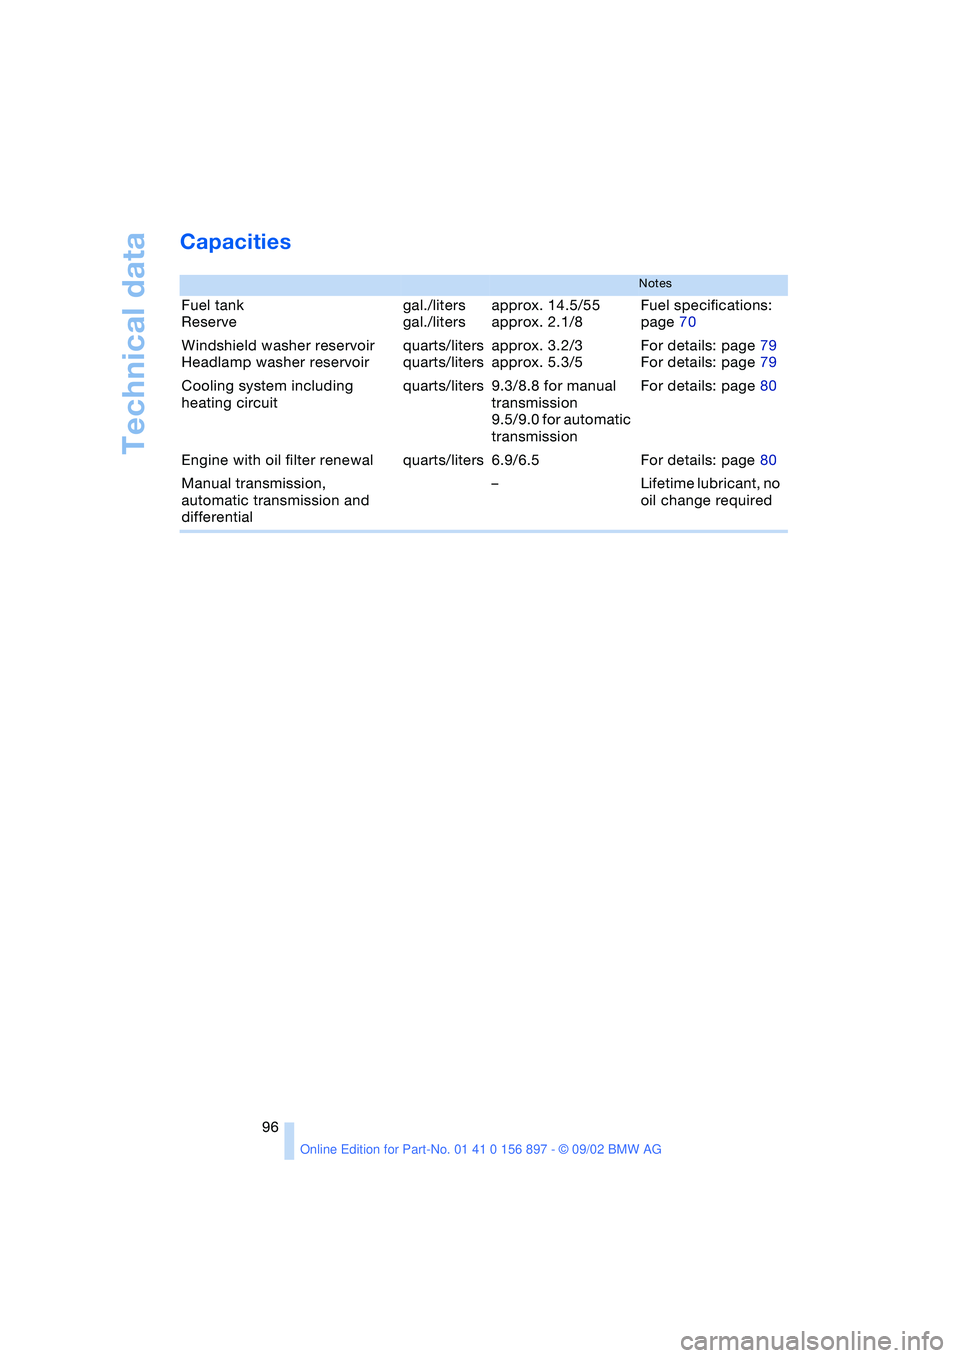
Capacities
Notes
Fuel tank
Reserve gal./liters
gal./litersapprox. 14.5/55
approx. 2.1/8Fuel specifications:
page 70
Windshield washer reservoir
Headlamp washer reservoirquarts/liters
quarts/litersapprox. 3.2/3
approx. 5.3/5For details: page 79
For details: page 79
Cooling system including
heating circuitquarts/liters 9.3/8.8 for manual
transmission
9.5/9.0 for automatic
transmissionFor details: page 80
Engine with oil filter renewal quarts/liters 6.9/6.5 For details: page 80
Manual transmission,
automatic transmission and
differential–Lifetime lubricant, no
oil change required
Page 98 of 106
Everything from A - Z
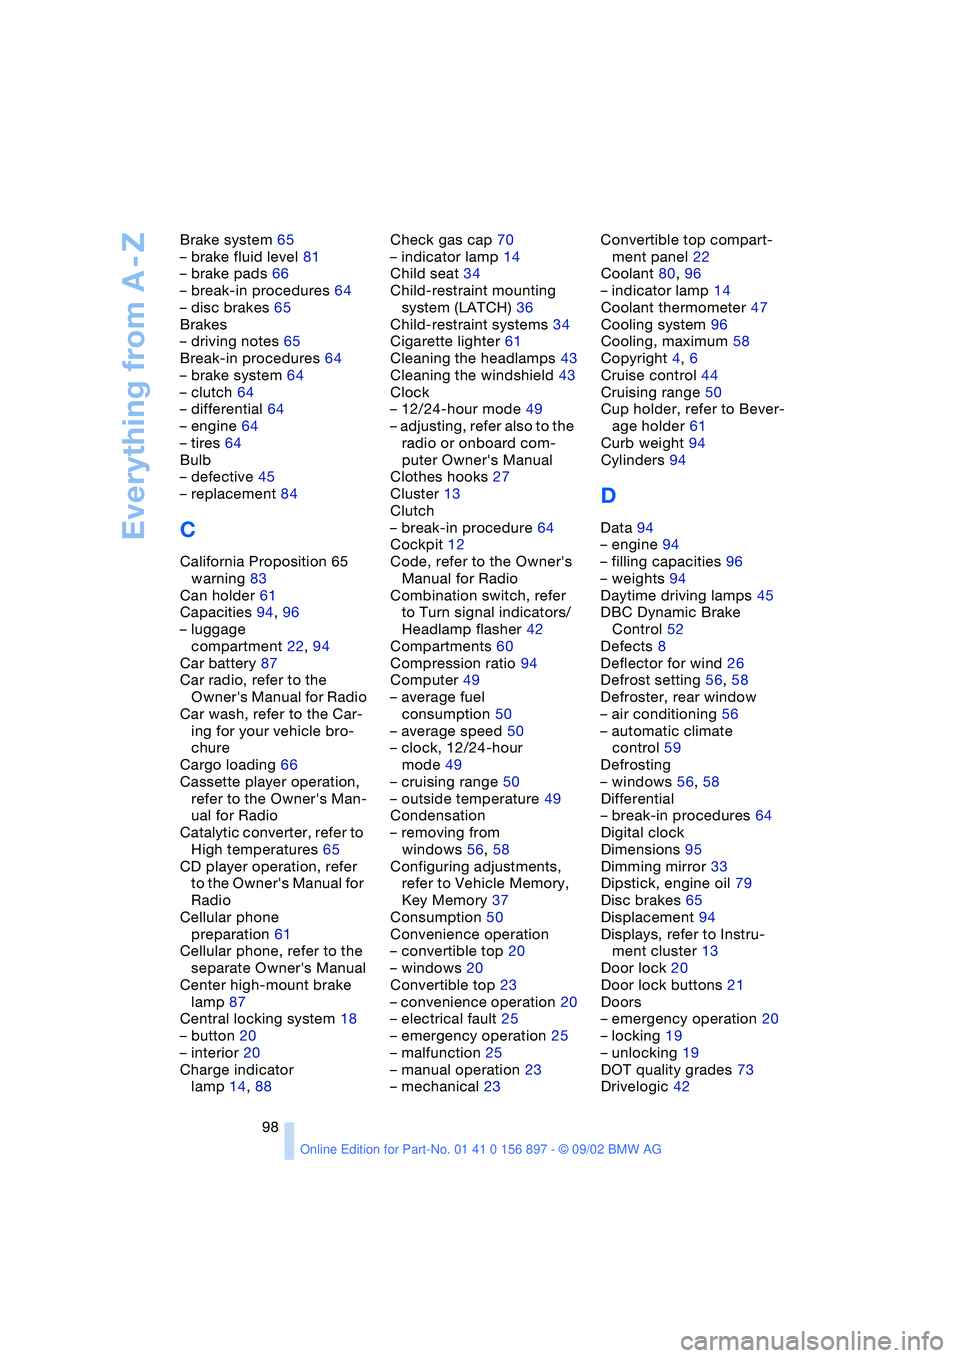
98 Brake system 65
– brake fluid level 81
– brake pads 66
– break-in procedures 64
– disc brakes 65
Brakes
– driving notes 65
Break-in procedures 64
– brake system 64
– clutch 64
– differential 64
– engine 64
– tires 64
Bulb
– defective 45
– replacement 84
C
California Proposition 65
warning 83
Can holder 61
Capacities 94, 96
– luggage
compartment 22, 94
Car battery 87
Car radio, refer to the
Owner's Manual for Radio
Car wash, refer to the Car-
ing for your vehicle bro-
chure
Cargo loading 66
Cassette player operation,
refer to the Owner's Man-
ual for Radio
Catalytic converter, refer to
High temperatures 65
CD player operation, refer
to the Owner's Manual for
Radio
Cellular phone
preparation 61
Cellular phone, refer to the
separate Owner's Manual
Center high-mount brake
lamp 87
Central locking system 18
– button 20
– interior 20
Charge indicator
lamp 14, 88Check gas cap 70
– indicator lamp 14
Child seat 34
Child-restraint mounting
system (LATCH) 36
Child-restraint systems 34
Cigarette lighter 61
Cleaning the headlamps 43
Cleaning the windshield 43
Clock
– 12/24-hour mode 49
– adjusting, refer also to the
radio or onboard com-
puter Owner's Manual
Clothes hooks 27
Cluster 13
Clutch
– break-in procedure 64
Cockpit 12
Code, refer to the Owner's
Manual for Radio
Combination switch, refer
to Turn signal indicators/
Headlamp flasher 42
Compartments 60
Compression ratio 94
Computer 49
– average fuel
consumption 50
– average speed 50
– clock, 12/24-hour
mode 49
– cruising range 50
– outside temperature 49
Condensation
– removing from
windows 56, 58
Configuring adjustments,
refer to Vehicle Memory,
Key Memory 37
Consumption 50
Convenience operation
– convertible top 20
– windows 20
Convertible top 23
– convenience operation 20
– electrical fault 25
– emergency operation 25
– malfunction 25
– manual operation 23
– mechanical 23Convertible top compart-
ment panel 22
Coolant 80, 96
– indicator lamp 14
Coolant thermometer 47
Cooling system 96
Cooling, maximum 58
Copyright 4, 6
Cruise control 44
Cruising range 50
Cup holder, refer to Bever-
age holder 61
Curb weight 94
Cylinders 94
D
Data 94
– engine 94
– filling capacities 96
– weights 94
Daytime driving lamps 45
DBC Dynamic Brake
Control 52
Defects 8
Deflector for wind 26
Defrost setting 56, 58
Defroster, rear window
– air conditioning 56
– automatic climate
control 59
Defrosting
– windows 56, 58
Differential
– break-in procedures 64
Digital clock
Dimensions 95
Dimming mirror 33
Dipstick, engine oil 79
Disc brakes 65
Displacement 94
Displays, refer to Instru-
ment cluster 13
Door lock 20
Door lock buttons 21
Doors
– emergency operation 20
– locking 19
– unlocking 19
DOT quality grades 73
Drivelogic 42