2003 BMW X5 3.0I turn signal
[x] Cancel search: turn signalPage 99 of 183

99n
OverviewControlsMaintenanceRepairsDataIndex
Parking lamps Ð side marker
lamps
The front, rear and side vehicle
lighting is switched on. You can
use the parking lamps for
parking. For lighting on one side for
parking as an additional feature, refer to
page 100.
Low beams
When the ignition is switched off
and the low beams are on, only
the parking lamps Ð side marker
lamps Ð remain on.
530us215
Follow me home lamps:
When you activate the headlamp
flasher after parking the vehicle and
switching off the lamps, the low beams
will come on for a brief period. You may
also have this function deactivated if
you wish.<
LIGHTS ON warningWhenever you open the driver's door,
after having turned the ignition key to
position 0, you will hear an acoustic
signal for a few seconds to remind you
that the lamps have not been switched
off.
On vehicles with alphanumeric Check
Control
*:
The reminder is given through the
Check Control.
Daytime driving lamps
*
The headlamps are automatically
switched on for daylight driving at
ignition key position 2.
Automatic headlamp control
*
When the switch is set to this
position the system automati-
cally activates or deactivates the
low beams in response to changes in
ambient light, e. g. in tunnels, at dusk,
as well as rain and snow.
The vehicle's external lamps
remain on constantly when you
switch on the fog lamps after the head-
lamps have come on automatically.<
Automatic headlamp control
cannot serve as a substitute for
the driver's judgement in determining
when the vehicle lamps should be
switched on. For example, the sensors
are not able to detect fog. To avoid
safety risks, you should respond to
these kinds of low-visibility situations
by switching the headlamps on manu-
ally.<
You can have the sensitivity of
your vehicle's automatic head-
lamp control adjusted.<
Parking lamps/Low beams
Page 100 of 183

100n
Instrument lighting
High beams/Standing lamps
Fog lamps
Turn the rotary dial to adjust the illumi-
nation intensity. 530us216
1 High beams Ð blue indicator lamp
2 Headlamp flasher Ð blue indicator
lamp
3 Standing lamps Standing lamps, left or right
*
As an additional feature, you can
illuminate your vehicle on either side
for parking, if you wish to do so:
With the ignition key in position 0,
engage the lever in the appropriate
turn signal position. 530de265
Fog lamps
A green indicator lamp appears
in the instrument cluster to indi-
cate that the front fog lamps are
on.
If the high beams are switched on, the
fog lamps go out.
If the automatic headlamp control
is activated, the low beams will
automatically be switched on when the
front fog lamps are switched on.<
530us210
Page 113 of 183

113n
OverviewControlsMaintenanceRepairsDataIndex
BMW Universal TransmitterChecking for the conversion code To determine whether the original
hand-held transmitter is provided with
a conversion-code system, you may
either read the instructions for the orig-
inal hand-held transmitter or program a
channel key as described on the next
page Ð left-hand column under
Programming.
Then press and hold the programmed
channel key of the BMW Universal
Transmitter. If the indicator lamp of the
BMW Universal Transmitter flashes for
two seconds and then comes on
steadily, the original hand-held trans-
mitter is provided with a conversion-
code system. With a conversion-code
system, program the channel keys as
described on the next page Ð right-hand
column under Programming a hand-
held transmitter with conversion code.
If you have additional questions,
please consult your BMW Sports
Activity Vehicle center or call
1-800-355-3515.
You can also visit this website:
www.bmwusa.com.<
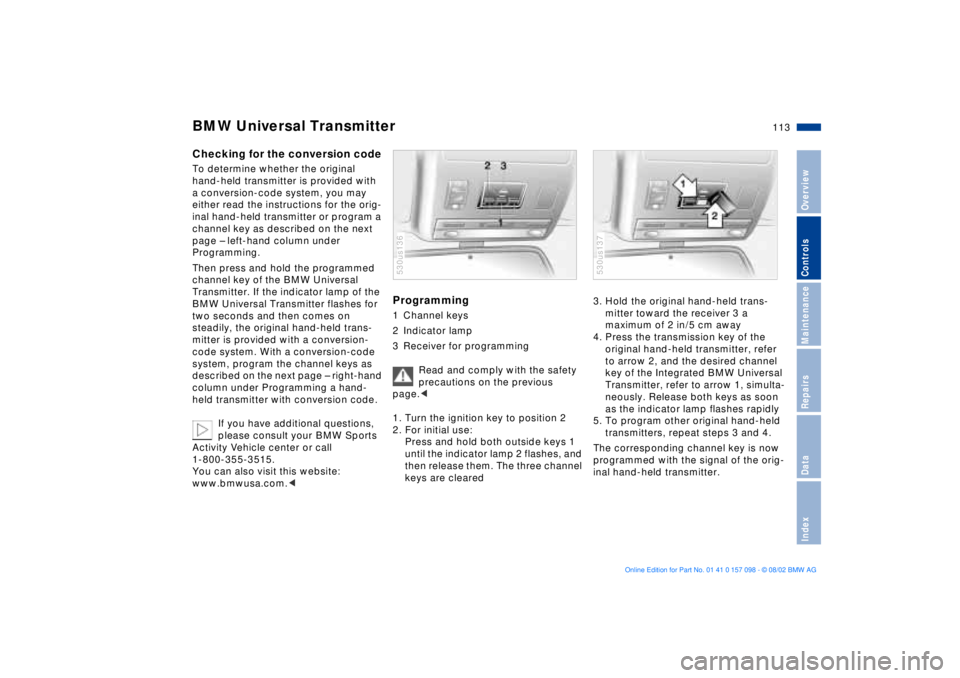
Programming 1 Channel keys
2 Indicator lamp
3 Receiver for programming
Read and comply with the safety
precautions on the previous
page.<
1. Turn the ignition key to position 2
2. For initial use:
Press and hold both outside keys 1
until the indicator lamp 2 flashes, and
then release them. The three channel
keys are cleared 530us136
3. Hold the original hand-held trans-
mitter toward the receiver 3 a
maximum of 2 in/5 cm away
4. Press the transmission key of the
original hand-held transmitter, refer
to arrow 2, and the desired channel
key of the Integrated BMW Universal
Transmitter, refer to arrow 1, simulta-
neously. Release both keys as soon
as the indicator lamp flashes rapidly
5. To program other original hand-held
transmitters, repeat steps 3 and 4.
The corresponding channel key is now
programmed with the signal of the orig-
inal hand-held transmitter. 530us137
Page 152 of 183

152n
Lamps and bulbs Xenon lamps
*
The operating life of these lamp units is
extremely long and the likelihood of
failure very low, provided that they are
not switched on and off a very great
number of times. If one of these bulbs
should nevertheless fail, it is possible to
continue driving with great caution
using the fog lamps, provided traffic
laws in your area do not prohibit this.
Because of the extremely high
voltages involved, any work on the
xenon lighting system should be carried
out by technically-qualified personnel
only. Failure to comply with this creates
a risk of fatal injury.< Turn signal indicators/Standing
lamps Ð side marker lamps Ð front Dual-filament bulb, 28/8 watts
Please contact a BMW Sports Activity
Vehicle center in case of a malfunction.
Side turn signal indicators5 watt bulb
1. Use finger pressure against the rear
end of the lamp, refer to arrow, to
press it forward for removal
2. Press gently on the bulb and turn it to
the left to remove it
3. Replace the bulb.530de304
Front fog lamps H3 bulb, 55 watts
The bulb is pressurized. There-
fore, wear safety glasses and
protective gloves. Failure to comply
with this precaution could lead to injury
if the bulb is accidentally damaged
during replacement.<
1. Pull the cover in front of the fog lamp
forward
2. Loosen the two screws, refer to
arrows, and remove the fog lamp
3. Turn the cover cap on the rear of the
fog lamp to the left and remove
4. Unhook the wire clamp, remove the
contact base and replace the bulb. 530de344
Page 153 of 183

153n
OverviewControlsMaintenanceRepairsDataIndex
Lamps and bulbs Tail lamp assembly Tail lamp 2: 21/5 watt bulb
Remaining bulbs: 21 watts
1 Turn signal indicator
2 Rear lamps/Side marker lamps
3 Backup lamps
4 Brake lamps
5 Reflector 530de212
Lamps in the side panel:
1. Open the cover in the side panel
2. Lift the side panel if necessary
3. Press gently on the bulb holder and
turn it to the left to remove it
4. Remove the bulb. 530de305
Lamps in the tailgate:
1. Unclip the trim panel in the tailgate
with a screwdriver
2. Press gently on the bulb holder and
turn it to the left to remove it
3. Remove the bulb. Center Ð high-mount Ð brake lamp LED strip in the rear spoiler: please
contact a BMW Sports Activity Vehicle
center in case of a malfunction. 530de306
Page 165 of 183

165n
OverviewControlsMaintenanceRepairsDataIndex
Towing the vehicle Towing a vehicle with automatic
transmission1. Place the selector lever in position N
2. Towing speed:
Maximum 45 mph/70 km/h
3. Towing distance:
Maximum 95 miles/150 km
4. Turn the ignition key to position 1 to
ensure that the brake lamps, turn
signal indicators, horn and wind-
shield wipers remain operative, and
to prevent the steering lock from
engaging
5. Switch on the hazard warning
flashers, comply with country-spe-
cific regulations.
In the event of electrical malfunction,
find some means of identifying the
vehicle in tow, for instance, place a sign
or warning triangle in the rear window.
Make sure that the ignition key
remains in position 1 even when
the electrical system has failed. This will
prevent the steering lock from
engaging. The steering and brakes are
without power assist when the engine is
not running. This means that increased
effort is required for steering and
braking.<
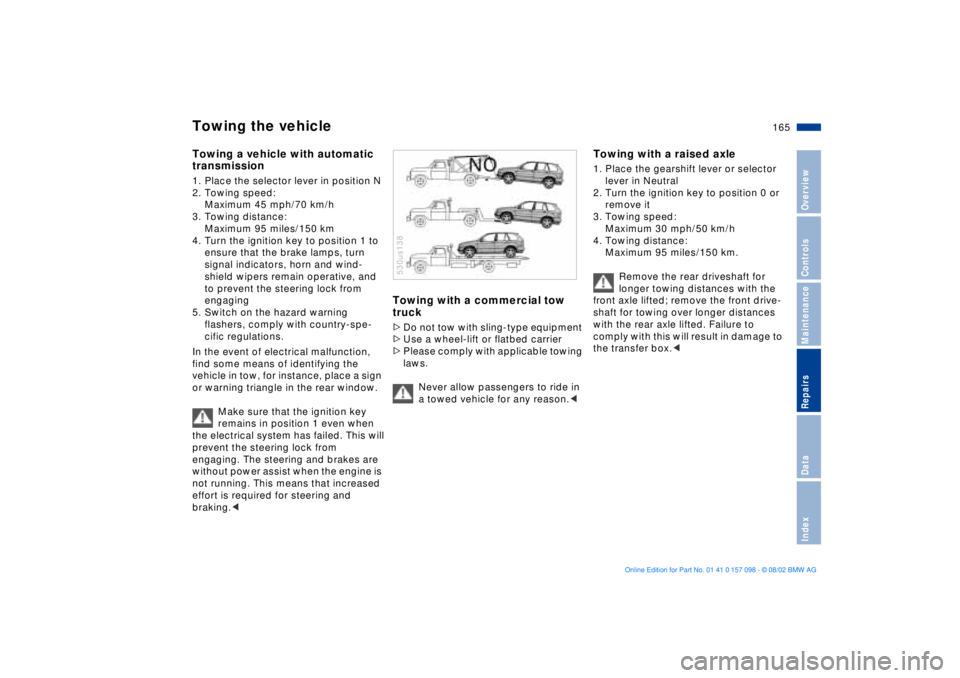
Towing with a commercial tow
truck >Do not tow with sling-type equipment
>Use a wheel-lift or flatbed carrier
>Please comply with applicable towing
laws.
Never allow passengers to ride in
a towed vehicle for any reason.< 530us138
Towing with a raised axle 1. Place the gearshift lever or selector
lever in Neutral
2. Turn the ignition key to position 0 or
remove it
3. Towing speed:
Maximum 30 mph/50 km/h
4. Towing distance:
Maximum 95 miles/150 km.
Remove the rear driveshaft for
longer towing distances with the
front axle lifted; remove the front drive-
shaft for towing over longer distances
with the rear axle lifted. Failure to
comply with this will result in damage to
the transfer box.<
Page 180 of 183

Everything from A to ZTraction Control System,
refer to DSC91
Transmission64, 65
Transporting children
safely58
Tread depth, tires134
Trip odometer73
Turn signal indicator68
bulb replacement152
Turning circle169
Two-axle self-leveling
suspension94
display95
lowering96
raising95UUniform Tire Quality
Grading136
Universal Transmitter112
Used batteries,
disposal160
Used oil, disposal142VVacuum cleaner
power outlet124
socket118Valve caps159
Variable Ride Height94
Vehicle battery160
Vehicle jack155
Vehicle keys30
Vehicle Memory61
Vehicle vacuum cleaner
power outlet124
socket118
Ventilation102, 104, 109
draft-free104, 109
in the rear104, 109
while parked111
Viscosity142
Voice entry23
WWarm feet Ð cool head104
Warning lamps19
Warning messages77
Warning triangle24
Warranty and Service Guide
Booklet for Canadian
models145
Washer fluid141
Washer reservoir, filling141
Washer/wiper system68
Weights170Wheel and tire
combinations137
Wheel, changing155
Wheelbase169
Wheels and tires137
Width169
Windows40
convenience operation34
remote control32
Windshield
intensive cleaning
program68
special wash program68
Windshield washer
filling reservoir141
Windshield wiper68
blade replacement150
Winter tires138
Wiper blade
replacement150
Wipers68
Work in the engine
compartment139
XXenon lamps152