2003 BMW X5 3.0I ECU
[x] Cancel search: ECUPage 58 of 183

58n
Transporting children safelyCommercially-available child-restraint
systems are designed to be secured
with a lap belt or with the lap belt
portion of a combination lap/shoulder
belt. Improperly or inadequately
installed restraint systems can increase
the risk of injury to children. Always
read and follow the instructions that
come with the system.
Child-restraint system with tether
strap If you use a child-restraint system with
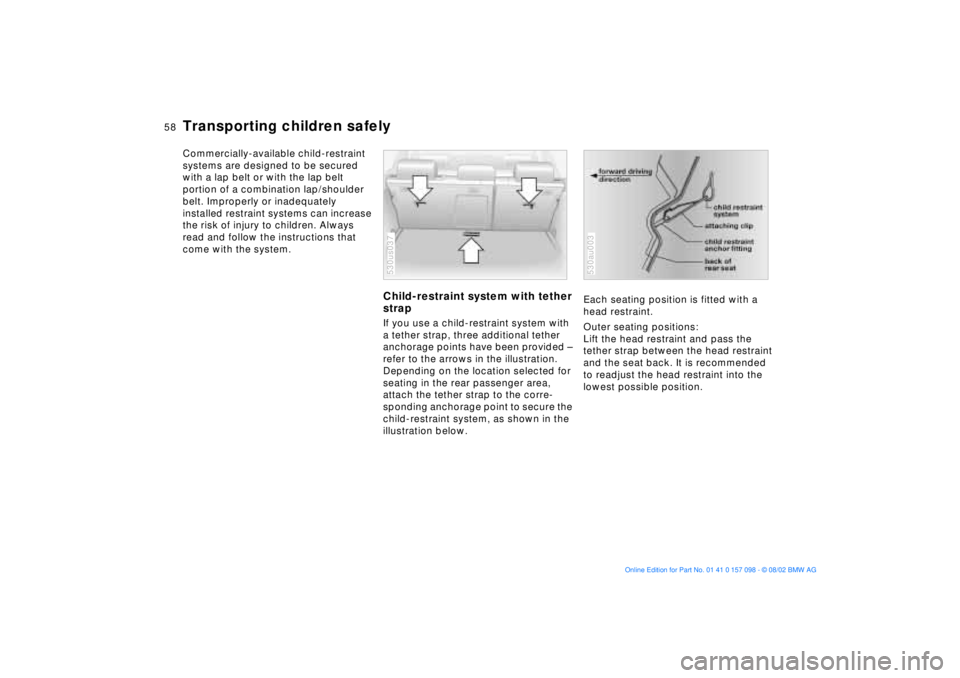
a tether strap, three additional tether
anchorage points have been provided Ð
refer to the arrows in the illustration.
Depending on the location selected for
seating in the rear passenger area,
attach the tether strap to the corre-
sponding anchorage point to secure the
child-restraint system, as shown in the
illustration below. 530us037
Each seating position is fitted with a
head restraint.
Outer seating positions:
Lift the head restraint and pass the
tether strap between the head restraint
and the seat back. It is recommended
to readjust the head restraint into the
lowest possible position. 530au003
Page 59 of 183

59n
OverviewControlsMaintenanceRepairsDataIndex
Transporting children safely
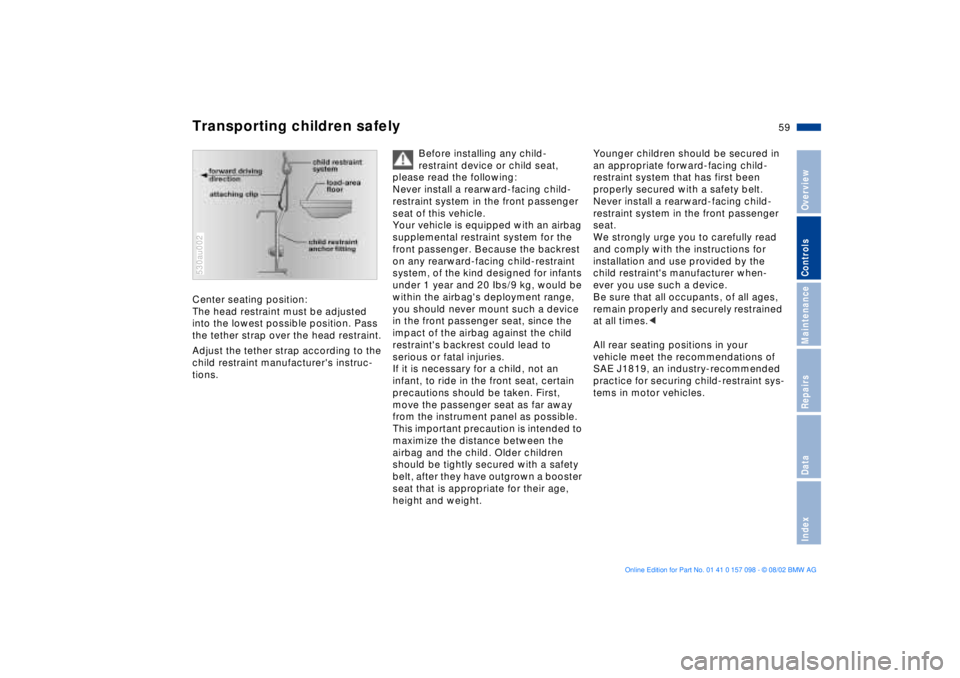
Center seating position:
The head restraint must be adjusted
into the lowest possible position. Pass
the tether strap over the head restraint.
Adjust the tether strap according to the
child restraint manufacturer's instruc-
tions.530au002
Before installing any child-
restraint device or child seat,
please read the following:
Never install a rearward-facing child-
restraint system in the front passenger
seat of this vehicle.
Your vehicle is equipped with an airbag
supplemental restraint system for the
front passenger. Because the backrest
on any rearward-facing child-restraint
system, of the kind designed for infants
under 1 year and 20 Ibs/9 kg, would be
within the airbag's deployment range,
you should never mount such a device
in the front passenger seat, since the
impact of the airbag against the child
restraint's backrest could lead to
serious or fatal injuries.
If it is necessary for a child, not an
infant, to ride in the front seat, certain
precautions should be taken. First,
move the passenger seat as far away
from the instrument panel as possible.
This important precaution is intended to
maximize the distance between the
airbag and the child. Older children
should be tightly secured with a safety
belt, after they have outgrown a booster
seat that is appropriate for their age,
height and weight.
Younger children should be secured in
an appropriate forward-facing child-
restraint system that has first been
properly secured with a safety belt.
Never install a rearward-facing child-
restraint system in the front passenger
seat.
We strongly urge you to carefully read
and comply with the instructions for
installation and use provided by the
child restraint's manufacturer when-
ever you use such a device.
Be sure that all occupants, of all ages,
remain properly and securely restrained
at all times.<
All rear seating positions in your
vehicle meet the recommendations of
SAE J1819, an industry-recommended
practice for securing child-restraint sys-
tems in motor vehicles.
Page 60 of 183

60n
Transporting children safelyChild-restraint system securityAll of the rear belt retractors and the
front passenger's safety belt can be
locked for mounting and securing child-
restraint systems. Information regarding
this is located near the buckle latch of
each safety belt. Lock the safety belt Pull the entire length of the belt from
the belt retractor. Allow the reel to
retract the belt somewhat and engage
the buckle, then tighten the belt against
the child-restraint system. The retrac-
tion mechanism is now locked. Release the safety belt Release the buckle, remove the child-
restraint device and allow the belt
retractor to reel the belt completely in. 530us104
LATCH child-restraint systemLATCH: Lower Anchors and Tethers for
CHildren
The rear outer seating positions are
provided with anchorage points for a
LATCH child-restraint system. The
illustration shows the anchorage points
in the left rear seat as an example.
Canadian models only:
The anchorage points for the LATCH
child-restraint system are indicated by
buttons, refer to illustration.
Remove cover panel by pulling it off
toward the front.
Simply put it back on to reattach it.
To install a LATCH child-restraint
system, please follow the manu-
facturer's operating instructions and
safety precautions.<530ue229
Child-safety locksSlide the safety lever on the rear doors
downward:
The door can now be opened from the
outside only. 530de226
Page 67 of 183

67n
OverviewControlsMaintenanceRepairsDataIndex
Automatic transmission with Steptronic
*
M/S Manual mode and
Sport Program When you change from D to M/S, the
Sport Program is activated. This is indi-
cated by D S in the transmission range
display. The Sport Program is designed
for performance-oriented driving.
With the first brief touch, the automatic
transmission shifts from the Sport Pro-
gram to the manual mode.
Whenever you tap the selector lever in
the
+ direction, the transmission shifts
up, and when you tap it in the
Ð direc-
tion, the transmission will shift down.
Depending on the equipment version,
1 to 5 or M1 to M5 is indicated in the
transmission range display.
530de264
Upshifts or downshifts will only be
carried out at appropriate engine
speeds and road speeds. If the engine
speed is too high, for instance, the
downshift will not be executed. The
gear selected will appear briefly in the
instrument cluster followed by the
current gear.
If you are driving in the manual
mode and wish to accelerate rap-
idly Ð to pass another vehicle, for
example Ð shift down manually or with
the kickdown function.<
You can only change from M/S to
selector lever positions P, R and N via
the D position.
Electronic transmission control
module
If the indicator lamp comes on
or the message Ð TRANS.FAIL-
SAFE PROG Ð appears in the
Check Control, there is a fault in the
transmission system.
Bring the vehicle to a stop. Move the
transmission selector lever to P. Set the
parking brake and switch the engine
off, ignition key to position 0.
Wait a few seconds, then start the
engine.
If the indicator lamp goes out after a
few seconds, normal transmission per-
formance has been restored. You may
continue to drive as usual. If the indi-
cator lamp does not go out, you can
place the selector lever in all positions.
However, the vehicle will now only drive
forward with limited gear selection.
If this happens, avoid extreme engine
loads and consult the nearest
BMW Sports Activity Vehicle center.
Do not work in the engine com-
partment when a drive gear is
engaged. If you do this, the vehicle
could move.<
Information on jump-starting, tow-
starting and towing begins on page 162.
Page 77 of 183

77n
OverviewControlsMaintenanceRepairsDataIndex
Check Control Graphic display
*
The following alerts or status messages
are displayed with icons from ignition
key position 2 and up until the defects
are corrected:
1 Check low beams
2 Add washer fluid (goes out after
approx. 1 minute)
3 Door open
4 Tailgate open
5 Check brake and tail lamps. A defec-
tive center brake lamp is indicated by
the upper symbol.
When you open the door after stopping,
a warning signal sounds without a
visual indicator for:
>LIGHTS ON
>KEY IN IGNITION LOCK. 390de121
Alphanumeric display
*
Text messages are used to alert the
driver to system malfunctions when the
ignition key is turned to position 2. The
alert is accompanied by an acoustic
signal.
1 Status messages symbol
2 Display
3 CHECK button
Messages concerning system faults are
differentiated based on two priorities: 390us111
Priority 1
These defects are immediately indi-
cated by an acoustic signal and a
flashing warning symbol 1. Simulta-
neous defects will be displayed con-
secutively. These status messages
remain in the display until the defects
are corrected. They cannot be deleted
by pressing the CHECK button 3:
>RELEASE PARKINGBRAKE
>COOLANT TEMPERATURE
The coolant is overheated. Stop the
vehicle immediately and switch off
the engine, refer to pages 76 and 143
>STOP!ENGINE OILPRESS
The oil pressure is too low. Stop the
vehicle immediately and switch off
the engine, refer to pages 19 and 141
Page 78 of 183

78n
Check Control>CHECK BRAKE FLUID
Indicates that brake fluid is down to
approximately the minimum level.
Top off the brake fluid at the next
opportunity, refer to page 144. Have
the cause of the brake fluid loss diag-
nosed and corrected by your BMW
Sports Activity Vehicle center
>TIRE LOW/FLAT
*
Reduce vehicle speed immediately
and stop the vehicle. Avoid hard
brake applications. Do not oversteer,
refer to page 98
>SELFLEVEL SUSP.INACT
*
Please consult the nearest
BMW Sports Activity Vehicle center
>SELFLEVEL SUSP.INACT
*
max. 35 mph/max. 60 km/h
*
These displays appear consecutively.
Do not exceed a maximum speed of
35 mph/60 km/h.
Please consult the nearest BMW
Sports Activity Vehicle center
>LIMIT
*
You will see this message if the pro-
grammed speed limit has been
exceeded, refer to page 85.Priority 2
These displays appear for 20 seconds
when the ignition key is turned to posi-
tion 2. The warning symbols remain
after the message disappears. You can
call up the messages again for display
by pressing the CHECK button.
>TRUNKLID OPEN
This message appears only at the
start of a trip
>DOOR OPEN
This message appears after a min-
imal defined road speed has been
exceeded
>FASTEN SEAT BELTS
*
In addition to this message, an indi-
cator lamp with the safety belt icon
appears and an acoustical signal is
sounded
>WASHER FLUID LOW
The fluid level is too low; top off at
the next opportunity, refer to
page 141
>CHECK ENGINE OIL LEV
The oil level is at the absolute min-
imum; refill as soon as possible, refer
to page 141. Do not drive more than
approx. 30 miles/50 km until you add
oil >CHECK FILLER CAP
Check to see whether the fuel filler
cap has been closed properly, refer
to page 25
>OUTSIDE TEMP. +23 7/Ð5 6
This display is only an example. The
current temperature is displayed at
outside temperatures of +37.5 7/
+3 6 and below, refer also to
page 73
>TIRE PRESSURE SET
*
The RDC has imported the current
inflation pressure in the tires as the
target values which the system will
monitor, refer to page 97
>CHECK TIRE PRESSURE
*
Check and correct the tire inflation
pressure to specifications at the ear-
liest opportunity, e.g. next stop to
refuel, refer to page 97
>TIRECONTROL INACTIVE
*
A temporary interference of the RDC
or a system fault, refer to page 98
>CHECK BRAKE LIGHTS
A lamp has failed or the electrical
circuit has a fault, refer to page 153
or consult a BMW Sports Activity
Vehicle center
Page 79 of 183

79n
OverviewControlsMaintenanceRepairsDataIndex
Check Control >CHECK LOWBEAM LIGHTS
CHECK SIDE LIGHTS
CHECK REAR LIGHTS
CHECK FRONT FOGLAMPS
CHECK LICPLATE LIGHT
CHECK HIGHBEAM LIGHT
CHECK BACK UP LIGHTS
Defective bulb or circuit, refer to
page 151 or consult a BMW Sports
Activity Vehicle center
>TRANS. FAILSAFE PROG
*
Please consult the nearest
BMW Sports Activity Vehicle center,
refer to page 67
>CHECK BRAKE LININGS
Have the brake pads inspected by
your BMW Sports Activity Vehicle
center, refer to page 133
>CHECK COOLANT LEVEL
Coolant too low, top off at the next
opportunity, refer to page 143
>ENGINE FAILSAFE PROG
There is a fault in the engine's elec-
tronic control system.
You can continue to drive with
reduced engine output or engine
speed.
Have the system checked by your
BMW Sports Activity Vehicle center.
Displays after completion of trip All of the malfunctions registered during
the trip appear consecutively when the
ignition key is turned to position 0.
The following displays will appear when
appropriate:
>LIGHTS ON
>KEY IN IGNITION LOCK
>CHECK ENGINE OIL LEV
Add engine oil at the next opportu-
nity, e.g. next stop to refuel, refer to
page 141.
This display appears when you open
the driver's door after parking the
vehicle. A supplementary acoustic
signal is also heard.
Status messages remain available for a
period of approx. three minutes after
the display goes out and the key is
removed from the ignition lock. Press
the CHECK button 3. If there were mul-
tiple messages, press the CHECK
button repeatedly to view them all in
sequence.
To check the Check Control Press the CHECK button 3 with the
ignition key in position 2:
CHECK CONTROL OK appears in the
display.
No malfunctions are present in the
monitored systems.Computer You can find a description of the com-
puter on pages 80 and 85 as well as in
the Owner's Manual for the Onboard
Computer.
You can have the Check Control
and computer messages dis-
played in a different language.<
Page 94 of 183

94n
Self-leveling suspension
*
2-axle self-leveling suspension
*
The warning lamp for the self-
leveling suspension comes on,
or the message Ð SELFLEVEL
SUSP.INACT Ð appears in the Check
Control: there is a malfunction in the
self-leveling suspension.
Stop and inspect the vehicle. If it is
riding significantly lower in the rear than
in the front, or if it is sitting at an incline
Ð left rear compared to right rear - con-
sult the nearest BMW Sports Activity
Vehicle center. Drive with appropriate
caution in the meantime. The vehicle
has reduced ground clearance or
driving comfort is noticeably reduced.
Even if the attitude of the vehicle is
normal, you should consult the nearest
BMW Sports Activity Vehicle center if
the warning lamp indicates a system
malfunction.
The conceptYour vehicle is equipped with 2-axle
self-leveling suspension acting on both
the front and rear suspension. This
system combines automatic self-lev-
eling, which compensates for variations
in front-to-rear load-distribution pat-
terns, with a selection feature allowing
drivers to choose from among several
ride-height options.
You may choose from among the fol-
lowing ride heights:
>Standard
The standard setting is intended for
most operating conditions, including
trailer towing
>Off-Road
Higher ride height for increased
ground clearance
>Access
Lowers vehicle for more convenient
cargo handling or easier passenger
ingress and exitsChanges in ride height are initiated
either manually, using the control
button, refer to page 95, or automati-
cally in response to specific speeds.
When the ride height is selected manu-
ally, the driver has the additional option
of revising the ride-height selection by
entering a new command during the
adjustment process.
When the vehicle is stationary, the
system executes ride-height changes in
both directions (up and down) when-
ever the doors are closed. The tailgate/
liftgate may be open. The system raises
the vehicle only when the engine is run-
ning.
The system's automatic self-leveling
feature automatically compensates for
variations in the vehicle's load.
Frequent changes in ride height
initiated at short intervals can
overheat the compressor, causing the
system to briefly suspend active opera-
tion.<