2003 BMW 325xi TOURING spare wheel
[x] Cancel search: spare wheelPage 86 of 166

86
If this occurs, reduce vehicle speed
immediately and stop the vehicle in a
safe location. Avoid hard brake applica-
tions. Do not oversteer. Replace the
defective tire, refer to page 141.
The space-saver spare tire is pro-
vided for temporary use only in the
case of a tire failure. It does not have
TPM electronics and is not monitored.
The spare tire that has the same dimen-
sions as the tires already mounted on
the vehicle is equipped with the neces-
sary TPM electronics and will be also
monitored once the tires have been
mounted and the system initialized.<
The TPM cannot alert you to
severe and sudden tire damage
caused by external factors.<
Have the tires changed by your
BMW center.
Your BMW center has the information
needed for working with TPM and is
equipped with the necessary special
tools.
The yellow indicator lamp will come on
during the malfunction.
The indicator lamp also comes on
>in the event of a system fault
>if a wheel is mounted without the
appropriate electronics
>if, in addition to the spare tire, addi-
tional wheels with TPM electronics
are on board.
Please refer the problem to your BMW
center.
Flat Tire Monitor*The conceptAs you drive, the Flat Tire Monitor
keeps track of pressure levels in all four
tires in order to detect and warn of any
substantial pressure loss.
The system actually detects pressure
loss by monitoring differences in the
relative speeds of the four wheels. It
interprets variations outside specified
limits as severe pressure loss, and then
responds by generating a warning.
Tire Pressure Monitor (TPM)*
handbook.book Page 86 Saturday, July 27, 2002 1:36 PM
Page 117 of 166

117 Wheels and tires
Tire inflation pressureInformation for your safetyThe factory-approved tires are matched
to your vehicle and have been selected
to provide optimum safety and driving
comfort when used properly.
It is not merely the tire's service life, but
also driving comfort and – above all else
– driving safety that depend on the con-
dition of the tires and the maintenance
of the specified tire inflation pressure.
Incorrect tire inflation pressure is a fre-
quent cause of tire damage. It also sig-
nificantly influences the roadholding
ability of your BMW.
Be sure to check the tire inflation
pressure, including the space-
saver spare tire or the spare tire, on a
regular basis, at least twice a month
and before every extended journey,
refer to page 25. If this is not done,
incorrect tire pressures can cause driv-
ing instability and tire damage, ulti-
mately resulting in an accident.<
Tire conditionTire tread – tire damageInspect your tires frequently for tread
wear, signs of damage and for foreign
objects lodged in the tread. Check the
tread depth.
Tread depth should not be allowed to
go below 1/8 in / 3 mm, even though
the legally specified minimum tread
depth is 1/16 in / 1.6 mm.
Below 1/8 in / 3 mm tread depth, there
is a great risk of hydroplaning, even at
relatively moderate speeds and with
only small amounts of water on the
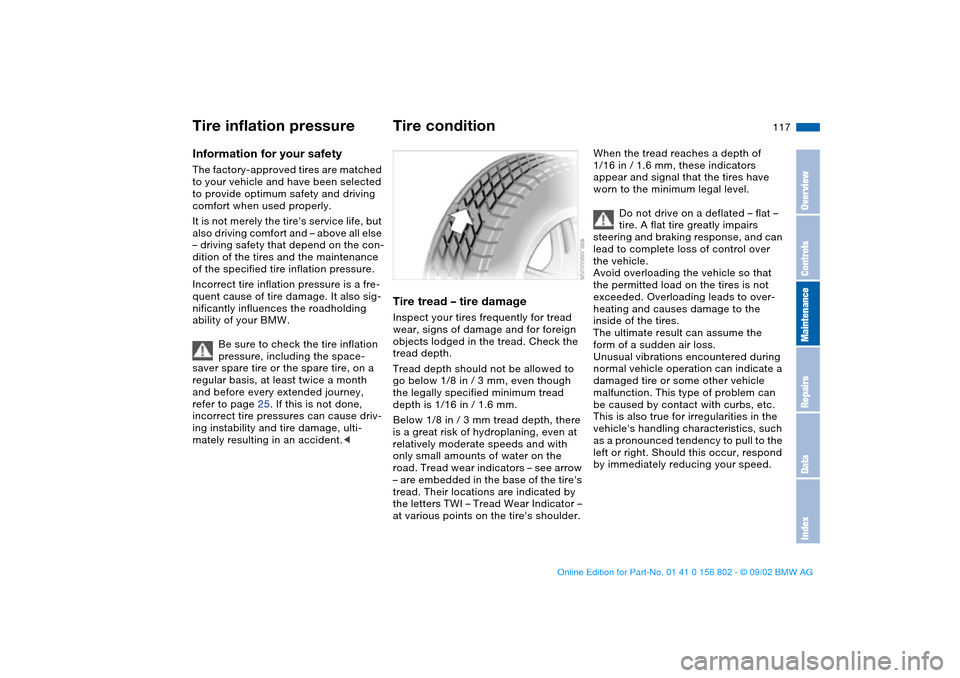
road. Tread wear indicators – see arrow
– are embedded in the base of the tire's
tread. Their locations are indicated by
the letters TWI – Tread Wear Indicator –
at various points on the tire's shoulder.
When the tread reaches a depth of
1/16 in / 1.6 mm, these indicators
appear and signal that the tires have
worn to the minimum legal level.
Do not drive on a deflated – flat –
tire. A flat tire greatly impairs
steering and braking response, and can
lead to complete loss of control over
the vehicle.
Avoid overloading the vehicle so that
the permitted load on the tires is not
exceeded. Overloading leads to over-
heating and causes damage to the
inside of the tires.
The ultimate result can assume the
form of a sudden air loss.
Unusual vibrations encountered during
normal vehicle operation can indicate a
damaged tire or some other vehicle
malfunction. This type of problem can
be caused by contact with curbs, etc.
This is also true for irregularities in the
vehicle's handling characteristics, such
as a pronounced tendency to pull to the
left or right. Should this occur, respond
by immediately reducing your speed.
OverviewControlsMaintenanceRepairsDataIndex
handbook.book Page 117 Saturday, July 27, 2002 1:36 PM
Page 119 of 166

119
tires must meet under the Federal
Motor Vehicle Safety Standard No. 109.
Grades B and A represent higher levels
of performance on the laboratory test
wheel than the minimum required by
law.
The temperature grade for this tire
is established for a tire that is
properly inflated and not overloaded.
Excessive speed, underinflation, or
excessive loading, either separately or
in combination, can cause heat buildup
and possible tire failure.
tread shoulder and maximum section
width. For example:
Tread wear 200
Traction AA
Temperature A
BMW advises against using
retreaded tires, since driving
safety may be impaired. This is due to
the possible variations in casing struc-
tures and, in some cases, to their
extreme age, which can lead to a
decrease in their durability.<
Tire ageThe date on which the tire was manu-
factured is indicated by the code on the
sidewall:
DOT... 3502 indicates that the tire was
manufactured in week 35 of the year
2002.
BMW recommends the replacement of
all tires – including the spare tire* –
when the tires are no more than 6 years
old, even if a tire life of 10 years is pos-
sible.Run Flat tires*Run Flat tires consist of self-supporting
tires and special rims. The tire rein-
forcement ensures that the tire retains
some residual safety in the event of
pressure drop and driving remains pos-
sible to a restricted degree. The vehicle
is equipped with a Tire Pressure Moni-
tor (TPM) or Flat Tire Monitor, which
indicate a flat tire. For additional infor-
mation on the Tire Pressure Monitor
(TPM) or Flat Tire Monitor, refer to
page 85 or 86.
Run Flat tires are only possible in
conjunction with the Tire Pres-
sure Monitor (TPM) or Flat Tire Moni-
tor.<
Tire replacement
OverviewControlsMaintenanceRepairsDataIndex
handbook.book Page 119 Saturday, July 27, 2002 1:36 PM
Page 142 of 166

142
Your BMW is equipped with a spare tire
or a space-saver spare tire designed for
temporary use in maintaining the vehi-
cle's mobility in an emergency.
To remove the spare tire, lift the
floor panel in the cargo area com-
pletely out, refer to page 109.<
What you will needIn order to avoid rattling noises later,
note the position of the tools when you
remove them and return them to their
original position when you are done
using them.
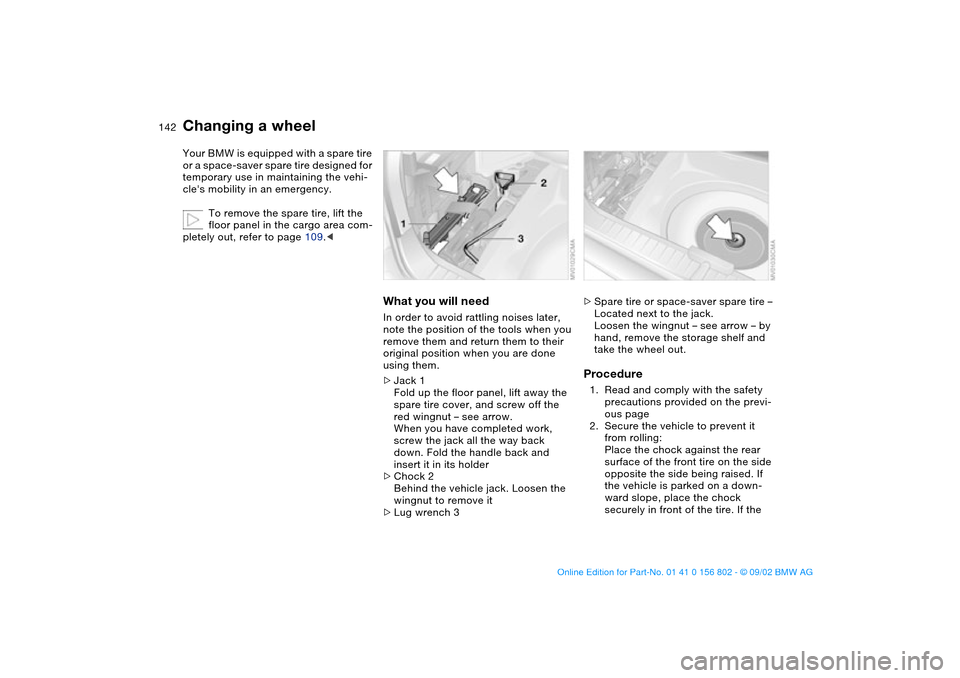
>Jack 1
Fold up the floor panel, lift away the
spare tire cover, and screw off the
red wingnut – see arrow.
When you have completed work,
screw the jack all the way back
down. Fold the handle back and
insert it in its holder
>Chock 2
Behind the vehicle jack. Loosen the
wingnut to remove it
>Lug wrench 3
>Spare tire or space-saver spare tire –
Located next to the jack.
Loosen the wingnut – see arrow – by
hand, remove the storage shelf and
take the wheel out.Procedure1. Read and comply with the safety
precautions provided on the previ-
ous page
2. Secure the vehicle to prevent it
from rolling:
Place the chock against the rear
surface of the front tire on the side
opposite the side being raised. If
the vehicle is parked on a down-
ward slope, place the chock
securely in front of the tire. If the
Changing a wheel
handbook.book Page 142 Saturday, July 27, 2002 1:36 PM
Page 143 of 166

143
wheel must be changed on a sur-
face with a more severe slope, take
additional precautions to secure
the vehicle from rolling
3. Wheels with full wheel covers*:
reach into the ventilation openings
and pull the cover off
4. Loosen the lug bolts by rotating
half a turn
5. Position the jack at the jacking
point – see arrows – closest to the
flat tire so that the jack base is ver-
tically below the jacking point and
the entire surface of the head of the
jack moves into the square recess
of the jacking point when the jack
is cranked – refer to the detail in the
next illustration
6. Jack the vehicle up until the wheel
you are changing is raised from the
ground
7. Unscrew the lug bolts and remove
the wheel
8. Remove accumulations of mud or
dirt from the mounting surfaces of
the wheel and hub. Clean the lug
bolts
9. Position the new wheel or the
space-saver spare tire on the hub
and screw at least two lug bolts fin-
ger-tight into opposite bolt holes
10. Screw in the remaining lug bolts.
Screw in all the bolts in a diagonal
pattern
11. Lower the jack and remove it from
beneath the vehicle
12. Tighten the lug bolts securely in a
diagonal pattern
Changing a wheel
OverviewControlsMaintenanceRepairsDataIndex
handbook.book Page 143 Saturday, July 27, 2002 1:36 PM
Page 144 of 166

144
13. Wheels with full wheel covers*:
place the wheel cover with the
valve opening – see arrow – over
the valve. Use both hands to press
the cover securely onto the rim
14. Check and correct the tire inflation
pressure at the earliest opportunity.
Vehicles with Tire Pressure Monitor
(TPM)/Flat Tire Monitor: after
mounting the spare tire or correct-
ing the inflation pressure, reinitial-
ize the system, refer to page 85
or 86.
Protect valve stems and valves from dirt
using screw-on valve stem caps. Dirty
valve stems frequently lead to slow
pressure loss.
Do not attempt to install the full
wheel cover on the space-saver
spare tire, since this could damage the
cover.<
The vehicle jack is designed for
changing wheels only. Do not
attempt to raise another vehicle model
with it or to raise any other type of load.
To do so could cause accidents and
personal injury.
To ensure continued safety, have the
tightness of the torque bolts checked
with a calibrated lug wrench – torque
specification: 88.5 lb ft/120 Nm – at the
earliest opportunity.<
When storing a wheel in the spare tire
recess, take care to avoid bending the
threaded rod.
If the original BMW light-alloy wheels
have been replaced with other light-
alloy wheels, different lug bolts may be
required.
Replace the defective tire as soon as
possible and have the new wheel/tire
balanced.
Driving with the space-saver
spare tireDrive cautiously. Do not exceed a
speed of 50 mph / 80 km/h.
Be aware that vehicle handling may be
altered. Anticipate, e.g., reduced track-
ing during braking, longer braking dis-
tances, and changed steering charac-
teristics when approaching limit
conditions. These handling characteris-
tics will be even more pronounced if
winter tires are mounted.
Only one space-saver spare tire
may be mounted at one time.
Mount a wheel and tire of the original
size at the earliest possible opportu-
nity.
tions, the size of the spare tire will
differ from that of the remaining tires.
The spare tire is fully functional at all
loads and speeds. However, the spare
tire should be replaced at the earliest
possible opportunity in order to achieve
the original operating conditions.<
Changing a wheel
handbook.book Page 144 Saturday, July 27, 2002 1:36 PM
Page 161 of 166

Everything from A to Z
161
N
Navigation System, refer to
the separate Owner's
Manual
Neckrest 47
O
OBD interface socket 132
Obstruction protection 39
Odometer 71
Oil
capacity 155
quality 127
viscosity 127
Oil additives 127
Oil change intervals, refer to
the Service and Warranty
Information Booklet for US
models/Warranty and Ser-
vice Guide Booklet for
Canadian models
Oil consumption 126
Oil dipstick 126
Oil filter change 155
Oil level
checking 126
indicator lamp 18
Oil pressure
indicator lamp 18
OIL SERVICE 73
Oil types 127Onboard computer, refer to
the Owner's Manual for
Onboard Computer
Onboard tool kit 136
Operating elements 14
Outlets, ventilation 92, 96
Outside temperature dis-
play 75
P
Panic mode 32
Park Distance Control
(PDC) 77
Parking aid 77
Parking brake 61
Parking lamps 89
replacing bulb 138
Partition net 107
PDC Park Distance
Control 77
Pocket flashlight 102
Pollen 95, 100
Power output 152
Power seat 46
Power windows
safety switch 40
Pressure, tires 25, 85, 117
monitoring 85
R
Radiator 155Radio, refer to the Owner's
Manual for Radio
Rain sensor 67
Range 76
Reading lamps
front 91
rear 91
Rear lamps 139
Rear window defroster
94, 99
Rearview mirror 50
Recirculated-air mode
94, 99
Reclining seat 44
Refueling 24
Remote control 31
Remote control keys 30
Replacement key 30
Reporting safety defects 6
Reserve indicator lamp 72
Reverse 62
Roof load capacity 154
Roof-mounted luggage
rack 111
Run Flat tires 119, 145
S
Safety belt height adjust-
ment 48
Safety feature 39
Safety instructions 5Seat adjustment 44
mechanical 44
power 46
Seat heating 49
Seat memory 48
Securing cargo 110
Securing devices 110
Selector lever, automatic
transmission 63
Service and Warranty Infor-
mation Booklet 130
Service interval display
73, 130
Shiftlock 63
Side airbags 52
Size 153
Ski bag 106
Sliding/tilt sunroof 40
closing following an elec-
trical malfunction 42
convenience operation 31
remote control 32
Snow chains 121
Socket 104
Spare key 30
Spare tire 141
Speedometer 16
Sports seat 45
Standing lamps 90
Starting problems 59
Starting the engine 59
Steering wheel lock 59
OverviewControlsMaintenanceRepairsDataIndex
handbook.book Page 161 Saturday, July 27, 2002 1:36 PM