2003 BMW 325XI tailgate
[x] Cancel search: tailgatePage 58 of 166

58
Vehicle Memory, Key MemoryHow the system functionsNo doubt you have often reflected on
how great it would be if you could per-
manently configure your vehicle's vari-
ous features and adjustments to mirror
your own personal preferences. In engi-
neering your vehicle, BMW has
included a number of options for stor-
ing personal adjustment data. These
can be programmed at your BMW cen-
ter.
The available configuration data fall into
two categories, according to whether
their primary orientation is the vehicle –
Vehicle Memory – or the individual –
Key Memory. Provided that each per-
son has a separate remote-control key,
you can have your BMW center enter
basic adjustment data for up to four
individuals in the system.
The system relies on a bilateral data
exchange to identify the individual user
and executes the selected settings
whenever the remote control unit is
used to disengage the locks.
Color-coded decals have been pro-
vided to help you distinguish the differ-
ent keys with their individual settings.What the system can doYou can learn about the entire array of
features this system offers at your BMW
center. Here are just a few examples:
Examples for Vehicle Memory:
>Various signals as acknowledgment
when locking or unlocking your vehi-
cle, refer to pages 31, 33
>Activates/deactivates the "Follow me
home" function, refer to page 89
>Activates/deactivates daytime driv-
ing lamps, refer to page 89
>Sets the units of measure for display-
ing time, outside temperature, dis-
tance traveled and fuel consumption
in the instrument cluster>Indicates via an acoustic tone that
PDC has been activated, refer to
page 77
>Switches on rear window defroster
automatically, refer to pages 94, 99
>After giving an ice warning, the dis-
play returns to the previous setting,
refer to page 75.
Examples for Key Memory:
>Locks the vehicle automatically after
starting off, refer to page 34
>Unlocks the driver's door first, then
the vehicle's remaining locks, refer to
page 34
>Opens the tailgate instead of the rear
window with the remote control, refer
to page 32
>Automatically adjusts the driver's
seat to the personal programmed
settings when the vehicle is
unlocked, refer to page 48
>Determines how far the passenger
mirror will tilt, refer to page 49.
You will see this symbol through-
out the Owner's Manual. It is to
remind you at appropriate places of the
settings that are available to you.<
handbook.book Page 58 Saturday, July 27, 2002 1:36 PM
Page 73 of 166

73
Service interval displayRemaining distance to serviceThe displays shown in the illustration
appear for a few seconds when the
ignition key is in position 1 or higher or
after the engine is started.
The next service due appears with the
message OIL SERVICE or
INSPECTION, together with the dis-
tance remaining in miles – in kilometers
in Canada – before the next scheduled
service.
The computer bases its calculations of
the remaining distance on the preced-
ing driving style.
A flashing message and a "–" in front of
the number mean that the service inter-
val has already been exceeded by the
distance shown on the display. Please
contact your BMW center for an
appointment.
Check ControlThe following information and/or condi-
tions are indicated using symbols, with
the ignition key in position 2 or higher,
until the condition has been corrected.
1Check the low beams and high
beams, as well as the parking lamps
2Door open
3Tailgate open
4Check brake and tail lamps
When you open the driver's door after
parking, a signal sounds to remind you
if the headlamps have not been
switched off.
OverviewControlsMaintenanceRepairsDataIndex
handbook.book Page 73 Saturday, July 27, 2002 1:36 PM
Page 111 of 166

111
Roof-mounted luggage rack*A special roof-rack system is available
as an optional extra for your BMW.
Please observe the precautions
included with the installation instruc-
tions.AnchoragesAccess to the anchorages:
To fold up the covers – see arrow –
please use the tool provided with the
roof-rack system.Loading and driving notesRoof-mounted luggage racks raise the
center of gravity of the vehicle when
they are loaded. For this reason, they
exercise a major effect on the vehicle's
handling and steering response.
You should therefore always remember
not to exceed the approved roof load
capacity, the approved gross vehicle
weight or the axle loads when loading
the rack. These weights are listed under
Technical data on page 154.
Make sure that the load is not too bulky,
and attempt to distribute it evenly.
Always load the heaviest pieces first so
that they are at the bottom. Be sure that
adequate clearance is maintained for
raising the sliding/tilt sunroof, and that
objects do not project into the opening
path of the tailgate.
Secure the roof-mounted luggage cor-
rectly and securely to prevent it from
shifting or being lost during driving.
Drive smoothly and avoid sudden
acceleration and braking. Do not corner
at high speeds.
The roof-mounted luggage rack and the
roof load increase the aerodynamic
resistance: increased fuel consumption
and additional stress on the vehicle's
body are the result.
OverviewControlsMaintenanceRepairsDataIndex
handbook.book Page 111 Saturday, July 27, 2002 1:36 PM
Page 140 of 166

140
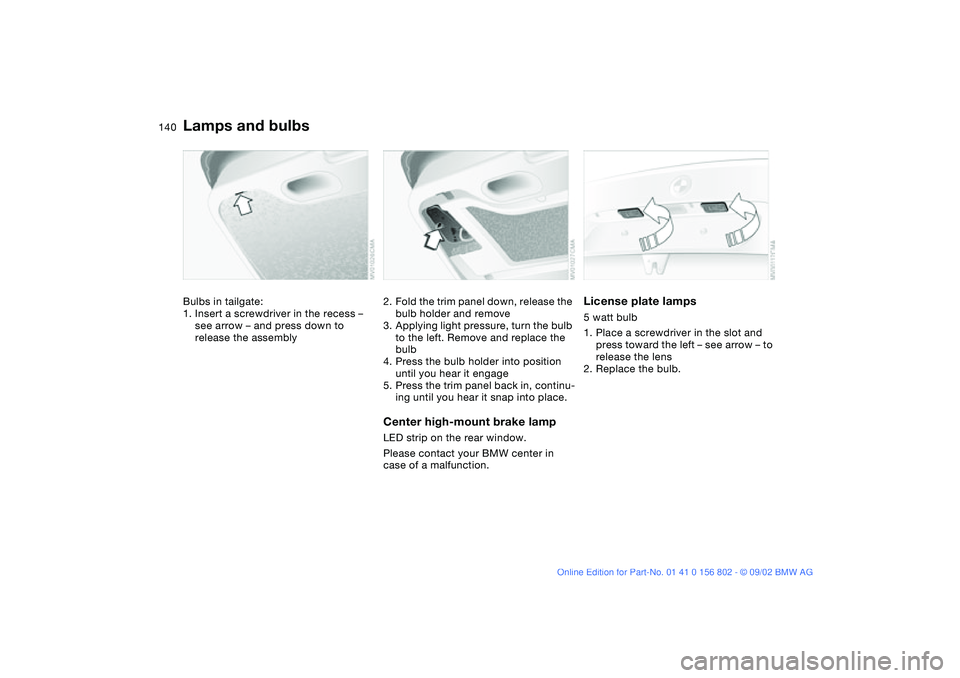
Bulbs in tailgate:
1. Insert a screwdriver in the recess –
see arrow – and press down to
release the assembly
2. Fold the trim panel down, release the
bulb holder and remove
3. Applying light pressure, turn the bulb
to the left. Remove and replace the
bulb
4. Press the bulb holder into position
until you hear it engage
5. Press the trim panel back in, continu-
ing until you hear it snap into place.Center high-mount brake lampLED strip on the rear window.
Please contact your BMW center in
case of a malfunction.
License plate lamps5 watt bulb
1. Place a screwdriver in the slot and
press toward the left – see arrow – to
release the lens
2. Replace the bulb.
Lamps and bulbs
handbook.book Page 140 Saturday, July 27, 2002 1:36 PM
Page 141 of 166

141
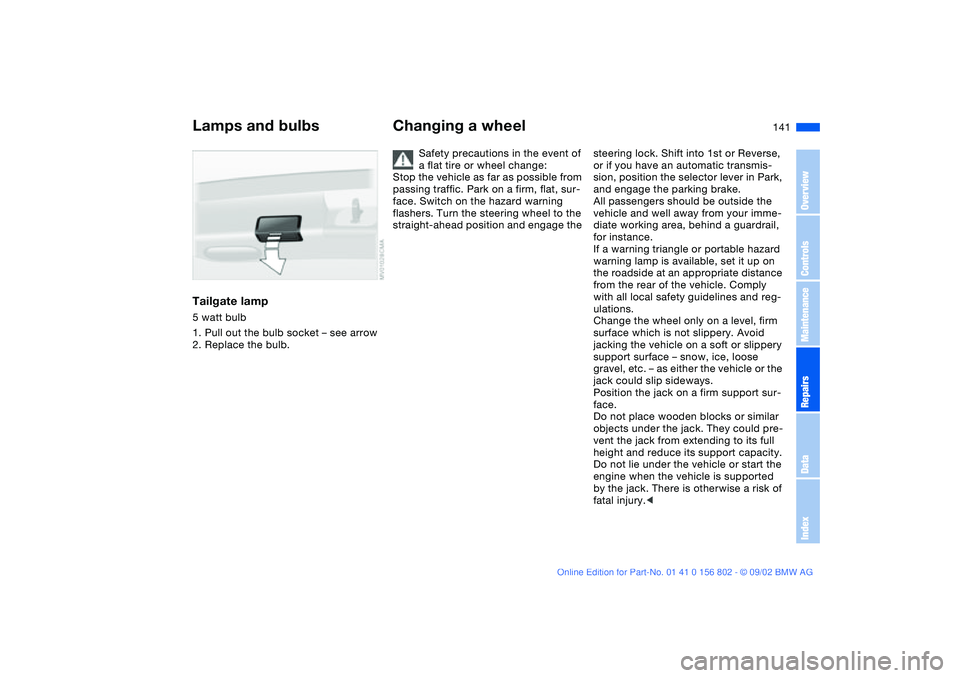
Tailgate lamp5 watt bulb
1. Pull out the bulb socket – see arrow
2. Replace the bulb.
Changing a wheel
Safety precautions in the event of
a flat tire or wheel change:
Stop the vehicle as far as possible from
passing traffic. Park on a firm, flat, sur-
face. Switch on the hazard warning
flashers. Turn the steering wheel to the
straight-ahead position and engage the
steering lock. Shift into 1st or Reverse,
or if you have an automatic transmis-
sion, position the selector lever in Park,
and engage the parking brake.
All passengers should be outside the
vehicle and well away from your imme-
diate working area, behind a guardrail,
for instance.
If a warning triangle or portable hazard
warning lamp is available, set it up on
the roadside at an appropriate distance
from the rear of the vehicle. Comply
with all local safety guidelines and reg-
ulations.
Change the wheel only on a level, firm
surface which is not slippery. Avoid
jacking the vehicle on a soft or slippery
support surface – snow, ice, loose
gravel, etc. – as either the vehicle or the
jack could slip sideways.
Position the jack on a firm support sur-
face.
Do not place wooden blocks or similar
objects under the jack. They could pre-
vent the jack from extending to its full
height and reduce its support capacity.
Do not lie under the vehicle or start the
engine when the vehicle is supported
by the jack. There is otherwise a risk of
fatal injury.<
Lamps and bulbs
OverviewControlsMaintenanceRepairsDataIndex
handbook.book Page 141 Saturday, July 27, 2002 1:36 PM
Page 162 of 166

Everything from A to ZSteering wheel with multi-
function buttons 22
Steering wheel, adjusting 50
Steptronic 63
Storage
refer to the Caring for your
vehicle brochure 137
Storage compartments 102
Stroke 152
Switching off the engine 61
Synthetic oils 127
T
Tachometer 16, 71
Tail lamp assembly
replacing bulb 139
Tail lamps
replacing bulb 139
Tailgate 34
emergency operation 35
Tailgate lamp
replacing bulb 141
Tank capacity 155
Technical data 152
Technical modifications 4, 5
Telephone hookup 103
Telephone, refer to the sep-
arate Owner's Manual
Temperature adjustment
94, 98Temperature display
engine coolant 72
outside temperature 75
Temperature layering 95, 99
Thigh support area, adjust-
ing 45
Third brake lamp 140
Tilt alarm sensor 32, 38
remote control 32
switching off 38
Time 74
Tire change 141
Tire inflation pressure
25, 117
Tire Pressure Monitor
(TPM) 85
Tire replacement 118
Tools 136
Torque 152
Towing eyelet 148
Towing the vehicle 148
TPM Tire Pressure
Monitor 85
Track 153
Transmission 62
Transporting children
safely 54
Tread depth, tires 117
Tread wear indicator 117
Trip odometer 71
Turn signal indicator 20, 66
replacing bulb 138Turning circle 153
U
Uniform Tire Quality
Grading 119
V
Vacuum cleaner, connect-
ing 104
Vehicle
break-in procedures 114
starting 59
switching off 61
Vehicle Memory 58
Vehicle storage
refer to the Caring for your
vehicle brochure
Vehicle weight 154
Ventilation 92, 96
draft-free 95, 99
Voice Control System, refer
to the separate Owner's
Manual
Voice recognition 22
W
Warning lamp Please fasten
safety belts 18
Warning lamps 18
Warning messages 73
Warranty and Service
Guide 130Warranty, refer to separate
booklet 6
Washer fluid
refilling 126, 155
Washer reservoir
filling 126, 155
Washer/wiper system 67
Water on roadways
deep water 115
Wear indicator for tires 117
Weights 154
Wheel, changing 141
Wheelbase 153
Wheels and tires 120
Width 153
Window condensation
removing 95, 98
Windows
convenience operation 31
defrosting 95
power 39
remote control 32
Windows, defrosting 98
Windshield washer reser-
voir, filling 126, 155
Windshield wipers 67
Winter tires 120
Wiper blades
replacing 136
Work in the engine compart-
ment 122
handbook.book Page 162 Saturday, July 27, 2002 1:36 PM