2003 BMW 325IT WAGON wheel
[x] Cancel search: wheelPage 50 of 166

50
Steering wheelTo adjust
Never attempt to adjust the steer-
ing wheel while driving the vehicle
– it could respond with unexpected
movement, posing a potential accident
hazard.<
1. Fold down the detent lever
2. Adjust the steering column to obtain
the best reach and rake angles for
the current seat position
3. Fold the detent lever back up to
engage the lock.
MirrorsTo adjust exterior mirrors1Switch for 4-way adjustment
2Selection switch for changing
between mirrorsTo adjust manuallyYou can also adjust the mirrors manu-
ally:
Press against the edges of the lens.
For storing mirror settings, refer to Seat
and mirror memory on page 48.
The mirror on the passenger's
side features a lens with a more
convex surface than the mirror installed
on the driver's side. When estimating
the distance between yourself and
other traffic, bear in mind that the
objects reflected in the mirror are closer
than they appear. This means that esti-
mations of the distance to following
traffic should not be regarded as pre-
cise.
tion 2.
handbook.book Page 50 Saturday, July 27, 2002 1:36 PM
Page 52 of 166

52Passenger safety systems
Airbags1Front driver and passenger-side air-
bags
2Head airbags for driver and front pas-
senger
3Side airbags on the driver and pas-
senger sides front and rear*Protective effectThe front airbags protect the vehicle's
occupants during frontal impacts in
which the protection provided by the
safety belts alone might not be enough
to prevent injury. The head airbags and
side airbags help provide protection in
the event of a collision from the side.
Each of the side airbags is designed to
help support the seat occupant's upper
body.
For information on the correct sitting
posture, refer to page 43.
The side airbags in the rear pas-
senger area* of your vehicle may
already have been deactivated either at
the time of manufacture or by a BMW
center. You may have them activated if
you desire to do so. Please contact
your BMW center for additional infor-
mation.<
The airbags do not deploy in
response to minor collisions, rear
impacts and certain kinds of vehicle
rollover.<
Do not apply adhesive materials to
the cover panels of the airbags,
cover them or modify them in any other
way. Do not remove the airbag restraint
system. In the event of a malfunction,
deactivation or triggered activation – as
a response to an accident – of the air-
bag restraint system, consult your BMW
center for inspection, repair or disas-
sembly. Do not modify or tamper with
either the wiring or the individual com-
ponents in the airbag system. These
include the upholstered cover panels in
the steering wheel, the instrument
panel, the side trim panels in the front
and rear, in the roof panels, and in the
sides of the inside roof lining. Also, do
not attempt to remove the steering
wheel. Unprofessional attempts to ser-
vice the system could lead to failure in
an emergency or undesired airbag acti-
vation, either of which could result in
personal injury. Do not touch the indi-
vidual components immediately after
the system has been activated, as this
could result in personal injury.<
At all times, occupants should sit
upright and be properly restrained
– infants and small children in appropri-
ate child-restraint systems; larger chil-
dren and adults using the safety belts.
Never let an occupant's head rest near
or on a side airbag because the inflating
airbag could cause a serious or fatal
injury. Please note that the word Airbag
imprinted on the door trim panel indi-
cates the airbag's location.
Accident research shows that the saf-
est place for children in an automobile
is in the rear seat. However, a child sit-
ting in the rear seat and not properly
restrained may place his or her head on
or near the airbag, if so equipped. For
example, a child — even though belted
in — may fall asleep with his or her head
against the side airbag. It may be diffi-
handbook.book Page 52 Saturday, July 27, 2002 1:36 PM
Page 59 of 166

59 Driving
Ignition lock0Steering locked
1Steering unlocked
2Ignition switched on
3Starting the engine
Vehicles with automatic transmis-
sion:
Do not move the selector lever from
position P until the engine is running,
ignition key position 2.
Your vehicle is equipped with an inter-
lock. Therefore, the ignition key cannot
be turned to position 0 or removed until
the selector lever is in position P.<
Vehicles with manual transmis-
sion:
Step on the clutch when starting the
vehicle. A lockout prevents the engine
from starting if the clutch is not
depressed.<
Steering lockedThe key can only be inserted and
removed in this position.
After removing the key, turn the steer-
ing wheel slightly to the left or right until
you hear the lock engage.
If the key is not removed, an acoustic
signal is sounded after the driver's door
has been opened.
The sound system remains operational
for approx. 20 minutes after you switch
off the ignition – ignition key in position
0 or key removed. Simply switch it back
on.Steering unlockedYou will find that it is often easier to turn
the ignition key from position 0 to posi-
tion 1 when you move the steering
wheel slightly to help disengage the
lock.
Individual electrical accessories are
ready for operation.
Starting the engineBefore starting>Engage the parking brake
>Ensure that the gearshift lever is in
neutral, or, with an automatic trans-
mission, that the selector lever is in
Park
>Depress the clutch pedal.
Do not allow the engine to run in
enclosed spaces. Otherwise,
breathing the exhaust fumes can lead
to unconsciousness and death. The
exhaust gases contain carbon monox-
ide, an odorless and colorless, but
highly toxic gas. Do not leave the vehi-
cle unattended with the engine running.
An unattended vehicle with a running
engine represents a safety hazard.<
When driving, standing at idle,
and parking the vehicle, take care
to avoid contact between the hot
exhaust system and flammable materi-
als – grass, hay, leaves, etc. Such con-
tact could lead to a fire, resulting in
serious personal injury and property
damage.<
>Start the engine. Do not press the
accelerator pedal.
OverviewControlsMaintenanceRepairsDataIndex
handbook.book Page 59 Saturday, July 27, 2002 1:36 PM
Page 61 of 166

61
Switching off the engineTurn the ignition key to position 1 or 0.
You should never remove the igni-
tion key when the vehicle is in
motion, as the steering lock could
engage.
When you leave the vehicle, always
remove the ignition key and engage the
steering lock.
Vehicles with manual transmission:
Always engage the parking brake when
parking on slopes and inclined sur-
faces. Placing the lever in gear may not
provide adequate resistance to rolling.
Vehicles with automatic transmission:
Place the selector lever in Park.<
Parking brakeThe parking brake is primarily designed
to prevent the vehicle from rolling while
parked. It operates on the rear wheels.To engageThe detent engages automatically, and
the indicator lamp in the instrument
cluster comes on when the ignition key
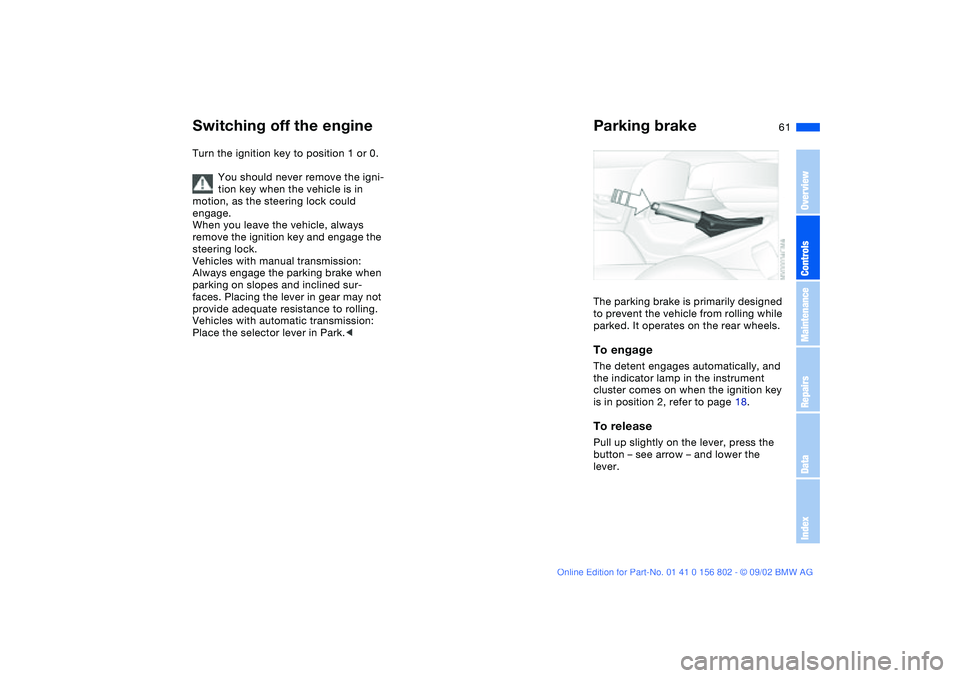
is in position 2, refer to page 18.To releasePull up slightly on the lever, press the
button – see arrow – and lower the
lever.
OverviewControlsMaintenanceRepairsDataIndex
handbook.book Page 61 Saturday, July 27, 2002 1:36 PM
Page 63 of 166

63
Automatic transmission with Steptronic*You can drive as with a normal auto-
matic transmission. In addition, you can
also shift manually.
When you move the selector lever from
the D position to the left into the M/S
range, the performance-oriented shift
programs of the automatic transmission
are engaged. Steptronic enters the
manual selection mode and executes
the desired shift whenever you tap the
selector lever in the direction indicated
by + or –. Whenever you want to use
the automatic mode again, just move
the selector lever toward the right to
position D. Under normal operating
conditions, fuel consumption is lowest
when driving in position D.
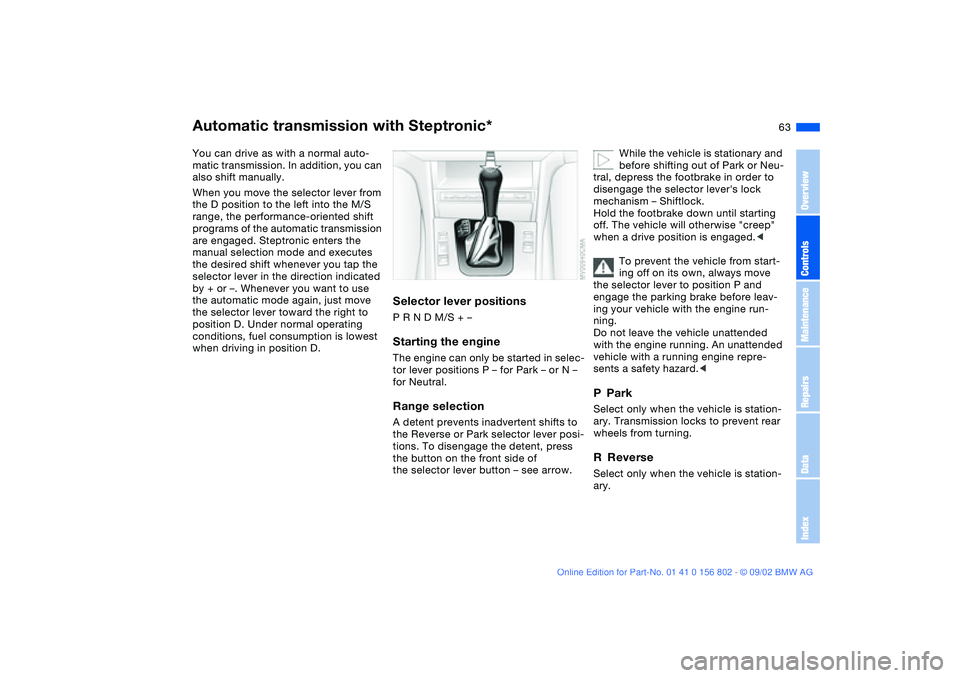
Selector lever positionsP R N D M/S + –Starting the engineThe engine can only be started in selec-
tor lever positions P – for Park – or N –
for Neutral.Range selectionA detent prevents inadvertent shifts to
the Reverse or Park selector lever posi-
tions. To disengage the detent, press
the button on the front side of
the selector lever button – see arrow.
While the vehicle is stationary and
before shifting out of Park or Neu-
tral, depress the footbrake in order to
disengage the selector lever's lock
mechanism – Shiftlock.
Hold the footbrake down until starting
off. The vehicle will otherwise "creep"
when a drive position is engaged.<
To prevent the vehicle from start-
ing off on its own, always move
the selector lever to position P and
engage the parking brake before leav-
ing your vehicle with the engine run-
ning.
Do not leave the vehicle unattended
with the engine running. An unattended
vehicle with a running engine repre-
sents a safety hazard.<
PParkSelect only when the vehicle is station-
ary. Transmission locks to prevent rear
wheels from turning.RReverseSelect only when the vehicle is station-
ary.
OverviewControlsMaintenanceRepairsDataIndex
handbook.book Page 63 Saturday, July 27, 2002 1:36 PM
Page 84 of 166

84
Hill Descent Control (HDC)*The conceptBy reducing the vehicle's speed on
steep downhill stretches, HDC main-
tains predictable vehicle handling
response to provide you with control of
your BMW during extreme descents.
The vehicle slows to a pace just slightly
faster than walking speed.
HDC is available for activation at vehi-
cle speeds below approx. 22 mph /
35 km/h. When driving down steep
hills, the vehicle reduces speed auto-
matically down to about double walking
speed – approx. 7.5 mph / 12 km/h –
and then maintains this speed at a con-
stant.
You can use the accelerator or brakes
to vary this speed within a range from
approx. 3 mph / 5 km/h to approx.
15 mph / 25 km/h.
In conjunction with the multifunction
steering wheel you can use the +/–
button to set the cruise control to a tar-
get speed in the range from approx.
3 mph / 5 km/h to approx. 15 mph /
25 km/h.
HDC is automatically deactivated once
vehicle speed again exceeds approx.
37 mph / 60 km/h.
To activate the systemPress the HDC button; the green indi-
cator lamp integrated within the button
comes on.
The indicator lamp flashes whenever
the system is actively intervening to
control your speed with automatic
brake applications.To deactivate the systemPress the button again, the indicator
lamp goes out.
HDC is automatically deactivated once
the vehicle accelerates to more than
37 mph / 60 km/h, as well as whenever
you switch off the ignition.
To use HDCWith manual transmission:
You should always ensure that either
reverse or first gear is engaged before
using HDC, as the engine's braking
effect is most pronounced in these
gears, and only reduced engine braking
is available in higher gears.
With automatic transmission: HDC is
available for use in all ranges.System malfunctionsSignaled by the indicator lamp, which
responds to problems by going out
while HDC is in operation or by failing
to come on when you activate the sys-
tem:
HDC is temporarily not available if
brake temperature is too high.
If the DSC indicator lamp comes
on at the same time:
There is a fault in the HDC and
DSC systems. Have your BMW center
inspect this system as soon as possi-
ble.
handbook.book Page 84 Saturday, July 27, 2002 1:36 PM
Page 86 of 166

86
If this occurs, reduce vehicle speed
immediately and stop the vehicle in a
safe location. Avoid hard brake applica-
tions. Do not oversteer. Replace the
defective tire, refer to page 141.
The space-saver spare tire is pro-
vided for temporary use only in the
case of a tire failure. It does not have
TPM electronics and is not monitored.
The spare tire that has the same dimen-
sions as the tires already mounted on
the vehicle is equipped with the neces-
sary TPM electronics and will be also
monitored once the tires have been
mounted and the system initialized.<
The TPM cannot alert you to
severe and sudden tire damage
caused by external factors.<
Have the tires changed by your
BMW center.
Your BMW center has the information
needed for working with TPM and is
equipped with the necessary special
tools.
The yellow indicator lamp will come on
during the malfunction.
The indicator lamp also comes on
>in the event of a system fault
>if a wheel is mounted without the
appropriate electronics
>if, in addition to the spare tire, addi-
tional wheels with TPM electronics
are on board.
Please refer the problem to your BMW
center.
Flat Tire Monitor*The conceptAs you drive, the Flat Tire Monitor
keeps track of pressure levels in all four
tires in order to detect and warn of any
substantial pressure loss.
The system actually detects pressure
loss by monitoring differences in the
relative speeds of the four wheels. It
interprets variations outside specified
limits as severe pressure loss, and then
responds by generating a warning.
Tire Pressure Monitor (TPM)*
handbook.book Page 86 Saturday, July 27, 2002 1:36 PM
Page 88 of 166

88
Flat tire
The red warning lamp in the
instrument cluster lights up to
warn of pressure loss and tire
failure. This visual alert is accompanied
by an acoustic warning signal. Reduce
your speed immediately, and steer and
brake gently as you bring the vehicle to
a stop.
To reset the warning lamp: after replac-
ing the flat tire you will need to reset the
red warning lamp manually. Maintain
pressure on the Flat Tire Monitor button
until the warning lamp goes out. Then
reinitialize the system.
The Flat Tire Monitor cannot pro-
vide you with advance warning of
sudden and severe tire damage caused
by external factors.
The system also does not detect the
gradual and minor loss of pressure that
all tires display over extended periods
of time.<
Check tire inflation pressures on a
regular basis, correcting them as
necessary, refer to page 25.
The system may respond to operation
on slippery or snow-covered road sur-
faces with false warnings or delays in
detecting actual pressure loss.
Performance-oriented driving – slip at
the drive wheels, high rates of lateral
acceleration – can also increase the
time that the Flat Tire Monitor requires
to detect a flat tire.<
System malfunctionsThe yellow indicator lamp in the instru-
ment cluster lights up and remains on
until the problem is corrected.
Please refer the problem to your BMW
center.
Flat Tire Monitor*
handbook.book Page 88 Saturday, July 27, 2002 1:36 PM