2003 BMW 325Ci remote control
[x] Cancel search: remote controlPage 69 of 178

69
Vehicle Memory, Key MemoryHow the system functionsNo doubt you have reflected at one
time or another on how great it would
be if you could permanently configure
your vehicle's various features and
adjustments to mirror your own individ-
ual preferences. In engineering your
vehicle, BMW has provided for a num-
ber of options for personal adjustment
that can be programmed into your vehi-
cle at your BMW center.
The available configuration data fall into
two categories, according to whether
their primary orientation is the vehicle –
Vehicle Memory – or the individual –
Key Memory. Provided that each per-
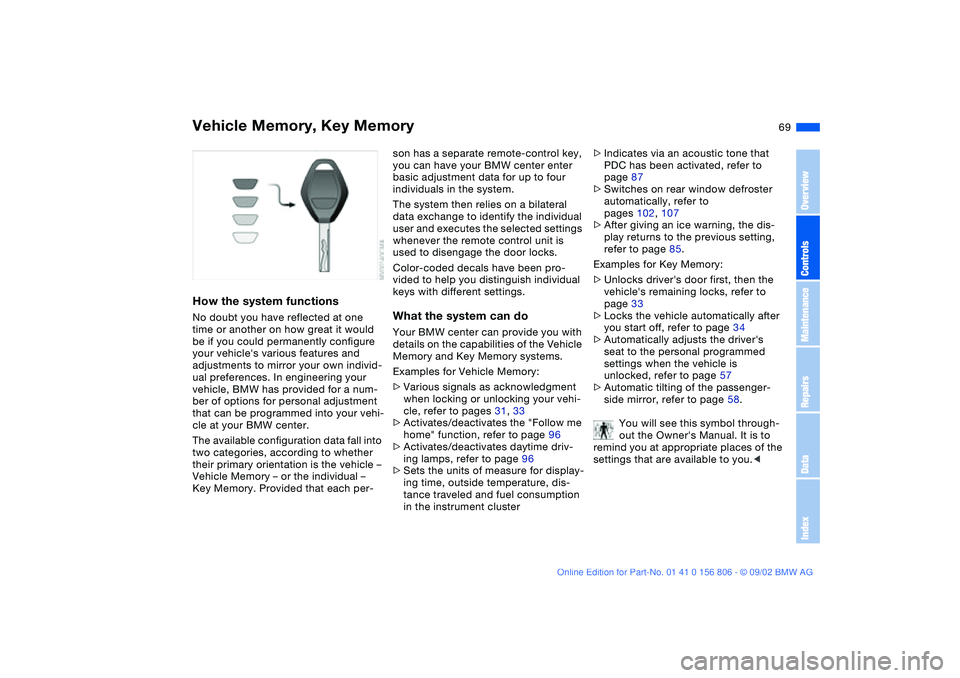
son has a separate remote-control key,
you can have your BMW center enter
basic adjustment data for up to four
individuals in the system.
The system then relies on a bilateral
data exchange to identify the individual
user and executes the selected settings
whenever the remote control unit is
used to disengage the door locks.
Color-coded decals have been pro-
vided to help you distinguish individual
keys with different settings.What the system can doYour BMW center can provide you with
details on the capabilities of the Vehicle
Memory and Key Memory systems.
Examples for Vehicle Memory:
>Various signals as acknowledgment
when locking or unlocking your vehi-
cle, refer to pages 31, 33
>Activates/deactivates the "Follow me
home" function, refer to page 96
>Activates/deactivates daytime driv-
ing lamps, refer to page 96
>Sets the units of measure for display-
ing time, outside temperature, dis-
tance traveled and fuel consumption
in the instrument cluster>Indicates via an acoustic tone that
PDC has been activated, refer to
page 87
>Switches on rear window defroster
automatically, refer to
pages 102, 107
>After giving an ice warning, the dis-
play returns to the previous setting,
refer to page 85.
Examples for Key Memory:
>Unlocks driver's door first, then the
vehicle's remaining locks, refer to
page 33
>Locks the vehicle automatically after
you start off, refer to page 34
>Automatically adjusts the driver's
seat to the personal programmed
settings when the vehicle is
unlocked, refer to page 57
>Automatic tilting of the passenger-
side mirror, refer to page 58.
You will see this symbol through-
out the Owner's Manual. It is to
remind you at appropriate places of the
settings that are available to you.<
OverviewControlsMaintenanceRepairsDataIndex
handbook.book Page 69 Wednesday, July 31, 2002 9:29 AM
Page 106 of 178

106
Tips for pleasant drivingUse the automatic mode – switch on
with AUTO button 7. Select the desired
interior temperature.
Detailed setting options are described
for you in the following section.
You can make the settings of your
vehicle in such a manner that,
when you unlock the vehicle with the
remote control of your personal key,
your own personalized setting for the
automatic climate control is initiated.
The AUTO program adjusts the
air distribution and the air sup-
ply for you and in addition adapts the
temperature to external influences –
summer, winter – to meet preferences
you can specify.
Individual air distribution
You can cancel the AUTO pro-
gram by selecting specific dis-
tribution patterns to suit your
own individual requirements.
While the AUTO program is then deacti-
vated, the automatic airflow control
remains in operation. Air flows onto
the windows , toward the upper
body , and into the footwell . You
can reactivate the automatic air distri-
bution mode by selecting the AUTO
button.Temperature
The interior temperature that
appears in the display panel is a
general figure intended for reference
purposes. We recommend 727/
+226 as a comfortable setting, even if
the air conditioning is on. When you
start the vehicle, the system ensures
that the selected temperature is
achieved as quickly as possible. It then
maintains this temperature, regardless
of the season.
To select the units of measure 6/7 of
the display, refer to page 85.
Air supply/Blower
By pressing the left or right half
of the button, you can vary the
air supply. This deactivates the auto-
matic control of the air supply, AUTO
disappears from the display panel. Nev-
ertheless, the automatic air distribution
remains unchanged. You can reactivate
the automatic air distribution mode by
selecting the AUTO button.
When the lowest blower speed is set
and you press the left half of the button,
all of the displays are canceled: the
blower, heating and air conditioning are
switched off. The outside air supply is
blocked. You can reactivate the system
by pressing any button for the auto-
matic climate control.To defrost windows and remove
condensation
This program quickly removes
ice and condensation from the
windshield and the side windows.
Air conditioning
The air is cooled and dehumidi-
fied and – depending on the
temperature setting – rewarmed.
Depending on the weather, the wind-
shield may fog over briefly when the
engine is started. Air conditioning helps
prevent the windows from fogging up.
Condensation forms during opera-
tion of the air conditioning system,
which then exits under the vehicle. It is
thus not unusual for a small puddle to
form under the car while the system is
running.<
Automatic climate control*
handbook.book Page 106 Wednesday, July 31, 2002 9:29 AM
Page 111 of 178

111
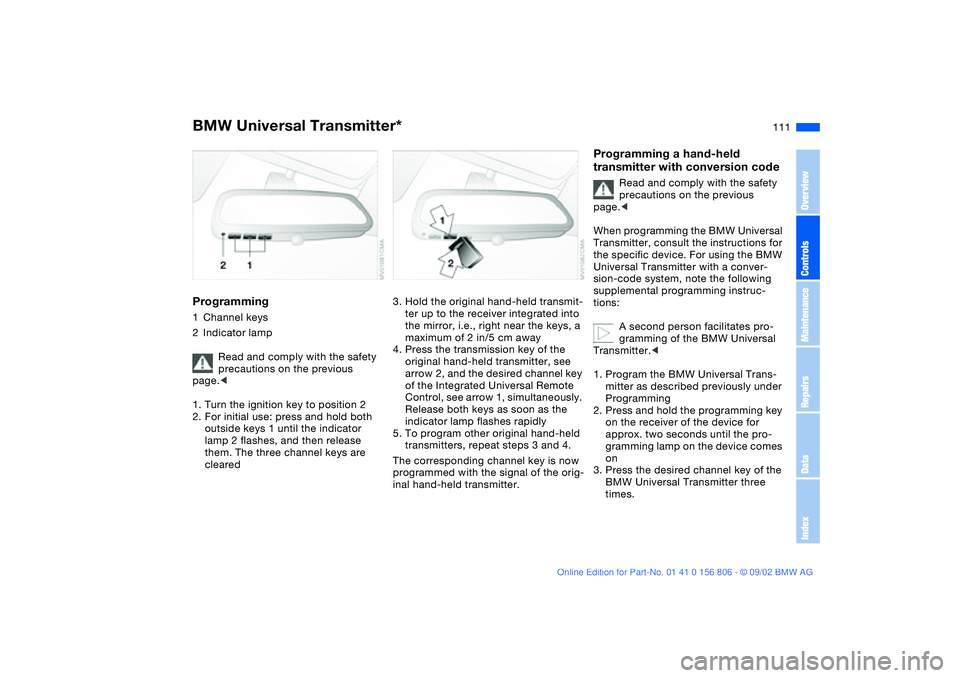
Programming1Channel keys
2Indicator lamp
Read and comply with the safety
precautions on the previous
page.<
1. Turn the ignition key to position 2
2. For initial use: press and hold both
outside keys 1 until the indicator
lamp 2 flashes, and then release
them. The three channel keys are
cleared
3. Hold the original hand-held transmit-
ter up to the receiver integrated into
the mirror, i.e., right near the keys, a
maximum of 2 in/5 cm away
4. Press the transmission key of the
original hand-held transmitter, see
arrow 2, and the desired channel key
of the Integrated Universal Remote
Control, see arrow 1, simultaneously.
Release both keys as soon as the
indicator lamp flashes rapidly
5. To program other original hand-held
transmitters, repeat steps 3 and 4.
The corresponding channel key is now
programmed with the signal of the orig-
inal hand-held transmitter.
Programming a hand-held
transmitter with conversion code
Read and comply with the safety
precautions on the previous
page.<
When programming the BMW Universal
Transmitter, consult the instructions for
the specific device. For using the BMW
Universal Transmitter with a conver-
sion-code system, note the following
supplemental programming instruc-
tions:
A second person facilitates pro-
gramming of the BMW Universal
Transmitter.<
1. Program the BMW Universal Trans-
mitter as described previously under
Programming
2. Press and hold the programming key
on the receiver of the device for
approx. two seconds until the pro-
gramming lamp on the device comes
on
3. Press the desired channel key of the
BMW Universal Transmitter three
times.
BMW Universal Transmitter*
OverviewControlsMaintenanceRepairsDataIndex
handbook.book Page 111 Wednesday, July 31, 2002 9:29 AM
Page 169 of 178

Everything from A to Z
169
Car wash, refer to the Caring
for your vehicle brochure
Cargo loading 116
Cassette player operation,
refer to the Owner's Man-
ual for Radio
CBC Cornering Brake
Control 123
indicator lamp 19
CD player operation, refer to
the Owner's Manual for
Radio
Cellular phone 113
Center armrest 112
Center high-mount brake
lamp 150
Central locking system 30
button 34
Changing a wheel 151
Check Control 83
Check Filler Cap
indicator lamp 19
Checking coolant level 138
Checking oil level 136
Child seats 63
integrated 61
Child-restraint mounting
system (LATCH) 66
Child-restraint system 63
Cigarette lighter 113
Clean headlamps 79Cleaning position, convert-
ible top 45, 50
Cleaning windshield 79
Clock 84
setting 84
Cockpit 14
Code, refer to the Owner's
Manual for Radio
Coin box 113
Compartments 112
Compression ratio 162
Computer 85
Condensation
removing from windows
103, 106
Consumption
display 82
fuel 86
Convertible top
cleaning position 45, 50
closing in an
emergency 48
electrical fault 48
Convertible top activation
fully automatic top 46
manual top 41
Convertible top compart-
ment panel, folding
down 37
Coolant 134, 138, 165
indicator lamp 19
Cooling system 165Copyright 4
Cornering Brake Control
(CBC) 123
indicator lamp 19
Cruise control 79
indicator lamp 20
Cup holder, see Beverage
holder 113
Curb weight 164
Cushion height 163
D
Data
dimensions 163
engine 162
technical 162
weights 164
Daytime driving lamps 96
DBC Dynamic Brake
Control 123
warning lamp 19
Defrost position 103, 106
Defrosting rear window
102, 107
Defrosting windows
103, 106
Digital clock 84
Dimensions 163
Dipstick, engine oil 136
Disc brakes 124
Displacement 162
Display lighting 97Displays 16
Distance warning PDC 87
Door key 30
Door lock buttons 34
Doors
emergency operation 33
manual operation 33
remote control 31
unlocking and locking
31, 33
Driving notes
braking 123
disc brakes 124
general information 123
hydroplaning 123
DSC Dynamic Stability
Control 90
indicator lamp 19
DTC Dynamic Traction
Control 90
Dynamic Brake Control
(DBC) 123
warning lamps 19
Dynamic Stability Control
(DSC) 90
indicator lamp 19
Dynamic Traction Control
(DTC) 90
E
Electric power windows 40
OverviewControlsMaintenanceRepairsDataIndex
handbook.book Page 169 Wednesday, July 31, 2002 9:29 AM
Page 171 of 178

Everything from A to Z
171
I
Ice warning 85
Ignition key 30
positions 70
Ignition lock 70
Imprint 4
Indicator lamps 18
Individual settings
Vehicle Memory, Key
Memory 69
Inflation pressure 25, 127
monitoring 92
INSPECTION 83
Instrument cluster 16
Instrument lighting 97
Instrument panel 14, 16
Interface socket for onboard
diagnostics (OBD) 141
Interior lamps 32, 98
remote control 32
Interior motion sensor 38
remote control 32
switching off 32, 39
Interior rearview mirror 60
automatic dimming
feature 60
Interior temperature, adjust-
ment 106
Interlock 70
Intermittent mode 78J
Jack 151
Jump-starting 157
K
Key Memory 69
Keys 30
L
Labels, tires 130
Lamps
daytime driving lamps 96
fog lamps 98
interior lamps 98
panel lighting 97
parking lamps 96
reading lamps 98
replacing 147
standing lamps 97
Lashing fittings 117
LATCH child-restraint
mounting system 66
Length 163
License plate lamp
replacing bulb 151
Light switch 96
Lighter 113
Lighting, see Lamps
LIGHTS ON warning 96
Load-securing devices 116
Lock, steering wheel 70Low beams 96
replacing bulb 147
Lug wrench 151
Luggage compartment 35
capacity 164
enlarge volume 37
floor panel 37
folding down convertible
top compartment panel 37
opening from the inside 35
Luggage compartment lid 35
emergency release 36
manual operation 35
remote control 32
securing separately 35
Luggage compartment light-
ing 35
Luggage rack 118
Lumbar support 53
M
M+S tires 130
Maintenance 83, 140
Malfunction displays 83
Manual convertible top 41
closing 44
opening 42
operation 41
Manual operation of con-
vertible top during electri-
cal fault 48
Manual transmission 73Master keys 30
MC operation, refer to the
Owner's Manual for Radio
MD operation, refer to the
Owner's Manual for Radio
Memory 57, 69
Vehicle Memory, Key
Memory 69
Microfilter 103, 108
Microphone 113
Mirror
exterior 59
interior 60
Mirror defrosting 59
Mirror memory 57
Mirrors 59
Modifications, technical 5
Multifunction switch 77
N
Navigation System, refer to
the separate Owner's
Manual
Neckrest 54
O
OBD interface socket 141
Odometer 81
Oil
capacity 165
quality 137
viscosity 137
OverviewControlsMaintenanceRepairsDataIndex
handbook.book Page 171 Wednesday, July 31, 2002 9:29 AM
Page 172 of 178

Everything from A to ZOil additives 137
Oil change intervals, refer to
the Service and Warranty
Information Booklet for US
models/Warranty and Ser-
vice Guide Booklet for
Canadian models
Oil consumption 136
Oil dipstick 136
Oil filter change 165
Oil level
checking 136
indicator lamp 19
warning lamp 18
Oil pressure
warning lamp 18
OIL SERVICE 83
Oil types 137
Onboard computer, refer to
the Owner's Manual for
Onboard Computer
Onboard tool kit 146
Opening and closing
from the inside 34
via the door lock 33
via the remote control 31
Operating elements 14
Outlets, ventilation 104
Outside temperature dis-
play 85P
Panic mode, trigger alarm
32
Park Distance Control
(PDC) 87
Parking aid 87
Parking brake 72
Parking lamps 96
replacing bulb 148
PDC Park Distance
Control 87
Pocket flashlight 109
Pollen 103, 108
Power output 162
Power seat 53
Pressure, tires 25, 92, 127
monitoring 92
R
Radiator 165
Radio, refer to the Owner's
Manual for Radio
Rain sensor 78
Range 86
Reading lamps
front 98
rear 98
Rear lamps 149
Rear window defroster
102, 107
Rearview mirror 59Recirculated-air mode
102, 107
Refueling 24
Remote control 31
Remote control keys 30
Replacement key 30, 31
Reporting safety defects 6
Reserve indicator lamp 82
Restraint system 63
Reverse 73
Rims 130
Rollover protection
system 67
indicator lamp 19
lowering 67
Roof load capacity 164
Roof-mounted luggage rack
118, 125
Run Flat tires 129, 155
S
Safe seating position 52
Safety belts 56
seat-integrated safety belt
system (SGS) 55
Seat
rear entry aid 55
Seat adjustment 52
lumbar support 53
thigh support 53
Seat heating 58
Seat memory 57Securing cargo 116
Securing child-restraint sys-
tem 65
Securing devices 117
Selector lever, automatic
transmission 74
Service and Warranty Infor-
mation Booklet 140
Service Engine Soon
warning lamp 19
Service interval display
83, 140
Setting
clock 84
Shiftlock 74
Side airbags 61
Side turn signal indicators
replacing bulb 149
Size 163
Ski bag 115
Snow chains 131
Socket 114
Spare key 30
Spare tire 151
Speedometer 16
Standing lamps 97
Starting problems 70
Starting the engine 70
Steering wheel lock 70
Steering wheel with multi-
function buttons 22
Steering wheel, adjusting 59
handbook.book Page 172 Wednesday, July 31, 2002 9:29 AM
Page 173 of 178

Everything from A to Z
173
Steptronic 74
Storage compartments 112
Stroke 162
Summer tires 130
Switching off the engine 72
Symbols 4
Synthetic oils 137
T
Tachometer 16, 81
Tail lamp assembly
replacing bulb 149
Tail lamps 149
replacing bulb 149
Tank capacity 165
Technical data 162
Technical modifications 5
Telephone hookup 113
Telephone, refer to the sep-
arate Owner's Manual
Temperature adjustment
102, 106
Temperature display
engine coolant 82
interior temperature 106
outside temperature 85
Temperature layering
103, 107
Thigh support area, adjust-
ing 53
Third brake lamp 150Tilt alarm sensor
remote control 32
switching off 32, 39
Time 84
Tire damage 127
Tire inflation pressure
25, 127
pressure specifications 25
Tire Pressure Monitor
(TPM) 92
indicator lamp 19
warning lamp 18
Tire replacement 128
Tire tread 127
Tires
labels 130
Tools 146
Torque 162
Towing eyelet 158
Towing the vehicle 158
TPM Tire Pressure
Monitor 92
indicator lamp 19
Track 163
Transmission 73
Transporting children
safely 63
Tread depth, tires 127
Tread wear indicator 127
Trip odometer 81
Trunk, see Luggage com-
partment 35, 164Trunk lid, see Luggage com-
partment lid 35
Turn signal indicator 77
indicator lamp 20
replacing bulb 148
Turning circle 163
U
Uniform Tire Quality
Grading 129
Universal Transmitter 110
Used batteries 156
V
Vacuum cleaner, connect-
ing 114
Vehicle
break-in procedures 122
starting 70
switching off 72
Vehicle battery 156
Vehicle Memory 69
Vehicle weight 164
Ventilation 100, 104
draft-free 103, 107
W
Warning lamp "Fasten safety
belts" 18
Warning lamps 18
Warning messages 83Warranty and Service
Guide 140
Warranty, refer also to sepa-
rate booklet 6
Washer fluid
adding 136, 165
indicator lamp 19
Washer reservoir
filling 165
Washer/wiper system 78
Water on roadways
deep water 123
Wear indicator for tires 127
Weights 164
Wheel slip control, see
DSC 90
Wheel, changing 151
Wheelbase 163
Wheels and tires 130
Width 163
Wind deflector 50
Window condensation
removing 103, 106
Windows
convenience operation 33
defrosting 103, 106
Windshield washer reservoir
filling 136, 165
Windshield wipers 78
Winter tires 130
Wiper blades, replacing 146
OverviewControlsMaintenanceRepairsDataIndex
handbook.book Page 173 Wednesday, July 31, 2002 9:29 AM