2003 BMW 325Ci COUPE spare tire
[x] Cancel search: spare tirePage 25 of 162

25
Another instruction plate regarding
inflation pressures on the door pillar
indicates which system your vehicle is
equipped with.
Check the tire pressures on a reg-
ular basis – at least twice a month
– and before every extended journey. If
this is not done, incorrect tire pressures
can cause driving instability and tire
damage, ultimately resulting in acci-
dents.
Remember to check the inflation pres-
sure in the space-saver or standard
spare tire.
Inflate the spare tire to the highest infla-
tion pressure specified for your vehi-
cle.
apply to BMW approved tire sizes and
tire manufacturers. Your BMW center
can provide you with more information
about these. Higher pressures may be
required for tires made by other manu-
facturers.
Your vehicle is equipped with tires that
not only meet US standards, but also
European standards. We recommend
the exclusive use of BMW approved
tires.
Tire inflation pressure
OverviewControlsMaintenanceRepairsDataIndex
handbook.book Page 25 Tuesday, July 30, 2002 12:16 PM
Page 26 of 162

26
BMW Tires
All pressure specifications in the table are indicated
in psi/kilopascal with cold tires –
cold = ambient temperature
325Ci 205/55 R 16 91 H M+S
205/55 R 16 91 H
225/50 R 16 92 W
225/45 R 17 91 W30/210 35/240 35/240 42/290
225/45 ZR 17
245/40 ZR 1730/210
––
35/24035/240
––
42/290
205/50 R 17 93 V M+S extra load
205/50 R 17 93 W extra load
205/55 R 16 91 Q M+S
225/50 R 16 92 Q M+S
205/50 R 17 93 Q M+S extra load
225/45 R 17 91 Q M+S33/230 38/260 38/260 45/310
330Ci 225/45 R 17 91 W 30/210 35/240 35/240 42/290
225/45 ZR 17
245/40 ZR 1730/210
––
35/24035/240
––
42/290
225/40 ZR 18
255/35 ZR 1832/220
––
38/26039/270
––
46/320
205/50 R 17 93 V M+S extra load
205/50 R 17 93 W extra load
205/50 R 17 93 Q M+S extra load
225/45 R 17 91 Q M+S33/230 38/260 38/260 45/310
All Space-saver spare tire 61/420Tire inflation pressure
handbook.book Page 26 Tuesday, July 30, 2002 12:16 PM
Page 82 of 162

82
If this occurs, reduce vehicle speed
immediately and stop the vehicle in a
safe location. Avoid hard brake applica-
tions. Do not oversteer. Replace the
defective tire, refer to page 135.
The space-saver spare tire is pro-
vided for temporary use only in the
case of a tire failure. It does not have
TPM electronics and is not monitored.
The spare tire that has the same dimen-
sions as the tires already mounted on
the vehicle is equipped with the neces-
sary TPM electronics and will also be
monitored once the tire has been
mounted and the system initialized.<
The TPM cannot alert you to
severe and sudden tire damage
caused by external factors.<
Have the tires changed by your
BMW center.
Your BMW center has the information
needed for working with TPM and is
equipped with the necessary special
tools.
The yellow indicator lamp will come on
during the malfunction.
The indicator lamp also comes on
>in the event of a system fault
>if a wheel is mounted without the
appropriate electronics
>if, in addition to the spare tire, addi-
tional wheels with TPM electronics
are on board.
Please refer the problem to your BMW
center.
Flat Tire Monitor*The conceptAs you drive, the Flat Tire Monitor
keeps track of pressure levels in all four
tires in order to detect and warn of any
substantial pressure loss.
The system actually detects pressure
loss by monitoring differences in the
relative speeds of the four wheels. It
interprets variations outside specified
limits as severe pressure loss, and then
responds by generating a warning.
Tire Pressure Monitor (TPM)*
handbook.book Page 82 Tuesday, July 30, 2002 12:16 PM
Page 111 of 162

111 Wheels and tires
Tire inflation pressureInformation for your safetyThe factory-approved tires are matched
to your vehicle and have been selected
to provide optimum safety and driving
comfort when used properly.
It is not merely the tire's service life, but
also driving comfort and – above all else
– driving safety that depend on the con-
dition of the tires and the maintenance
of the specified tire inflation pressure.
Incorrect tire inflation pressure is a fre-
quent cause of tire damage. It also sig-
nificantly influences the roadholding
ability of your BMW.
Be sure to check the tire inflation
pressure, including the space-
saver spare tire or the spare tire, on a
regular basis, at least twice a month
and before every extended journey,
refer to page 24. If this is not done,
incorrect tire pressures can cause driv-
ing instability and tire damage, ulti-
mately resulting in accidents.<
Tire conditionTire tread – tire damageInspect your tires frequently for tread
wear, signs of damage and for foreign
objects lodged in the tread. Check the
tread depth.
Tread depth should not be allowed to
go below 1/8 in / 3 mm, even though
the legally specified minimum tread
depth is 1/16 in / 1.6 mm.
Below 1/8 in / 3 mm tread depth, there
is a great risk of hydroplaning, even at
relatively moderate speeds and with
only small amounts of water on the
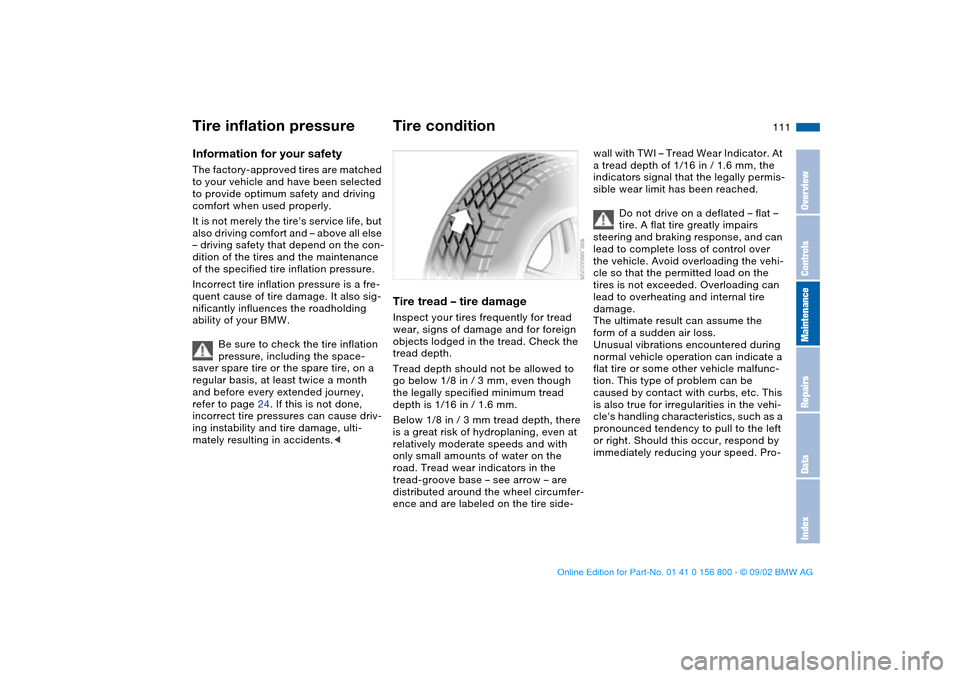
road. Tread wear indicators in the
tread-groove base – see arrow – are
distributed around the wheel circumfer-
ence and are labeled on the tire side-
wall with TWI – Tread Wear Indicator. At
a tread depth of 1/16 in / 1.6 mm, the
indicators signal that the legally permis-
sible wear limit has been reached.
Do not drive on a deflated – flat –
tire. A flat tire greatly impairs
steering and braking response, and can
lead to complete loss of control over
the vehicle. Avoid overloading the vehi-
cle so that the permitted load on the
tires is not exceeded. Overloading can
lead to overheating and internal tire
damage.
The ultimate result can assume the
form of a sudden air loss.
Unusual vibrations encountered during
normal vehicle operation can indicate a
flat tire or some other vehicle malfunc-
tion. This type of problem can be
caused by contact with curbs, etc. This
is also true for irregularities in the vehi-
cle's handling characteristics, such as a
pronounced tendency to pull to the left
or right. Should this occur, respond by
immediately reducing your speed. Pro-
OverviewControlsMaintenanceRepairsDataIndex
handbook.book Page 111 Tuesday, July 30, 2002 12:16 PM
Page 113 of 162

113
tires must meet under the Federal
Motor Vehicle Safety Standard No. 109.
Grades B and A represent higher levels
of performance on the laboratory test
wheel than the minimum required by
law.
The temperature grade for this tire
is established for a tire that is
properly inflated and not overloaded.
Excessive speed, underinflation, or
excessive loading, either separately or
in combination, can cause heat buildup
and possible tire failure.
tread shoulder and maximum section
width. For example:
Tread wear 200
Traction AA
Temperature A
BMW advises against using
retreaded tires, since driving
safety may be impaired. This is due to
the possible variations in casing struc-
tures and, in some cases, to their
extreme age, which can lead to a
decrease in their durability.<
Tire ageThe date on which the tire was manu-
factured is indicated by the code on the
sidewall:
DOT... 3502 indicates that the tire was
manufactured in week 35 of the year
2002.
BMW recommends the replacement of
all tires – including the spare tire* –
when the tires are no more than 6 years
old, even if a tire life of 10 years is pos-
sible.Run Flat tires*Run Flat tires consist of self-supporting
tires and special rims. The tire rein-
forcement ensures that the tire retains
some residual safety in the event of
pressure drop and driving remains pos-
sible to a restricted degree. The vehicle
is equipped with the Flat Tire Monitor or
Tire Pressure Monitor (TPM), which
indicate a flat tire.
For additional information on the Flat
Tire Monitor or Tire Pressure Monitor
refer to page 81 or 82.
Run Flat tires are only possible in
conjunction with the Flat Tire
Monitor or Tire Pressure Monitor.<
Tire replacement
OverviewControlsMaintenanceRepairsDataIndex
handbook.book Page 113 Tuesday, July 30, 2002 12:16 PM
Page 136 of 162

136
Your BMW is equipped with a spare tire
or a space-saver tire designed for tem-
porary use in maintaining the vehicle's
mobility in an emergency.
To remove the spare tire, lift the
floor panel in the luggage com-
partment completely out, refer to
page 37.<
What you will needIn order to avoid rattling noises later,
note the position of the tools when you
remove them and return them to their
original position when you are done
using them.
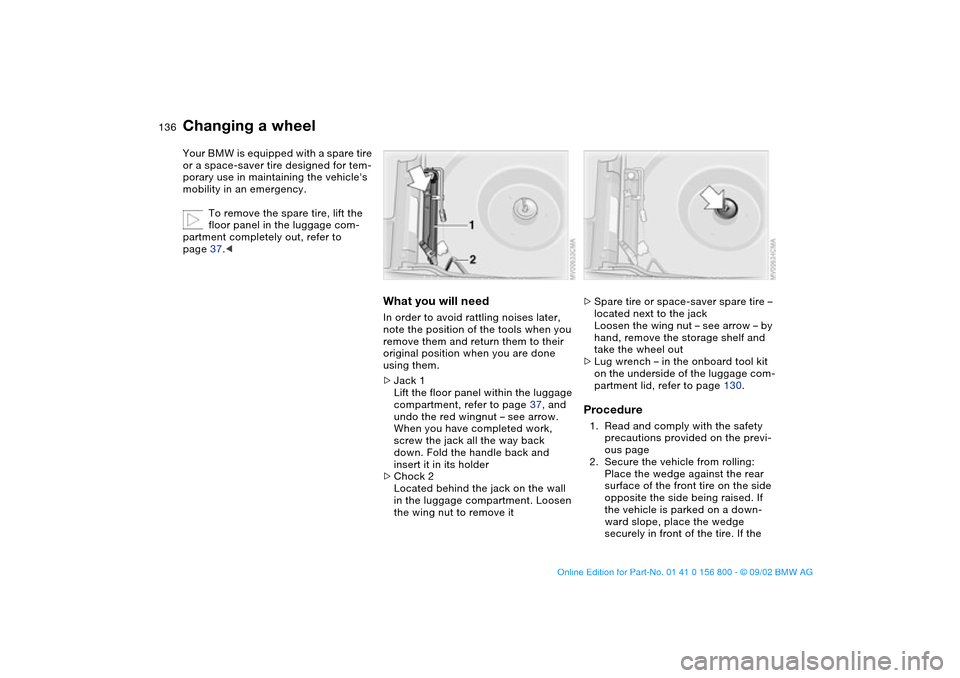
>Jack 1
Lift the floor panel within the luggage
compartment, refer to page 37, and
undo the red wingnut – see arrow.
When you have completed work,
screw the jack all the way back
down. Fold the handle back and
insert it in its holder
>Chock 2
Located behind the jack on the wall
in the luggage compartment. Loosen
the wing nut to remove it
>Spare tire or space-saver spare tire –
located next to the jack
Loosen the wing nut – see arrow – by
hand, remove the storage shelf and
take the wheel out
>Lug wrench – in the onboard tool kit
on the underside of the luggage com-
partment lid, refer to page 130.Procedure1. Read and comply with the safety
precautions provided on the previ-
ous page
2. Secure the vehicle from rolling:
Place the wedge against the rear
surface of the front tire on the side
opposite the side being raised. If
the vehicle is parked on a down-
ward slope, place the wedge
securely in front of the tire. If the
Changing a wheel
handbook.book Page 136 Tuesday, July 30, 2002 12:16 PM
Page 137 of 162

137
wheel must be changed on a sur-
face with a more severe slope, take
additional precautions to secure
the vehicle from rolling
3. Wheels with full wheel covers*:
reach into the ventilation openings
and pull the cover off
4. Loosen the lug bolts by rotating
half a turn
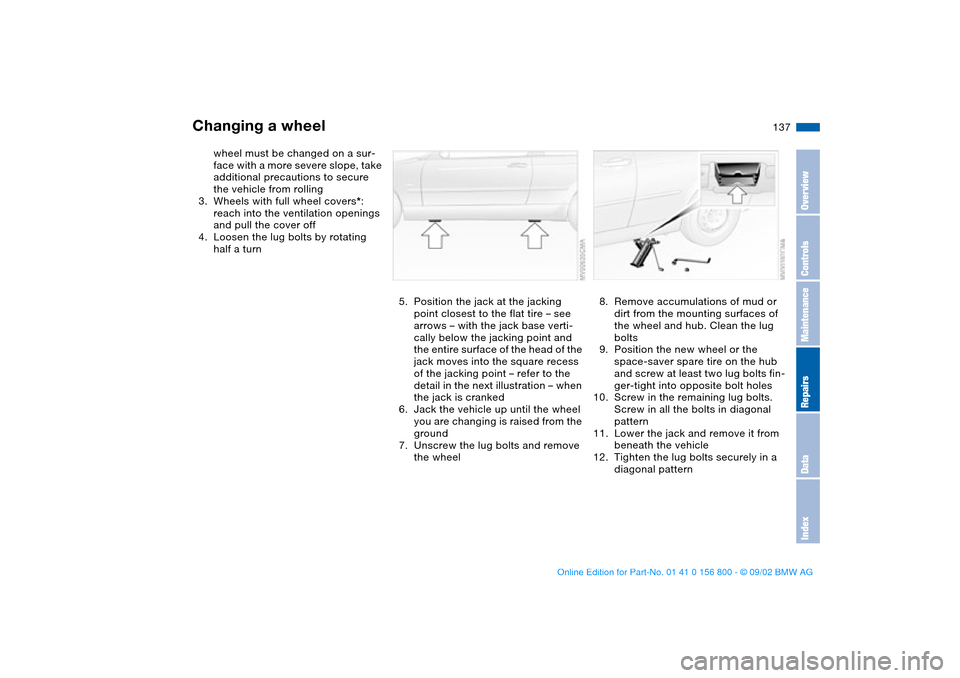
5. Position the jack at the jacking
point closest to the flat tire – see
arrows – with the jack base verti-
cally below the jacking point and
the entire surface of the head of the
jack moves into the square recess
of the jacking point – refer to the
detail in the next illustration – when
the jack is cranked
6. Jack the vehicle up until the wheel
you are changing is raised from the
ground
7. Unscrew the lug bolts and remove
the wheel
8. Remove accumulations of mud or
dirt from the mounting surfaces of
the wheel and hub. Clean the lug
bolts
9. Position the new wheel or the
space-saver spare tire on the hub
and screw at least two lug bolts fin-
ger-tight into opposite bolt holes
10. Screw in the remaining lug bolts.
Screw in all the bolts in diagonal
pattern
11. Lower the jack and remove it from
beneath the vehicle
12. Tighten the lug bolts securely in a
diagonal pattern
Changing a wheel
OverviewControlsMaintenanceRepairsDataIndex
handbook.book Page 137 Tuesday, July 30, 2002 12:16 PM
Page 138 of 162

138
13. Wheels with full wheel covers*:
place the wheel cover with the
valve opening – see arrow – over
the valve. Use both hands to press
the cover securely onto the rim
14. Check and correct the tire inflation
pressure at the earliest opportunity.
Vehicles with Tire Pressure Monitor
(TPM)/Flat Tire Monitor: after
mounting the spare tire or correct-
ing the tire inflation pressure, reini-
tialize the system, refer to
pages 81, 82.
Protect valve stems and valves from dirt
using screw-on valve stem caps. Dirty
valve stems frequently lead to slow
pressure loss.
Do not attempt to install the full
wheel cover on the space-saver
spare tire, since this could damage the
cover.<
The vehicle jack is designed for
changing wheels only. Do not
attempt to raise another vehicle model
with it or to raise any load of any kind.
To do so could cause accidents and
personal injury.
To ensure continued safety, have the
tightness of the torque bolts checked
with a calibrated lug wrench – torque
specification: 88.5 lb ft/120 Nm – at the
earliest opportunity.<
When storing a wheel in the spare tire
recess, take care to avoid bending the
threaded rod.
If the original BMW light-alloy wheels
have been replaced with other light-
alloy wheels, different lug bolts may be
required.
Replace the defective tire as soon as
possible and have the new wheel/tire
balanced.
Driving with the space-saver
spare tireDrive cautiously. Do not exceed a
speed of 50 mph / 80 km/h.
Be aware that vehicle handling may be
altered. Anticipate, e.g., reduced track-
ing during braking, longer braking dis-
tances and changed steering charac-
teristics when approaching limit
conditions. These handling characteris-
tics will be even more pronounced if
winter tires are mounted.
Only one space-saver spare tire
may be mounted at one time.
Mount a wheel and tire of the original
size at the earliest possible opportu-
nity.
tions, the size of the spare tire will
differ from that of the remaining tires.
The spare tire is fully functional at all
loads and speeds. However, the spare
tire should be replaced at the earliest
possible opportunity in order to achieve
the original operating conditions.<
Changing a wheel
handbook.book Page 138 Tuesday, July 30, 2002 12:16 PM