Page 7 of 420
�Î
�Î
To use the horn, press the pad around the ‘‘A’’ logo.
:
Your Vehicle at a Glance
3
HEADLIGHTS/
TURN SIGNALS
MOONROOF
SWITCH
CRUISE CONTROL FOG LIGHTS REMOTE AUDIO
CONTROLS STEERING WHEEL
ADJUSTMENT CRUISE CONTROL
HORN
WINDSHIELD WIPERS/WASHERSLIGHT CONTROL
SWITCH
HAZARD WARNING
LIGHTS
REAR WINDOW DEFOGGER
VTM-4 LOCK
INSTRUMENT PANEL BRIGHTNESS
PASSENGER AIRBAG
CUTOFF INDICATOR
VEHICLE STABILITY
ASSIST SYSTEM
OFF SWITCH (P.82)
(P.79/ 83)
(P.114)
(P.216) (P.267)
(P.88) (P.181) (P.89) (P.216)
(P.83/87) (P.128)
(P.87)
(P.58)
(P.88)
(P.259)
Page 71 of 420
�Î
�Î
�Î
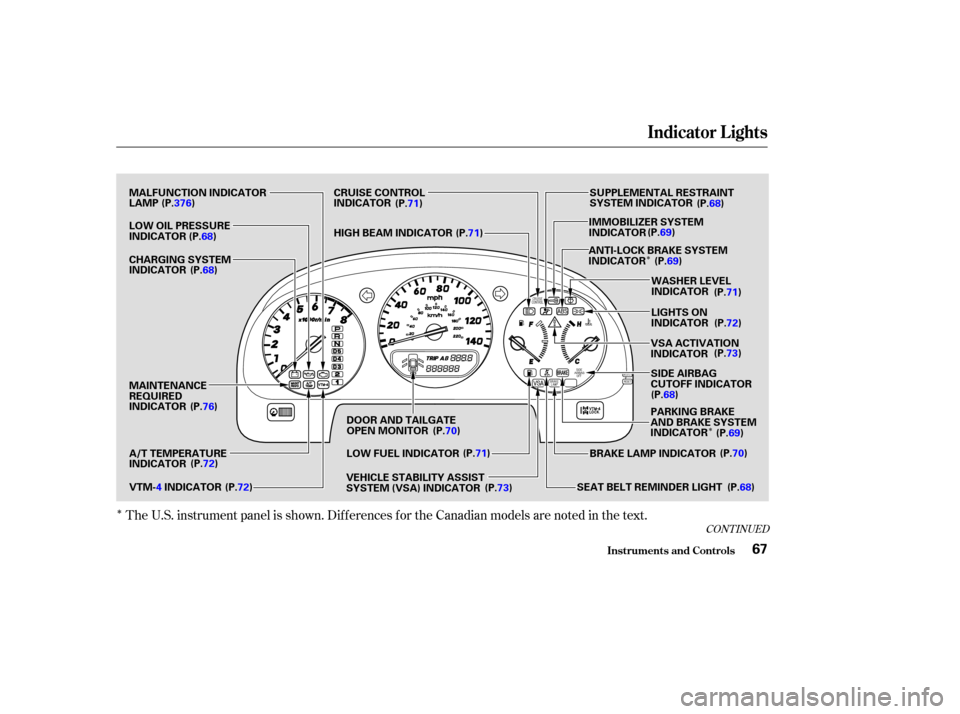
The U.S. instrument panel is shown. Dif f erences f or the Canadian models are noted in the text.
CONT INUED
Indicator L ights
Inst rument s and Cont rols67
VEHICLE STABILITY ASSIST
SYSTEM (VSA) INDICATOR
MALFUNCTION INDICATOR
LAMP
LOW OIL PRESSURE
INDICATOR
CHARGING SYSTEM
INDICATOR
A/T TEMPERATURE
INDICATOR MAINTENANCE
REQUIRED
INDICATOR
VTM-
4INDICATOR DOOR AND TAILGATE
OPEN MONITOR
LOW FUEL INDICATOR
SEAT BELT REMINDER LIGHTBRAKE LAMP INDICATOR SIDE AIRBAG
CUTOFF INDICATOR
PARKING BRAKE
AND BRAKE SYSTEM
INDICATOR WASHER LEVEL
INDICATOR
ANTI-LOCK BRAKE SYSTEM
INDICATOR
IMMOBILIZER SYSTEM
INDICATOR SUPPLEMENTAL RESTRAINT
SYSTEM INDICATOR
CRUISE CONTROL
INDICATOR
HIGH BEAM INDICATOR
LIGHTS ON
INDICATOR
VSA ACTIVATION
INDICATOR
(P.376)
(P.68)
(P.68)
(P.76)
(P.72) (P.72) (P.70)
(P.71)
(P.73) (P.
68)
(P.
70)
(P.
69)
(P.
68) (P.73)
(P.
72)
(P.71)
(P.69)
(P.
69) (P.
68)
(P.71)
(P.71)
Page 75 of 420
 with
the headlight switch of f and the
parking brake set. It should go of f if
youturnontheheadlightsorrelease
t")
Canadian models only
This indicator lights when you turn
the ignition switch to ON (II) with
the headlight switch of f and the
parking brake set. It should go of f if
youturnontheheadlightsorrelease
the parking brake. If it comes on at
any other time, it means there is a
problem with the DRL. There may
also be a problem with the high
beam headlights.This light comes on with the high
beam headlights. See page for
inf ormation on the headlight
controls.
On Canadian models, this indicator
comes on with reduced brightness
when the Daytime Running Lights
(DRL) are on (see page ).
This lights when you set the cruise
control. See page f or inf ormation
on operating the cruise control. This light comes on as a reminder
that you must ref uel soon.This light comes on when the
washer f luid level is low. Add washer
f luid when you see this light come on
(see page ).
216 79
82 316
‘‘Daytime Running
Lights’’ Indicator
High Beam Indicator
Cruise Control Indicator Low Fuel IndicatorWasher Level Indicator
Indicator L ights
Inst rument s and Cont rols71
Page 82 of 420

�Î
�Î
Thetwoleversonthesteering
column contain controls f or driving
f eatures you use most of ten. The lef t
lever controls the turn signals,
headlights, and high beams. The
right lever controls the windshield
washers and wipers.
The switches for the hazard warning
lights and rear window def ogger are
located to the right of the steering
column.
The controls under the lef t air vent
areforthecruisecontrol,the
moonroof , the f og lights, and the
VSA light.To use the horn, press the pad
around the ‘‘A’’ logo.
The tilt adjustment lever on the
underside of the steering column
allows you to tilt the steering wheel.
Controls Near the Steering Wheel
Inst rument s and Cont rols78
VEHICLE
STABILITY
ASSIST
SYSTEM
OFF
SWITCH HEADLIGHTS/
TURN SIGNALS
FOG LIGHTS
CRUISE
CONTROL
MOONROOF
SWITCH REMOTE AUDIO
CONTROLS
STEERING WHEEL
ADJUSTMENT HORN
CRUISE
CONTROL
WINDSHIELD
WIPERS/WASHERSLIGHT CONTROL
SWITCH HAZARD
WARNING
LIGHTS
REAR WINDOW
DEFOGGER
VTM-4
LOCK
INSTRUMENT PANEL
BRIGHTNESS
PASSENGER
AIRBAG
CUTOFF
INDICATOR
(P.79/
83)
(P.88)
(P.267)
(P.216) (P.114)
(P.181) (P.89)(P.216)
(P.83/87)(P.128)
(P.
87)
(P.
58)
(P.
88)
(P.259)
(P.82)
Page 137 of 420

...............
Climate Control System . 134
.......
Fully-automatic Operation . 136
.......
Semi-automatic Operation . 137
........
Mode Button/Mode Icon . 139
Sunlight Sensor/ ............
Temperature Sensor . 141
...........................
Rear A/C Unit .142
................................
Audio System .145
AM/FM/Cassette/CD changer ........................
Audio System .145
.................
Operating the Radio . 146
.................
Adjusting the Sound . 149
............
Audio System Lighting . 149
..............................
Digital Clock .150
Operating the Cassette .....................................
Player .151
............
Tape Search Functions . 152
.....
Operating the CD Changer . 155
CD Changer Error .............................
Indications .162
................................
Audio System .163
AM/FM/Cassette/CD Stereo ........................
Audio System .163
.................
Operating the Radio . 164
.................
Adjusting the Sound . 168
............
Audio System Lighting . 169....................
Radio Frequencies . 169
........................
Radio Reception .169
.........
Operating the CD Player . 171
.....
Operating the CD Changer . 173
.......
Protecting Compact Discs . 174
....
CD Player Error Indications . 175
CD Changer Error .............................
Indications .176
Operating the Cassette .....................................
Player .177
............
Tape Search Functions . 178
Caring f or the Cassette .....................................
Player .180
...........
Remote Audio Controls . 181
.......................
Thef t Protection .182
Audio System (Optional on .....................
Touring model) .183
AM/FM/CD/DVD Audio ....................................
System .183
.................
Operating the Radio . 185
.................
Adjusting the Sound . 189
..............................
Digital Clock .190
............
Audio System Lighting . 190
Operating the Cassette .....................................
Player .191
.........
Operating the CD Player . 194 .....
Operating the CD Changer . 196
....
CD Player Error Indications . 197
CD Changer Error .............................
Indications .198
........
Rear Entertainment System . 199
............................
Security System .215
...............................
Cruise Control .216
..............................
Trip Computer .219
.
(Without Navigation System) . 219
HomeLink Universal .................................
Tranceiver .229
.
Rear View Camera and Monitor . 234
Comf ort and Convenience Features
Comf ort and Convenience Feat ures133
Page 220 of 420

without keeping")
Push in the Cruise Control Master
Switch to the lef t of the steering
column. The indicator in the
switch will light.
Cruise control allows you to maintain
asetspeedabove25mph(40km/h)
without keeping your f oot on the
accelerator pedal. It should be used
f or cruising on straight, open
highways. It is not recommended f or
conditions such as city driving,
winding roads, slippery roads, heavy
rain, or bad weather. You should
have f ull control of the vehicle under
those conditions.
Accelerate to the desired cruising
speedabove25mph(40km/h).Press and release the SET/
DECELbuttononthesteering
wheel. The CRUISE CONTROL
light on the instrument panel
comes on to show the system is
now activated.
1.
2. 3.
Cruise Control
Using t he Cruise Cont rol
Cruise Control
Comf ort and Convenience Feat ures216
CRUISE CONTROL MASTER SWITCH
CANCEL
RESUME/ACCEL
SET/DECEL
Improper use of the cruise
control can lead to a crash.
Use the cruise control only
when traveling on open
highways in good weather.
Page 221 of 420

You can decrease the set cruising
speed in any of these ways:
You can increase the set cruising
speed in any of these ways:
When climbing a steep hill, the
automatic transmission may
downshif t to hold the set speed. Thecruisecontrolmaynotholdthe
set speed when you are going up and
down hills. If your speed increases
going down a hill, use the brakes to
slow down to the desired speed. This
will cancel the cruise control. To
resume the set speed, press the
RESUME/ACCEL button. The
CRUISE CONTROL light on the
instrument panel comes on. Press and hold the RESUME/
ACCEL button. The vehicle will
accelerate. When you reach the
desired cruising speed, release the
button.
Push on the accelerator pedal.
Accelerate to the desired cruising
speed and press the SET/DECEL
button.
To increase your speed in very
small amounts, tap the RESUME/
ACCEL button repeatedly. Each
time you do this, your vehicle will
speed up about 1 mph (1.6 km/h).Press and hold the SET/DECEL
button. The vehicle will decelerate.
Release the button when you
reach the desired speed.
To slow down in very small
amounts, tap the SET/DECEL
button repeatedly. Each time you
do this, your vehicle will slow
down about 1 mph (1.6 km/h).
Tap the brake pedal lightly with
your f oot. The CRUISE
CONTROL light on the instru-
ment panel will go out. When the
vehicle slows to the desired speed,
press the SET/DECEL button.
The vehicle will then maintain the
desired speed.
CONT INUED
Changing t he Set Speed
Cruise Control
Comf ort and Convenience Feat ures217
Page 222 of 420

Youcancancelthecruisecontrolin
any of these ways:Push the CANCEL button on the
steering wheel.
Press the Cruise Control Master
Switch.
Even with the cruise control turned
on, you can still use the accelerator
pedal to speed up f or passing. Af ter
completing the pass, take your foot
of f the accelerator pedal. The vehicle
will return to the set cruising speed.
Resting your f oot on the brake pedal
will cause the cruise control to
cancel.
Tap the brake pedal.Pressing the Cruise Control Master
Switch turns the system completely
of f and erases the previous cruising
speed f rom memory. To use the
system again, ref er to
.
When you push the CANCEL button,
or tap the brake pedal, the CRUISE
CONTROL light on the instrument
panel will go out and the vehicle will
begin to slow down. You can use the
accelerator pedal in the normal way.
The system remembers the
previously-set cruising speed. To
return to that speed, accelerate to
above25mph(40km/h)andthen
press and release the RESUME/
ACCEL button. The CRUISE
CONTROL light comes on. The
vehicle will accelerate to the same
cruising speed as bef ore.
Cancelling t he Cruise Cont rol
Using t he
Cruise Cont rol
Cruise Control
Comf ort and Convenience Feat ures218
CANCEL
BUTTON