Page 69 of 420

This section gives inf ormation about
the controls and displays that
contribute to the daily operation of
your Acura. All the essential controls
are within easy reach............................
Control Locations .66
...............................
Indicator Lights .67
.............................................
Gauges .74
Controls Near the Steering .......................................
Wheel .78
...................................
Headlights .79 ....................
Automatic Lighting .80
Automatic Lighting Off .....................................
Feature .81
............
Daytime Running Lights . 82
....
Instrument Panel Brightness . 82
................................
Turn Signals .83
.....................
Windshield Wipers .83
..................
Windshield Washers . 87
Rear Window Wiper and .....................................
Washer .87
..........................
Hazard Warning .87
.............
Rear Window Def ogger . 88
.....................................
Fog Light .88
......
Steering Wheel Adjustment . 89
...............................
Keys and Locks .90
..............................................
Keys .90
....................
Immobilizer System . 91
............................
Ignition Switch .92
......................
Power Door Locks .93
...................
Remote Transmitter . 95
..............
Childproof Door Locks . 99
........................................
Tailgate .99
..................................
Glove Box .100
...............................................
Seats .101
..........
Power Seat Adjustments . 101
.........
Driver’s Lumbar Support . 102 ........
Manual Seat Adjustments . 103
Second and Third Row seat ..........................
Adjustments .104
........................
Head Restraints .105
......................
Rear Seat Access .106
..........
Folding the Second Seat . 106
.............
Folding the Third Seat . 107
.................
Detachable Anchors . 109
..................................
Seat Heaters .110
............................
Power Windows .111
.......................................
Moonroof .114
...........................................
Mirrors .115
...............................
Parking Brake .117
Driving Position Memory ........................................
System .118
...........................
Beverage Holder .121
.................
Console Compartment . 123
.......................
Rear Compartment .123
.................................
Cargo Hooks .123
........................
Sunglasses Holder .124
........................................
Sun Visor .124
................................
Vanity Mirror .125
............
Accessory Power Sockets . 125
........................................
Coin Box .127
......................................
Coat Hook .127
...............................
Interior Lights .128
Instruments and Controls
Inst rument s and Cont rols65
Page 70 of 420
Control L ocations
Inst rument s and Cont rols66
MIRROR
CONTROLS
HOOD RELEASE
HANDLEPARKING BRAKE
PEDALREAR A/C CONTROL ACCESSORY POWER SOCKET GLOVE BOX AUDIO SYSTEM
CLIMATE CONTROL SYSTEM
SHIFT LEVER
INDICATOR LIGHTS
GAUGES
POWER DOOR LOCK
SWITCHES
POWER WINDOW
SWITCHES FUEL FILL DOOR
RELEASE(P.67)
(P.74)
(P.93)
(P.116)
(P.111)
(P.238) (P.237) (P.117) (P.143)
(P.125)(P.100) (P.145,
163,183)
(P.136)
(P.254)
Page 71 of 420
�Î
�Î
�Î
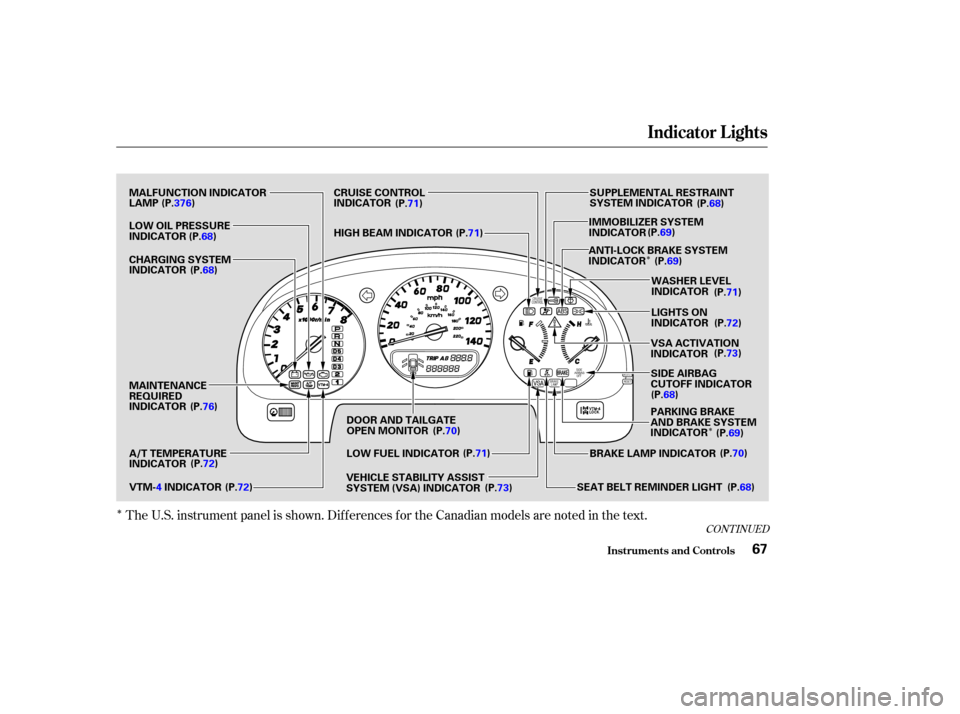
The U.S. instrument panel is shown. Dif f erences f or the Canadian models are noted in the text.
CONT INUED
Indicator L ights
Inst rument s and Cont rols67
VEHICLE STABILITY ASSIST
SYSTEM (VSA) INDICATOR
MALFUNCTION INDICATOR
LAMP
LOW OIL PRESSURE
INDICATOR
CHARGING SYSTEM
INDICATOR
A/T TEMPERATURE
INDICATOR MAINTENANCE
REQUIRED
INDICATOR
VTM-
4INDICATOR DOOR AND TAILGATE
OPEN MONITOR
LOW FUEL INDICATOR
SEAT BELT REMINDER LIGHTBRAKE LAMP INDICATOR SIDE AIRBAG
CUTOFF INDICATOR
PARKING BRAKE
AND BRAKE SYSTEM
INDICATOR WASHER LEVEL
INDICATOR
ANTI-LOCK BRAKE SYSTEM
INDICATOR
IMMOBILIZER SYSTEM
INDICATOR SUPPLEMENTAL RESTRAINT
SYSTEM INDICATOR
CRUISE CONTROL
INDICATOR
HIGH BEAM INDICATOR
LIGHTS ON
INDICATOR
VSA ACTIVATION
INDICATOR
(P.376)
(P.68)
(P.68)
(P.76)
(P.72) (P.72) (P.70)
(P.71)
(P.73) (P.
68)
(P.
70)
(P.
69)
(P.
68) (P.73)
(P.
72)
(P.71)
(P.69)
(P.
69) (P.
68)
(P.71)
(P.71)
Page 76 of 420
. If this light
comes on at any other time, there is
a problem in the 4WD system. Take
the vehicle to your dea")
This light normally comes on f or a
f ew seconds when you turn the
ignition switch ON (II). If this light
comes on at any other time, there is
a problem in the 4WD system. Take
the vehicle to your dealer to have it
checked.
This indicator monitors the
temperature of the automatic
transmission f luid. The indicator
should come on f or a f ew seconds
when you turn the ignition switch
ON (II). If it comes on while driving,
it indicates the transmission f luid
temperature is too high. Pull to the
side of the road when it is saf e, shif t
to Park, and let the engine idle until
the indicator goes out.
If the indicator blinks while driving,
pull to the side of the road when it is
saf e, shif t to Park, and let the engine
idle until the indicator goes out.
This indicator reminds you that the
exterior lights are on. It comes on
when the light switch is in either the
or position. This indicator
will come on when the light switch is
in AUTO and the lights turn on
automatically. If you turn the ignition
switch to ACCESSORY (I) or LOCK
(0) without turning of f the light
switch, this indicator will remain on.
A reminder chime will also sound
when you open the driver’s door.On cars with automatic lighting (see
page ) 80
Indicator L ights
Inst rument s and Cont rols
VTM-4 Indicator
A/T Temperature
Indicator
Lights On Indicator
(U.S. models only)
72
Continuing to drive with the A/T
Temperature indicator lit may cause
serious damage to the transmission. Continuing to drive with the VTM-4
indicator blinking may cause serious
damage to the system.
Page 83 of 420
If you leave the lights on with the
ignition switch in ACCESSORY (I)
or LOCK (0), you will hear a
reminder chime when you open the
driver’s door.
The rotating switch on the lef t lever
controls the lights. Turning this
switch to the ‘‘ ’’ position turns
on the parking lights, taillights,
instrument panel lights, side-marker
lights, and rear license plate lights.
Turning the switch to the ‘‘ ’’
position turns on the headlights. To change between low beams and
high beams, pull the turn signal lever
until you hear a click, then let go.
The blue high beam indicator will
light (see page ).
When the light switch is in either of
these positions, the Lights On
indicator comes on as a reminder.
This light remains on if you leave the
light switch on and turn the ignition
switch to ACCESSORY (I) or LOCK
(0).
71
CONT INUED
On vehicles with automatic lighting
Headlights
Controls Near the Steering Wheel
Inst rument s and Cont rols79
Page 86 of 420
The dial on the instrument panel
controls the brightness of the
instrument panel lights. Turn the dial
to adjust the brightness.
The lights will turn on again when
you unlock or open the driver’s door.
If you unlock the door, but do not
open it within 15 seconds, the lights
will go off. With the driver’s door
open, you will hear a lights-on
reminder chime.
With the headlight switch off, the
high beam headlights come on with
reduced brightness when you turn
the ignition switch to ON (II) and
release the parking brake. They
remain on until you turn the ignition
of f , even if you set the parking brake.
The headlights revert to normal
operation when you turn them on
with the switch.Instrument Panel Brightness
Daytime Running L ights
(Canadian Models)
Controls Near the Steering Wheel
Inst rument s and Cont rols82
INSTRUMENT PANEL BRIGHTNESS
CONTROL DIAL
Page 94 of 420

Your vehicle comes with two master
keys and a valet key.
The master key fits all the locks on
your vehicle:
Ignition
Driver’s Door
GloveboxThe valet key works only in the
ignition and the door locks. You can
keepthegloveboxlockedwhenyou
leave your vehicle and valet key at a
parking f acility.
Youshouldhavereceivedakey
number tag with your keys. You will
need this key number if you ever
have to get a lost key replaced. Keep
the tag stored in a safe place. If you
need to replace a key, use only an
Acura-approved key blank.
These keys contain electronic
circuits that are activated by the
Immobilizer System. They will not
work to start the engine if the
circuits are damaged.
Protect the keys f rom direct
sunlight, high temperature, and
high humidity.
Donotdropthekeysorsetheavy
objects on them.
Keep the keys away f rom liquids.
If they get wet, dry them
immediately with a sof t cloth.
The keys do not contain batteries.
Do not try to take them apart.
Your vehicle also comes with two
remote transmitters; see page for
an explanation of their operation. 95
Keys
Remote Transmitter
Keys and Locks
Inst rument s and Cont rols90
KEY
NUMBER
TAG
MASTER
KEYS
(BLACK) VALET KEY
(GRAY)
Page 97 of 420
 when you let go of
the key.
This is the normal key
position when driving. All f eatures
and accessories on the veh")
�µ
�µ �µ
Use this position
only to start the engine. The switch
returns to ON (II) when you let go of
the key.
This is the normal key
position when driving. All f eatures
and accessories on the vehicle are
usable. Several of the lights on the
instrument panel come on as a test
when you turn the ignition switch
f rom ACCESSORY to ON. The engine will not start if the
Immobilizer System does not
recognize the key’s coding (see page
).
In this position,
you can operate the audio system
and the accessory power socket.
You will hear a reminder beeper if
you leave the key in the ignition
switch in the LOCK (0) or
ACCESSORY (I) position and open
thedriver’sdoor.Removethekeyto
turn of f the beeper.Each f ront door has a master door
lock switch. Either switch locks and
unlocks all doors and the tailgate.
Push the switch down to lock all
doors and the tailgate, and up to
unlock them.
91
CONT INUED
ST A RT (III)
Power Door L ocks
ON (II) A CCESSORY (I)
Keys and Locks
Inst rument s and Cont rols93
MASTER DOOR LOCK SWITCH


or LOCK (0), you will hear a
reminder chime when you open the
driver’s door.
The rotating switch on the lef t lever
controls the")
