Page 124 of 355

...............
Climate Control System . 122
.......
Fully-automatic Operation . 124
.......
Semi-automatic Operation . 125
.......
Fully-automatic Operation . 129
.......
Semi-automatic Operation . 130
Sunlight Sensor/ ............
Temperature Sensor . 134................................
Audio System .135
.................
Operating the Radio . 136
.................
Adjusting the Sound . 139
............
Audio System Lighting . 140
....................
Radio Frequencies . 140
........................
Radio Reception .140
Operating the Cassette .....................................
Player .142
............
Tape Search Functions . 143
Caring f or the Cassette .....................................
Player .146
.....
Operating the CD Changer . 147
..
Loading CDs in the Changer . 148
...................................
Operation .150
Removing CDs from the .................................
Changer .152
.......
Protecting Compact Discs . 154
CD Changer Error .............................
Indications .155
...........
Remote Audio Controls . 156
.......................
Thef t Protection .157
............................
Security System .158
...............................
Cruise Control .159
HomeLink Universal ................................
Transceiver .163
............................................
OnStar .168
3.2 CL without Navigation System
3.2 CL with Navigation System
Comf ort and Convenience Features
Comf ort and Convenience Feat ures121
Page 138 of 355
�Î
�Î
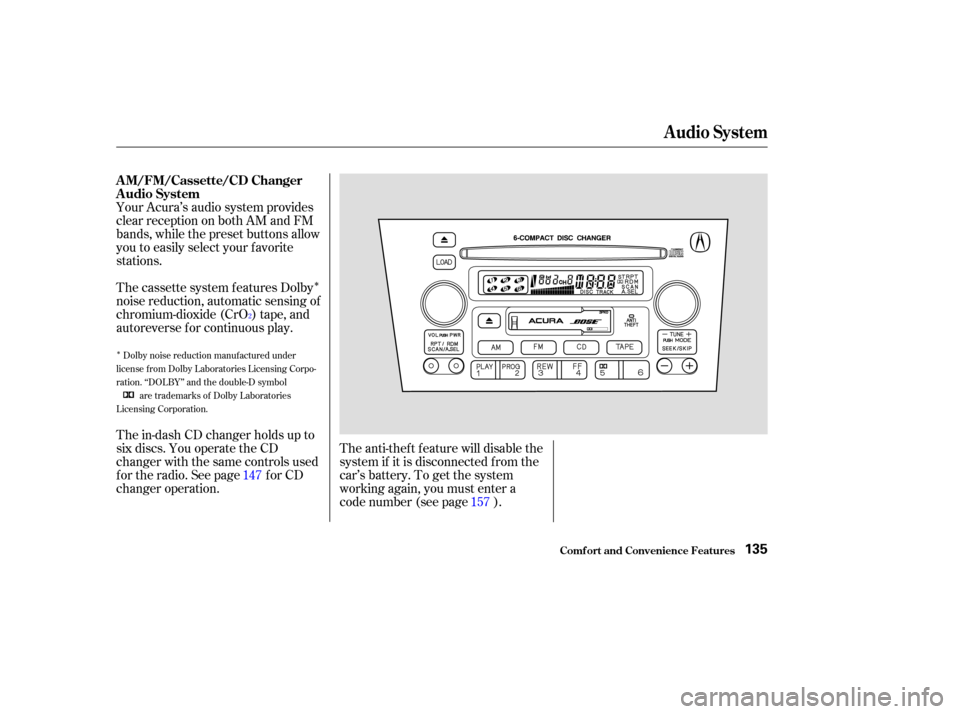
Your Acura’s audio system provides
clear reception on both AM and FM
bands, while the preset buttons allow
you to easily select your f avorite
stations.The anti-thef t f eature will disable the
system if it is disconnected f rom the
car’s battery. To get the system
working again, you must enter a
code number (see page ).
The cassette system f eatures Dolby
noise reduction, automatic sensing of
chromium-dioxide (CrO ) tape, and
autoreverse f or continuous play.
The in-dash CD changer holds up to
six discs. You operate the CD
changer with the same controls used
f or the radio. See page f or CD
changer operation.
147
157
2
Dolby noise reduction manuf actured under
license from Dolby Laboratories Licensing Corpo-
ration. ‘‘DOLBY’’ and the double-D symbol are trademarks of Dolby Laboratories
Licensing Corporation.
Audio System
Comf ort and Convenience Feat ures
A M/FM/Cassette/CD Changer
Audio System
135
Page 145 of 355
 or ON (II).
Make sure the tape opening on the
cassette is facing to the right, then
insert the cassette most of the way
into the slot. The system will")
�Û
The ignition switch must be in
ACCESSORY (I) or ON (II).
Make sure the tape opening on the
cassette is facing to the right, then
insert the cassette most of the way
into the slot. The system will pull it
in the rest of the way, and begin to
play.
The tape direction indicator will light
to show you which side of the
cassette is playing. The indicates
thesideyouinsertedfacingupward
is now playing. If you want to play
the other side, press the PROG
button. If you turn the system of f while a
tape is playing, either with the PWR/
VOL knob or by turning of f the
ignition, the cassette will remain in
the drive. When you turn the system
back on, the tape will begin playing
where it lef t of f .
To switch to the radio or CD
changer while listening to a tape,
presstheAM,FMorCDbutton.To
change back to the cassette player,
press the TAPE button.
Dolby noise reduction turns on when
you insert a cassette. The indi-
cator will light in the display. If the
tape was not recorded with Dolby
noise reduction, turn it of f by
pressing the button.
Noise reduction remains of f until you
turn it on by pressing the button
again.
When the system reaches the end of
the tape, it will automatically reverse
direction and play the other side. If
you want to remove the cassette
f rom the drive, press the EJECT
button.
You can remove the cassette with
the ignition switch in any position,
even if the audio system is turned of f .
Operating the Cassette Player
Audio System
Comf ort and Convenience Feat ures142
Page 150 of 355

CONT INUED
Your Acura’s audio system has an in-
dash CD changer that holds up to six
discs, providing several hours of
continuous entertainment. You
operate this CD changer with the
same controls used f or the radio and
cassette player.
To load the CDs or operate the CD
changer, the ignition switch must be
in ACCESSORY (I) or ON (II).
Load and play only standard round
discs. Odd-shaped CDs may jam in
the drive or cause other problems.
You cannot load and play 3-inch
(8-cm)discsinthissystem.
For best results when using CD-R
discs, use only high quality discs
labeled f or audio use. When
recording a CD-R, the recording
must be closed in order f or the disc
to be used by CD players. CD-RW
discs will not work in this unit.
Audio System
Comf ort and Convenience Feat ures
Operating the CD Changer
147
S SKKIIPP B
BUUT TT
TO
ON NSS
C
CD D B
BUUT TT
TO
ON N
R
RD D M
M B
BUUT TT
TO
ON N
R
RE EP
PE
EA
A T
T B
BUUT TT
TO
ON N
L
LO
OA AD
D B
BUUT TT
TO
ON N C
CDD E
EJ
JEE C
CT T B
BUUT TT
TO
ON N
P
P W
WR R//V
V O
OL L
K
KN NO OBB C
CD
D S
SLLOOT T
Page 151 of 355

To load multiple CDs in one
operation:Press and hold the Load button
until you hear a beep and see
‘‘____’’inthedisplay,then
release the button.
On the lef t side of the display, the
CD Loaded indicator f or an empty
position will begin blinking.
When LOAd appears again in the
display, insert the next disc into
the CD slot. Repeat this until all six positions
are loaded. The system will then
begin playing the last CD loaded.
If you are not loading CDs into all six
positions, press the Load button
again after the last CD has loaded.
The system will begin playing the
last CD loaded.
If you stop loading CDs bef ore all six
positions are f illed, and you do not
press the Load button, the system
will wait f or ten seconds, then stop
the load operation and begin playing
the last CD loaded. To load a single CD:
Press and release the Load button.
When the CD Loaded indicator f or
an empty position starts to blink,
andyouseeLOAdinthedisplay,
insert the disc into the CD slot.
Insert it only about halfway, the
drive will pull it in the rest of the
way.
The system will load the CD, and
begin playing it.
When you see LOAd in the display,
insert the disc into the CD slot.
Insert it only about halfway, the
drive will pull it in the rest of the
way. You will again see the dashes
in the display as the CD is loaded.
1.
2.
3.
4. 5.
1.
2.
3.
Audio System
Comf ort and Convenience Feat ures
L oading CDs in t he Changer
148
Page 153 of 355

�µ�µ
�µ
�Ó
�Ó
�Ó�Ó
�´
�µ
�´�µ
Select the CD changer by pressing
the CD button. You will see ‘‘Cd’’ in
the display. The system will begin
playing the last selected disc in the
CD changer. You will see the disc
and track numbers displayed.
When that disc ends, the next disc in
the CD changer is loaded and played.
Af ter the last disc f inishes, the
system returns to disc 1.
To select a dif f erent disc, press the
appropriate Preset button (1 6). If
youselectanemptypositioninthe
CD changer, the system will go into
the loading sequence (see page ).
You can use the SKIP buttons while
a disc is playing to select passages
and change tracks. To activate the Repeat
f eature, press and release the RPT
button. You will see RPT in the
display as a reminder. The system
continuously replays the current
track. Press the RPT button again to
turn it off. Pressing either of the
SKIP buttons also turns off the
repeat feature.
This feature,
when activated, plays the tracks
within a CD in random order, rather
than in the order they are recorded
on the CD. To activate Random Play,
press the RDM button. You will see
RDM in the display. The system will
then select and play tracks randomly.
This continues until you deactivate
RandomPlaybypressingtheRDM
button again, or you select a
dif f erent CD with a preset button.
To move rapidly within a track, press
and hold the appropriate SKIP
button. You will hear a beep and the
system will continue to move. Press
the button to move forward, or
the button to move backward.
Release the button when the system
reaches the point you want.
Each time you press the button
and release it, the system skips
f orward to the beginning of the next
track. Press and release the
buttontoskipbackwardtothe
beginning of the current track. Press
and release it again to skip to the
beginning of the previous track.
148
Audio System
Comf ort and Convenience Feat ures
Operat ionREPEAT
RANDOM PLAY
150
Page 155 of 355
To remove the disc that is currently
playing, press the Eject button. You
will see ‘‘EJEC’’ in the display. When
you remove the disc f rom the slot,
the system automatically begins the
Load sequence so you can load
another CD in that position. If you do
not load another CD, af ter ten
seconds the system begins playing
the next disc in the changer. If the
changer is empty, the system selects
the previous mode (AM, FM, or
Tape).
If you do not remove the disc f rom
the slot, the system will reload the
disc af ter ten seconds and begin
playing it.
To remove a different CD from the
changer,firstselectitwiththe
appropriate preset button. When that
CD begins playing, press the Eject
button.
Removing CDs f rom t he Changer
Comf ort and Convenience Feat ures
Audio System
152
C CDD B
BUUT TT
TO
ON N
C
CD
D E
EJ
JEE C
CT T B
BUUT TT
TO
ON N C
CDD S
SLLOOT T
Page 156 of 355
If you press the Eject button while
listening to the radio or tape, or with
the audio system turned of f , the disc
that was last selected is ejected.
Af ter that disc is ejected, pressing
the Eject button again will eject the
next disc in the numerical order. By
doing this six times, you can remove
all the CDs f rom the changer.
In any mode, if you press the Eject
button and hold it until you hear a
beep, the system will eject all of the
discs in the changer.
You can also eject discs when the
ignition switch is of f . The disc that
was last selected is ejected f irst. You
can eject all six discs, one at a time.
Audio System
Comf ort and Convenience Feat ures153