Page 42 of 104

OPERATION AND IMPORTANT RIDING POINTS
5-5
5
EAU01128
Engine break-in There is never a more important period
in the life of your engine than the period
between 0 and 1,600 km. For this rea-
son, you should read the following ma-
terial carefully.
Since the engine is brand new, do not
put an excessive load on it for the first
1,600 km. The various parts in the en-
gine wear and polish themselves to the
correct operating clearances. During
this period, prolonged full-throttle oper-
ation or any condition that might result
in engine overheating must be avoided.
EAU01740*
0–1,000 km
Avoid prolonged operation above
1/3 throttle.
1,000–1,600 km
Avoid prolonged operation above
1/2 throttle.
ECA00026*
CAUTION:@ After 1,000 km of operation, the en-
gine oil and transfer case oil must
be changed, and the oil filter car-
tridge replaced. @
1,600 km and beyond
The vehicle can now be operated nor-
mally.
EC000049
CAUTION:@ If any engine trouble should occur
during the engine break-in period,
immediately have a Yamaha dealer
check the vehicle. @
E_5JA.book Page 5 Saturday, August 18, 2001 3:52 PM
Page 50 of 104
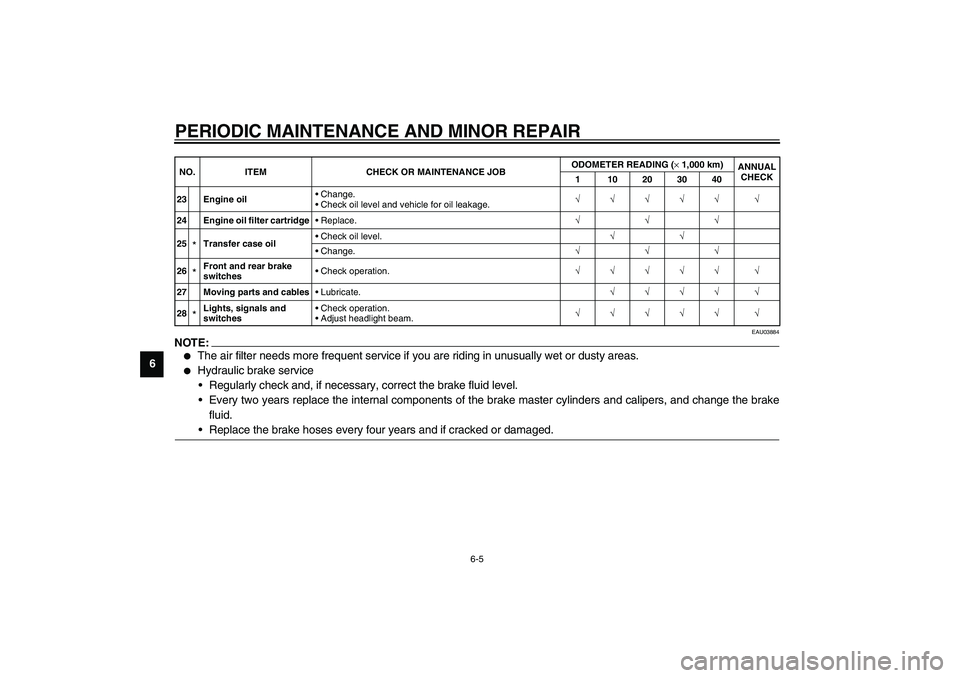
PERIODIC MAINTENANCE AND MINOR REPAIR
6-5
6
EAU03884
NOTE:_ �
The air filter needs more frequent service if you are riding in unusually wet or dusty areas.
�
Hydraulic brake service
Regularly check and, if necessary, correct the brake fluid level.
Every two years replace the internal components of the brake master cylinders and calipers, and change the brake
fluid.
Replace the brake hoses every four years and if cracked or damaged.
_23 Engine oilChange.
Check oil level and vehicle for oil leakage.√√√√√ √
24 Engine oil filter cartridgeReplace.√√√
25
*Transfer case oilCheck oil level.√√
Change.√√√
26*Front and rear brake
switchesCheck operation.√√√√√ √
27 Moving parts and cablesLubricate.√√√√ √
28*Lights, signals and
switchesCheck operation.
Adjust headlight beam.√√√√√ √ NO. ITEM CHECK OR MAINTENANCE JOBODOMETER READING (×1,000 km)
ANNUAL
CHECK
1 10203040
E_5JA_Periodic.fm Page 5 Saturday, August 18, 2001 5:37 PM
Page 53 of 104

PERIODIC MAINTENANCE AND MINOR REPAIR
6-8
6
ECA00021
CAUTION:@ Do not use any tools to remove or
install the spark plug cap, otherwise
the ignition coil coupler may get
damaged. The spark plug cap may
be difficult to remove because the
rubber seal on the end of the cap fits
tightly. To remove the spark plug
cap, simply twist it back and forth
while pulling it out; to install it, twist
it back and forth while pushing it in. @
EAU04212
Engine oil and oil filter
cartridge The engine oil level should be checked
before each ride. In addition, the oil
must be changed and the oil filter car-
tridge replaced at the intervals speci-
fied in the periodic maintenance and
lubrication chart.
To check the engine oil level
1. Place the motorcycle on a level
surface and hold it in an upright
position.
NOTE:_ Make sure that the motorcycle is posi-
tioned straight up when checking the oil
level. A slight tilt to the side can result in
a false reading. _2. Remove the rider seat. (See
page 3-12 for rider seat removal
and installation procedures.)
3. Start the engine, warm it up until
the engine oil has reached a nor-
mal temperature of 60°C, let it
continue to idle for ten seconds,
and then turn the engine off.NOTE:_ To achieve the proper engine oil tem-
perature for an accurate oil level read-
ing, the engine must have first
completely cooled down, and then
warmed up again for several minutes to
normal operating temperature. _
1. Engine oil filler cap
E_5JA.book Page 8 Saturday, August 18, 2001 3:52 PM
Page 54 of 104

PERIODIC MAINTENANCE AND MINOR REPAIR
6-9
64. Wait a few minutes until the oil set-
tles, remove the oil filler cap, wipe
the dipstick clean, insert it back
into the oil filler hole (without
screwing it in), and then remove it
again to check the oil level.
NOTE:_ The engine oil should be between the
minimum and maximum level marks. _5. If the engine oil is below the mini-
mum level mark, add sufficient oil
of the recommended type to raise
it to the correct level.
NOTE:_ When adding oil, be careful not to over-
fill the engine; the oil level rises faster
starting from the half level portion on
the dipstick. _6. Insert the dipstick into the oil filler
hole, and then tighten the oil filler
cap.
7. Install the rider seat.
ECA00027
CAUTION:_ Make sure that the oil filler cap is se-
curely tightened, otherwise oil may
seep out when the engine is run-
ning. _
To change the engine oil
(with or without oil filter cartridge
replacement)
1. Start the engine, warm it up for
several minutes, and then turn it
off.
2. Place an oil pan under the oil tank
to collect the used oil.
3. Remove the engine oil filler cap
and drain bolt to drain the oil from
the oil tank.
1. Maximum level mark
2. Minimum level mark
3. Dipstick
1. Engine oil drain bolt (oil tank)
E_5JA.book Page 9 Saturday, August 18, 2001 3:52 PM
Page 57 of 104

PERIODIC MAINTENANCE AND MINOR REPAIR
6-12
6
EAU03395
Transfer case oil The transfer case oil level should be
checked before each ride. In addition,
the oil must be changed at the intervals
specified in the periodic maintenance
and lubrication chart.
To check the transfer case oil level
1. Place the motorcycle on a level
surface and hold it in an upright
position.
NOTE:@ Make sure that the motorcycle is posi-
tioned straight up when checking the oil
level. A slight tilt to the side can result in
a false reading. @2. Remove the oil check bolt, and
then check the oil level in the
transfer case.NOTE:@ The oil should be at the brim of the
check hole. @3. If the oil is below the brim of the
check hole, remove the oil filler
cap, add sufficient oil of the rec-
ommended type to raise it to the
correct level, and then install the
oil filler cap.
4. Install the oil check bolt, and then
tighten it to the specified torque.To change the transfer case oil
1. Place an oil pan under the transfer
case to collect the used oil.
2. Remove the drain bolt and the
check bolt to drain the oil from the
transfer case.
3. Install the drain bolt and the check
bolt, and then tighten the drain bolt
to the specified torque.
1. Transfer case oil filler cap
2. Transfer case oil check bolt
Tightening torque:
Transfer case oil check bolt:
7.5 Nm (0.75 m·kgf)
1. Transfer case oil drain boltTightening torque:
Transfer case oil drain bolt:
17.5 Nm (1.75 m·kgf)
E_5JA.book Page 12 Saturday, August 18, 2001 3:52 PM
Page 71 of 104

PERIODIC MAINTENANCE AND MINOR REPAIR
6-26
6
EAU03976
Changing the brake fluid Have a Yamaha dealer change the
brake fluid at the intervals specified in
the NOTE after the periodic mainte-
nance and lubrication chart. In addition,
have the oil seals of the master cylin-
ders and calipers as well as the brake
hoses replaced at the intervals listed
below or whenever they are damaged
or leaking.�
Oil seals: Replace every two
years.
�
Brake hoses: Replace every four
years.
EAU01830
Drive belt slack The drive belt slack should be checked
before each ride and adjusted if neces-
sary.
To check the drive belt slack
1. Place the motorcycle on a level
surface and hold it in an upright
position.
2. Note the current position of the
drive belt using the marks near the
check hole.
NOTE:@ The marks near the drive belt check
hole are 5 mm apart. @3. Note the position of the drive belt
with a force of 45 N (4.5 kgf) ap-
plied to the belt with a belt tension
gauge as shown.
4. Calculate the drive belt slack by
subtracting the measurement not-
ed in step 2 from the measure-
ment noted in step 3.
1. Drive belt
2. Marks
a. Drive belt slack
1. Belt tension gauge
E_5JA.book Page 26 Saturday, August 18, 2001 3:52 PM