Page 48 of 104

PERIODIC MAINTENANCE AND MINOR REPAIR
6-3
6
EAU03685
Periodic maintenance and lubrication chart
NOTE:_ �
The annual checks must be performed every year, except if a kilometer-based maintenance is performed instead.
�
From 50,000 km, repeat the maintenance intervals starting from 10,000 km.
�
Items marked with an asterisk should be performed by a Yamaha dealer as they require special tools, data and techni-
cal skills.
_CP-01ENO. ITEM CHECK OR MAINTENANCE JOBODOMETER READING (×1,000 km)
ANNUAL
CHECK
1 10203040
1
*Fuel line• Check fuel hoses for cracks or damage.√√√√ √
2*Fuel filter Check condition.√√
3 Spark plugs Check condition.
Clean and regap.√√
Replace.√√
4*Valves Check valve clearance.
Adjust.√√√√
5 Air filter element Clean.√√
Replace.√√
6Clutch Check operation.
Adjust.√√√√√
7*Front brake Check operation, fluid level and vehicle for fluid leakage.
(See NOTE on page 6-5.)√√ √ √ √ √
Replace brake pads. Whenever worn to the limit
8*Rear brake Check operation, fluid level and vehicle for fluid leakage.
(See NOTE on page 6-5.)√√ √ √ √ √
Replace brake pads. Whenever worn to the limit
E_5JA_Periodic.fm Page 3 Saturday, August 18, 2001 5:37 PM
Page 49 of 104

PERIODIC MAINTENANCE AND MINOR REPAIR
6-4
6
9
*Brake hosesCheck for cracks or damage.√√√√ √
Replace. (See NOTE on page 6-5.) Every 4 years
10*WheelsCheck runout, spoke tightness and for damage.
Tighten spokes if necessary.√√√√
11*TiresCheck tread depth and for damage.
Replace if necessary.
Check air pressure.
Correct if necessary.√√√√ √
12*Wheel bearingsCheck bearing for looseness or damage.√√√√
13*SwingarmCheck operation and for excessive play.√√√√
Lubricate with lithium-soap-based grease. Every 50,000 km
14*Drive beltCheck belt tension.
Make sure that the rear wheel is properly aligned.Every 4,000 km
15*Steering bearingsCheck bearing play and steering for roughness.√√√√√
Lubricate with lithium-soap-based grease. Every 50,000 km
16*Chassis fastenersMake sure that all nuts, bolts and screws are properly tightened.√√√√ √
17 SidestandCheck operation.
Lubricate.√√√√ √
18*Sidestand switchCheck operation.√√√√√ √
19*Front forkCheck operation and for oil leakage.√√√√
20*Shock absorber
assemblyCheck operation and shock absorber for oil leakage.√√√√
21*Rear suspension relay
arm and connecting arm
pivoting pointsCheck operation.√√√√
Lubricate with lithium-soap-based grease.√√
22*CarburetorCheck starter (choke) operation.
Adjust engine idling speed.√√√√√ √ NO. ITEM CHECK OR MAINTENANCE JOBODOMETER READING (×1,000 km)
ANNUAL
CHECK
1 10203040
E_5JA_Periodic.fm Page 4 Saturday, August 18, 2001 5:37 PM
Page 50 of 104
PERIODIC MAINTENANCE AND MINOR REPAIR
6-5
6
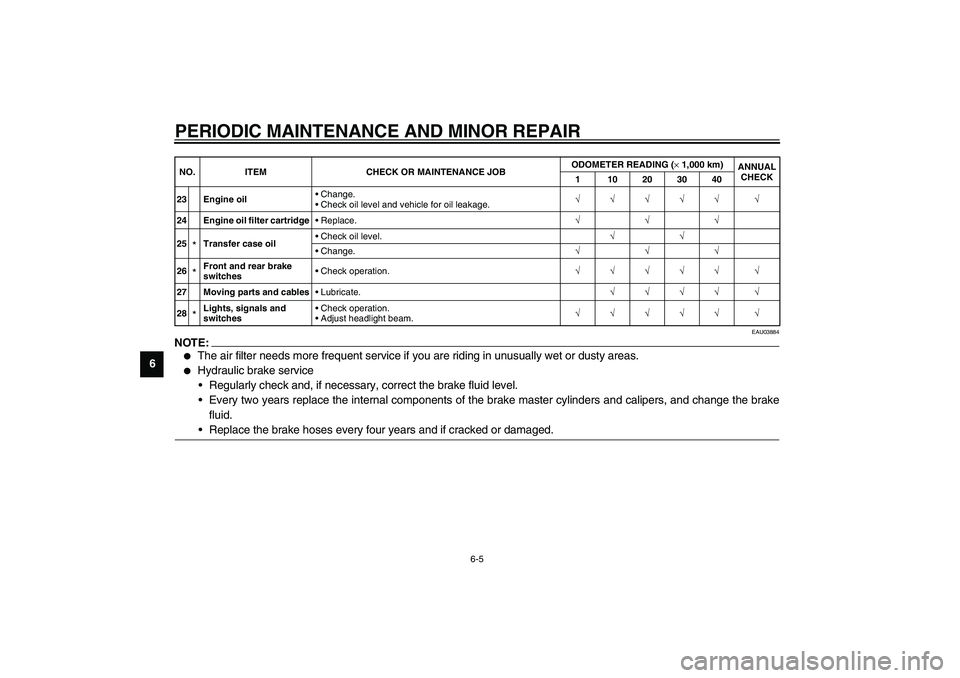
EAU03884
NOTE:_ �
The air filter needs more frequent service if you are riding in unusually wet or dusty areas.
�
Hydraulic brake service
Regularly check and, if necessary, correct the brake fluid level.
Every two years replace the internal components of the brake master cylinders and calipers, and change the brake
fluid.
Replace the brake hoses every four years and if cracked or damaged.
_23 Engine oilChange.
Check oil level and vehicle for oil leakage.√√√√√ √
24 Engine oil filter cartridgeReplace.√√√
25
*Transfer case oilCheck oil level.√√
Change.√√√
26*Front and rear brake
switchesCheck operation.√√√√√ √
27 Moving parts and cablesLubricate.√√√√ √
28*Lights, signals and
switchesCheck operation.
Adjust headlight beam.√√√√√ √ NO. ITEM CHECK OR MAINTENANCE JOBODOMETER READING (×1,000 km)
ANNUAL
CHECK
1 10203040
E_5JA_Periodic.fm Page 5 Saturday, August 18, 2001 5:37 PM
Page 64 of 104

PERIODIC MAINTENANCE AND MINOR REPAIR
6-19
6Tire inspection
The tires must be checked before each
ride. If the center tread depth reaches
the specified limit, if the tire has a nail
or glass fragments in it, or if the side-
wall is cracked, have a Yamaha dealer
replace the tire immediately.
CE-08ENOTE:@ The tire tread depth limits may differ
from country to country. Always comply
with the local regulations. @
EW000079
WARNING
@ �
Have a Yamaha dealer replace
excessively worn tires. Besides
being illegal, operating the
motorcycle with excessively
worn tires decreases riding sta-
bility and can lead to loss of
control.
�
The replacement of all wheel-
and brake-related parts, includ-
ing the tires, should be left to a
Yamaha dealer, who has the
necessary professional knowl-
edge and experience.
@
Tire information
This motorcycle is equipped with tube
tires.
EW000078
WARNING
@ �
The front and rear tires should
be of the same make and de-
sign, otherwise the handling
characteristics of the motor-
cycle cannot be guaranteed.
�
After extensive tests, only the
tires listed below have been ap-
proved for this model by
Yamaha Motor Co., Ltd.
@CE-10E
1. Tire sidewall
a. Tire tread depthMinimum tire tread depth
(front and rear)1.6 mm
FRONT
Manufacturer Size Model
Dunlop130/90-16 67H
D404FL
130/90-16 M/C 67H
Bridgestone130/90-16 67H
G703F
130/90-16 M/C 67H
REAR
Manufacturer Size Model
Dunlop150/80B-16 71H
D404
150/80B-16 M/C 71H
Bridgestone150/80B-16 71H
G702
150/80B-16 M/C 71H
E_5JA.book Page 19 Saturday, August 18, 2001 3:52 PM
Page 65 of 104

PERIODIC MAINTENANCE AND MINOR REPAIR
6-20
6
EAU00681
WARNING
@ �
Have a Yamaha dealer replace
excessively worn tires. Besides
being illegal, operating the
motorcycle with excessively
worn tires decreases riding sta-
bility and can lead to loss of
control.
�
The replacement of all wheel-
and brake-related parts, includ-
ing the tires, should be left to a
Yamaha dealer, who has the
necessary professional knowl-
edge and experience.
�
It is not recommended to patch
a punctured tube. If unavoid-
able, however, patch the tube
very carefully and replace it as
soon as possible with a high-
quality product.
@
EAU00685
Spoke wheels To maximize the performance, durabil-
ity, and safe operation of your motor-
cycle, note the following points
regarding the specified wheels.�
The wheel rims should be checked
for cracks, bends or warpage, and
the spokes for looseness or dam-
age before each ride. If any dam-
age is found, have a Yamaha
dealer replace the wheel. Do not
attempt even the smallest repair to
the wheel. A deformed or cracked
wheel must be replaced.
�
The wheel should be balanced
whenever either the tire or wheel
has been changed or replaced. An
unbalanced wheel can result in
poor performance, adverse han-
dling characteristics, and a short-
ened tire life.
�
Ride at moderate speeds after
changing a tire since the tire sur-
face must first be “broken in” for it
to develop its optimal characteris-
tics.
E_5JA.book Page 20 Saturday, August 18, 2001 3:52 PM
Page 67 of 104

PERIODIC MAINTENANCE AND MINOR REPAIR
6-22
6
EAU00696
Adjusting the brake lever free
play The brake lever free play should mea-
sure 2–5 mm as shown. Periodically
check the brake lever free play and, if
necessary, adjust it as follows.
1. Loosen the locknut at the brake le-
ver.
2. To increase the brake lever free
play, turn the adjusting bolt in di-
rection
a. To decrease the brake
lever free play, turn the adjusting
bolt in direction
b.
3. Tighten the locknut.
EW000099
WARNING
@ �
After adjusting the brake lever
free play, check the free play
and make sure that the brake is
working properly.
�
A soft or spongy feeling in the
brake lever can indicate the
presence of air in the hydraulic
system. If there is air in the hy-
draulic system, have a Yamaha
dealer bleed the system before
operating the motorcycle. Air in
the hydraulic system will dimin-
ish the braking performance,
which may result in loss of con-
trol and an accident.
@
EAU01746
Adjusting the brake pedal
position The top of the brake pedal should be
positioned approximately 100 mm
above the top of the footrest as shown.
Periodically check the brake pedal po-
sition and, if necessary, have a
Yamaha dealer adjust it.
1. Locknut
2. Brake lever free play adjusting bolt
c. Brake lever free play
a. Distance between brake pedal and footrest
E_5JA.book Page 22 Saturday, August 18, 2001 3:52 PM
Page 68 of 104

PERIODIC MAINTENANCE AND MINOR REPAIR
6-23
6
EW000109
WARNING
@ A soft or spongy feeling in the brake
pedal can indicate the presence of
air in the hydraulic system. If there
is air in the hydraulic system, have a
Yamaha dealer bleed the system be-
fore operating the motorcycle. Air in
the hydraulic system will diminish
the braking performance, which
may result in loss of control and an
accident. @
EAU00713
Adjusting the rear brake light
switch The rear brake light switch, which is ac-
tivated by the brake pedal, is properly
adjusted when the brake light comes
on just before braking takes effect. If
necessary, adjust the brake light switch
as follows.
Turn the adjusting nut while holding the
rear brake light switch in place. To
make the brake light come on earlier,
turn the adjusting nut in direction
a. To
make the brake light come on later,
turn the adjusting nut in direction
b.
EAU00721
Checking the front and rear
brake pads The front and rear brake pads must be
checked for wear at the intervals spec-
ified in the periodic maintenance and
lubrication chart.
1. Rear brake light switch
2. Rear brake light switch adjusting nut
E_5JA.book Page 23 Saturday, August 18, 2001 3:52 PM
Page 69 of 104
PERIODIC MAINTENANCE AND MINOR REPAIR
6-24
6
EAU03938
Front brake pads
Each front brake pad is provided with
wear indicator grooves, which allow
you to check the brake pad wear with-
out having to disassemble the brake.
To check the brake pad wear, check
the wear indicator grooves. If a brake
pad has worn to the point that the wear
indicator grooves have almost disap-
peared, have a Yamaha dealer replace
the brake pads as a set.
EAU03939
Rear brake pads
Each rear brake pad is provided with a
wear indicator groove, which allows
you to check the brake pad wear with-
out having to disassemble the brake.
To check the brake pad wear, check
the wear indicator groove. If a brake
pad has worn to the point that the wear
indicator groove has almost disap-
peared, have a Yamaha dealer replace
the brake pads as a set.
1. Brake pad wear indicator groove (× 2)Front
1. Brake pad wear indicator grooveRear
E_5JA.book Page 24 Saturday, August 18, 2001 3:52 PM