Page 75 of 102
PERIODIC MAINTENANCE AND MINOR REPAIR
6-32
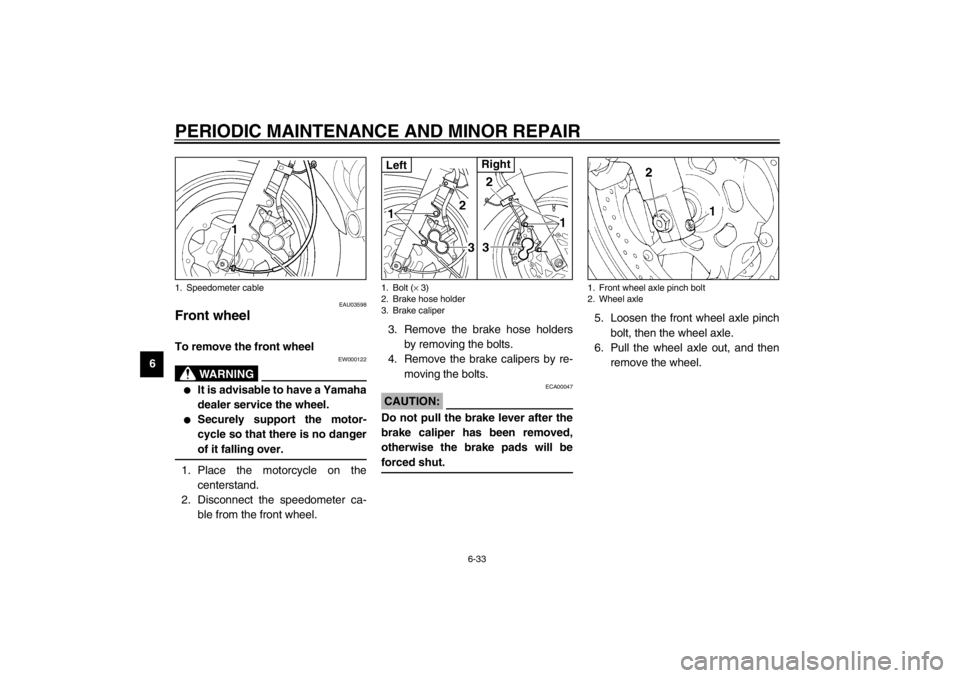
6 3. Place a new headlight bulb into
position, and then secure it with
the bulb holder.
EC000105
CAUTION:_ Do not touch the glass part of the
headlight bulb to keep it free from
oil, otherwise the transparency of
the glass, the luminosity of the bulb,
and the bulb life will be adversely af-
fected. Thoroughly clean off any dirt
and fingerprints on the headlight
bulb using a cloth moistened with
alcohol or thinner. _4. Install the headlight bulb cover,
and then connect the coupler.
5. Have a Yamaha dealer adjust the
headlight beam if necessary.
EAU01623
Replacing the tail/brake light
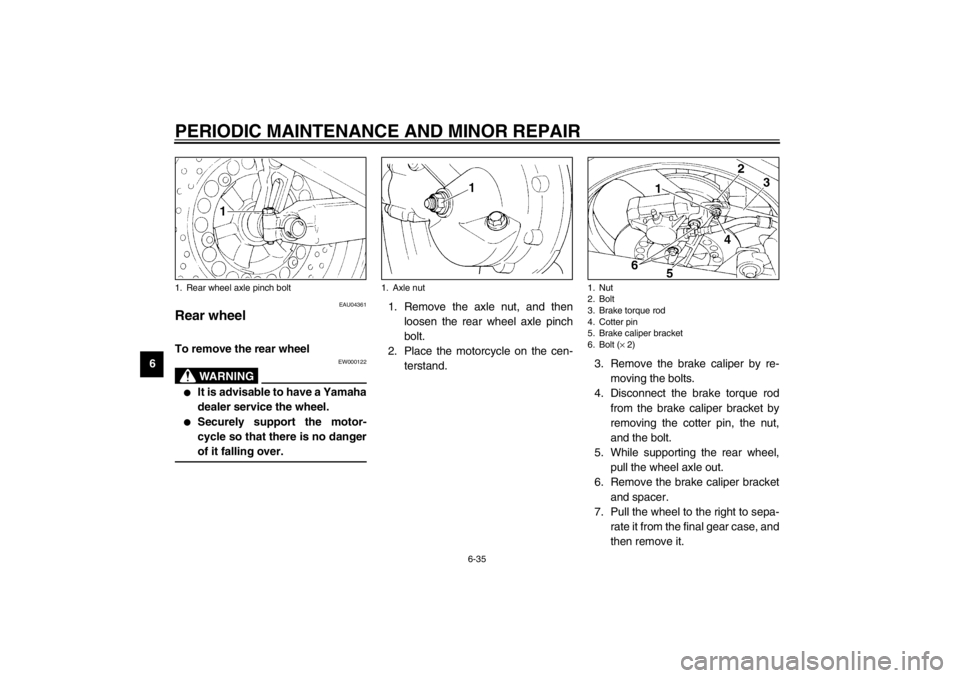
bulb 1. Remove the tail/brake light lens by
removing the screws.
2. Remove the defective bulb by
pushing it in and turning it counter-
clockwise.
3. Insert a new bulb into the socket,
push it in, and then turn it clock-
wise until it stops.
4. Install the lens by installing the
screws.
EC000108
CAUTION:_ Do not overtighten the screws, oth-
erwise the lens may break. _
EAU03497
Replacing a turn signal light
bulb 1. Remove the turn signal light lens
by removing the screw.
2. Remove the defective bulb by
pushing it in and turning it counter-
clockwise.
3. Insert a new bulb into the socket,
push it in, and then turn it clock-
wise until it stops.
4. Install the lens by installing the
screw.
ECA00065
CAUTION:_ Do not overtighten the screw, other-
wise the lens may break. _
1. Do not touch this area.
1. Screw (× 2)
1. Screw
E_4km.book Page 32 Tuesday, August 28, 2001 9:51 AM
Page 76 of 102
PERIODIC MAINTENANCE AND MINOR REPAIR
6-33
6
EAU03598
Front wheel To remove the front wheel
EW000122
WARNING
@ �
It is advisable to have a Yamaha
dealer service the wheel.
�
Securely support the motor-
cycle so that there is no danger
of it falling over.
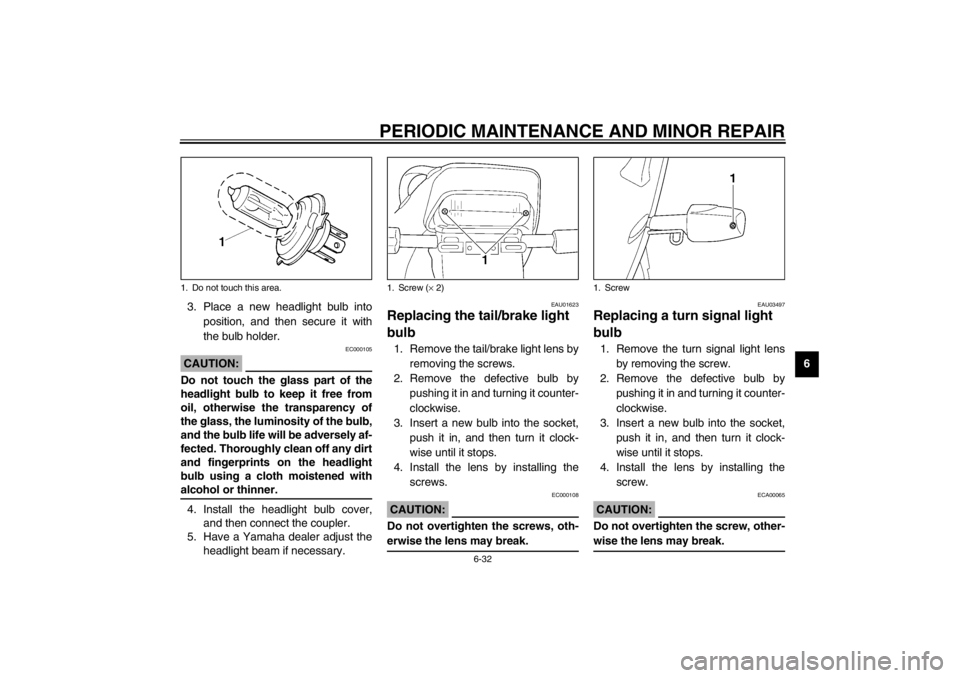
@1. Place the motorcycle on the
centerstand.
2. Disconnect the speedometer ca-
ble from the front wheel.3. Remove the brake hose holders
by removing the bolts.
4. Remove the brake calipers by re-
moving the bolts.
ECA00047
CAUTION:@ Do not pull the brake lever after the
brake caliper has been removed,
otherwise the brake pads will be
forced shut. @
5. Loosen the front wheel axle pinch
bolt, then the wheel axle.
6. Pull the wheel axle out, and then
remove the wheel.
1. Speedometer cable
1. Bolt (× 3)
2. Brake hose holder
3. Brake caliperLeft
Right
1. Front wheel axle pinch bolt
2. Wheel axle
E_4km.book Page 33 Tuesday, August 28, 2001 9:51 AM
Page 77 of 102
PERIODIC MAINTENANCE AND MINOR REPAIR
6-34
6
EAU04360
To install the front wheel
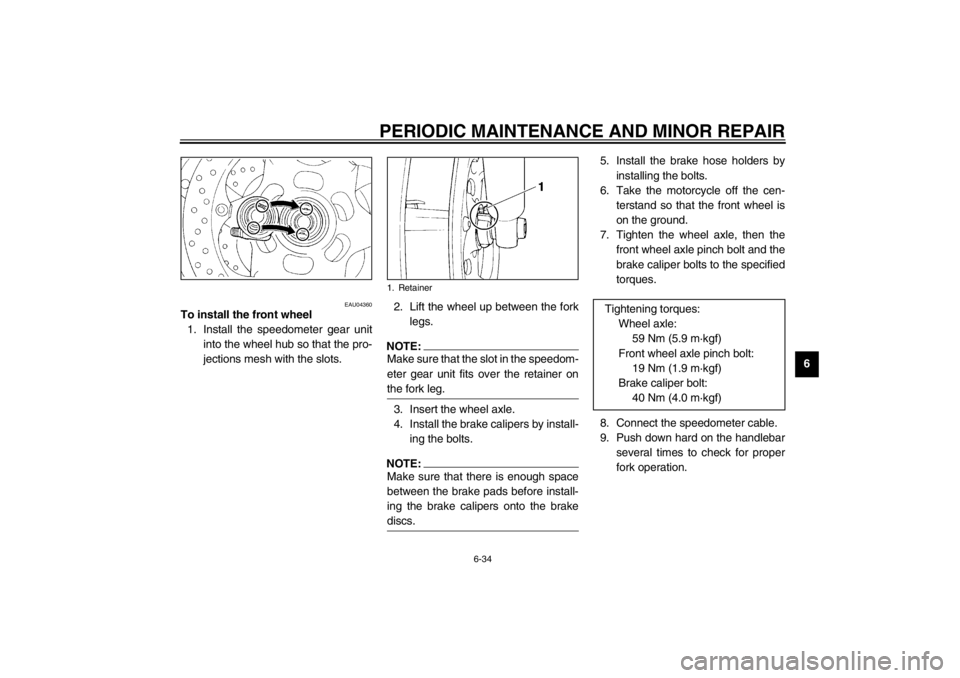
1. Install the speedometer gear unit
into the wheel hub so that the pro-
jections mesh with the slots.2. Lift the wheel up between the fork
legs.
NOTE:_ Make sure that the slot in the speedom-
eter gear unit fits over the retainer on
the fork leg. _3. Insert the wheel axle.
4. Install the brake calipers by install-
ing the bolts.NOTE:_ Make sure that there is enough space
between the brake pads before install-
ing the brake calipers onto the brake
discs. _
5. Install the brake hose holders by
installing the bolts.
6. Take the motorcycle off the cen-
terstand so that the front wheel is
on the ground.
7. Tighten the wheel axle, then the
front wheel axle pinch bolt and the
brake caliper bolts to the specified
torques.
8. Connect the speedometer cable.
9. Push down hard on the handlebar
several times to check for proper
fork operation.
1. Retainer
Tightening torques:
Wheel axle:
59 Nm (5.9 m·kgf)
Front wheel axle pinch bolt:
19 Nm (1.9 m·kgf)
Brake caliper bolt:
40 Nm (4.0 m·kgf)
E_4km.book Page 34 Tuesday, August 28, 2001 9:51 AM
Page 78 of 102
PERIODIC MAINTENANCE AND MINOR REPAIR
6-35
6
EAU04361
Rear wheel To remove the rear wheel
EW000122
WARNING
_ �
It is advisable to have a Yamaha
dealer service the wheel.
�
Securely support the motor-
cycle so that there is no danger
of it falling over.
_
1. Remove the axle nut, and then
loosen the rear wheel axle pinch
bolt.
2. Place the motorcycle on the cen-
terstand.3. Remove the brake caliper by re-
moving the bolts.
4. Disconnect the brake torque rod
from the brake caliper bracket by
removing the cotter pin, the nut,
and the bolt.
5. While supporting the rear wheel,
pull the wheel axle out.
6. Remove the brake caliper bracket
and spacer.
7. Pull the wheel to the right to sepa-
rate it from the final gear case, and
then remove it.
1. Rear wheel axle pinch bolt
1. Axle nut
1. Nut
2. Bolt
3. Brake torque rod
4. Cotter pin
5. Brake caliper bracket
6. Bolt (× 2)
E_4km.book Page 35 Tuesday, August 28, 2001 9:51 AM
Page 79 of 102
PERIODIC MAINTENANCE AND MINOR REPAIR
6-36
6
ECA00062
CAUTION:_ Do not push the brake pedal after
the wheel has been removed togeth-
er with the brake disc, otherwise the
brake pads will be forced shut. _
EAU04362
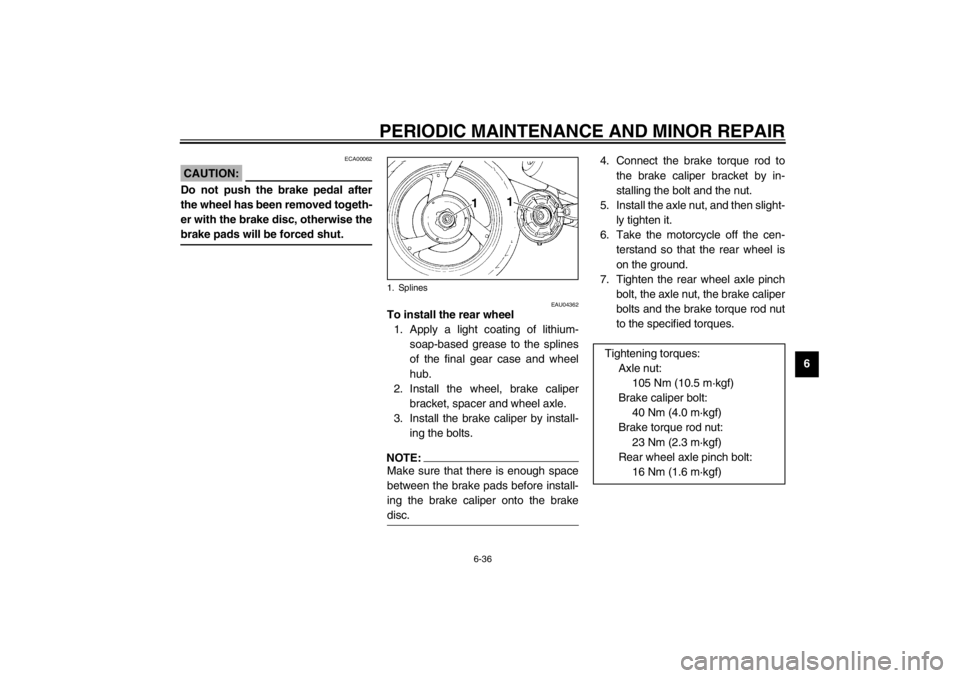
To install the rear wheel
1. Apply a light coating of lithium-
soap-based grease to the splines
of the final gear case and wheel
hub.
2. Install the wheel, brake caliper
bracket, spacer and wheel axle.
3. Install the brake caliper by install-
ing the bolts.NOTE:_ Make sure that there is enough space
between the brake pads before install-
ing the brake caliper onto the brake
disc. _
4. Connect the brake torque rod to
the brake caliper bracket by in-
stalling the bolt and the nut.
5. Install the axle nut, and then slight-
ly tighten it.
6. Take the motorcycle off the cen-
terstand so that the rear wheel is
on the ground.
7. Tighten the rear wheel axle pinch
bolt, the axle nut, the brake caliper
bolts and the brake torque rod nut
to the specified torques.
1. Splines
Tightening torques:
Axle nut:
105 Nm (10.5 m·kgf)
Brake caliper bolt:
40 Nm (4.0 m·kgf)
Brake torque rod nut:
23 Nm (2.3 m·kgf)
Rear wheel axle pinch bolt:
16 Nm (1.6 m·kgf)
E_4km.book Page 36 Tuesday, August 28, 2001 9:51 AM
Page 80 of 102
PERIODIC MAINTENANCE AND MINOR REPAIR
6-37
68. Install the brake torque rod cotter
pin.
EW000124
WARNING
_ Always use a new cotter pin. _
EAU01008
Troubleshooting Although Yamaha motorcycles receive
a thorough inspection before shipment
from the factory, trouble may occur dur-
ing operation. Any problem in the fuel,
compression, or ignition systems, for
example, can cause poor starting and
loss of power.
The following troubleshooting chart
represents a quick and easy procedure
for checking these vital systems your-
self. However, should your motorcycle
require any repair, take it to a Yamaha
dealer, whose skilled technicians have
the necessary tools, experience, and
know-how to service the motorcycle
properly.
Use only genuine Yamaha replace-
ment parts. Imitation parts may look
like Yamaha parts, but they are often
inferior, have a shorter service life and
can lead to expensive repair bills.
E_4km.book Page 37 Tuesday, August 28, 2001 9:51 AM
Page 85 of 102
MOTORCYCLE CARE AND STORAGE
7-2
7
�
Do not use any harsh chemical
products on plastic parts. Be
sure to avoid using cloths or
sponges which have been in
contact with strong or abrasive
cleaning products, solvent or
thinner, fuel (gasoline), rust re-
movers or inhibitors, brake flu-
id, antifreeze or electrolyte.
�
Do not use high-pressure wash-
ers or steam-jet cleaners since
they cause water seepage and
deterioration in the following ar-
eas: seals (of wheel and swing-
arm bearings, fork and brakes),
electric components (couplers,
connectors, instruments, switch-
es and lights), breather hoses
and vents.
�
For motorcycles equipped with
a windshield: Do not use strong
cleaners or hard sponges as
they will cause dulling or
scratching. Some cleaning
compounds for plastic may
leave scratches on the wind-
shield. Test the product on a
small hidden part of the wind-
shield to make sure that it does
not leave any marks. If the wind-
shield is scratched, use a quali-
ty plastic polishing compound
after washing.
@After normal useRemove dirt with warm water, a mild
detergent, and a soft, clean sponge,
and then rinse thoroughly with clean
water. Use a toothbrush or bottlebrush
for hard-to-reach areas. Stubborn dirt
and insects will come off more easily if
the area is covered with a wet cloth for
a few minutes before cleaning.After riding in the rain, near the sea or
on salt-sprayed roadsSince sea salt or salt sprayed on roads
during winter are extremely corrosive in
combination with water, carry out the
following steps after each ride in the
rain, near the sea or on salt-sprayed
roads.NOTE:@ Salt sprayed on roads in the winter may
remain well into spring. @1. Clean the motorcycle with cold
water and a mild detergent, after
the engine has cooled down.
ECA00012
CAUTION:@ Do not use warm water since it in-
creases the corrosive action of the
salt. @2. After drying the motorcycle, apply
a corrosion protection spray on all
metal, including chrome- and nick-
el-plated, surfaces to prevent
corrosion.
E_4km.book Page 2 Tuesday, August 28, 2001 9:51 AM
Page 86 of 102
MOTORCYCLE CARE AND STORAGE
7-3
7After cleaning
1. Dry the motorcycle with a chamois
or an absorbing cloth.
2. Use a chrome polish to shine
chrome, aluminum and stainless-
steel parts, including the exhaust
system. (Even the thermally in-
duced discoloring of stainless-
steel exhaust systems can be re-
moved through polishing.)
3. To prevent corrosion, it is recom-
mended to apply a corrosion pro-
tection spray on all metal,
including chrome- and nickel-plat-
ed, surfaces.
4. Use spray oil as a universal clean-
er to remove any remaining dirt.
5. Touch up minor paint damage
caused by stones, etc.
6. Wax all painted surfaces.
7. Let the motorcycle dry completely
before storing or covering it.
EWA00031
WARNING
@ �
Make sure that there is no oil or
wax on the brakes or tires.
�
If necessary, clean the brake
discs and brake linings with a
regular brake disc cleaner or ac-
etone, and wash the tires with
warm water and a mild deter-
gent. Before riding at higher
speeds, test the motorcycle’s
braking performance and cor-
nering behavior.
@
ECA00013
CAUTION:@ �
Apply spray oil and wax spar-
ingly and make sure to wipe off
any excess.
�
Never apply oil or wax to any
rubber and plastic parts, but
treat them with a suitable care
product.
�
Avoid using abrasive polishing
compounds as they will wear
away the paint.
@NOTE:@ Consult a Yamaha dealer for advice on
what products to use. @
E_4km.book Page 3 Tuesday, August 28, 2001 9:51 AM