Page 71 of 102
PERIODIC MAINTENANCE AND MINOR REPAIR
6-28
6 2. Hold the lower ends of the front
fork legs and try to move them for-
ward and backward. If any free
play can be felt, have a Yamaha
dealer check or repair the
steering.
EAU01144
Checking the wheel bearings The front and rear wheel bearings must
be checked at the intervals specified in
the periodic maintenance and lubrica-
tion chart. If there is play in the wheel
hub or if the wheel does not turn
smoothly, have a Yamaha dealer
check the wheel bearings.
E_4km.book Page 28 Tuesday, August 28, 2001 9:51 AM
Page 76 of 102
PERIODIC MAINTENANCE AND MINOR REPAIR
6-33
6
EAU03598
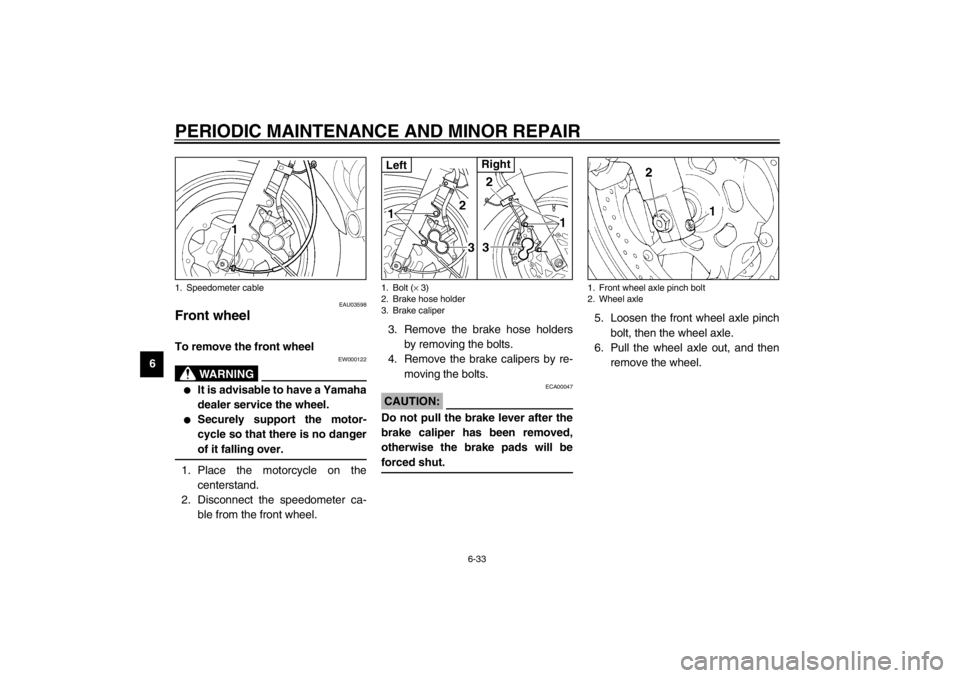
Front wheel To remove the front wheel
EW000122
WARNING
@ �
It is advisable to have a Yamaha
dealer service the wheel.
�
Securely support the motor-
cycle so that there is no danger
of it falling over.
@1. Place the motorcycle on the
centerstand.
2. Disconnect the speedometer ca-
ble from the front wheel.3. Remove the brake hose holders
by removing the bolts.
4. Remove the brake calipers by re-
moving the bolts.
ECA00047
CAUTION:@ Do not pull the brake lever after the
brake caliper has been removed,
otherwise the brake pads will be
forced shut. @
5. Loosen the front wheel axle pinch
bolt, then the wheel axle.
6. Pull the wheel axle out, and then
remove the wheel.
1. Speedometer cable
1. Bolt (× 3)
2. Brake hose holder
3. Brake caliperLeft
Right
1. Front wheel axle pinch bolt
2. Wheel axle
E_4km.book Page 33 Tuesday, August 28, 2001 9:51 AM
Page 77 of 102

PERIODIC MAINTENANCE AND MINOR REPAIR
6-34
6
EAU04360
To install the front wheel
1. Install the speedometer gear unit
into the wheel hub so that the pro-
jections mesh with the slots.2. Lift the wheel up between the fork
legs.
NOTE:_ Make sure that the slot in the speedom-
eter gear unit fits over the retainer on
the fork leg. _3. Insert the wheel axle.
4. Install the brake calipers by install-
ing the bolts.NOTE:_ Make sure that there is enough space
between the brake pads before install-
ing the brake calipers onto the brake
discs. _
5. Install the brake hose holders by
installing the bolts.
6. Take the motorcycle off the cen-
terstand so that the front wheel is
on the ground.
7. Tighten the wheel axle, then the
front wheel axle pinch bolt and the
brake caliper bolts to the specified
torques.
8. Connect the speedometer cable.
9. Push down hard on the handlebar
several times to check for proper
fork operation.
1. Retainer
Tightening torques:
Wheel axle:
59 Nm (5.9 m·kgf)
Front wheel axle pinch bolt:
19 Nm (1.9 m·kgf)
Brake caliper bolt:
40 Nm (4.0 m·kgf)
E_4km.book Page 34 Tuesday, August 28, 2001 9:51 AM
Page 78 of 102
PERIODIC MAINTENANCE AND MINOR REPAIR
6-35
6
EAU04361
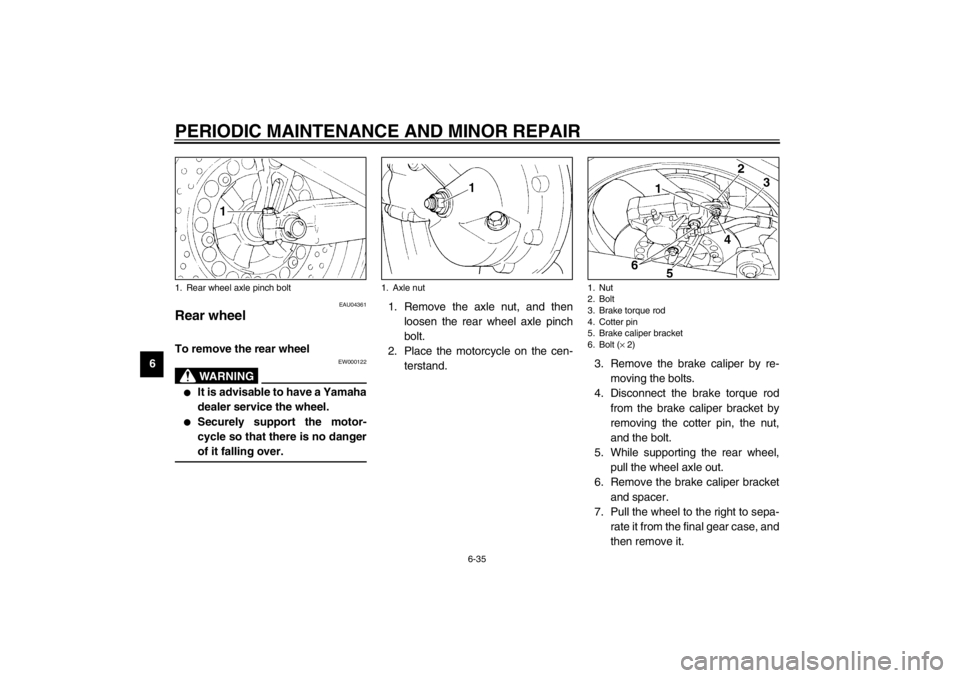
Rear wheel To remove the rear wheel
EW000122
WARNING
_ �
It is advisable to have a Yamaha
dealer service the wheel.
�
Securely support the motor-
cycle so that there is no danger
of it falling over.
_
1. Remove the axle nut, and then
loosen the rear wheel axle pinch
bolt.
2. Place the motorcycle on the cen-
terstand.3. Remove the brake caliper by re-
moving the bolts.
4. Disconnect the brake torque rod
from the brake caliper bracket by
removing the cotter pin, the nut,
and the bolt.
5. While supporting the rear wheel,
pull the wheel axle out.
6. Remove the brake caliper bracket
and spacer.
7. Pull the wheel to the right to sepa-
rate it from the final gear case, and
then remove it.
1. Rear wheel axle pinch bolt
1. Axle nut
1. Nut
2. Bolt
3. Brake torque rod
4. Cotter pin
5. Brake caliper bracket
6. Bolt (× 2)
E_4km.book Page 35 Tuesday, August 28, 2001 9:51 AM
Page 79 of 102

PERIODIC MAINTENANCE AND MINOR REPAIR
6-36
6
ECA00062
CAUTION:_ Do not push the brake pedal after
the wheel has been removed togeth-
er with the brake disc, otherwise the
brake pads will be forced shut. _
EAU04362
To install the rear wheel
1. Apply a light coating of lithium-
soap-based grease to the splines
of the final gear case and wheel
hub.
2. Install the wheel, brake caliper
bracket, spacer and wheel axle.
3. Install the brake caliper by install-
ing the bolts.NOTE:_ Make sure that there is enough space
between the brake pads before install-
ing the brake caliper onto the brake
disc. _
4. Connect the brake torque rod to
the brake caliper bracket by in-
stalling the bolt and the nut.
5. Install the axle nut, and then slight-
ly tighten it.
6. Take the motorcycle off the cen-
terstand so that the rear wheel is
on the ground.
7. Tighten the rear wheel axle pinch
bolt, the axle nut, the brake caliper
bolts and the brake torque rod nut
to the specified torques.
1. Splines
Tightening torques:
Axle nut:
105 Nm (10.5 m·kgf)
Brake caliper bolt:
40 Nm (4.0 m·kgf)
Brake torque rod nut:
23 Nm (2.3 m·kgf)
Rear wheel axle pinch bolt:
16 Nm (1.6 m·kgf)
E_4km.book Page 36 Tuesday, August 28, 2001 9:51 AM
Page 84 of 102

7-1
7
EAU03412
7-MOTORCYCLE CARE AND STORAGECare While the open design of a motorcycle
reveals the attractiveness of the tech-
nology, it also makes it more vulnera-
ble. Rust and corrosion can develop
even if high-quality components are
used. A rusty exhaust pipe may go un-
noticed on a car, however, it detracts
from the overall appearance of a
motorcycle. Frequent and proper care
does not only comply with the terms of
the warranty, but it will also keep your
motorcycle looking good, extend its life
and optimize its performance.Before cleaning
1. Cover the muffler outlets with plas-
tic bags after the engine has
cooled down.
2. Make sure that all caps and covers
as well as all electrical couplers
and connectors, including the
spark plug caps, are tightly in-
stalled.
3. Remove extremely stubborn dirt,
like oil burnt onto the crankcase,
with a degreasing agent and a
brush, but never apply such prod-
ucts onto seals, gaskets and
wheel axles. Always rinse the dirt
and degreaser off with water.Cleaning
ECA00010
CAUTION:@ �
Avoid using strong acidic wheel
cleaners, especially on spoked
wheels. If such products are
used on hard-to-remove dirt, do
not leave the cleaner on the af-
fected area any longer than in-
structed. Also, thoroughly rinse
the area off with water, immedi-
ately dry it, and then apply a
corrosion protection spray.
�
Improper cleaning can damage
windshields, cowlings, panels
and other plastic parts. Use
only a soft, clean cloth or
sponge with mild detergent and
water to clean plastic.
E_4km.book Page 1 Tuesday, August 28, 2001 9:51 AM
Page 85 of 102

MOTORCYCLE CARE AND STORAGE
7-2
7
�
Do not use any harsh chemical
products on plastic parts. Be
sure to avoid using cloths or
sponges which have been in
contact with strong or abrasive
cleaning products, solvent or
thinner, fuel (gasoline), rust re-
movers or inhibitors, brake flu-
id, antifreeze or electrolyte.
�
Do not use high-pressure wash-
ers or steam-jet cleaners since
they cause water seepage and
deterioration in the following ar-
eas: seals (of wheel and swing-
arm bearings, fork and brakes),
electric components (couplers,
connectors, instruments, switch-
es and lights), breather hoses
and vents.
�
For motorcycles equipped with
a windshield: Do not use strong
cleaners or hard sponges as
they will cause dulling or
scratching. Some cleaning
compounds for plastic may
leave scratches on the wind-
shield. Test the product on a
small hidden part of the wind-
shield to make sure that it does
not leave any marks. If the wind-
shield is scratched, use a quali-
ty plastic polishing compound
after washing.
@After normal useRemove dirt with warm water, a mild
detergent, and a soft, clean sponge,
and then rinse thoroughly with clean
water. Use a toothbrush or bottlebrush
for hard-to-reach areas. Stubborn dirt
and insects will come off more easily if
the area is covered with a wet cloth for
a few minutes before cleaning.After riding in the rain, near the sea or
on salt-sprayed roadsSince sea salt or salt sprayed on roads
during winter are extremely corrosive in
combination with water, carry out the
following steps after each ride in the
rain, near the sea or on salt-sprayed
roads.NOTE:@ Salt sprayed on roads in the winter may
remain well into spring. @1. Clean the motorcycle with cold
water and a mild detergent, after
the engine has cooled down.
ECA00012
CAUTION:@ Do not use warm water since it in-
creases the corrosive action of the
salt. @2. After drying the motorcycle, apply
a corrosion protection spray on all
metal, including chrome- and nick-
el-plated, surfaces to prevent
corrosion.
E_4km.book Page 2 Tuesday, August 28, 2001 9:51 AM
Page 88 of 102
MOTORCYCLE CARE AND STORAGE
7-5
76. Lubricate all control cables and
the pivoting points of all levers and
pedals as well as of the sidestand/
centerstand.
7. Check and, if necessary, correct
the tire air pressure, and then lift
the motorcycle so that both of its
wheels are off the ground. Alterna-
tively, turn the wheels a little every
month in order to prevent the tires
from becoming degraded in one
spot.
8. Cover the muffler outlets with plas-
tic bags to prevent moisture from
entering them.
9. Remove the battery and fully
charge it. Store it in a cool, dry
place and charge it once a month.
Do not store the battery in an ex-
cessively cold or warm place (less
than 0°C or more than 30°C). For
more information on storing the
battery, see page 6-29.
NOTE:@ Make any necessary repairs before
storing the motorcycle. @
E_4km.book Page 5 Tuesday, August 28, 2001 9:51 AM