Page 198 of 694
3 - 16
INSP
ADJ
ENGINE OIL REPLACEMENT
ENGINE OIL REPLACEMENT
1. Start the engine and warm it up for sev-
eral minutes, and then turn off the engine
and wait for five minute.
2. Place the machine on a level place and
hold it on upright position by placing the
suitable stand under the engine.
3. Place a suitable container under the
engine.
4. Remove:
�Oil tank cap 1
�Frame oil drain bolt 2
�Crankcase oil drain bolt 3
�Oil filter element drain bolt 4
Drain the crankcase and oil tank
(frame) of its oil.
5. Remove:
�Lower engine bracket
�Oil hose clamp 1
�Bolt (oil hose) 2
�Oil hose 3
�Oil strainer (frame) 4
6. Inspect:
�Oil strainer (frame)
Clogged → Blow.
Page 200 of 694

3 - 17
INSP
ADJ
ENGINE OIL REPLACEMENT
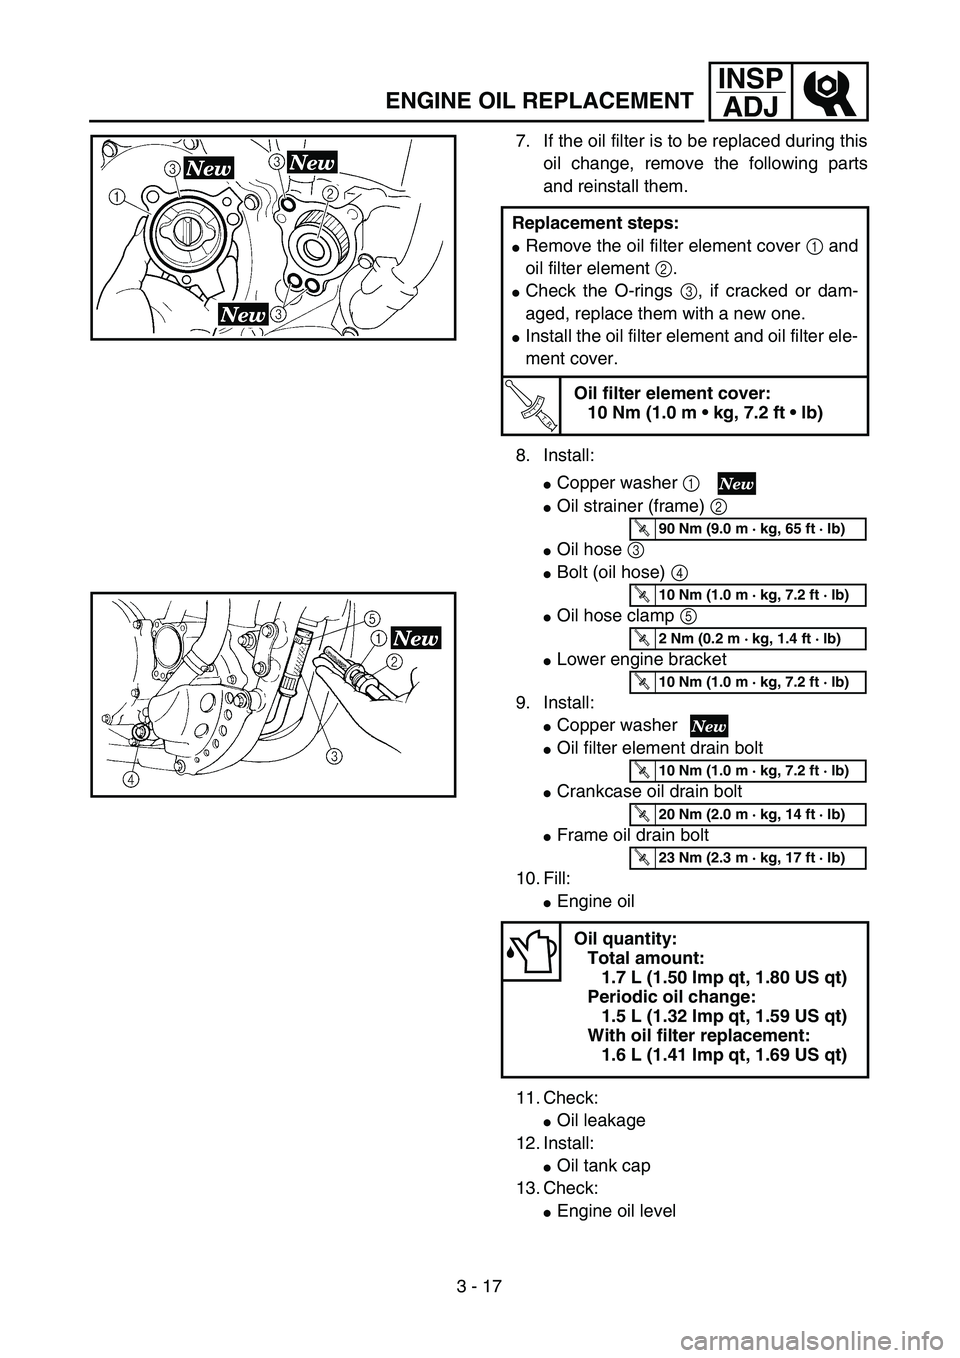
7. If the oil filter is to be replaced during this
oil change, remove the following parts
and reinstall them.
8. Install:
�Copper washer 1
�Oil strainer (frame) 2
�Oil hose 3
�Bolt (oil hose) 4
�Oil hose clamp 5
�Lower engine bracket
9. Install:
�Copper washer
�Oil filter element drain bolt
�Crankcase oil drain bolt
�Frame oil drain bolt
10. Fill:
�Engine oil
11. Check:
�Oil leakage
12. Install:
�Oil tank cap
13. Check:
�Engine oil level Replacement steps:
�Remove the oil filter element cover 1 and
oil filter element 2.
�Check the O-rings 3, if cracked or dam-
aged, replace them with a new one.
�Install the oil filter element and oil filter ele-
ment cover.
T R..
Oil filter element cover:
10 Nm (1.0 m • kg, 7.2 ft • lb)
Oil quantity:
Total amount:
1.7 L (1.50 Imp qt, 1.80 US qt)
Periodic oil change:
1.5 L (1.32 Imp qt, 1.59 US qt)
With oil filter replacement:
1.6 L (1.41 Imp qt, 1.69 US qt)
T R..90 Nm (9.0 m · kg, 65 ft · lb)
T R..10 Nm (1.0 m · kg, 7.2 ft · lb)
T R..2 Nm (0.2 m · kg, 1.4 ft · lb)
T R..10 Nm (1.0 m · kg, 7.2 ft · lb)
T R..10 Nm (1.0 m · kg, 7.2 ft · lb)
T R..20 Nm (2.0 m · kg, 14 ft · lb)
T R..23 Nm (2.3 m · kg, 17 ft · lb)
Page 202 of 694

3 - 18
INSP
ADJ
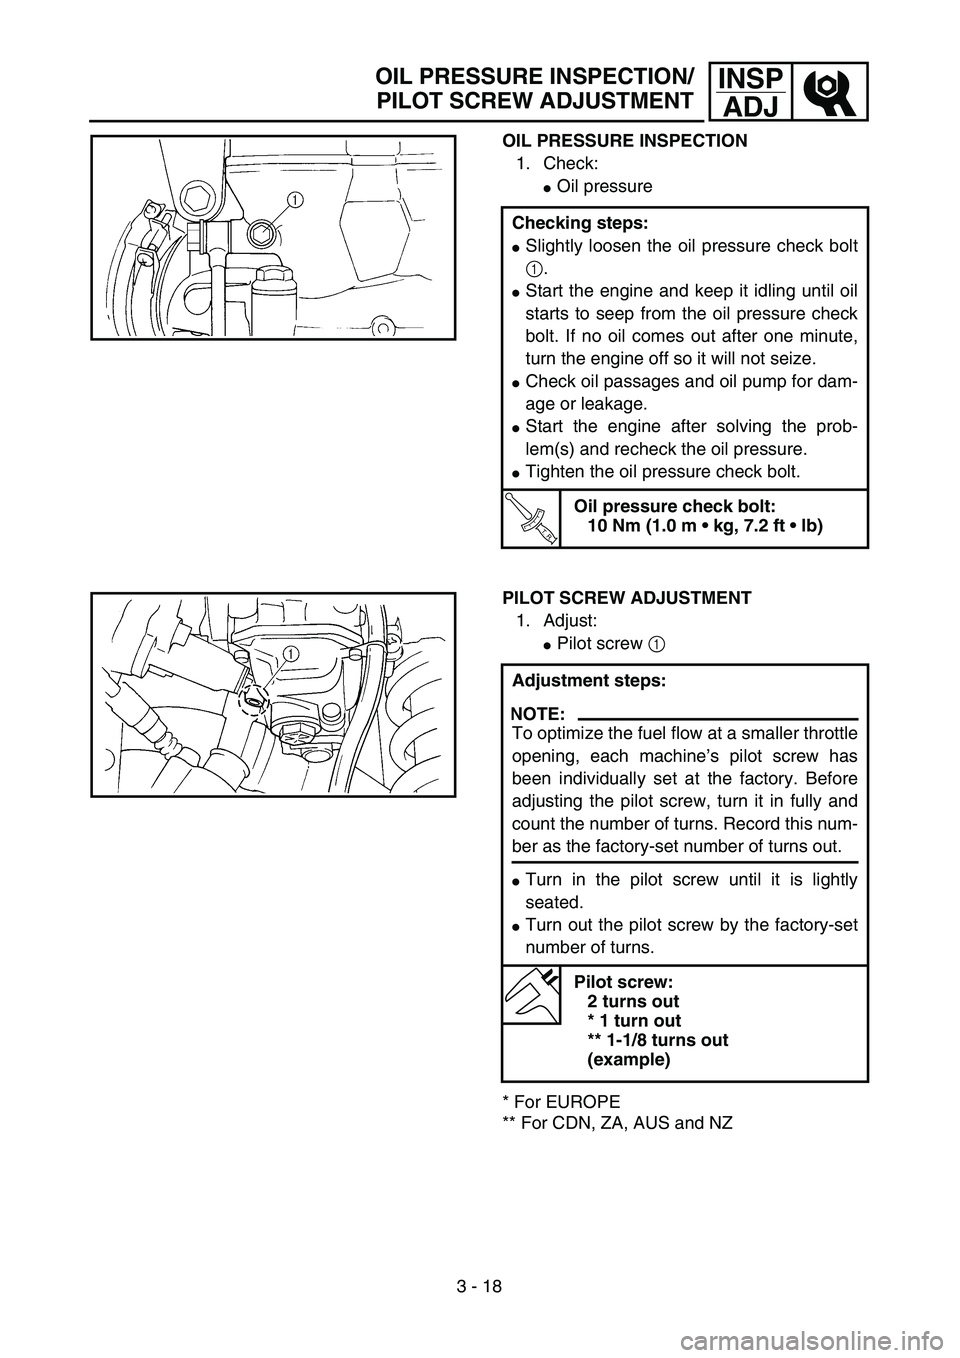
OIL PRESSURE INSPECTION
1. Check:
�Oil pressure
Checking steps:
�Slightly loosen the oil pressure check bolt
1.
�Start the engine and keep it idling until oil
starts to seep from the oil pressure check
bolt. If no oil comes out after one minute,
turn the engine off so it will not seize.
�Check oil passages and oil pump for dam-
age or leakage.
�Start the engine after solving the prob-
lem(s) and recheck the oil pressure.
�Tighten the oil pressure check bolt.
T R..
Oil pressure check bolt:
10 Nm (1.0 m • kg, 7.2 ft • lb)
PILOT SCREW ADJUSTMENT
1. Adjust:
�Pilot screw 1
* For EUROPE
** For CDN, ZA, AUS and NZAdjustment steps:
NOTE:
To optimize the fuel flow at a smaller throttle
opening, each machine’s pilot screw has
been individually set at the factory. Before
adjusting the pilot screw, turn it in fully and
count the number of turns. Record this num-
ber as the factory-set number of turns out.
�Turn in the pilot screw until it is lightly
seated.
�Turn out the pilot screw by the factory-set
number of turns.
Pilot screw:
2 turns out
* 1 turn out
** 1-1/8 turns out
(example)
OIL PRESSURE INSPECTION/
PILOT SCREW ADJUSTMENT
Page 212 of 694

3 - 23
INSP
ADJ
VALVE CLEARANCE INSPECTION AND ADJUSTMENT
�Locate the rounded-off value and the
measured valve clearance in the chart
“PAD SELECTION TABLE”. The field
where these two coordinates intersect
shows the new pad number to use.
NOTE:
Use the new pad number only as a guide
when verifying the valve clearance adjust-
ment.
�Install the new pads 7 and the valve lift-
ers 8.
NOTE:
�Apply the engine oil on the valve lifters.
�Apply the molybdenum disulfied oil on the
valve stem ends.
�Valve lifter must turn smoothly when
rotated with a finger.
�Be careful to reinstall valve lifters and
pads in their original place.
�Install the decompression shaft 9, copper
washer 0, bolt (decompression shaft) A,
guide B, bolt (guide) C and decompres-
sion cable D.
NOTE:
Apply the engine oil on the decompression
shaft.
T R..
Bolt (decompression shaft):
7 Nm (0.7 m • kg, 5.1 ft • lb)
Bolt (guide):
10 Nm (1.0 m • kg, 7.2 ft • lb)
�Install the camshafts (exhaust and intake).
Refer to “CAMSHAFTS” section in the
CHAPTER 4.
Page 240 of 694

3 - 36
INSP
ADJFRONT FORK INSPECTION/
FRONT FORK OIL SEAL AND DUST SEAL CLEANING/
FRONT FORK INTERNAL PRESSURE RELIEVING
EC36C000
FRONT FORK INSPECTION
1. Inspect:
�Front fork smooth action
Operate the front brake and stroke the
front fork.
Unsmooth action/oil leakage → Repair
or replace.
EC36D001
FRONT FORK OIL SEAL AND DUST SEAL
CLEANING
1. Remove:
�Protector
�Dust seal 1
NOTE:
Use a thin screw driver, and be careful not to
damage the inner fork tube and dust seal.
2. Clean:
�Dust seal a
�Oil seal b
NOTE:
�Clean the dust seal and oil seal after every
run.
�Apply the lithium soap base grease on the
inner tube.
FRONT FORK INTERNAL PRESSURE
RELIEVING
NOTE:
If the front fork initial movement feels stiff during
a run, relieve the front fork internal pressure.
1. Elevate the front wheel by placing a suit-
able stand under the engine.
2. Remove the air bleed screw 1 and
release the internal pressure from the
front fork.
3. Install:
�Air bleed screw
T R..1 Nm (0.1 m · kg, 0.7 ft · lb)
Page 246 of 694

3 - 39
INSP
ADJREAR SHOCK ABSORBER INSPECTION/REAR SHOCK
ABSORBER SPRING PRELOAD ADJUSTMENT
EC36K000
REAR SHOCK ABSORBER INSPECTION
1. Inspect:
�Swingarm smooth action
Abnormal noise/unsmooth action →
Grease the pivoting points or repair the
pivoting points.
Damage/oil leakage → Replace.
EC36M013
REAR SHOCK ABSORBER SPRING
PRELOAD ADJUSTMENT
1. Elevate the rear wheel by placing the
suitable stand under the engine.
2. Remove:
�Rear frame
3. Loosen:
�Locknut 1
4. Adjust:
�Spring preload
By turning the adjuster 2.
* For EUROPE
** For AUS, NZ and ZA
NOTE:
�Be sure to remove all dirt and mud from
around the locknut and adjuster before
adjustment.
�The length of the spring (installed) changes
1.5 mm (0.06 in) per turn of the adjuster.
CAUTION:
Never attempt to turn the adjuster beyond
the maximum or minimum setting.
5. Tighten:
�Locknut
6. Install:
�Rear frame Stiffer →Increase the spring preload.
(Turn the adjuster 2 in.)
Softer →Decrease the spring preload.
(Turn the adjuster 2 out.)
Spring length (installed) a:
Standard length Extent of adjustment
244 mm (9.61 in)
* 247 mm (9.72 in)
** 243.5 mm (9.59 in)240.5 ~ 258.5 mm
(9.47 ~ 10.18 in)
T R..29 Nm (2.9 m · kg, 21 ft · lb)
Page 322 of 694

4 - 27
ENGCAMSHAFTS
CAUTION:
Do not turn the crankshaft during the
camshaft installation. Damage or
improper valve timing will result.
�Install the clips, camshaft caps 4 and
bolts (camshaft cap) 5.
T R..
Bolt (camshaft cap):
10 Nm (1.0 m • kg, 7.2 ft • lb)
NOTE:
�Before removing the clips, cover the cylin-
der head with a clean rag to prevent the
clips from into the cylinder head cavity.
�Apply the engine oil on the thread and con-
tact surface of the bolts (camshaft cap).
�Tighten the bolts (camshaft cap) 5 in a
crisscross pattern.
CAUTION:
The bolts (camshaft cap) must be tight-
ened evenly, or damage to the cylinder
head, camshaft caps, and camshaft will
result.
2. Install:
�Timing chain tensioner
Installation steps:
�While pressing the tensioner rod lightly
with fingers, use a thin screwdriver and
wind the tensioner rod up fully clockwise.
�With the rod fully wound and the chain
tensioner UP mark a facing upward,
install the gasket 1 and the timing chain
tensioner 2, and tighten the bolt 3 to the
specified torque.
T R..
Bolt (timing chain tensioner):
10 Nm (1.0 m • kg, 7.2 ft • lb)
Page 328 of 694
4 - 30
ENGCYLINDER HEAD
CYLINDER HEAD
Extent of removal:1 Cylinder head removal
Extent of removal Order Part name Q’ty Remarks
CYLINDER HEAD REMOVAL
Preparation for removal Seat and fuel tank Refer to “SEAT, FUEL TANK AND SIDE
COVERS” section.
Exhaust pipe and silencer Refer to “EXHAUST PIPE AND
SILENCER” section.
Radiator hose 1 Disconnect at cylinder head side.
Carburetor Refer to “CARBURETOR” section.
Camshaft Refer to “CAMSHAFTS” section.
Upper engine bracket Refer to “ENGINE REMOVAL” section.
1 Radiator pipe 1
2 Decompression cable guide 1
3 Oil delivery pipe 1
4 Nut 2
5 Bolt [L=135 mm (5.31 in)] 2
6 Bolt [L=145 mm (5.71 in)] 2
7 Cylinder head 1 Disconnect the decompression cable.
8 Timing chain guard (exhaust side) 1
9 Bolt (decompression shaft) 1
10 Decompression shaft 1
1