Page 18 of 94
3-7
INSTRUMENT AND CONTROL FUNCTIONS
3
EAU00158
Brake leverThe brake lever is located at the right
handlebar grip. To apply the front
brake, pull the lever toward the han-
dlebar grip.
EAU00162
Brake pedalThe brake pedal is on the right side
of the motorcycle. To apply the rear
brake, press down on the brake
pedal.
EAU02935
Fuel tank capTo open the fuel tank cap
Open the fuel tank cap lock cover,
insert the key into the lock, and then
turn it 1/4 turn clockwise. The lock will
be released and the fuel tank cap can
be opened.
To close the fuel tank cap
1. Push the fuel tank cap into posi-
tion with the key inserted in the
lock.
2. Turn the key counterclockwise to
the original position, remove it,
and then close the lock cover.
1
1
1
a
b
1. Brake lever 1. Brake pedal 1. Fuel tank cap lock cover
a. Open.
b. Unlock.
5AE-28199-E5 honbun 7/6/01 10:18 AM Page 17
Page 23 of 94
3-12
EAU03839
Starter (choke) lever “1”Starting a cold engine requires a rich-
er air-fuel mixture, which is supplied
by the starter (choke).
Move the lever in direction ato turn
on the starter (choke).
Move the lever in direction bto turn
off the starter (choke).
EAU01619
SeatTo remove the seat
1. Insert the key into the seat lock,
and then turn it clockwise.
2. Pull the seat off.To install the seat
1. Insert the projection on the front
of the seat into the seat holder
as shown.
2. Push the rear of the seat down to
lock it in place.
3. Turn the key counterclockwise,
and then remove it.
NOTE:
Make sure that the seat is properly
secured before riding.
INSTRUMENT AND CONTROL FUNCTIONS
3
1
a
b
a
1
2
1. Starter (choke) lever “1”a. Unlock. 1. Projection
2. Seat holder
5AE-28199-E5 honbun 7/6/01 10:18 AM Page 22
Page 72 of 94
6-36
PERIODIC MAINTENANCE AND MINOR REPAIR
6 3. Remove the socket (together
with the bulb) by turning it coun-
terclockwise.
4. Remove the defective bulb by
pushing it in and turning it coun-
terclockwise.
5. Insert a new bulb into the socket,
push it in, and then turn it clock-
wise until it stops.
6. Install the socket (together with
the bulb) by turning it clockwise.
7. Install the panel and the seat.
EAU03497
Replacing a turn signal light
bulb1. Remove the turn signal light lens
by removing the screw.2. Remove the defective bulb by
pushing it in and turning it coun-
terclockwise.
3. Insert a new bulb into the socket,
push it in, and then turn it clock-
wise until it stops.
4. Install the lens by installing the
screw.
ECA00065
cCDo not overtighten the screw, oth-
erwise the lens may break.
1
12
1
1. Socket 1. Lens
2. Screw1. Bulb
5AE-28199-E5 honbun 7/6/01 10:18 AM Page 71
Page 79 of 94

6-43
PERIODIC MAINTENANCE AND MINOR REPAIR
6
NOTE:
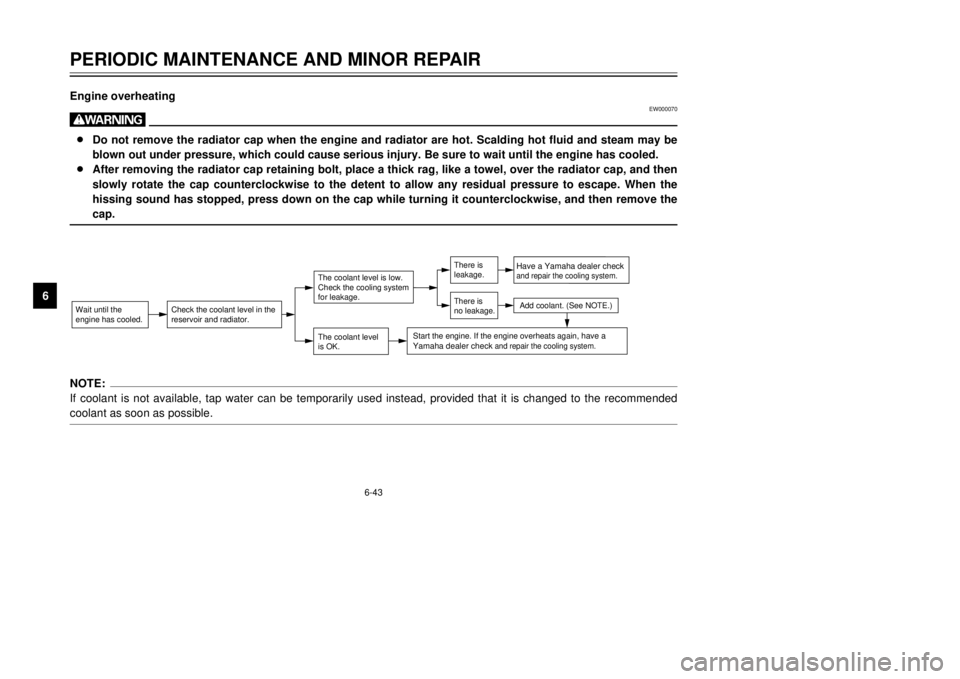
If coolant is not available, tap water can be temporarily used instead, provided that it is changed to the recommended
coolant as soon as possible.Engine overheating
EW000070
w8Do not remove the radiator cap when the engine and radiator are hot. Scalding hot fluid and steam may be
blown out under pressure, which could cause serious injury. Be sure to wait until the engine has cooled.
8After removing the radiator cap retaining bolt, place a thick rag, like a towel, over the radiator cap, and then
slowly rotate the cap counterclockwise to the detent to allow any residual pressure to escape. When the
hissing sound has stopped, press down on the cap while turning it counterclockwise, and then remove the
cap.Wait until the
engine has cooled.
Check the coolant level in the
reservoir and radiator.
The coolant level
is OK.The coolant level is low.
Check the cooling system
for leakage.
Have a Yamaha dealer checkand repair the cooling system.Add coolant. (See NOTE.)
Start the engine. If the engine overheats again,
have a
Yamaha dealer check
and repair the cooling system.
There is
leakage.
There is
no leakage.
5AE-28199-E5 honbun 7/6/01 10:18 AM Page 78