2002 YAMAHA DT125R recommended oil
[x] Cancel search: recommended oilPage 6 of 96

EAU00009
TABLE OF CONTENTS
GIVE SAFETY THE RIGHT OF WAY ............... 1-1
DESCRIPTION .................................................. 2-1
Left view ......................................................... 2-1
Right view ....................................................... 2-2
Controls and instruments ............................... 2-3
INSTRUMENT AND CONTROL FUNCTIONS .. 3-1
Main switch ..................................................... 3-1
Indicator and warning lights ............................ 3-1
Speedometer unit .......................................... 3-2
Tachometer .................................................... 3-2
Coolant temperature gauge ............................ 3-3
Handlebar switches ........................................ 3-3
Clutch lever .................................................... 3-4
Shift pedal ...................................................... 3-4
Brake lever ..................................................... 3-5
Brake pedal .................................................... 3-5
Fuel tank cap .................................................. 3-5
Fuel (except for Switzerland and Austria) ...... 3-6
Fuel (for Switzerland and Austria) ................. 3-6
Catalytic converter
(for Switzerland and Austria) ....................... 3-7
2-stroke engine oil .......................................... 3-8
Fuel cock ........................................................ 3-9
Starter (choke) lever ..................................... 3-10Kickstarter .................................................... 3-10
Steering lock ................................................. 3-10
Seat .............................................................. 3-11
Helmet holder ............................................... 3-12
Adjusting the shock absorber assembly ....... 3-12
Carrier .......................................................... 3-14
YEIS handling precautions .......................... 3-14
YPVS ............................................................ 3-14
Sidestand ..................................................... 3-15
Ignition circuit cut-off system ........................ 3-16
PRE-OPERATION CHECKS ............................. 4-1
Pre-operation check list .................................. 4-1
OPERATION AND IMPORTANT
RIDING POINTS ............................................... 5-1
Starting a cold engine .................................... 5-1
Starting a warm engine .................................. 5-2
Shifting ........................................................... 5-2
Recommended shift points
(for Switzerland only) .................................. 5-3
Tips for reducing fuel consumption ................ 5-3
Engine break-in .............................................. 5-4
Parking ........................................................... 5-5
123
45
3MB-9-E8 6/13/01 10:55 AM Page 5
Page 21 of 96

3-8
INSTRUMENT AND CONTROL FUNCTIONS
3
EC000114
cCThe following precautions must be
observed to prevent a fire hazard
or other damages.
8Use only unleaded gasoline.
The use of leaded gasoline will
cause unrepairable damage to
the catalytic converter.
8Never park the motorcycle
near possible fire hazards
such as grass or other materi-
als that easily burn.
8Do not allow the engine to idle
too long.
EAU03750
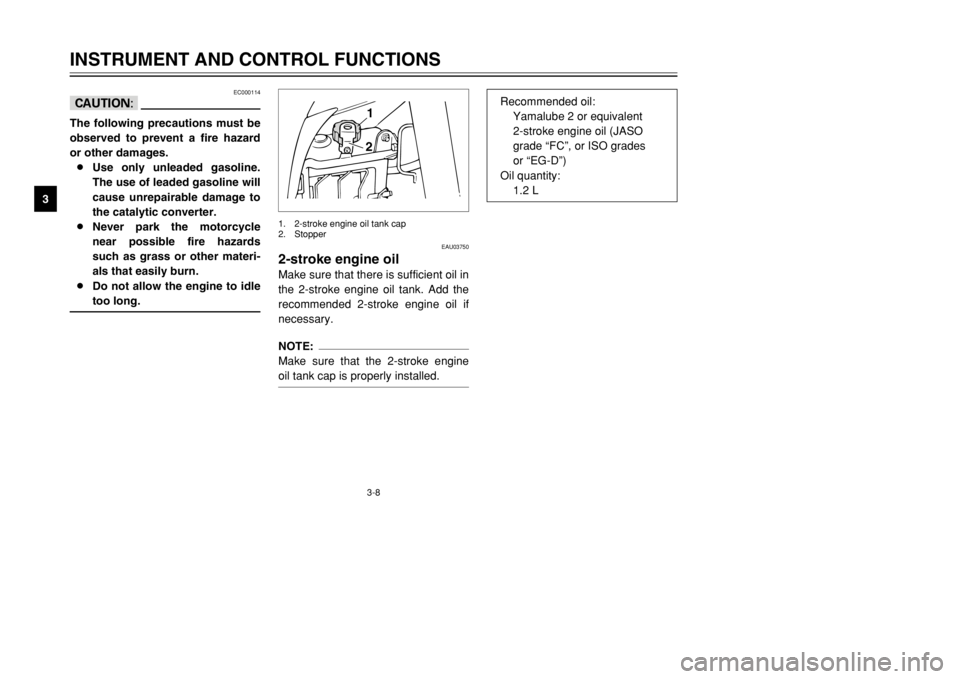
2-stroke engine oilMake sure that there is sufficient oil in
the 2-stroke engine oil tank. Add the
recommended 2-stroke engine oil if
necessary.NOTE:
Make sure that the 2-stroke engine
oil tank cap is properly installed.
21
1. 2-stroke engine oil tank cap
2. Stopper
Recommended oil:
Yamalube 2 or equivalent
2-stroke engine oil (JASO
grade “FC”, or ISO grades
or “EG-D”)
Oil quantity:
1.2 L
3MB-9-E8 6/13/01 10:55 AM Page 20
Page 31 of 96

4-1
EAU01114
PRE-OPERATION CHECKS
4The condition of a vehicle is the owner’s responsibility. Vital components can start to deteriorate quickly and unexpect-
edly, even if the vehicle remains unused (for example, as a result of exposure to the elements). Any damage, fluid leak-
age or loss of tire air pressure could have serious consequences. Therefore, it is very important, in addition to a thor-
ough visual inspection, to check the following points before each ride.
EAU03439
Pre-operation check list
ITEM CHECKS PAGE
Fuel•Check fuel level in fuel tank.
•Refuel if necessary.
•Check fuel line for leakage.3-5–3-7
2-stroke engine oil•Check oil level in oil tank.
•If necessary, add recommended oil to specified level.
•Check vehicle for oil leakage.3-8
Transmission oil•Check oil level in transmission case.
•If necessary, add recommended oil to specified level.6-10–6-12
Coolant•Check coolant level in reservoir.
•If necessary, add recommended coolant to specified level.
•Check cooling system for leakage.6-12–6-15
Front brake•Check operation.
•If soft or spongy, have Yamaha dealer bleed hydraulic system.
•Check lever free play.
•Adjust if necessary.
•Check fluid level in reservoir.
•If necessary, add recommended brake fluid to specified level.
•Check hydraulic system for leakage.3-5, 6-23, 6-24–6-26
Rear brake•Check operation.
•If soft or spongy, have Yamaha dealer bleed hydraulic system.
•Check fluid level in reservoir.
•If necessary, add recommended brake fluid to specified level.
•Check hydraulic system for leakage.3-5, 6-23–6-26
3MB-9-E8 6/13/01 10:55 AM Page 30
Page 49 of 96

6-11
PERIODIC MAINTENANCE AND MINOR REPAIR
63. Wait a few minutes until the oil
settles, and then check the oil
level through the check window
located at the right side of the
crankcase.
NOTE:
The transmission oil should be at or
above the minimum level mark.4. If the oil is below the minimum
level mark, remove the oil filler
cap, add sufficient oil of the rec-
ommended type to raise it to the
correct level, and then install and
tighten the cap.
1
2
1. Transmission oil level check window
2. Minimum level mark
4. Install the transmission oil drain
bolt, and then tighten it to the
specified torque.
5. Add the specified amount of the
recommended transmission oil,
and then install and tighten the
oil filler cap.
1
1. Transmission oil drain bolt
To change the transmission oil
1. Start the engine, warm it up for
several minutes, and then turn it
off.
2. Place an oil pan under the trans-
mission to collect the used oil.
3. Remove the oil filler cap and
drain bolt to drain the oil from the
transmission.
1
1. Oil filler cap
Tightening torque:
Transmission oil drain bolt:
15 Nm (1.5 m0kgf)
3MB-9-E8 6/13/01 10:55 AM Page 48
Page 50 of 96

6-12
PERIODIC MAINTENANCE AND MINOR REPAIR
6
EC000077
cC8In order to prevent clutch slip-
page (since the transmission
oil also lubricates the clutch),
do not mix any chemical addi-
tives with the oil.
8Make sure that no foreign
material enters the transmis-
sion.6. Start the engine, and then let it
idle for several minutes while
checking the transmission for oil
leakage. If oil is leaking, immedi-
ately turn off the engine and
check for the cause.
EAU01808
CoolantTo check the coolant level
1. Place the motorcycle on a level
surface and hold it in an upright
position.NOTE:
8The coolant level must be
checked on a cold engine since
the level varies with engine tem-
perature.
8Make sure that the motorcycle is
positioned straight up when
checking the coolant level. A
slight tilt to the side can result in
a false reading.
2. Remove panel A. (See page 6-8
for panel removal and installation
procedures.)
3. Check the coolant level in the
coolant reservoir.NOTE:
The coolant should be between the
minimum and maximum level marks.
2
1
1. Maximum level mark
2. Minimum level mark
Recommended transmission oil:
See page 8-1.
Oil quantity:
Periodic oil change:
0.75 L
Total amount (dry transmission):
0.8 L
3MB-9-E8 6/13/01 10:55 AM Page 49
Page 54 of 96

6-16
PERIODIC MAINTENANCE AND MINOR REPAIR
6
EAU04233
Cleaning the air filter
elementThe air filter element should be
cleaned at the intervals specified in
the periodic maintenance and lubrica-
tion chart. Clean the air filter element
more frequently if you are riding in
unusually wet or dusty areas.
1. Remove panel A. (See page 6-8
for panel removal and installation
procedures.)
2. Remove the air filter case cover
by removing the screws.��
1
2
1. Screw (×3)
2. Air filter case cover
4. Remove the wing nut, and then
separate the air filter element
from the guide.
5. Remove the sponge material
from the frame, clean it with sol-
vent, and then squeeze the
remaining solvent out.
6. Apply oil of the recommended
type to the entire surface of the
sponge material, and then
squeeze the excess oil out.NOTE:
The sponge material should be wet
but not dripping.
12
3
4
1. Air filter element guide
2. Air filter element frame
3. Sponge material
4. Wing nut
3. Remove the air filter element
from the case.
3MB-9-E8 6/13/01 10:55 AM Page 53
Page 55 of 96

6-17
PERIODIC MAINTENANCE AND MINOR REPAIR
67. Pull the sponge material over the
frame.
8. Install the air filter element onto
the guide, and then tighten the
wing nut.
9. Insert the air filter element into
the case.
10. Install the air filter case cover by
installing the screws.
11. Install the panel.
EC000082
cC8Make sure that the air filter ele-
ment is properly seated in the
air filter case.
8The engine should never be
operated without the air filter
element installed, otherwise
the piston and/or cylinder may
become excessively worn.
EAU00632
Adjusting the engine idling
speedThe engine idling speed must be
checked and, if necessary, adjusted
as follows at the intervals specified in
the periodic maintenance and lubrica-
tion chart.
1. Start the engine and warm it up
for several minutes at 1,000–
2,000 r/min while occasionally
revving it to 4,000–5,000 r/min.NOTE:
The engine is warm when it quickly
responds to the throttle.2. Check the engine idling speed
and, if necessary, adjust it to
specification by turning the throt-
tle stop screw.
EAU00629
Adjusting the carburetorThe carburetor is an important part of
the engine and requires very sophisti-
cated adjustment. Therefore, most
carburetor adjustments should be left
to a Yamaha dealer, who has the
necessary professional knowledge
and experience. The adjustment
described in the following section,
however, may be serviced by the
owner as part of routine mainte-
nance.
EC000094
cCThe carburetor has been set and
extensively tested at the Yamaha
factory. Changing these settings
without sufficient technical knowl-
edge may result in poor perfor-
mance of or damage to the engine.
Recommended oil:
2-stroke engine oil
3MB-9-E8 6/13/01 10:55 AM Page 54
Page 64 of 96

6-26
PERIODIC MAINTENANCE AND MINOR REPAIR
6 Observe these precautions:
8When checking the fluid level,
make sure that the top of the
brake fluid reservoir is level.
8Use only the recommended qual-
ity brake fluid, otherwise the rub-
ber seals may deteriorate, caus-
ing leakage and poor braking
performance.
1
1. Minimum level mark
EAU03976
Changing the brake fluidHave a Yamaha dealer change the
brake fluid at the intervals specified in
the NOTE after the periodic mainte-
nance and lubrication chart. In addi-
tion, have the oil seals of the master
cylinders and calipers as well as the
brake hoses replaced at the intervals
listed below or whenever they are
damaged or leaking.
8Oil seals: Replace every two
years.
8Brake hoses: Replace every four
years. 8Refill with the same type of brake
fluid. Mixing fluids may result in a
harmful chemical reaction and
lead to poor braking perfor-
mance.
8Be careful that water does not
enter the brake fluid reservoir
when refilling. Water will signifi-
cantly lower the boiling point of
the fluid and may result in vapor
lock.
8Brake fluid may deteriorate paint-
ed surfaces or plastic parts.
Always clean up spilled fluid
immediately.
8As the brake pads wear, it is nor-
mal for the brake fluid level to
gradually go down. However, if
the brake fluid level goes down
suddenly, have a Yamaha dealer
check the cause.
REARRecommended brake fluid:
DOT 4
3MB-9-E8 6/13/01 10:55 AM Page 63