2002 VOLVO S60 change wheel
[x] Cancel search: change wheelPage 15 of 106

2 0 0 2
VOLVO S60
Instruments and controls
pg. 29 Instruments and controls
Instrument panel 30
Indicator and warning symbols31
Switches in the center console37
Steering wheel adjustment39
Lighting panel40
Turn signals41
Windshield wipers/washer42
Hazard warning flashers, rear window/sideview mirror defroster, heated front seats43
Trip computer (option)44
Cruise control45
Parking brake, electric socket/cigarette lighter46
Electrically operated windows47
Rearview mirror/sideview mirrors49
Electrically operated sun roof50
pg. 30 Instrument panel
1. Turn signal indicators - right - left
2. Text window
The text window displays information and warning messages.
3. Temperature gauge
The pointer should be approximately midway on the gauge when driving. Do not drive the car if the warning light is
on. The text window will provide you with additional information. If the engine temperature remains high, check
coolant level - see page 171
.
4. Trip odometer
The trip odometers are used for measuring shorter distances. The right-hand digit gives tenth of a mile/kilometer. Press
the button for more than 2 seconds to reset. Change between trip odometers 1 and 2 using one short press on the
button.
ProCarManuals.com
Page 34 of 106

18. Automatic presetting of radio stations
19. Display
pg. 67 Audio systems HU-413/ HU-613/ HU-803
Switch on/off
Press the knob to switch on or turn off the radio.
Volume control
Turn the knob clockwise to increase volume. Volume control is electronic and does not have an end stop. If you have
a key pad in the steering wheel, increase or decrease the volume with the + or - buttons.
Band selector
Turn "SOURCE" knob to select FM or AM. The station and band are displayed. You can also select cassette deck,
CD, or the optional CD changer if connected, with this knob. Active sound control (ASC) The ASC (Active Sound
Control) automatically adapts volume to vehicle speed.
Press the ASC button (HU-613) for several seconds to switch this function ON or OFF. This function is included in
the Advanced User Mode on the HU -803 equipped with this feature.
"ASC ON" or "ASC OFF" will be shown in the display for several seconds.
Bass
Adjust the bass by pressing the button to extend the control and turning it to the left (less bass) or to the right (more
bass). A "detent" indicates "equalized" bass. Press the button back in when you have made the adjustment.
Treble
Adjust the treble by pressing the button to extend the control, pulling it out as far as possible, and then turning it to the
left (less treble) or to the right (more treble). A "detent" indicates "equalized" treble. Press the button back in when you
have made the adjustment.
ProCarManuals.com
Page 36 of 106

Press the left or right-hand side of the button to seek lower or higher frequencies. The radio seeks the next
audible station and sets it. Press the button again to continue seek.
Steering wheel keypad
If you have a keypad in the steering wheel, press the right or left arrow to select preset stations.
Scan function
Press the SCAN button (HU-613) or the SOURCE knob (HU-803) to start the station scan function. When a station is
found, scanning stops for several seconds, after which scanning will continue.
Press the SCAN button or SOURCE knob when a station has been found if you would like to listen to that station and
to discontinue the scan function.
pg. 70 Audio systems HU-413/ HU-613/ HU-803
Automatic station preset
This function seeks and stores up to 10 strong AM or FM stations in a separate memory. This function is especially
useful in areas where you are not familiar with the radio stations.
1. Press in the "AUTO" button. A number of strong signal stations (max. 10) from the currently selected waveband are
now stored automatically in the memory. An "A" and "AUTO" is displayed. If there is no station with sufficient signal
strength "NO STATION" is displayed.
2. Turn "1- 20/ DISC" knob if you wish to change to another of the auto-stored stations.
Another auto-stored station is selected with each turn.
Programming stations
1. Tune in the desired frequency.
2. Press the "1-20/ DISC" knob. Select a number by turning forwards or backwards. Press again to store the selected
frequency and station.
Preset
To choose a pre-set station, turn "1-20/ DISC" knob to the stored number. The currently selected station is displayed.
Radio Data System (RDS, also referred to as RBDS) - HU-803 only
This feature, which may not work in your area, functions only with FM broadcasts. The HU -803 radio in your car is
equipped with an advanced system allowing information from broadcasters to be transmitted visually, as text, together
with the audio signal. This information is then decoded by the radio and made available for several new and unique
ProCarManuals.com
Page 72 of 106

Changing wheels
The spare wheel is located under the carpet on the trunk floor. The jack and crank are secured in the wheel recess.
There are two jack attachment points on each side of the car (see illustration on next page). To change a wheel:
Engage the parking brake.
Put the gear selector in (P) ark (automatic transmission) or reverse (manual transmission).
Remove the wheel cap (where applicable) using the lug wrench in the tool kit.
With the car still on the ground, use the lug wrench to loosen the wheel bolts 1/2 - 1 turn. Turn the bolts
counterclockwise to loosen.
CAUTION:
The car must not be driven with wheels of different dimensions or with a spare tire other than the one that came with
the car. The use of different size wheels can seriously damage your car's transmission.
Correct tightening torque on wheel bolts must be observed. The wheel bolts should never be greased or lubricated. The
extended, chromed wheel bolts must not be used with steel rims, as they make it impossible to fit the hub caps.
pg. 161 Changing wheels
ProCarManuals.com
Page 73 of 106

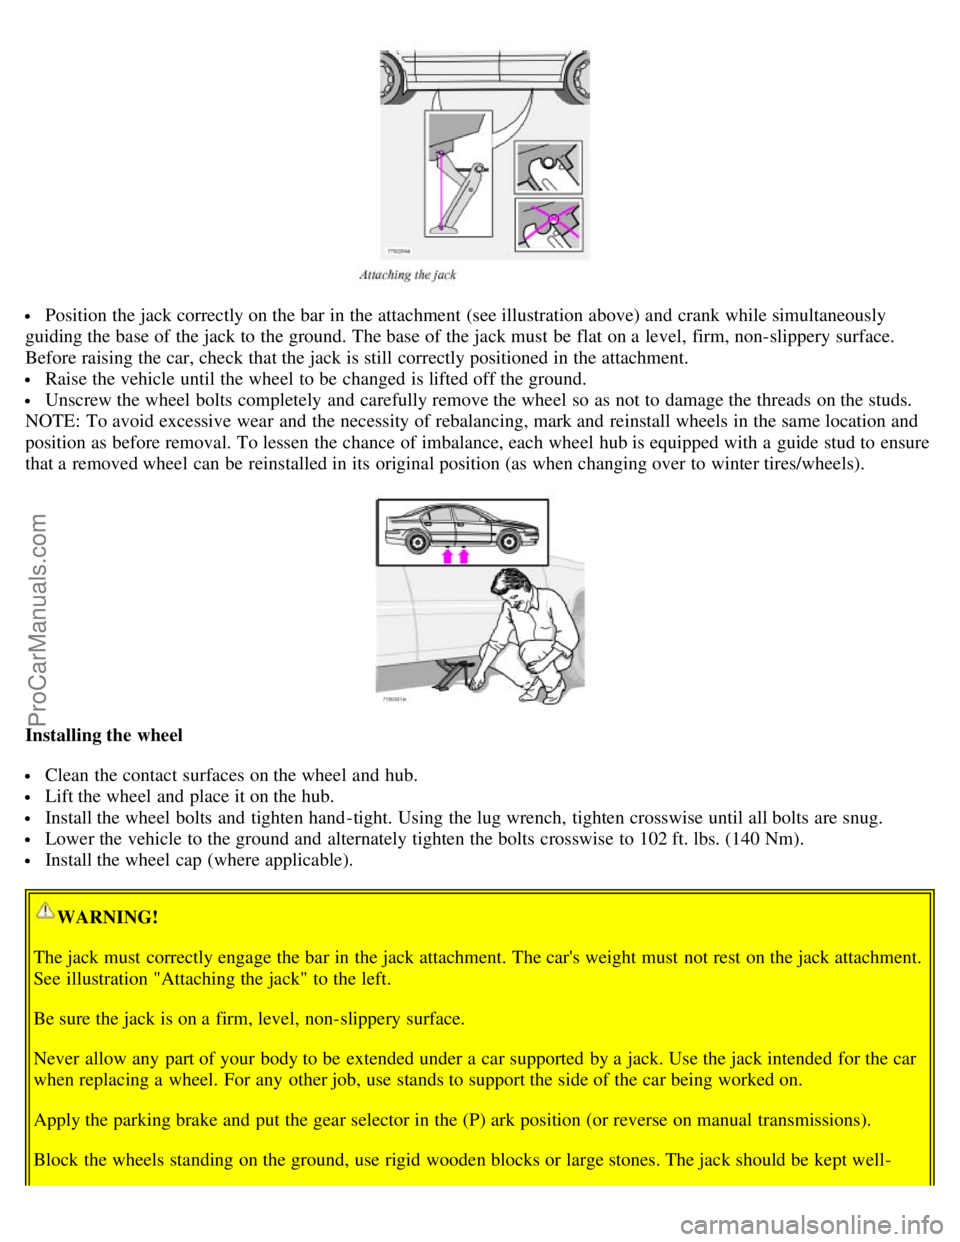
Position the jack correctly on the bar in the attachment (see illustration above) and crank while simultaneously
guiding the base of the jack to the ground. The base of the jack must be flat on a level, firm, non-slippery surface.
Before raising the car, check that the jack is still correctly positioned in the attachment.
Raise the vehicle until the wheel to be changed is lifted off the ground.
Unscrew the wheel bolts completely and carefully remove the wheel so as not to damage the threads on the studs.
NOTE: To avoid excessive wear and the necessity of rebalancing, mark and reinstall wheels in the same location and
position as before removal. To lessen the chance of imbalance, each wheel hub is equipped with a guide stud to ensure
that a removed wheel can be reinstalled in its original position (as when changing over to winter tires/wheels).
Installing the wheel
Clean the contact surfaces on the wheel and hub.
Lift the wheel and place it on the hub.
Install the wheel bolts and tighten hand -tight. Using the lug wrench, tighten crosswise until all bolts are snug.
Lower the vehicle to the ground and alternately tighten the bolts crosswise to 102 ft. lbs. (140 Nm).
Install the wheel cap (where applicable).
WARNING!
The jack must correctly engage the bar in the jack attachment. The car's weight must not rest on the jack attachment.
See illustration "Attaching the jack" to the left.
Be sure the jack is on a firm, level, non-slippery surface.
Never allow any part of your body to be extended under a car supported by a jack. Use the jack intended for the car
when replacing a wheel. For any other job, use stands to support the side of the car being worked on.
Apply the parking brake and put the gear selector in the (P) ark position (or reverse on manual transmissions).
Block the wheels standing on the ground, use rigid wooden blocks or large stones. The jack should be kept well-
ProCarManuals.com
Page 103 of 106

Trunk - opening from the inside122
Trunk - unlocking122
Turn signals - normal turns41
Turn signals - lane change position41
Type designations194
U
Uniform Tire Quality Grading162
, 162
Unlocking121
Unlocking the trunk122
Use of Additives129
V
Valet key118
Vanity mirror108
Vehicle Identification Number (VIN)194
Vehicle loading158
VIN (Vehicle Identification Number)194
Volvo and the environment3
Volvo On Call205
W
W - Winter137
, 139
Warning symbol in center of dashboard31
Warranties168
Washer fluid reservoir172 , 175
Washing the car164
Waxing165
Weight distribution133
Weights195
Wheels156
WHIPS22
Windshield washer42
Windshield washer fluid reservoir175
Windshield wipers42
Winter tires156
Winter/ Wet driving mode153
Wiper blades177
Contents | Top of Page
ProCarManuals.com