Page 91 of 308
’02 Tacoma U (L/O 0109)
852002 MY TACOMA_U (OM35786U)
2. Fully extend the shoulder belt to put itin the lock mode. When the belt is
then retracted even slightly, it cannot
be extended.
To hold the infant seat securely, make
sure the belt is in the lock mode before
letting the belt retract.3. While pressing the infant seat firmly against the seat cushion and seatback,
let the shoulder belt retract as far as
it will go to hold the infant seat secure-
ly.CAUTION
Push and pull the child restraint sys-
tem in different directions to be sure
it is secure. Follow all the installation
instructions provided by its manufac-
turer.
Page 94 of 308
’02 Tacoma U (L/O 0109)
882002 MY TACOMA_U (OM35786U)
CAUTION
�After inserting the tab, make sure
the tab and buckle are locked and
that the lap and shoulder portions
of the belt are not twisted.
�Do not insert coins, clips, etc. in
the buckle as this may prevent you
from properly latching the tab and
buckle.
�If the seat belt does not function
normally, it cannot protect your
child from injury. Contact your
Toyota dealer immediately. Do not
use the seat until the seat belt is
fixed.
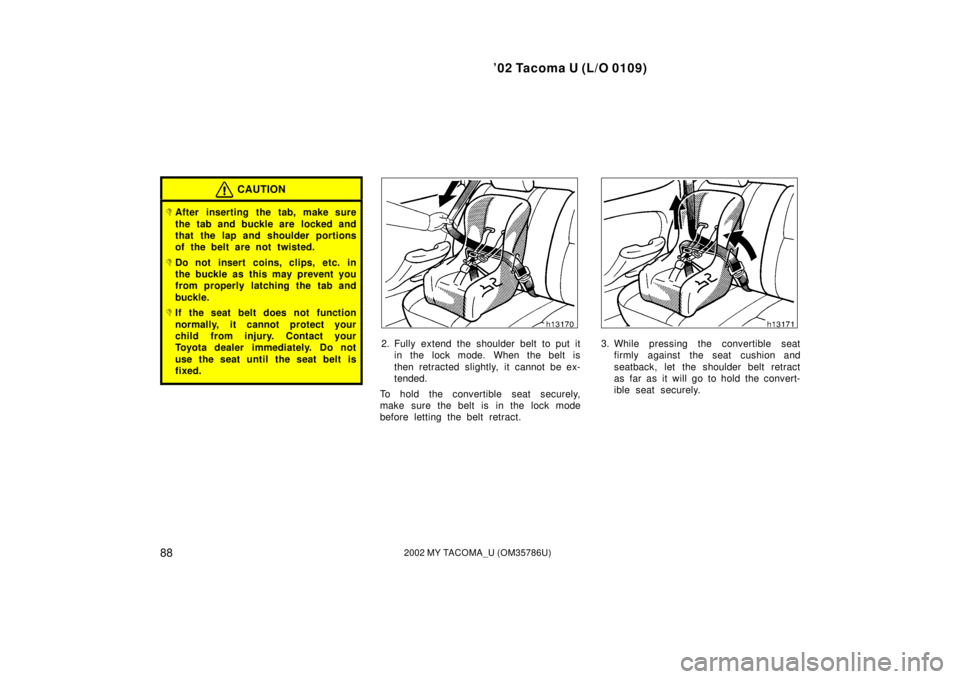
2. Fully extend the shoulder belt to put itin the lock mode. When the belt is
then retracted slightly, it cannot be ex-
tended.
To hold the convertible seat securely,
make sure the belt is in the lock mode
before letting the belt retract.3. While pressing the convertible seat firmly against the seat cushion and
seatback, let the shoulder belt retract
as far as it will go to hold the convert-
ible seat securely.
Page 99 of 308
’02 Tacoma U (L/O 0109)
932002 MY TACOMA_U (OM35786U)
TO USE THE ANCHOR BRACKET:
Regular cab with bench seat—1. Pull the seatback release lever and swing the seatback forward slightly,
then latch the hook onto the anchor
bracket.
Return the seatback to its original
position.2. Fix the child restraint system withthe seat belt and tighten the top
strap.
For instructions on installing the child re-
straint system, see “Child restraint” in this
section.
CAUTION
�When returning the seatback to its
original position, make sure the
seatback is securely locked by
pushing forward and rearward on
the top of the seatback.
�Make sure the top strap is securely
latched, and check that the child
restraint system is secure by push-
ing and pulling it in different direc-
tions. Follow all the installation in-
structions provided by its manufac-
turer.
Page 100 of 308
’02 Tacoma U (L/O 0109)
942002 MY TACOMA_U (OM35786U)
Regular cab with separate seat—1. Remove the passenger head re- straint.2. Pull the seatback release lever andswing the seatback forward slightly,
then latch the hook onto the anchor
bracket.
Return the seatback to upright posi-
tion.3. Fix the child restraint system withthe seat belt and tighten the top
strap.
Replace the passenger head re-
straint.
For instructions on installing the child re-
straint system, see “Child restraint” in this
section.
Page 101 of 308
’02 Tacoma U (L/O 0109)
952002 MY TACOMA_U (OM35786U)
CAUTION
�When returning the seatback to its
original position, make sure the
seatback is securely locked by
pushing forward and rearward on
the top of the seatback.
�Make sure the top strap is securely
latched, and check that the child
restraint system is secure by push-
ing and pulling it in different direc-
tions. Follow all the installation in-
structions provided by its manufac-
turer.
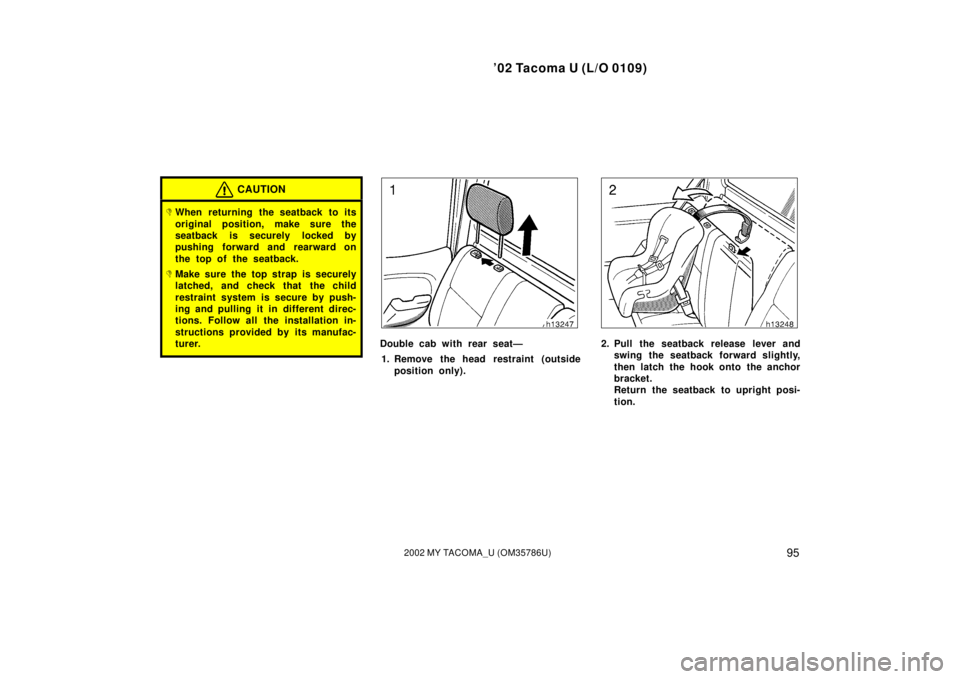
Double cab with rear seat—1. Remove the head restraint (outside position only).2. Pull the seatback release lever andswing the seatback forward slightly,
then latch the hook onto the anchor
bracket.
Return the seatback to upright posi-
tion.
Page 103 of 308
’02 Tacoma U (L/O 0109)
972002 MY TACOMA_U (OM35786U)
Rear outside position
Follow the procedure below for a child
restraint system that requires the use
of a top strap.
Routing
device
Upper
anchor bracket
Lower anchor
bracket Symbol mark
Use the routing device and the anchor
bracket to attach the top strap.
Upper anchor bracket is installed for
right�front passenger ’s seating position,
lower anchor bracket is installed for front
center seating position (with split bench
seat) or right�rear seating position.
This symbol indicates the locations of
user ready anchor bracket.
Symbol mark
TO USE THE ANCHOR BRACKET:
Front outside position—
1. Remove the passenger head re- straint.
Lightly push down on the top sur-
face of the anchor bracket cover
with the symbol mark shown in the
illustration, then pull it forward to
remove.
Page 105 of 308
’02 Tacoma U (L/O 0109)
992002 MY TACOMA_U (OM35786U)
Front center position—
Fix the child restraint system with the
seat belt.
Latch the hook onto the rear lower an-
chor bracket and tighten the top strap.
For instructions on installing the child re-
straint system, see “Child restraint” in this
section.
CAUTION
Make sure the top strap is securely
latched, and check that the child re-
straint system is secure by pushing
and pulling it in different directions.
Follow all the installation instructions
provided by its manufacturer.
Symbol mark
Rear outside position—1. Lightly push down on the top sur- face of the anchor bracket cover
with the symbol mark shown in the
illustration, then pull it forward to
remove.
Page 109 of 308
 ’02 Tacoma U (L/O 0109)
1032002 MY TACOMA_U (OM35786U)
To adjust a mirror, use the switches.1. Master switch—To select the mirror to be adjusted
Push the switch to “L” (left) or “R”
(right")
’02 Tacoma U (L/O 0109)
1032002 MY TACOMA_U (OM35786U)
To adjust a mirror, use the switches.1. Master switch—To select the mirror to be adjusted
Push the switch to “L” (left) or “R”
(right).
2. Control switch—To move the mirror Push the switch in the desired direc-
tion.
Mirror can be adjusted when key is in the
“ACC” or “ON” position.
NOTICE
If ice should jam the mirror, do not
operate the control or scrape the mir-
ror face. Use a spray de�icer to free
the mirror.The rear view mirrors can be folded
backward for parking in restricted
areas.
To fold the rear view mirror, push back-
ward.
CAUTION
Do not drive with the mirrors folded
backward. Both the driver and pas-
senger side rear view mirrors must
be extended and properly adjusted
before driving.
Adjust the mirror so that you can just
see the rear of your vehicle in the mir-
ror.
To reduce glare from the headlights of
the vehicle behind you during night
driving, operate the lever on the lower
edge of the mirror.
Daylight driving—Lever at position 1
The reflection in the mirror has greater
clarity at this position.
Night driving—Lever at position 2
Remember that by reducing glare you also
lose some rear view clarity.
—Folding rear view mirrors
(with power rear view mirror
control) Anti�glare inside rear view
mirror
 ’02 Tacoma U (L/O 0109)
852002 MY TACOMA_U (OM35786U)
2. Fully extend the shoulder belt to put itin the lock mode. When the belt is
then retracted even slightly, it cannot
be extended.
To hold the i")
 ’02 Tacoma U (L/O 0109)
932002 MY TACOMA_U (OM35786U)
TO USE THE ANCHOR BRACKET:
Regular cab with bench seat—1. Pull the seatback release lever and swing the seatback forward slightly,
then latch")
 ’02 Tacoma U (L/O 0109)
942002 MY TACOMA_U (OM35786U)
Regular cab with separate seat—1. Remove the passenger head re- straint.2. Pull the seatback release lever andswing the seatback forward sligh")
 ’02 Tacoma U (L/O 0109)
972002 MY TACOMA_U (OM35786U)
Rear outside position
Follow the procedure below for a child
restraint system that requires the use
of a top strap.
Routing
device
Upper
ancho")
 ’02 Tacoma U (L/O 0109)
992002 MY TACOMA_U (OM35786U)
Front center position—
Fix the child restraint system with the
seat belt.
Latch the hook onto the rear lower an-
chor bracket and tighten the")