Page 212 of 290
’02 SOLARA_U (L/O 0108)
2082002 MY SOLARA_U (OM33545U)
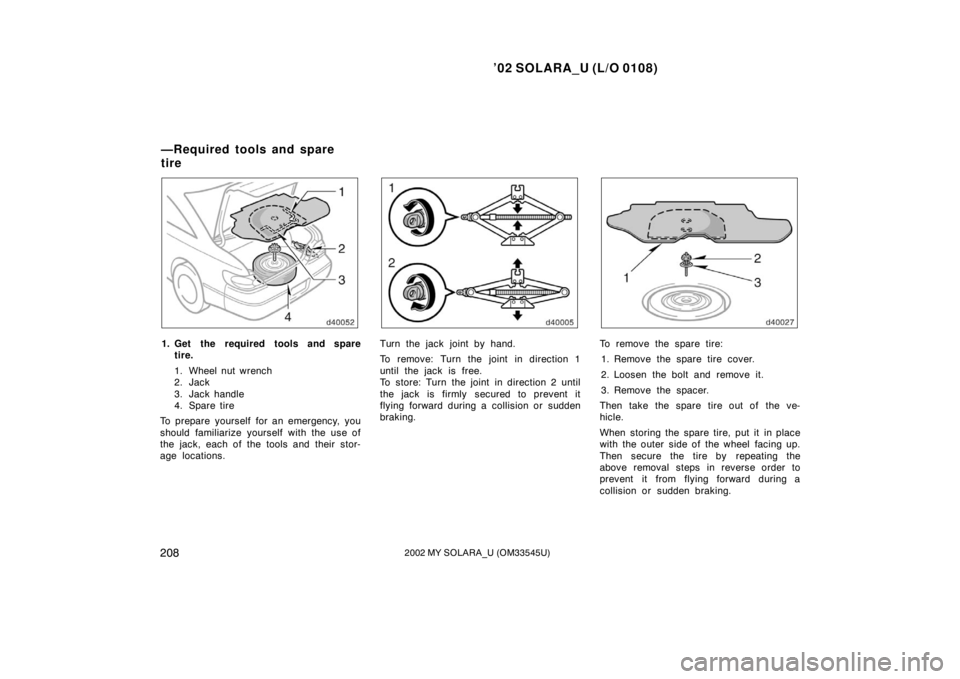
1. Get the required tools and spare
tire.
1. Wheel nut wrench
2. Jack
3. Jack handle
4. Spare tire
To prepare yourself for an emergency, you
should fam iliarize yourself with the use of
the jack, each of the tools and their stor-
age locations.Turn the jack joint by hand.
To remove: Turn the joint in direction 1
until the jack is free.
To store: Turn the joint in direction 2 until
the jack is firmly secured to prevent it
flying forward during a collision or sudden
braking.To remove the spare tire:
1. Remove the spare tire cover.
2. Loosen the bolt and remove it.
3. Remove the spacer.
Then take the spare tire out of the ve-
hicle.
When storing the spare tire, put it in place
with the outer side of the wheel facing up.
Then secure the tire by repeating the
above removal steps in reverse order to
prevent it from flying forward during a
collision or sudden braking.
—Required tools and spare
tire
Page 214 of 290
’02 SOLARA_U (L/O 0108)
2102002 MY SOLARA_U (OM33545U)
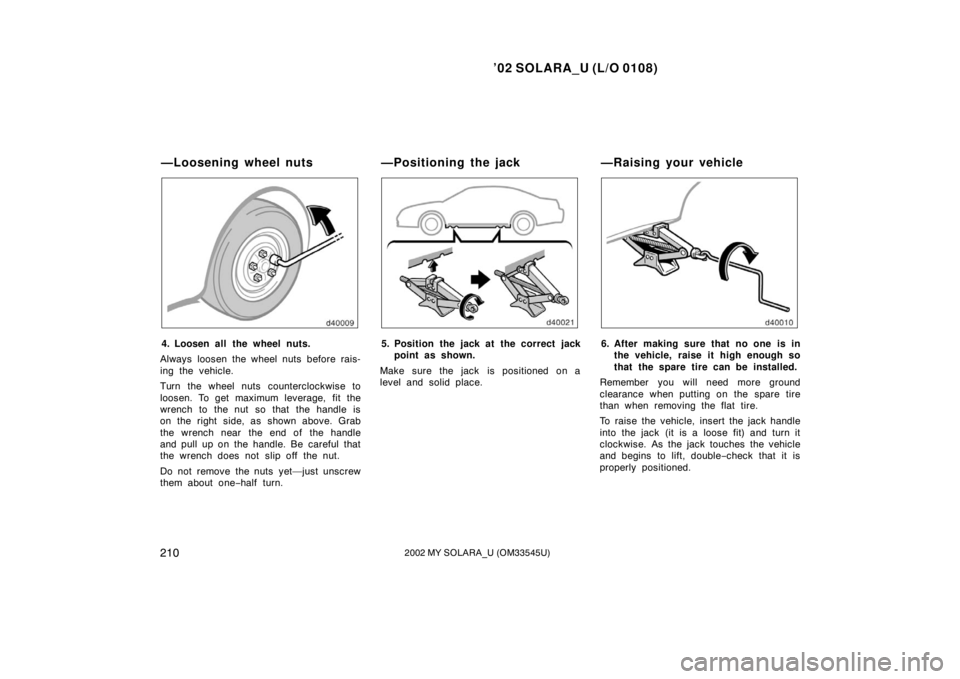
4. Loosen all the wheel nuts.
Always loosen the wheel nuts before rais-
ing the vehicle.
Turn the wheel nuts counterclockwise to
loosen. To get maximum leverage, fit the
wrench to the nut so that the handle is
on the right side, as shown above. Grab
the wrench near the end of the handle
and pull up on the handle. Be careful that
the wrench does not slip off the nut.
Do not remove the nuts yet—just unscrew
them about one− half turn.5. Position the jack at the correct jack
point as shown.
Make sure the jack is positioned on a
level and solid place.6. After making sure that no one is in the vehicle, raise it high enough so
that the spare tire can be installed.
Remember you will need more ground
clearance when putting on the spare tire
than when removing the flat tire.
To raise the vehicle, insert the jack handle
into the jack (it is a loose fit) and turn it
clockwise. As the jack touches the vehicle
and begins to lift, double −check that it is
properly positioned.
—Loosening wheel nuts —Positioning the jack—Raising your vehicle
Page 215 of 290
’02 SOLARA_U (L/O 0108)
2112002 MY SOLARA_U (OM33545U)
CAUTION
Never get under the vehicle when the
vehicle is supported by the jack
alone.
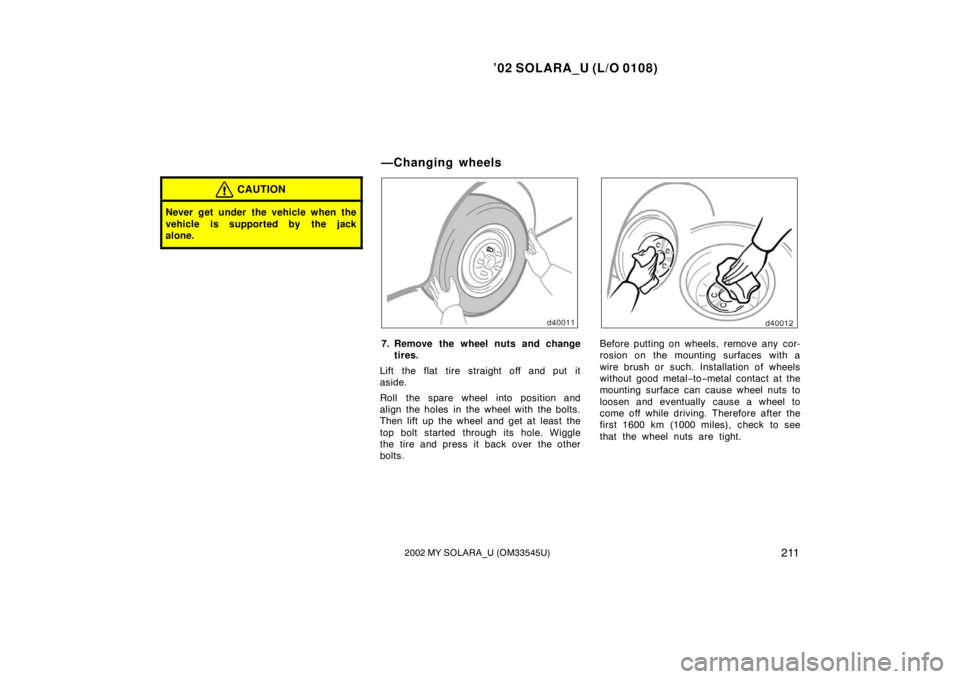
7. Remove the wheel nuts and change
tires.
Lift the flat tire straight off and put it
aside.
Roll the spare wheel into position and
align the holes in the wheel with the bolts.
Then lift up the wheel and get at least the
top bolt started through its hole. Wiggle
the tire and press it back over the other
bolts.Before putting on wheels, remove any cor-
rosion on the mounting surfaces with a
wire brush or such. Installation of wheels
without good metal −to −metal contact at the
mounting surface can cause wheel nuts to
loosen and eventually cause a wheel to
come off while driving. Therefore after the
first 1600 km (1000 miles), check to see
that the wheel nuts are tight.
—Changing wheels
Page 252 of 290

’02 SOLARA_U (L/O 0108)
2482002 MY SOLARA_U (OM33545U)
Clean all dirt from outside of the reservoir
tank and look at the fluid level. If the fluid
is cold, the level should be in the “COLD”
range. Similarly, if it is hot, the fluid level
should be in the “HOT” range. If the level
is at the low side of either range, add
automatic transmission fluid DEXRON �II
or III to bring the level within the range.
To remove the reservoir cap, turn it coun-
terclockwise and lift up. To reinstall it,
turn it clockwise. After replacing the reser-
voir cap,visually check the steering box
case, vane pump and hose connections
for leaks or damage.
CAUTION
The reservoir tank may be hot so be
careful not to burn yourself.
NOTICE
Avoid overfilling, or the power steer-
ing could be damaged.
Keep your tire pressures at the proper
level.
The recommended cold tire pressures, tire
size and the vehicle capacity weight are
given in Section 8. They are also on the
tire pressure label as shown.
You should check the tire pressures every
two weeks, or at least once a month. And
don’t forget the spare!
Incorrect tire pressure can reduce tire
life and make your vehicle less safe to
drive. Low tire pressure results in excessive
wear, poor handling, reduced fuel econo-
my, and the possibility of blowouts from
overheated tires. Also, low tire pressure
can cause poor sealing of the tire bead.
If the tire pressure is excessively low,
there is the possibility of wheel deforma-
tion and/or tire separation.
High tire pressure produces a harsh ride,
handling problems,excessive wear at the
center of the tire tread, and a greater
possibility of tire damage from road haz-
ards.
If a tire frequently needs refi
lling, have it
checked by your Toyota dealer.
The following instructions for checking
tire pressure should be observed:
�The pressure should be checked only
when the tires are cold. If your ve-
hicle has been parked for at least 3
hours and has not been driven for
more than 1.5 km or 1 mile since, you
will get an accurate cold tire pressure
reading.
�Always use a tire pressure gauge.
The appearance of a tire can be mis-
leading. Besides, tire pressures that
are even just a few pounds off can
degrade ride and handling.
Checking tire pressure
Page 256 of 290
’02 SOLARA_U (L/O 0108)
2522002 MY SOLARA_U (OM33545U)
�Avoid sharp turns or lockedwheel
braking, as use of chains may ad-
versely affect vehicle handling.
�When driving with chains installed,
be sure to drive carefully. Slow
down before entering the curves to
avoid losing control of the vehicle.
Otherwise an accident may occur.
WHEN TO REPLACE YOUR WHEELS
If you have wheel damage such as
bending, cracks or heavy corrosion, the
wheel should be replaced.
If you fail to replace damaged wheels, the
tire may slip off the wheel or cause loss
of handling control.
WHEEL SELECTION
When replacing wheels, care should be
taken to ensure that the wheels are re-
placed by ones with the same load ca-
pacity, diameter, rim width, and offset.
This must be observed on compact spare
tires, too.
Correct replacement wheels are available
at your Toyota dealer.
A wheel of a different size or type may
adversely affect handling, wheel and bear-
ing life, brake cooling, speedometer/odom-
eter calibration, stopping ability, headlight
aim, bumper height, vehicle ground clear-
ance, and tire or snow chain clearance to
the body and chassis. Replacement with used wheels is not rec-
ommended as they may have been sub-
jected to rough treatment or high mileage
and could fail without warning. Also, bent
wheels which have been straightened may
have structural damage and therefore
should not be used. Never use an inner
tube in a leaking wheel which is designed
for a tubeless tire.
Replacing wheels