Page 163 of 290

’02 SOLARA_U (L/O 0108)
1592002 MY SOLARA_U (OM33545U)
OPERATION OF INSTRUMENTS AND
CONTROLS
Other equipment
Clock 160
. . . . . . . . . . . . . . . . . . . . . . . . . . . . . . . . . . . . .\
. . . . . . . . . . . . . . . . .
Outside temperature gauge 160
. . . . . . . . . . . . . . . . . . . . . . . . . . . . . . . . . .
Cigarette lighter and ashtrays 160
. . . . . . . . . . . . . . . . . . . . . . . . . . . . . . . .
Power outlet 161
. . . . . . . . . . . . . . . . . . . . . . . . . . . . . . . . . . . . \
. . . . . . . . . . .
Glove box 162
. . . . . . . . . . . . . . . . . . . . . . . . . . . . . . . . . . . . \
. . . . . . . . . . . . . .
Garage door opener 162
. . . . . . . . . . . . . . . . . . . . . . . . . . . . . . . . . . . . \
. . . .
Garage door opener box 165
. . . . . . . . . . . . . . . . . . . . . . . . . . . . . . . . . . . . \
Auxiliary box 168
. . . . . . . . . . . . . . . . . . . . . . . . . . . . . . . . . . . . \
. . . . . . . . . . .
Cup holder 170
. . . . . . . . . . . . . . . . . . . . . . . . . . . . . . . . . . . . \
. . . . . . . . . . . . .
Floor mat 170
. . . . . . . . . . . . . . . . . . . . . . . . . . . . . . . . . . . . \
. . . . . . . . . . . . . .
SECTION 1� 9
Page 164 of 290
’02 SOLARA_U (L/O 0108)
1602002 MY SOLARA_U (OM33545U)
The digital clock indicates the time.
The key must be in the “ACC” or “ON”
position.
To reset the hour: Push the “H” button.
To reset the minutes: Push the “M” button.
If the electrical power source has been
disconnected from the clock, the time dis-
play will automatically be set to 1:00 (one
o’clock).
When the instrument panel lights are
turned on, the brightness of the time in-
dication will be reduced.The outside temperature gauge indi-
cates the outside air temperature when
you push the “TEMP” selector button.
The key must be in the “ON” position.
Pushing the button once again will turn off
the display.
When the air conditioning system is on,
pushing the button once indicates the out-
side temperature and a second time
changes the display back to the air condi-
tioning temperature.Cigarette lighter and front ashtray
Rear ashtray (on some models)
Clock Outside temperature gauge Cigarette lighter and ashtrays
Page 166 of 290

’02 SOLARA_U (L/O 0108)
1622002 MY SOLARA_U (OM33545U)
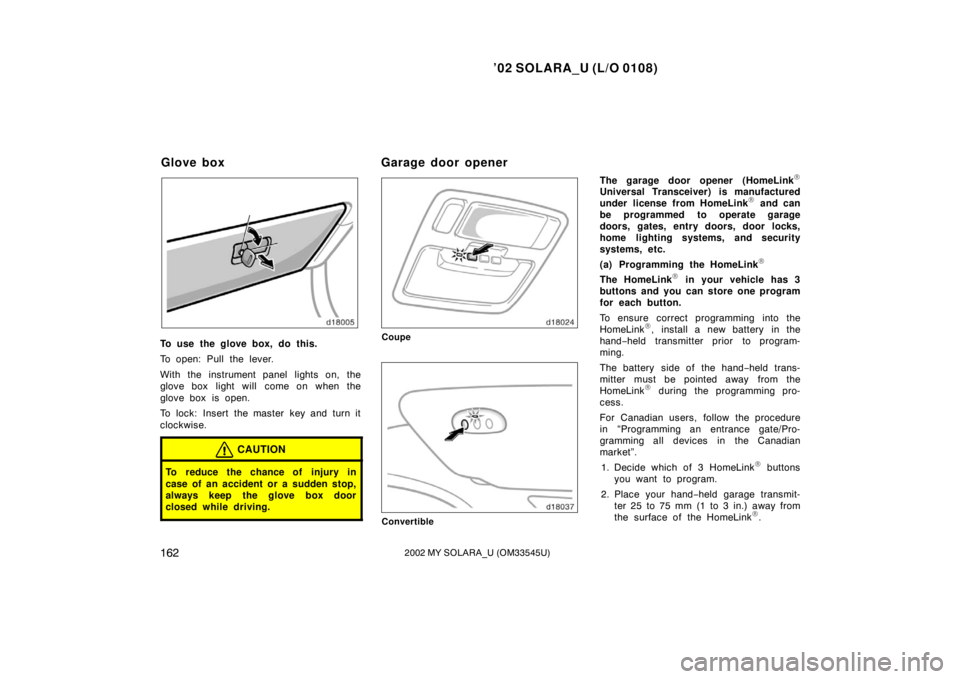
To use the glove box, do this.
To open: Pull the lever.
With the instrument panel lights on, the
glove box light will come on when the
glove box is open.
To lock: Insert the master key and turn it
clockwise.
CAUTION
To reduce the chance of injury in
case of an accident or a sudden stop,
always keep the glove box door
closed while driving.
Coupe
Convertible
The garage door opener (HomeLink�
Universal Transceiver) is manufactured
under license from HomeLink� and can
be programmed to operate garage
doors, gates, entry doors, door locks,
home lighting systems, and security
systems, etc.
(a) Programming the HomeLink
�
The HomeLink� in your vehicle has 3
buttons and you can store one program
for each button.
To ensure correct programming into the
HomeLink
�, install a new battery in the
hand− held transmitter prior to program-
ming.
The battery side of the hand −held trans-
mitter must be pointed away from the
HomeLink
� during the programming pro-
cess.
For Canadian users, follow the procedure
in “Programming an entrance gate/Pro-
gramming all devices in the Canadian
market”.
1. Decide which of 3 HomeLink
� buttons
you want to program.
2. Place your hand− held garage transmit-
ter 25 to 75 mm (1 to 3 in.) away from
the surface of the HomeLink
�.
Glove box Garage door opener
Page 214 of 290

’02 SOLARA_U (L/O 0108)
2102002 MY SOLARA_U (OM33545U)
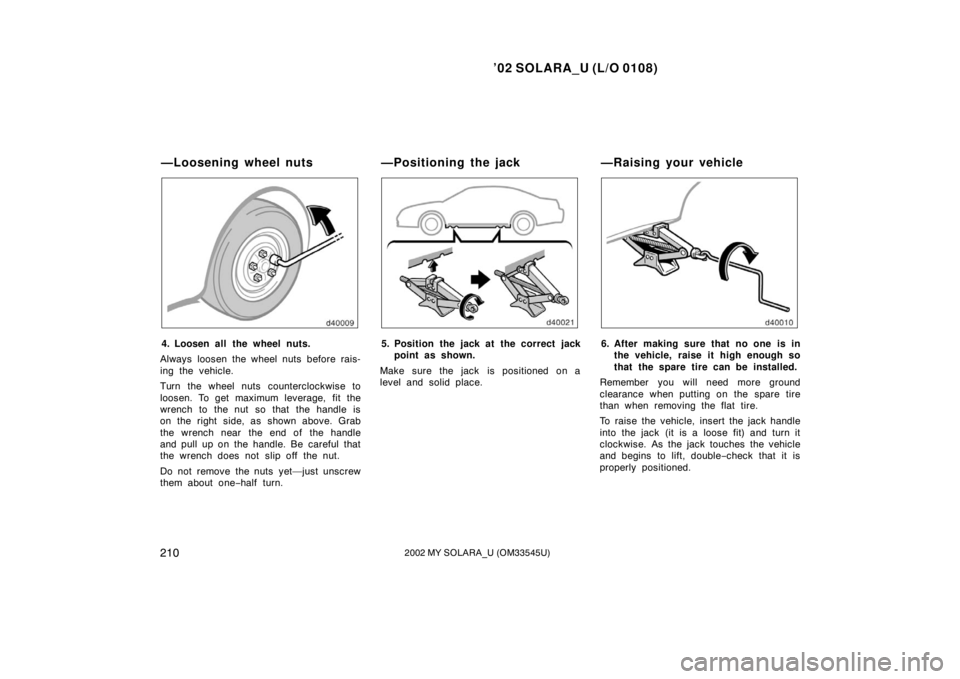
4. Loosen all the wheel nuts.
Always loosen the wheel nuts before rais-
ing the vehicle.
Turn the wheel nuts counterclockwise to
loosen. To get maximum leverage, fit the
wrench to the nut so that the handle is
on the right side, as shown above. Grab
the wrench near the end of the handle
and pull up on the handle. Be careful that
the wrench does not slip off the nut.
Do not remove the nuts yet—just unscrew
them about one− half turn.5. Position the jack at the correct jack
point as shown.
Make sure the jack is positioned on a
level and solid place.6. After making sure that no one is in the vehicle, raise it high enough so
that the spare tire can be installed.
Remember you will need more ground
clearance when putting on the spare tire
than when removing the flat tire.
To raise the vehicle, insert the jack handle
into the jack (it is a loose fit) and turn it
clockwise. As the jack touches the vehicle
and begins to lift, double −check that it is
properly positioned.
—Loosening wheel nuts —Positioning the jack—Raising your vehicle
Page 216 of 290
’02 SOLARA_U (L/O 0108)
2122002 MY SOLARA_U (OM33545U)
8. Reinstall all the wheel nuts finger
tight.
Reinstall the wheel nuts (tapered end in-
ward) and tighten them as much as you
can by hand. Press back on the tire and
see if you can tighten them more.9. Lower the vehicle completely and tighten the wheel nuts.
Turn the jack handle counterclockwise to
lower the vehicle.
Use only the wheel nut wrench to tighten
the nuts. Do not use other tools or any
additional leverage other than your hands,
such as a hammer, pipe or your foot.
Make sure the wrench is securely en-
gaged over the nut.
Tighten each nut a little at a time in the
order shown. Repeat the process until all
the nuts are tight.
CAUTION
When lowering the vehicle, make sure
all portions of your body and all oth-
er persons around will not be injured
as the vehicle is lowered to the
ground.
—Reinstalling wheel nuts —Lowering your vehicle
Page 252 of 290

’02 SOLARA_U (L/O 0108)
2482002 MY SOLARA_U (OM33545U)
Clean all dirt from outside of the reservoir
tank and look at the fluid level. If the fluid
is cold, the level should be in the “COLD”
range. Similarly, if it is hot, the fluid level
should be in the “HOT” range. If the level
is at the low side of either range, add
automatic transmission fluid DEXRON �II
or III to bring the level within the range.
To remove the reservoir cap, turn it coun-
terclockwise and lift up. To reinstall it,
turn it clockwise. After replacing the reser-
voir cap,visually check the steering box
case, vane pump and hose connections
for leaks or damage.
CAUTION
The reservoir tank may be hot so be
careful not to burn yourself.
NOTICE
Avoid overfilling, or the power steer-
ing could be damaged.
Keep your tire pressures at the proper
level.
The recommended cold tire pressures, tire
size and the vehicle capacity weight are
given in Section 8. They are also on the
tire pressure label as shown.
You should check the tire pressures every
two weeks, or at least once a month. And
don’t forget the spare!
Incorrect tire pressure can reduce tire
life and make your vehicle less safe to
drive. Low tire pressure results in excessive
wear, poor handling, reduced fuel econo-
my, and the possibility of blowouts from
overheated tires. Also, low tire pressure
can cause poor sealing of the tire bead.
If the tire pressure is excessively low,
there is the possibility of wheel deforma-
tion and/or tire separation.
High tire pressure produces a harsh ride,
handling problems,excessive wear at the
center of the tire tread, and a greater
possibility of tire damage from road haz-
ards.
If a tire frequently needs refi
lling, have it
checked by your Toyota dealer.
The following instructions for checking
tire pressure should be observed:
�The pressure should be checked only
when the tires are cold. If your ve-
hicle has been parked for at least 3
hours and has not been driven for
more than 1.5 km or 1 mile since, you
will get an accurate cold tire pressure
reading.
�Always use a tire pressure gauge.
The appearance of a tire can be mis-
leading. Besides, tire pressures that
are even just a few pounds off can
degrade ride and handling.
Checking tire pressure
Page 264 of 290

’02 SOLARA_U (L/O 0108)
2602002 MY SOLARA_U (OM33545U)
The inside of the lens of exterior lights
such as headlights may temporarily fog up
when the lens becomes wet in the rain or
in a car wash. This is not a problem
because the fogging is caused by the
temperature difference between the outside
and inside of the lens, just like the
windshield fogged up in the rain. However,
if there is a large drop of water on the
inside of the lens, or if there is water
pooled inside the light, contact your
Toyota dealer.
Light bulbs
BulbNo.WTy p e
Headlights (high)900560A
Headlights (low)900651B
Front fog lights900651B
Parking/front turn
signal lights1157NA27/8D
Rear turn signal
lights315627E
Stop/tail lights315727/8E
Back −up lights92118E
License plate
lights—5E
Light bulbsBulb
No.WTy p e
High mounted
stop light21CP18E
Personal light
(coupe)—10F
Personal lights
(convertible)—8C
Interior light—10F
Vanity lights—3F
Glove box light—1.2E
Quarter trim
courtesy light1943.8E
Trunk light—3.8E
A: HB3 halogen bulbs
B: HB4 halogen bulbs
C: Single end bulbs (clear)
D: Single end bulbs (amber)
E: Wedge base bulbs
F: Double end bulbs
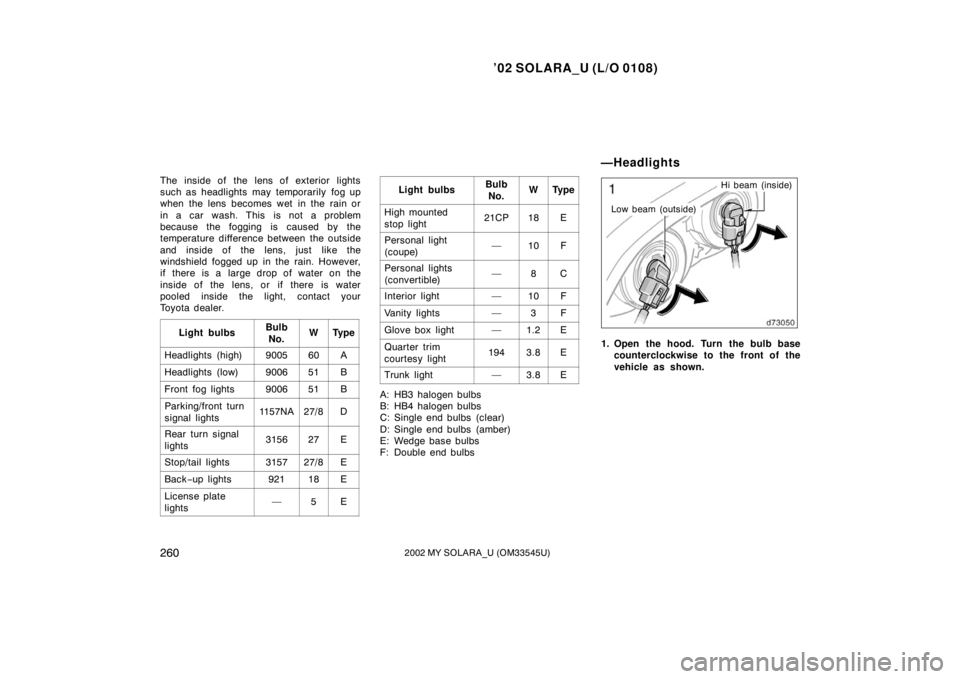
Low beam (outside) Hi beam (inside)
1. Open the hood. Turn the bulb base
counterclockwise to the front of the
vehicle as shown.
—Headlights
Page 266 of 290
’02 SOLARA_U (L/O 0108)
2622002 MY SOLARA_U (OM33545U)
2. Turn the bulb and remove it.3. Unplug the connector while depress-
ing the lock release.
If the connector is tight, wiggle it.4. Install a new bulb and the connector into the mounting hole by turning it
clockwise.