Page 208 of 238

’02MY CELICA U (L/O 0108)
2042002 MY CELICA_U (OM20792U)
CAUTION
BATTERY PRECAUTIONS
The battery produces flammable and
explosive hydrogen gas.
�Do not cause a spark from the bat-
tery with tools.
�Do not smoke or light a match near
the battery.
The electrolyte contains poisonous
and corrosive sulfuric acid.
�Avoid contact with eyes, skin or
clothes.
�Never ingest electrolyte.
�Wear protective safety glasses when
working near the battery.
�Keep children away from the bat-
tery.
EMERGENCY MEASURES
�If electrolyte gets in your eyes,
flush your eyes with clean water
immediately and get immediate
medical attention. If possible, con-
tinue to apply water with a sponge
or cloth while en route to the medi-
cal office.
�If electrolyte gets on your skin,
thoroughly wash the contact area. If
you feel pain or burning, get medi-
cal attention immediately.
�If electrolyte gets on your clothes,
there is a possibility of its soaking
through to your skin, so immediate-
ly take off the exposed clothing and
follow the procedure above, if nec-
essary.
�If you accidentally swallow electro-
lyte, drink a large quantity of water
or milk. Follow with milk of magne-
sia, beaten raw egg or vegetable
oil. Then go immediately for emer-
gency help.
�Warning: Battery posts, terminals
and related accessories contain lead
and lead compounds, chemicals
known to the State of California to
cause cancer and reproductive
harm. Wash hands after handling.
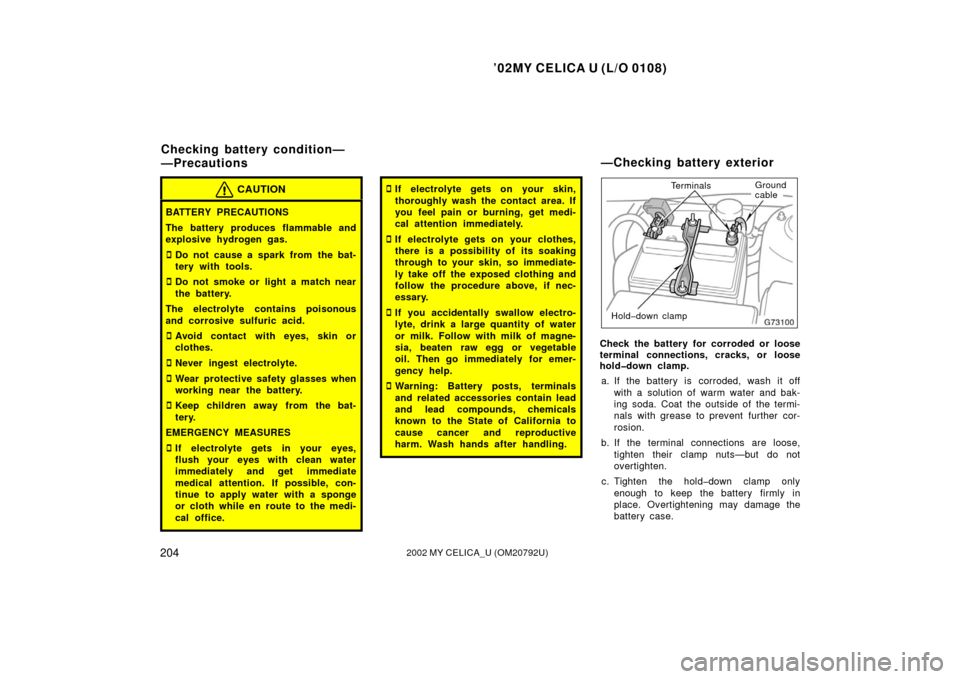
Terminals Ground
cable
Hold�down clamp
Check the battery for corroded or loose
terminal connections, cracks, or loose
hold�down clamp. a. If the battery is corroded, wash it off with a solution of warm water and bak-
ing soda. Coat the outside of the termi-
nals with grease to prevent further cor-
rosion.
b. If the terminal connections are loose, tighten their clamp nuts—but do not
overtighten.
c. Tighten the hold�down clamp only enough to keep the battery firmly in
place. Overtightening may damage the
battery case.
Checking battery c ondition—
—Precautions —Checking battery exterior
Page 209 of 238

’02MY CELICA U (L/O 0108)
2052002 MY CELICA_U (OM20792U)
NOTICE
�Be sure the engine and all accesso-
ries are off before performing main-
tenance.
� When checking the battery, remove
the ground cable from the negative
terminal (“�” mark) first and rein-
stall it last.
� Be careful not to cause a short cir-
cuit with tools.
� Take care no solution gets into the
battery when washing it.
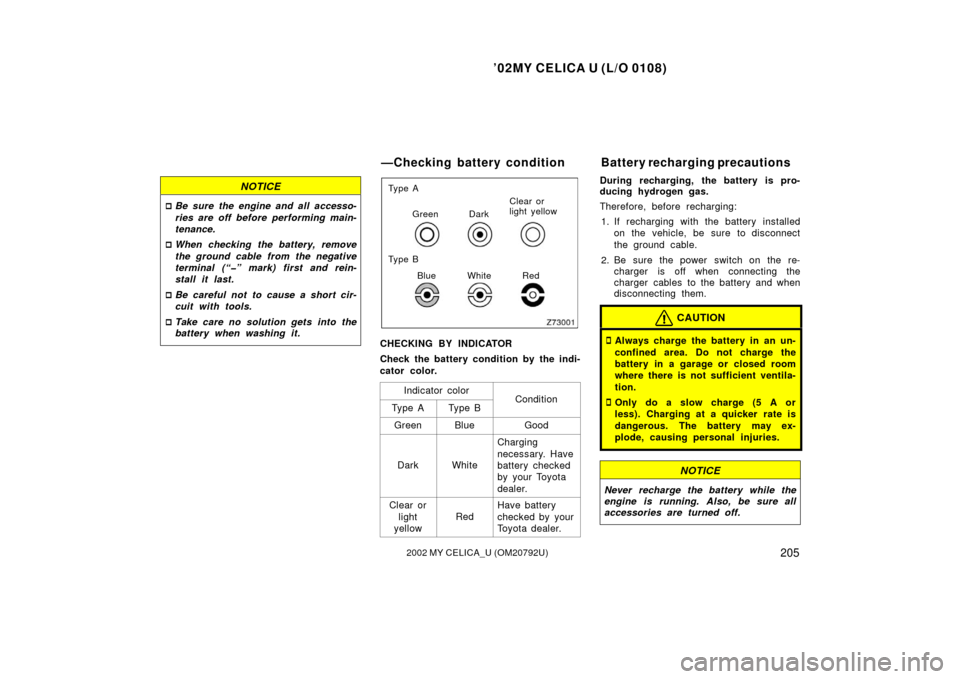
Ty p e A
Green Dark Clear or
light yellow
Ty p e B Blue White Red
CHECKING BY INDICATOR
Check the battery condition by the indi-
cator color.
Indicator color
ConditionTy p e ATy p e B
GreenBlueGood
DarkWhite
Charging
necessary. Have
battery checked
by your Toyota
dealer.
Clear orlight
yellow
Red
Have battery
checked by your
Toyota dealer.
During recharging, the battery is pro-
ducing hydrogen gas.
Therefore, before recharging:
1. If recharging with the battery installed on the vehicle, be sure to disconnect
the ground cable.
2. Be sure the power switch on the re- charger is off when connecting the
charger cables to the battery and when
disconnecting them.
CAUTION
�Always charge the battery in an un-
confined area. Do not charge the
battery in a garage or closed room
where there is not sufficient ventila-
tion.
�Only do a slow charge (5 A or
less). Charging at a quicker rate is
dangerous. The battery may ex-
plode, causing personal injuries.
NOTICE
Never recharge the battery while the
engine is running. Also, be sure all
accessories are turned off.
—Checking battery c ondition Battery recharging pr ecautions
Page 210 of 238
’02MY CELICA U (L/O 0108)
2062002 MY CELICA_U (OM20792U)
GoodBlown
Ty p e A
Good Blown
Ty p e B
Good Blown
Ty p e C
Good Blown
Ty p e D
If the headlights or other electrical
components do not work, check the
fuses. If any of the fuses are blown,
they must be replaced.
See “Fuse locations” in Section 7�1 for
locations of the fuses.
Turn the ignition switch and inoperative
component off. Pull a suspected fuse
straight out and check it.
Determine which fuse may be causing the
problem. The lid of the fuse box shows
the name of the circuit for each fuse. See
Section 8 of this manual for the functions
controlled by each circuit.
Type A fuses can be pulled out by the
pull�out tool. The location of the pull�out
tool is shown in the illustration.
Checking and replacing fuses
Page 212 of 238

’02MY CELICA U (L/O 0108)
2082002 MY CELICA_U (OM20792U)
NOTICE
Do not use engine antifreeze or any
other substitute because it may dam-
age your vehicle’s paint.
The following illustrations show how to
gain access to the bulbs. When replacing
a bulb, make sure the ignition switch and
light switch are off. Use bulbs with the
wattage ratings given in the table.
CAUTION
�To prevent yourself from burning,
do not replace the light bulbs while
they are hot.
�Halogen bulbs have pressurized gas
inside and require special handling.
They can burst or shatter if
scratched or dropped. Hold a bulb
only by its plastic or metal case.
Do not touch the glass part of a
bulb with bare hands.
The inside of the lens of exterior lights
such as headlights may temporarily fog up
when the lens becomes wet in the rain or
in a car wash. This is not a problem
because the fogging is caused by the
temperature difference between the outside
and inside of the lens, just like the
windshield fogged up in the rain. However,
if there is a large drop of water on the
inside of the lens, or if there is water
pooled inside the light, contact your
Toyota dealer.
NOTICE
Only use a bulb of the listed type.
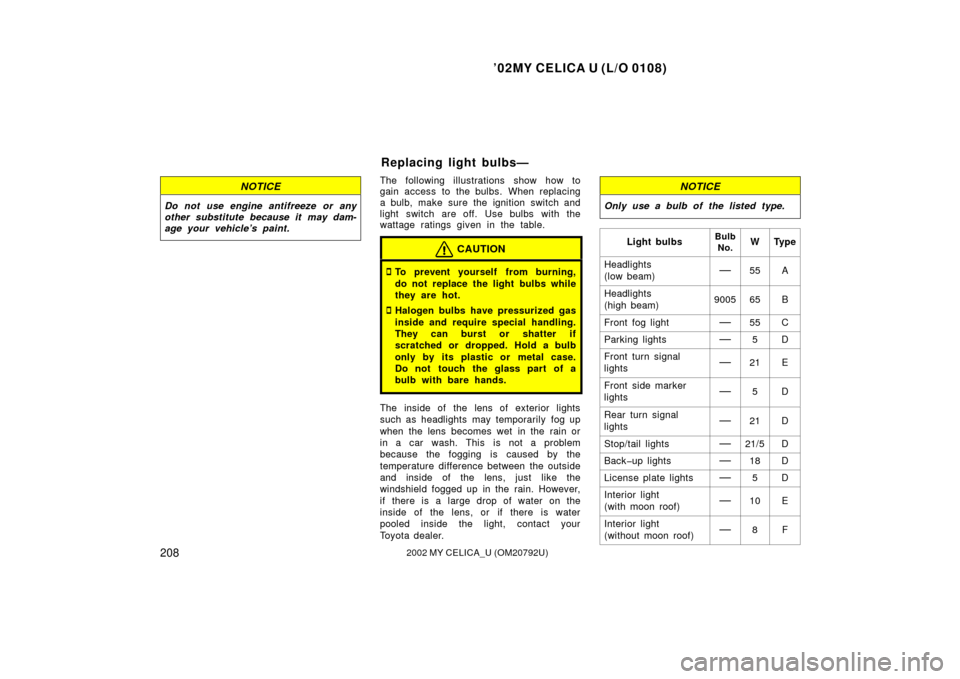
Light bulbsBulbNo.WTy p e
Headlights
(low beam)—55A
Headlights
(high beam)900565B
Front fog light—55C
Parking lights—5D
Front turn signal
lights—21E
Front side marker
lights—5D
Rear turn signal
lights—21D
Stop/tail lights—21/5D
Back�up lights—18D
License plate lights—5D
Interior light
(with moon roof)—10E
Interior light
(without moon roof)—8F
Replacing light bulbs—
Page 213 of 238
’02MY CELICA U (L/O 0108)
2092002 MY CELICA_U (OM20792U)
Light bulbsBulbNo.WTy p e
Glove box light—1.2D
Luggage
compartment light—5F
A: H7 halogen bulbs
B: HB3 halogen bulbs
C: H3 halogen bulbs
D: Wedge base bulbs
E: Single end bulbs
F: Double end bulbs
1. Open the hood.
RIGHT SIDE HEADLIGHT—Remove the
clips and take out the cover. In doing
so, remove the washer hose from the
notch on the cover.
Remove and install the cover clips as
shown in the following illustrations.
—Headlights (low beam)
Page 215 of 238
’02MY CELICA U (L/O 0108)
2112002 MY CELICA_U (OM20792U)
4. Install the rubber cover with the“TOP” mark upward, and snuggle on
the boss. Plug in the connector.
Make sure the rubber cover fits snugly on
the connector and the headlight body.
Aiming is not necessary after replacing
the bulb. When aiming adjustment is nec-
essary, contact your Toyota dealer.5. RIGHT SIDE HEADLIGHT—Install the cover.
NOTICE
Always notch the washer hose before
fastening it when installing the cover.
This prevents washer hose damage.
—Headlights (high beam)
Page 216 of 238
’02MY CELICA U (L/O 0108)
2122002 MY CELICA_U (OM20792U)
1. Open the hood.
RIGHT SIDE HEADLIGHT—Remove the
clips and take out the cover. In doing
so, remove the washer hose from the
notch on the cover.
Remove and install the cover clips as
shown in the following illustrations.
Removing clip
Installing clip
2. Turn the bulb base counterclockwise and remove it.
Page 217 of 238
’02MY CELICA U (L/O 0108)
2132002 MY CELICA_U (OM20792U)
3. Pull the bulb out of the bulb baseand install a new bulb.
If the connector is tight, wiggle it.4. Insert the bulb base into the mount- ing hole by turning it clockwise.
Aiming is not necessary after replacing
the bulb. When aiming adjustment is nec-
essary, contact your Toyota dealer.5. RIGHT SIDE HEADLIGHT—Install the cover.
NOTICE
Always notch the washer hose before
fastening it when installing the cover.
This prevents washer hose damage.