Page 166 of 293
AP_Camry_U (L/O 0201)
1622002 MY CAMRY_U (OM33567U)
The following information is displayed
on the clock/outside temperature gauge
when you push the “CLOCK/INFO” but-
ton with the ignition switch turned on.
Each time you push the “MODE/RESET”
button, the display toggles through this
information.1. Instantaneous fuel consumption
2. Average fuel consumption
3. Driving range
4. Average vehicle speed
5. Driving time
The displayed values in the multi −informa-
tion display indicate general driving condi-
tions. Accuracy varies with driving habits
and road conditions.
Push the “CLOCK/INFO” button once
again, the display will return to the clock
and outside temperature gauge.
When the ignition switch is on, the last
previously used mode displayed just be-
fore the ignition switch is off will appear.
Multi�information display
Page 177 of 293
AP_Camry_U (L/O 0201)
1732002 MY CAMRY_U (OM33567U)
To use the glove box, do this.
To open: Pull the lever.
With the instrument panel lights on, the
glove box light will come on when the
glove box is open.
To lock: Insert the master key and turn it
clockwise.
CAUTION
To reduce the chance of injury in
case of an accident or a sudden stop,
always keep the glove box door
closed while driving.
Instrument panel
Over head console
To use the box, open it as shown
above.
CAUTION
To reduce the chance of injury in
case of an accident or a sudden stop,
always keep the auxiliary box closed
while driving.
NOTICE
Over head console box—During hot
weather, the interior of the vehicle
becomes very hot. Do not leave any-
thing flammable or deformable such
as a lighter, glasses, etc. inside.
Glove boxAuxiliary boxes
Page 224 of 293

AP_Camry_U (L/O 0201)
2202002 MY CAMRY_U (OM33567U)
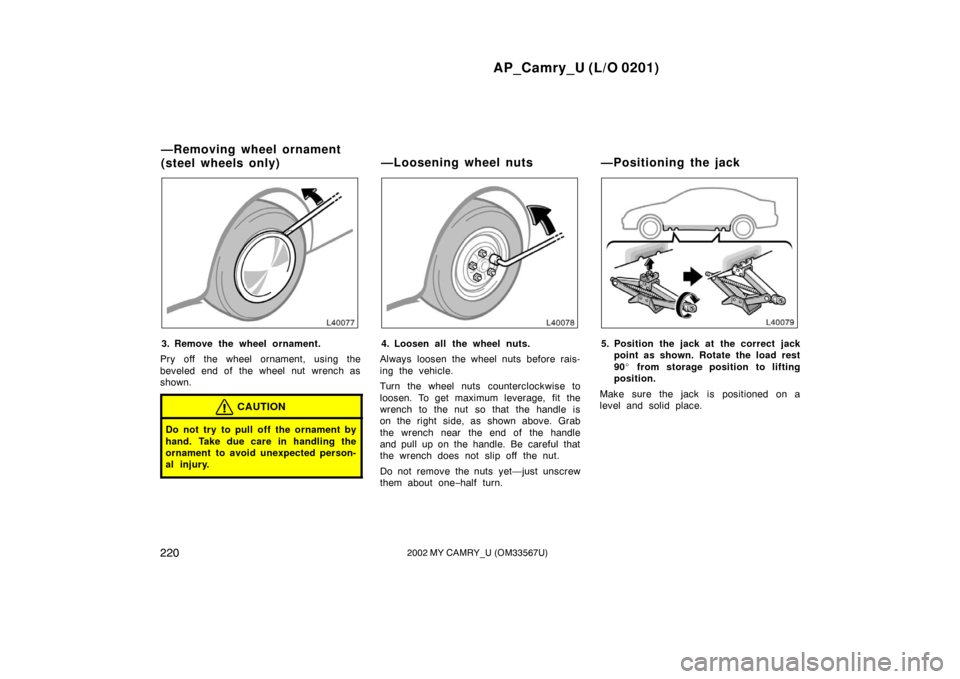
3. Remove the wheel ornament.
Pry off the wheel ornament, using the
beveled end of the wheel nut wrench as
shown.
CAUTION
Do not try to pull off the ornament by
hand. Take due care in handling the
ornament to avoid unexpected person-
al injury.
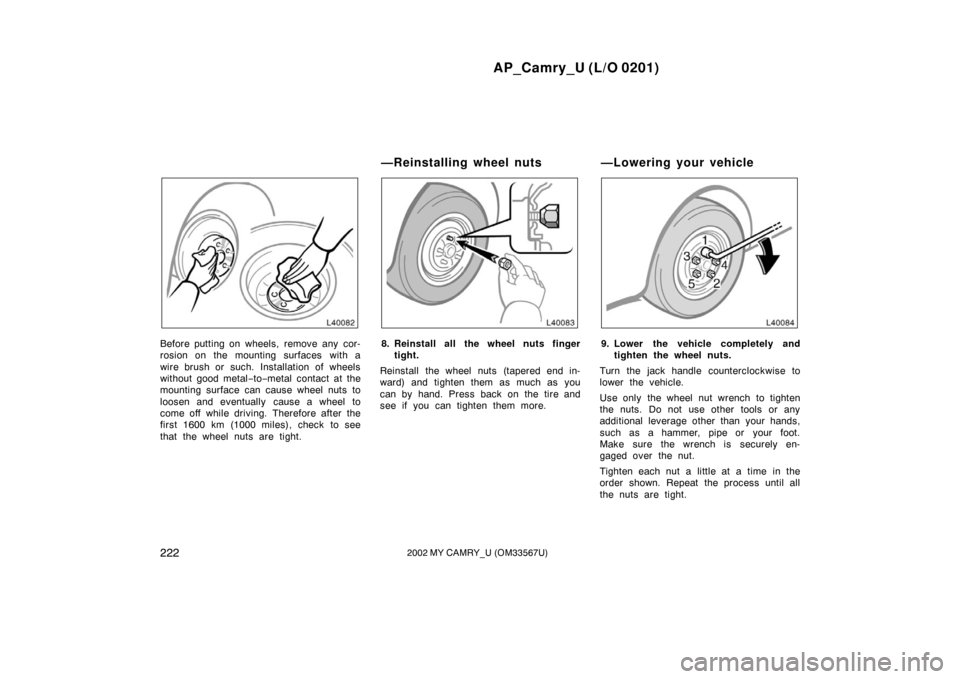
4. Loosen all the wheel nuts.
Always loosen the wheel nuts before rais-
ing the vehicle.
Turn the wheel nuts counterclockwise to
loosen. To get maximum leverage, fit the
wrench to the nut so that the handle is
on the right side, as shown above. Grab
the wrench near the end of the handle
and pull up on the handle. Be careful that
the wrench does not slip off the nut.
Do not remove the nuts yet—just unscrew
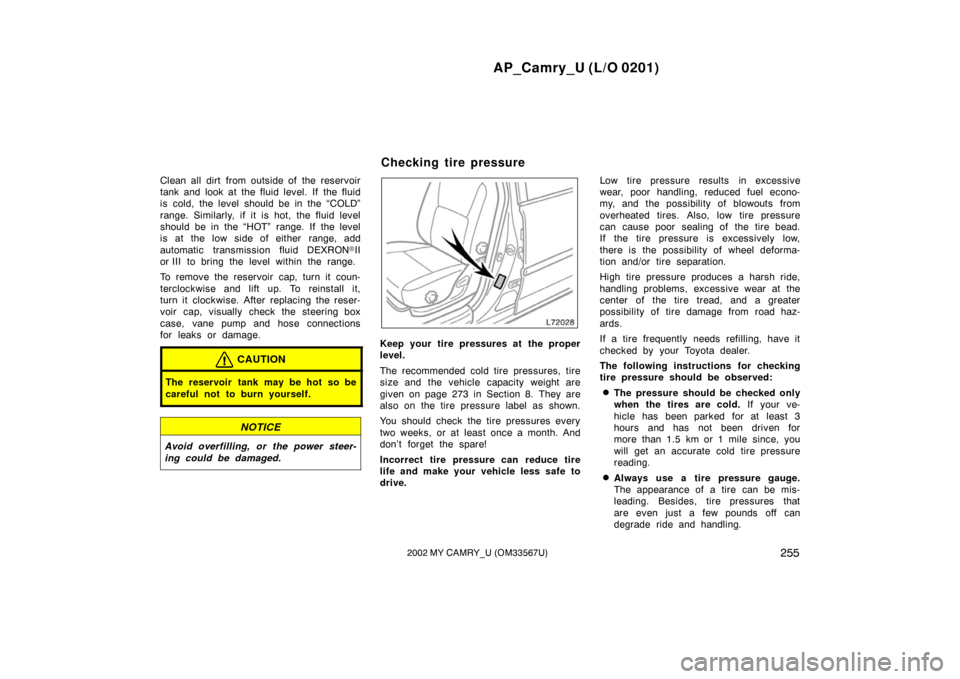
them about one− half turn.5. Position the jack at the correct jack
point as shown. Rotate the load rest
90� from storage position to lifting
position.
Make sure the jack is positioned on a
level and solid place.
—Removing wheel ornament
(steel wheels only) —Loosening wheel nuts —Positioning the jack
Page 225 of 293
AP_Camry_U (L/O 0201)
2212002 MY CAMRY_U (OM33567U)
6. After making sure that no one is inthe vehicle, raise it high enough so
that the spare tire can be installed.
Remember you will need more ground
clearance when putting on the spare tire
than when removing the flat tire.
To raise the vehicle, insert the jack handle
into the jack (it is a loose fit) and turn it
clockwise. As the jack touches the vehicle
and begins to lift, double −check that it is
properly positioned.
CAUTION
Never get under the vehicle when the
vehicle is supported by the jack
alone.
7. Remove the wheel nuts and change tires.
Lift the flat tire straight off and put it
aside.
Roll the spare wheel into position and
align the holes in the wheel with the bolts.
Then lift up the wheel and get at least the
top bolt started through its hole. Wiggle
the tire and press it back over the other
bolts.
—Raising your vehicle —Changing wheels
Page 226 of 293

AP_Camry_U (L/O 0201)
2222002 MY CAMRY_U (OM33567U)
Before putting on wheels, remove any cor-
rosion on the mounting surfaces with a
wire brush or such. Installation of wheels
without good metal−to −metal contact at the
mounting surface can cause wheel nuts to
loosen and eventually cause a wheel to
come off while driving. Therefore after the
first 1600 km (1000 miles), check to see
that the wheel nuts are tight.8. Reinstall all the wheel nuts finger tight.
Reinstall the wheel nuts (tapered end in-
ward) and tighten them as much as you
can by hand. Press back on the tire and
see if you can tighten them more.9. Lower the vehicle completely and tighten the wheel nuts.
Turn the jack handle counterclockwise to
lower the vehicle.
Use only the wheel nut wrench to tighten
the nuts. Do not use other tools or any
additional leverage other than your hands,
such as a hammer, pipe or your foot.
Make sure the wrench is securely en-
gaged over the nut.
Tighten each nut a little at a time in the
order shown. Repeat the process until all
the nuts are tight.
—Reinstalling wheel nuts —Lowering your vehicle
Page 232 of 293
AP_Camry_U (L/O 0201)
2282002 MY CAMRY_U (OM33567U)
3. Secure the front towing eyelet to thehole on the bumper by turning clock-
wise.4. Tighten the front towing eyelet securelyby a wheel nut wrench.
NOTICE
Make sure that the front towing eyelet
is tightened securely, or it may be
loosened or removed when towing the
vehicle.
If you cannot shift the selector lever
out of “P” position to other positions
even though the brake pedal is de-
pressed, use the shift lock override but-
ton as follows:
1. Turn the ignition key to “LOCK” position. Make sure the parking
brake is on.
2. Pry up the cover with a flat�bladed screwdriver or equivalent.
If you cannot shift automatic
transmission selector lever
Page 259 of 293

AP_Camry_U (L/O 0201)
2552002 MY CAMRY_U (OM33567U)
Clean all dirt from outside of the reservoir
tank and look at the fluid level. If the fluid
is cold, the level should be in the “COLD”
range. Similarly, if it is hot, the fluid level
should be in the “HOT” range. If the level
is at the low side of either range, add
automatic transmission fluid DEXRON�II
or III to bring the level within the range.
To remove the reservoir cap, turn it coun-
terclockwise and lift up. To reinstall it,
turn it clockwise. After replacing the reser-
voir cap, visually check the steering box
case, vane pump and hose connections
for leaks or damage.
CAUTION
The reservoir tank may be hot so be
careful not to burn yourself.
NOTICE
Avoid overfilling, or the power steer-
ing could be damaged.
Keep your tire pressures at the proper
level.
The recommended cold tire pressures, tire
size and the vehicle capacity weight are
given on page 273 in Section 8. They are
also on the tire pressure label as shown.
You should check the tire pressures every
two weeks, or at least once a month. And
don’t forget the spare!
Incorrect tire pressure can reduce tire
life and make your vehicle less safe to
drive. Low tire pressure results in excessive
wear, poor handling, reduced fuel econo-
my, and the possibility of blowouts from
overheated tires. Also, low tire pressure
can cause poor sealing of the tire bead.
If the tire pressure is excessively low,
there is the possibility of wheel deforma-
tion and/or tire separation.
High tire pressure produces a harsh ride,
handling problems, excessive wear at the
center of the tire tread, and a greater
possibility of tire damage from road haz-
ards.
If a tire frequently needs refi
lling, have it
checked by your Toyota dealer.
The following instructions for checking
tire pressure should be observed:
�The pressure should be checked only
when the tires are cold. If your ve-
hicle has been parked for at least 3
hours and has not been driven for
more than 1.5 km or 1 mile since, you
will get an accurate cold tire pressure
reading.
�Always use a tire pressure gauge.
The appearance of a tire can be mis-
leading. Besides, tire pressures that
are even just a few pounds off can
degrade ride and handling.
Checking tire pressure
Page 272 of 293
AP_Camry_U (L/O 0201)
2682002 MY CAMRY_U (OM33567U)
Low beam (outside)High beam (inside)
1. Open the hood. Turn the bulb base
counterclockwise to the front of the
vehicle as shown.2. Unplug the connector while depress-ing the lock release.
If the connector is tight, wiggle it.3. Plug in a new bulb into the connec- tor and install it into the mounting
hole.
Aiming is not necessary after replacing
the bulb. When aiming adjustment is nec-
essary, contact your Toyota dealer.
—Headlights