Page 1675 of 1690

E68116
± WIPER & WASHERWIPER AND WASHER SYSTEM
66±5
AVENSIS REPAIR MANUAL (RM1018E)
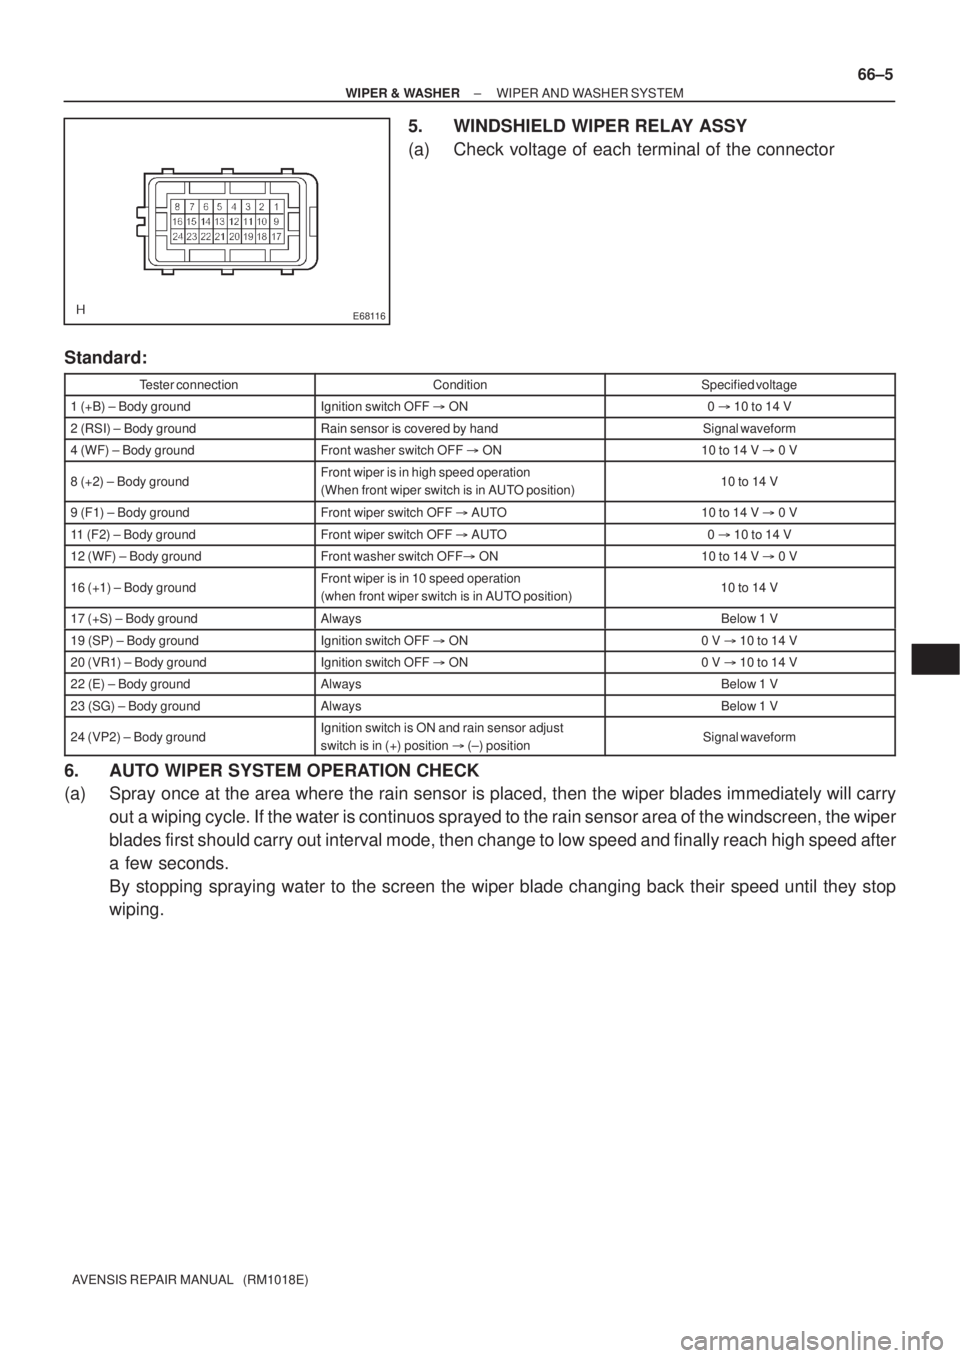
5. WINDSHIELD WIPER RELAY ASSY
(a) Check voltage of each terminal of the connector
Standard:
Tester connectionConditionSpecified voltage
1 (+B) ± Body groundIgnition switch OFF � ON0 � 10 to 14 V
2 (RSI) ± Body groundRain sensor is covered by handSignal waveform
4 (WF) ± Body groundFront washer switch OFF � ON10 to 14 V � 0 V
8 (+2) ± Body groundFront wiper is in high speed operation
(When front wiper switch is in AUTO position)10 to 14 V
9 (F1) ± Body groundFront wiper switch OFF � AUTO10 to 14 V � 0 V
11 (F2) ± Body groundFront wiper switch OFF � AUTO0 � 10 to 14 V
12 (WF) ± Body groundFront washer switch OFF� ON10 to 14 V � 0 V
16 (+1) ± Body groundFront wiper is in 10 speed operation
(when front wiper switch is in AUTO position)10 to 14 V
17 (+S) ± Body groundAlwaysBelow 1 V
19 (SP) ± Body groundIgnition switch OFF � ON0 V � 10 to 14 V
20 (VR1) ± Body groundIgnition switch OFF � ON0 V � 10 to 14 V
22 (E) ± Body groundAlwaysBelow 1 V
23 (SG) ± Body groundAlwaysBelow 1 V
24 (VP2) ± Body groundIgnition switch is ON and rain sensor adjust
switch is in (+) position � (±) positionSignal waveform
6. AUTO WIPER SYSTEM OPERATION CHECK
(a) Spray once at the area where the rain sensor is placed, then the wiper blades immediately will carry
out a wiping cycle. If the water is continuos sprayed to the rain sensor area of the windscreen, the wiper
blades first should carry out interval mode, then change to low speed and finally reach high speed after
a few seconds.
By stopping spraying water to the screen the wiper blade changing back their speed until they stop
wiping.
Page 1677 of 1690

E56399
7 (+1) ± 2 (EW)
Voltage between terminals
10.7 �5 seconds Connect the battery (±)
to terminal 16 (+S) FAST:
1.6 �1 secondSLOW:
Connect the battery (±)
to terminal 16 (+S)
�
��
�����
�
I30007
Washer
Switch
7(+1) ± 2(EW)
Voltage be-
tween terminals
Approx.���
��ondsApprox.���
��onds
E65758
± WIPER & WASHERWIPER AND WASHER SYSTEM
66±7
AVENSIS REPAIR MANUAL (RM1018E)
(5) Connect the battery (±) to the terminal 16 (+S) of the
connector. Operate the intermittent wiper relay and
check voltage between terminal 7 (+1) and terminal
2 (EW).
(c) Operation Check (Front Wiper)
(1) Turn the wiper switch into OFF position.
(2) Connect the battery (+) to the terminal 17 (+B) of the
connector, the battery (±) to the terminal 16 (+S)
and the terminal 2 (EW) of the connecter.
(3) Connect the voltmeter (+) terminal to the terminal 7
(+1) of the connector and the voltmeter (±) terminal
to the terminal 2 (EW) of the connector. Turn the
washer switch ON and OFF, and check voltage be-
tween terminal 7 (+1) and terminal 2 (EW).
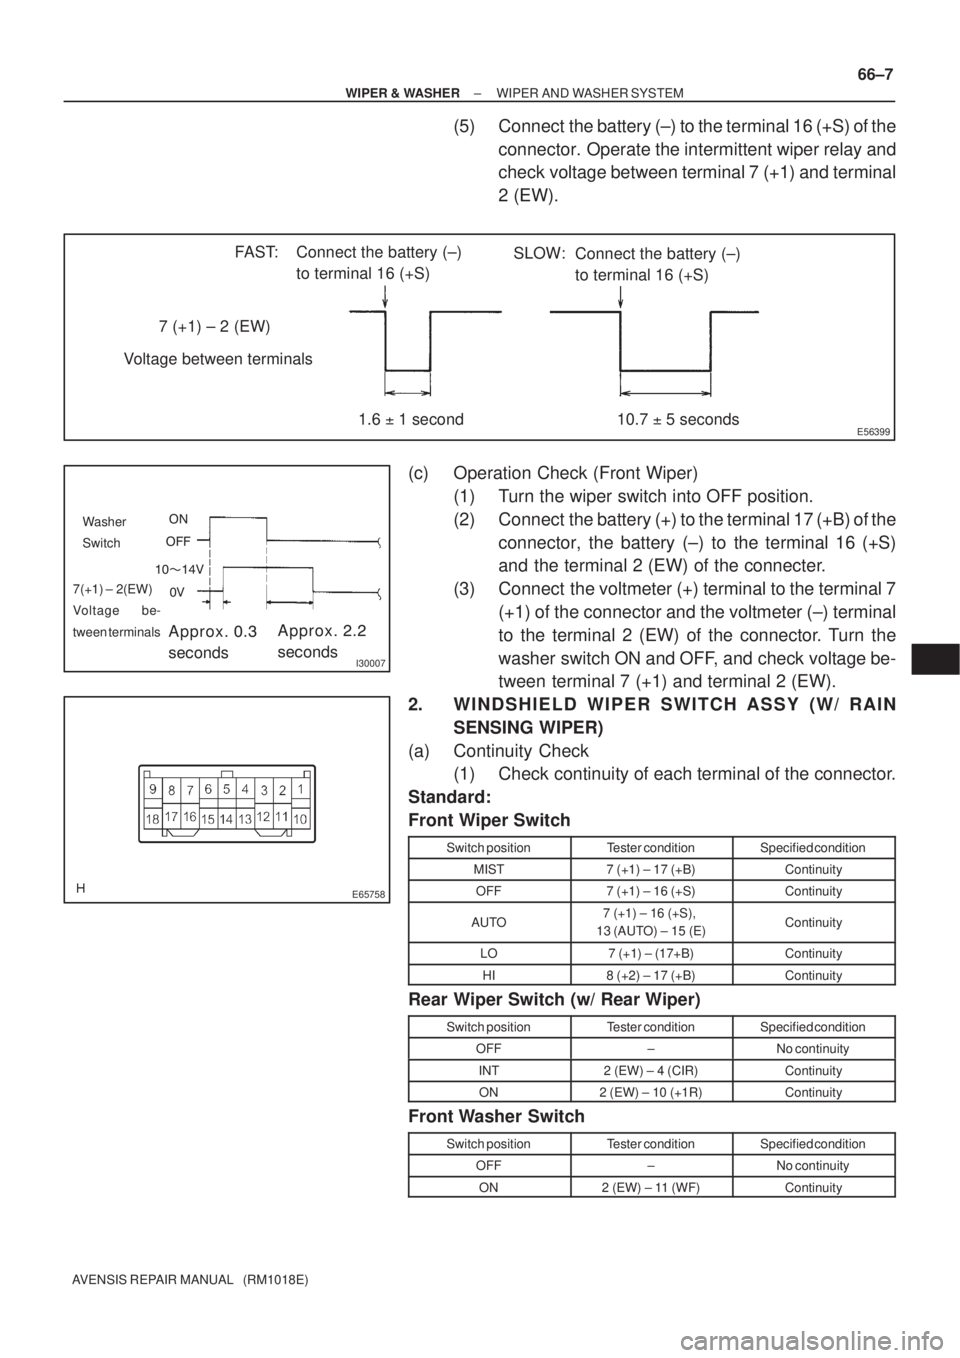
2. WINDSHIELD WIPER SWITCH ASSY (W/ RAIN
SENSING WIPER)
(a) Continuity Check
(1) Check continuity of each terminal of the connector.
Standard:
Front Wiper Switch
Switch positionTester conditionSpecified condition
MIST7 (+1) ± 17 (+B)Continuity
OFF7 (+1) ± 16 (+S)Continuity
AUTO7 (+1) ± 16 (+S),
13 (AUTO) ± 15 (E)Continuity
LO7 (+1) ± (17+B)Continuity
HI8 (+2) ± 17 (+B)Continuity
Rear Wiper Switch (w/ Rear Wiper)
Switch positionTester conditionSpecified condition
OFF±No continuity
INT2 (EW) ± 4 (CIR)Continuity
ON2 (EW) ± 10 (+1R)Continuity
Front Washer Switch
Switch positionTester conditionSpecified condition
OFF±No continuity
ON2 (EW) ± 11 (WF)Continuity
Page 1681 of 1690

E68112
������E69072
± WIPER & WASHERWIPER AND WASHER SYSTEM
66±11
AVENSIS REPAIR MANUAL (RM1018E)
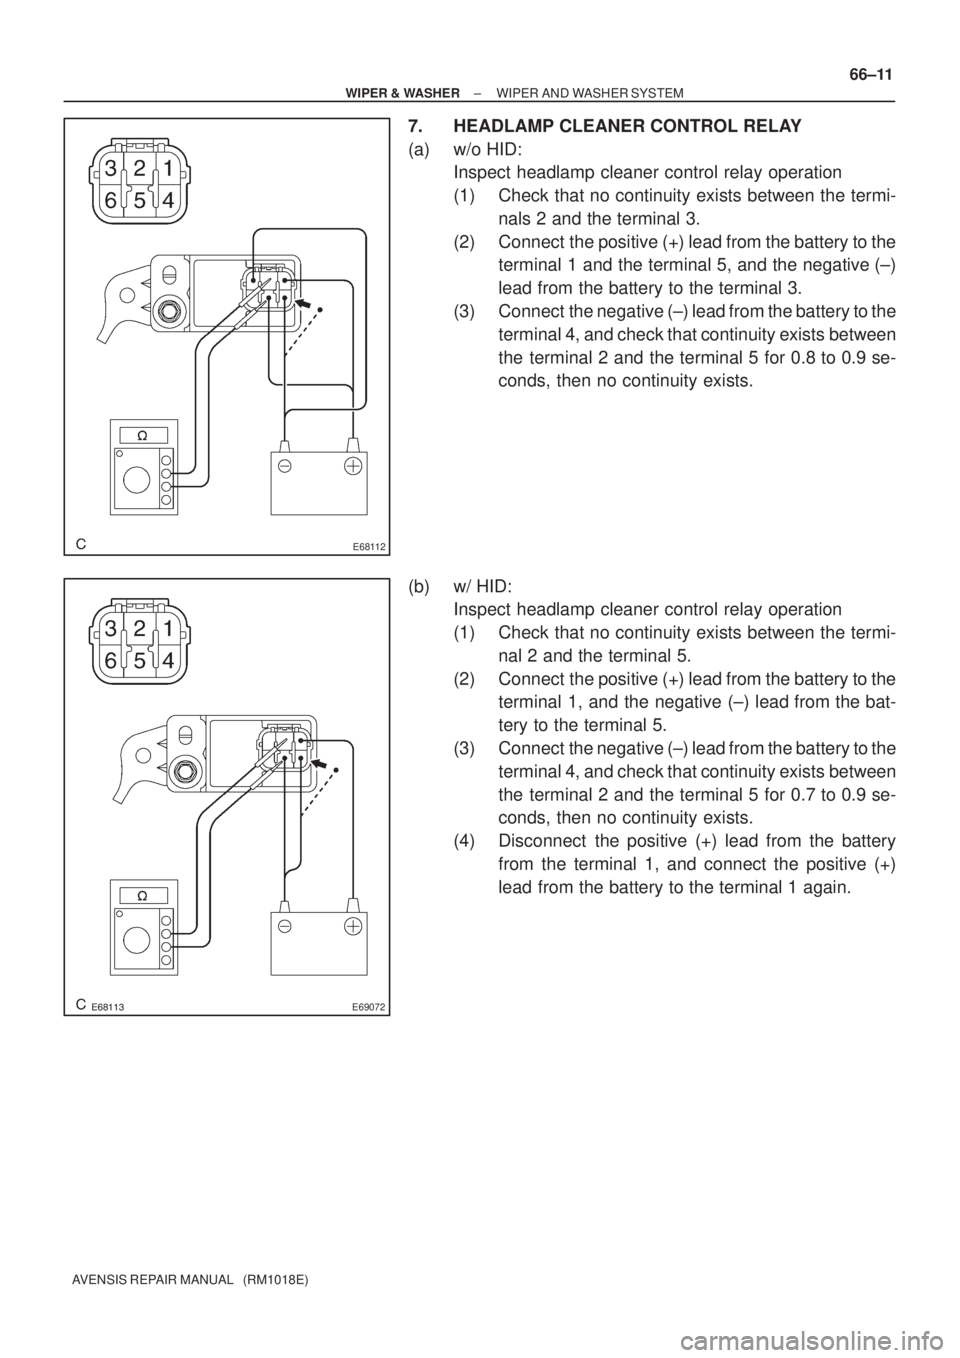
7. HEADLAMP CLEANER CONTROL RELAY
(a) w/o HID:
Inspect headlamp cleaner control relay operation
(1) Check that no continuity exists between the termi-
nals 2 and the terminal 3.
(2) Connect the positive (+) lead from the battery to the
terminal 1 and the terminal 5, and the negative (±)
lead from the battery to the terminal 3.
(3) Connect the negative (±) lead from the battery to the
terminal 4, and check that continuity exists between
the terminal 2 and the terminal 5 for 0.8 to 0.9 se-
conds, then no continuity exists.
(b) w/ HID:
Inspect headlamp cleaner control relay operation
(1) Check that no continuity exists between the termi-
nal 2 and the terminal 5.
(2) Connect the positive (+) lead from the battery to the
terminal 1, and the negative (±) lead from the bat-
tery to the terminal 5.
(3) Connect the negative (±) lead from the battery to the
terminal 4, and check that continuity exists between
the terminal 2 and the terminal 5 for 0.7 to 0.9 se-
conds, then no continuity exists.
(4) Disconnect the positive (+) lead from the battery
from the terminal 1, and connect the positive (+)
lead from the battery to the terminal 1 again.
Page 1684 of 1690
6804U±01
I35269
Engine Room No.2 Relay Block
Engine Room Relay Block
Glow Plug Relay AssyEngine Room No.3 Relay Block
Engine Room No.2 Relay Relay
Engine Room No.3 Relay Block
ENGINE:
3ZZ±FE:
1ZZ±FE:
2AZ±FSE:
1AZ±FSE:
1AZ±FE:
ENGINE:
1CD±FTV: w/o Discharge headlamp:
Headlamp Cleaner Control Relay
w/ Discharge headlamp:
Headlamp Cleaner Control Relay Assy
w/o Discharge headlamp:
Headlamp Cleaner Control Relay
w/ Discharge headlamp:
Headlamp Cleaner Control Relay Assy
Engine Room Relay Block
± WIRINGPOWER SOURCE
68±1
AVENSIS REPAIR MANUAL (RM1018E)
POWER SOURCE
LOCATION
Page 1685 of 1690
I35270
Windshield Wiper Relay
Driver Side Relay Block Assy
Turn Signal Flasher Assy
Rear Fog Lamp Relay
Defogger Relay
Circuit Opening
Relay Assy
Instrument Panel
Junction Block Assy
Fuse Block Assy
LHD:
RHD:
Defogger Relay
Rear Fog Lamp RelayPassenger Side Relay Block Assy
Turn Signal Flasher Assy
Windshield Wiper Relay
Fuse Block Assy
Circuit Opening Relay Assy
Instrument Panel Junction Block Assy
68±2
± WIRINGPOWER SOURCE
AVENSIS REPAIR MANUAL (RM1018E)
Page 1686 of 1690
I35135
Engine Room Relay Block
FUSE RELAY
1. EMPS 50A
2. ±
3. A/F 20A
4. THROTTLE 10A
5. HORN 15A6. HAZARD 10A
7. ALT±S 7.5A
8. IG2 15A
9. EFI 20A
10. DCC 30A11. AM2 30A
12. MAIN 40A
13. ±
14. ±
15. ± A. FAN No.2
B. FAN No.1
C. FAN No.3
D. ±
E. ±
F. EMPS12B
CD E
F
11 1016 15
9 814
19 18 13
7 6
1217
34 5
Engine Room Relay Block ENGINE:
3ZZ±FE:
1ZZ±FE:
2AZ±FSE:
1AZ±FSE:
1AZ±FE:
A
16. RR DEF 30A
17. HTR 40A
18. RDI 30A
19. CDS 30A
ENGINE:
1CD±FTV:
1211
10 9 8 7 612
345 B
A
13
15 14
1619 18 17 20
CD
FUSE RELAY
1. MAIN 40A
2. RR DEF 30A
3. PWR HTR 25A
4. EFI 20A
5. HORN 15A6. F±HTR 25A
7. HAZARD 10A
8. AM2 30A
9. DCC 30A
10. ALT±S 7.5A11. ±
12. ±
13. ±
14. *1
15. *2 A. FAN No.1
B. FAN No.3
C. EDU
D. EFI MAIN16. RDI 40A
17. CDS 30A
18. HTR 40A
19. H/CLN 30A
20. AM1 No.1 50A
*1 VSC 25A (w/ VSC)
ABS 25A (w/o VSC)
*2 VSC 50A (w/ VSC)
ABS 40A (w/o VSC)
± WIRINGPOWER SOURCE
68±3
AVENSIS REPAIR MANUAL (RM1018E)
Page 1687 of 1690
I35139
Engine Room No.2 Relay Block
RELAY
A. INJ
B. A/F
C. IG2
D. EFIFUSE
1. EFI No.1 10A
2. EFI No.2 7.5A
3. *1
4. *2
5. H±LP CLN 30A
6. AM1 No.1 50A
7. *3 ENGINE:
3ZZ±FE:
1ZZ±FE:
2AZ±FSE:
1AZ±FSE:
1AZ±FE:
ENGINE:
ICD±FTV:
RELAY
A. HTR1
B. HTR2
C. HTR3FUSE
1. ALT 140A
2. GLOW 80A
3. HTR1 50A
4. HTR2 50A
5. HTR3 50A ABC1
2
345 BC D
5673
1
2
A
4*1 ALT 120A
ALT 100A2AZ±FSE
1AZ±FSE
1AZ±FE
3ZZ±FE
1ZZ±FE
VSC 25A (w/ VSC)
ABS 25A (w/o VSC) *2
Engine Room No.2 Relay BlockVSC 50A (w/ VSC)
ABS 40A (w/o VSC) *3 68±4
± WIRINGPOWER SOURCE
AVENSIS REPAIR MANUAL (RM1018E)
Page 1688 of 1690
I35750
RELAY
A. ±
B. HTR
C. SEAT HTR
D. IG1
E. TAILFUSE
1. IGN 10A
2. S/ROOF 20A
3. RR FOG 7.5A
4. FR FOG 7.5A
5. AM1 25A
6. PANEL 7.5A
7. RR WIP 20A
8. GAUGE2 7.5A
9. CIG 15A
10.HTR 10A
11. ±
12. RAD No.1 7.5A
A. HORN
B. F±HTR
C. H±LP
D. DIM
E. FAN No.2RELAY
1. H±LP HI LH 10A
2. H±LP HI RH 10A
3. H±LP LH 15A
4. H±LP RH 15AFUSE A
B
13
14
15
9
103
4
5
6
7
8
1
3
4 2CD
E
16
17
18
19
20
21
22 12 111
2
A
BCDE13. PWR SEAT 30A
14. TAIL 10A
15. OBD2 7.5A
16. P/POINT 15A
17. DOOR 25A
18. WIP 25A
19. EGU±IG 7.5A
20. S±HTR 20A
21. GAUGE1 10A
22. STOP 15A Instrument Panel Junction Block Assy
Engine Room Relay No.3 Block
± WIRINGPOWER SOURCE
68±5
AVENSIS REPAIR MANUAL (RM1018E)