Page 183 of 308

’02 4Runner_U (L/O 0108)
1772002 MY 4RUNNER_U (OM 35787U)
OPERATION OF INSTRUMENTS AND
CONTROLS
Other equipment
Clock 178
. . . . . . . . . . . . . . . . . . . . . . . . . . . . . . . . . . . . .\
. . . . . . . . . . . . . . . . .
Thermometer 178
. . . . . . . . . . . . . . . . . . . . . . . . . . . . . . . . . . . . \
. . . . . . . . . .
Cigarette lighter and ashtrays 179
. . . . . . . . . . . . . . . . . . . . . . . . . . . . . . . .
Power outlets 180
. . . . . . . . . . . . . . . . . . . . . . . . . . . . . . . . . . . . \
. . . . . . . . . .
Glove box 180
. . . . . . . . . . . . . . . . . . . . . . . . . . . . . . . . . . . . \
. . . . . . . . . . . . . .
Garage door opener 181
. . . . . . . . . . . . . . . . . . . . . . . . . . . . . . . . . . . . \
. . . .
Garage door opener box 184
. . . . . . . . . . . . . . . . . . . . . . . . . . . . . . . . . . . . \
Auxiliary box 186
. . . . . . . . . . . . . . . . . . . . . . . . . . . . . . . . . . . . \
. . . . . . . . . . .
Warning reflector holder 187
. . . . . . . . . . . . . . . . . . . . . . . . . . . . . . . . . . . . \
.
Rear console box 188
. . . . . . . . . . . . . . . . . . . . . . . . . . . . . . . . . . . . \
. . . . . . .
Card holder 189
. . . . . . . . . . . . . . . . . . . . . . . . . . . . . . . . . . . . \
. . . . . . . . . . . .
Front cup holders 189
. . . . . . . . . . . . . . . . . . . . . . . . . . . . . . . . . . . . \
. . . . . . .
Rear cup holders 190
. . . . . . . . . . . . . . . . . . . . . . . . . . . . . . . . . . . . \
. . . . . . .
Tie�down hooks 191
. . . . . . . . . . . . . . . . . . . . . . . . . . . . . . . . . . . . \
. . . . . . . .
Luggage cover 191
. . . . . . . . . . . . . . . . . . . . . . . . . . . . . . . . . . . . \
. . . . . . . . .
Floor mat 192
. . . . . . . . . . . . . . . . . . . . . . . . . . . . . . . . . . . . \
. . . . . . . . . . . . . .
SECTION 1� 9
Page 184 of 308

’02 4Runner_U (L/O 0108)
1782002 MY 4RUNNER_U (OM 35787U)
The digital clock indicates the time.
The key must be in the “ACC” or “ON”
position.
To reset the hour: Push the “H” button.
To reset the minutes: Push the “M” button.
If quick adjustment to a full hour is de-
sired, push the “:00” button.
For example, if the “:00” button is de-
pressed when the time is between
1:01—1:29, the time will change to 1:00.
If the time is between 1:30—1:59, the
time will change to 2:00. If the electrical power source has been
disconnected from the clock, the time dis-
play will automatically be set to 1:00 (one
o’clock).
When the instrument panel lights are
turned on, the brightness of the time in-
dication will be reduced.The thermometer indicates the outside
air temperature when you push the
“OUT/T” button.
The key must be in the “ON” position.
Pushing the button once again or turning
the temperature selector will turn off the
display.
When the air conditioning system is on,
pushing the button once indicates the out-
side temperature and a second time
changes the display back to the air condi-
tioning temperature.
Also, turning the temperature selector
while the outside temperature is indicated
changes the display to the air conditioning
temperature.
Clock
Thermometer
Page 186 of 308

’02 4Runner_U (L/O 0108)
1802002 MY 4RUNNER_U (OM 35787U)
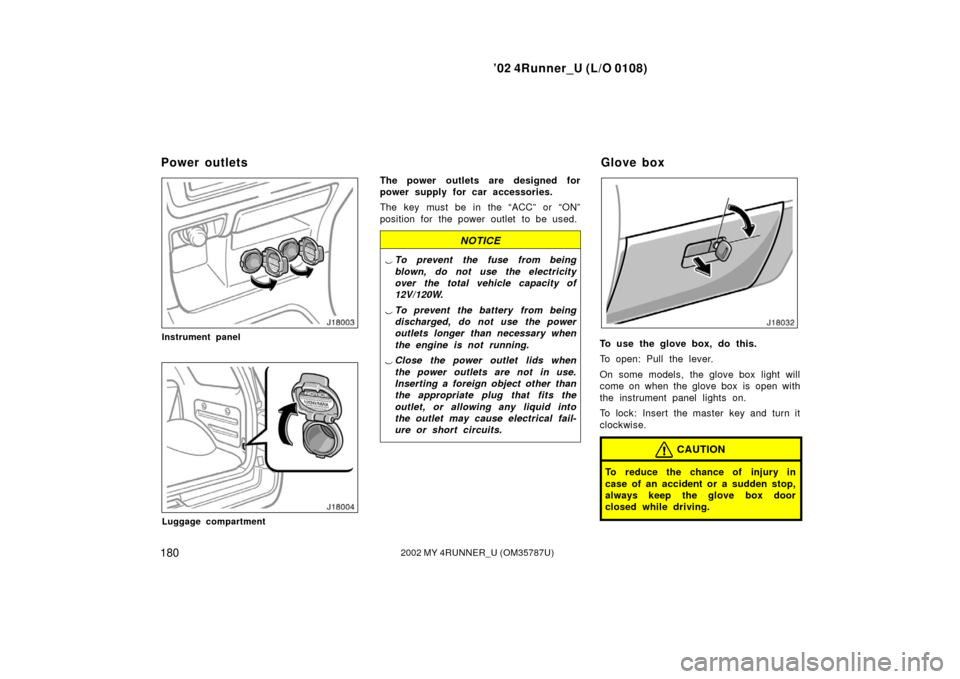
Instrument panel
Luggage compartment
The power outlets are designed for
power supply for car accessories.
The key must be in the “ACC” or “ON”
position for the power outlet to be used.
NOTICE
�To prevent the fuse from being
blown, do not use the electricity
over the total vehicle capacity of
12V/120W.
� To prevent the battery from being
discharged, do not use the power
outlets longer than necessary when
the engine is not running.
� Close the power outlet lids when
the power outlets are not in use.
Inserting a foreign object other than
the appropriate plug that fits the
outlet, or allowing any liquid into
the outlet may cause electrical fail-
ure or short circuits.
To use the glove box, do this.
To open: Pull the lever.
On some models, the glove box light will
come on when the glove box is open with
the instrument panel lights on.
To lock: Insert the master key and turn it
clockwise.
CAUTION
To reduce the chance of injury in
case of an accident or a sudden stop,
always keep the glove box door
closed while driving.
Power outlets Glove box
Page 236 of 308

’02 4Runner_U (L/O 0108)
2302002 MY 4RUNNER_U (OM 35787U)
Cover
(on some models)
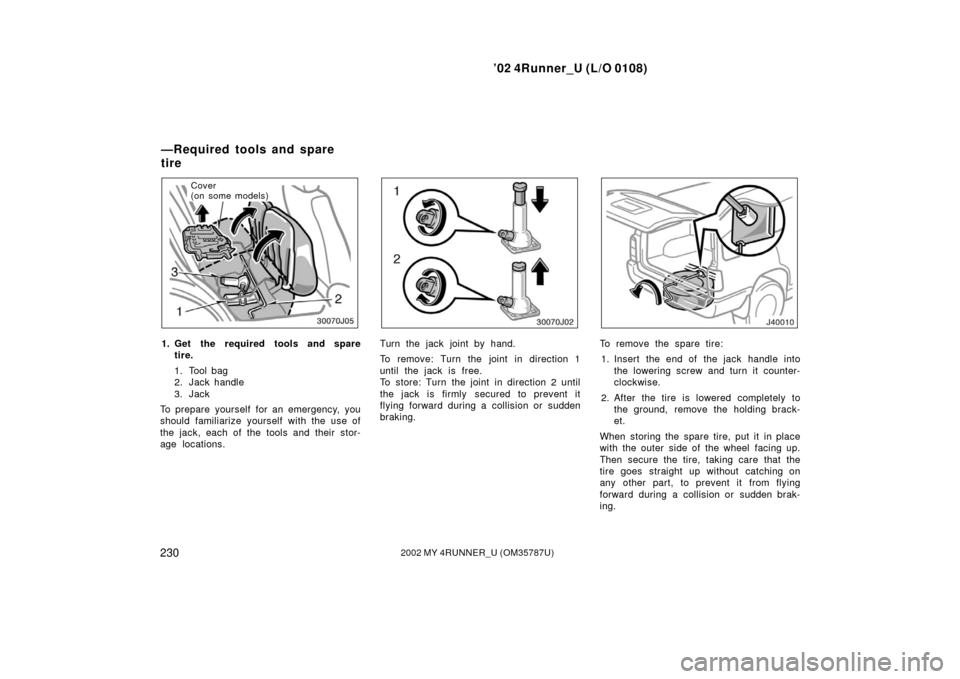
1. Get the required tools and spare
tire.
1. Tool bag
2. Jack handle
3. Jack
To prepare yourself for an emergency, you
should fam iliarize yourself with the use of
the jack, each of the tools and their stor-
age locations.Turn the jack joint by hand.
To remove: Turn the joint in direction 1
until the jack is free.
To store: Turn the joint in direction 2 until
the jack is firmly secured to prevent it
flying forward during a collision or s udden
braking.To remove the spare tire:
1. Insert the end of the jack handle into the lowering screw and turn it counter-
clockwise.
2. After the tire is lowered completely to the ground, remove the holding brack-
et.
When storing the spare tire, put it in place
with the outer side of the wheel facing up.
Then secure the tire, taking care that the
tire goes straight up without catching on
any other part, to prevent it from flying
forward during a collision or s udden brak-
ing.
— R eq u ired to o ls an d sp are
tire
Page 238 of 308
’02 4Runner_U (L/O 0108)
2322002 MY 4RUNNER_U (OM 35787U)
4. Loosen all the wheel nuts.
Always loosen the wheel nuts before rais-
ing the vehicle.
Turn the wheel nuts counterclockwise to
loosen. To get maximum leverage, fit the
wrench to the nut so that the handle is
on the right side, as shown above. Grab
the wrench near the end of the handle
and pull up on the handle. Be careful that
the wrench does not slip off the nut.
Do not remove the nuts yet—just unscrew
them about one�half turn.
Front Rear
Two�wheel drive models
RearFront
Four�wheel drive models
5. Position the jack at the correct jack point as shown.
Make sure the jack is positioned on a
level and solid place.
—Loosening wheel nuts —Positioning the jack
Page 239 of 308

’02 4Runner_U (L/O 0108)
2332002 MY 4RUNNER_U (OM 35787U)
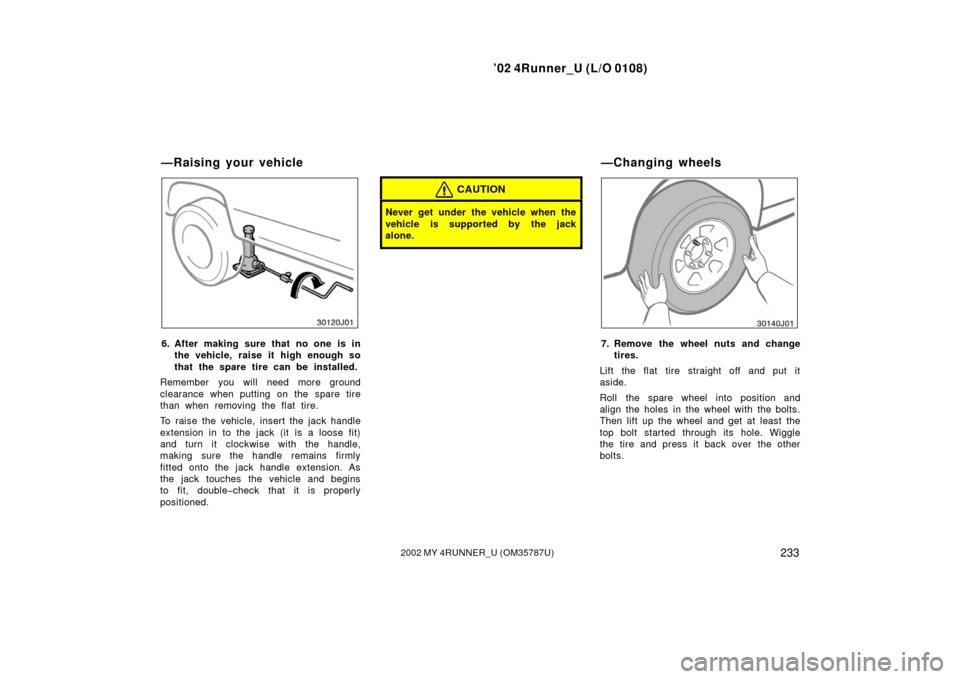
6. After making sure that no one is in
the vehicle, raise it high enough so
that the spare tire can be installed.
Remember you will need more ground
clearance when putting on the spare tire
than when removing the flat tire.
To raise the vehicle, insert the jack handle
extension in to the jack (it is a loose fit)
and turn it clockwise with the handle,
making sure the handle remains firmly
fitted onto the jack handle extension. As
the jack touches the vehicle and begins
to fit, double�check that it is properly
positioned.
CAUTION
Never get under the vehicle when the
vehicle is supported by the jack
alone.
7. Remove the wheel nuts and change tires.
Lift the flat tire straight off and put it
aside.
Roll the spare wheel into position and
align the holes in the wheel with the bolts.
Then lift up the wheel and get at least the
top bolt started through its hole. Wiggle
the tire and press it back over the other
bolts.
—Raising your vehicle —Changing wheels
Page 240 of 308

’02 4Runner_U (L/O 0108)
2342002 MY 4RUNNER_U (OM 35787U)
Before putting on wheels, remove any cor-
rosion on the mounting surfaces with a
wire brush or such. Installation of wheels
without good metal�to�metal contact at the
mounting surface can cause wheel nuts to
loosen and eventually cause a wheel to
come off while driving. Therefore after the
first 1600 km (1000 miles), check to see
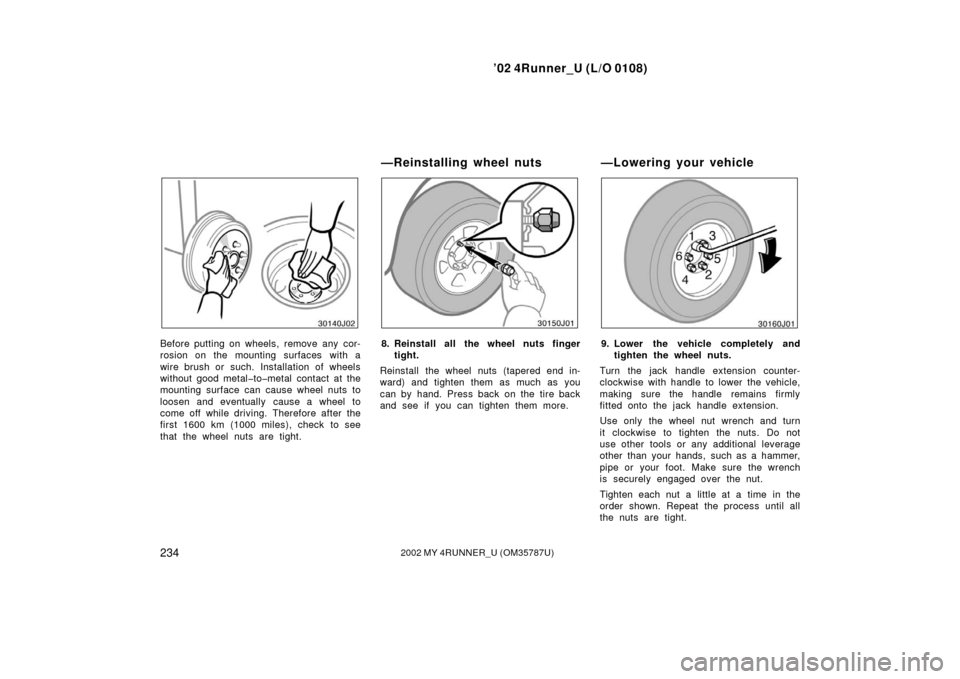
that the wheel nuts are tight.8. Reinstall all the wheel nuts finger
tight.
Reinstall the wheel nuts (tapered end in-
ward) and tighten them as much as you
can by hand. Press back on the tire back
and see if you can tighten them more.9. Lower the vehicle completely and tighten the wheel nuts.
Turn the jack handle extension counter-
clockwise with handle to lower the vehicle,
making sure the handle remains firmly
fitted onto the jack handle extension.
Use only the wheel nut wrench and turn
it clockwise to tighten the nuts. Do not
use other tools or any additional leverage
other than your hands, such as a hammer,
pipe or your foot. Make sure the wrench
is securely engaged over the nut.
Tighten each nut a little at a time in the
order shown. Repeat the process until all
the nuts are tight.
—Reinstalling wheel nuts —Lowering your vehicle
Page 274 of 308

’02 4Runner_U (L/O 0108)
2682002 MY 4RUNNER_U (OM 35787U)
If cold add
If cold O.K.
If hot add If hot O.K.
Check the fluid level on the dipstick. If
necessary, add automatic transmission
fluid DEXRON �II or III.
If the vehicle has been driven around 80
km/h (50 mph) for 20 minutes (a little
more in frigid temperatures), the fluid is
hot (60 �C—80 �C or 140 �F—175 �F). You
may also check the level when the fluid
is cold (about room temperature,
10 �C—30 �C or 50 �F—85 �F) if the engine
has not been run for about five hours.
a. Clean all dirt from outside of the reser-
voir tank.
b. Remove the reservoir cap by turning it
counterclockwise and wipe the dipstick
clean. c. Reinstall the reservoir cap.
d. Remove the reservoir cap again and
look at the fluid level. If the fluid is cold,
the level should be in the “COLD” range
on the dipstick. Similarly, if it is hot, the
fluid level should be in the “HOT” range.
If the level is at the low side of either
range, add automatic transmission fluid
DEXRON
�II or III to bring the level within
the range.
e. After replacing the reservoir cap, visu-
ally check the steering box case, vane
pump and hose connections for leaks or
damage.
CAUTION
The reservoir tank may be hot so be
careful not to burn yourself.
NOTICE
Avoid overfilling, or the power steer-
ing could be damaged.
Keep your tire pressures at the proper
level.
The recommended cold tire pressures, tire
size and the vehicle capacity weight are
given in Section 8. The recommended tire
pressures and tire size are also on the
tire pressure label as shown.
You should check the tire pressures every
two weeks, or at least once a month. And
do not forget the spare!
Checking power steering fluid Checking tire pressure