Page 92 of 466

Keys and doors2-13
–
CONTINUED –
times. If you have two current transmitters, program each one twice. If
you have three current transmitters, program two of them once and
the third one twice. This process will leave only current transmittercodes in the system ’s memory.
NOTE
Make sure no one else is operating their keyless entry system within range of your vehicle when programming transmitters. If
someone else were to operate their remote transmitter while youare programming your transmitters, it is possible that their trans-mitter code will be programmed into your system, allowing themunauthorized access to your vehicle.
Security system (if equipped)
The security system helps to protect your vehicle and valuables from
theft. The horn sounds and the parking lights flash if someone attempts
to break into your vehicle. The starter motor is also interrupted to prevent
starting the vehicle without a key.
The system can be armed and disarmed with the remote transmitter.
The system does not operate when the key is inserted into the ignitionswitch. �System operation
The security system will give the following alarm indications when trig-
gered:� The parking lights will flash and the horn will sound intermittently.
In addition, the starter motor will not operate.� The alarm automatically resets after 30 seconds; however, the
alarm will reactivate if the vehicle is tampered with again. The alarmwill continue for six times if any sensor continues to be activated.
The alarm is triggered by: � Opening a door, the rear gate or trunk lid.
� Application of physical shock to the vehicle (e.g. breaking glass or
forced entry). Note that there are two alarm levels for shock: warning
Page 147 of 466

3-34
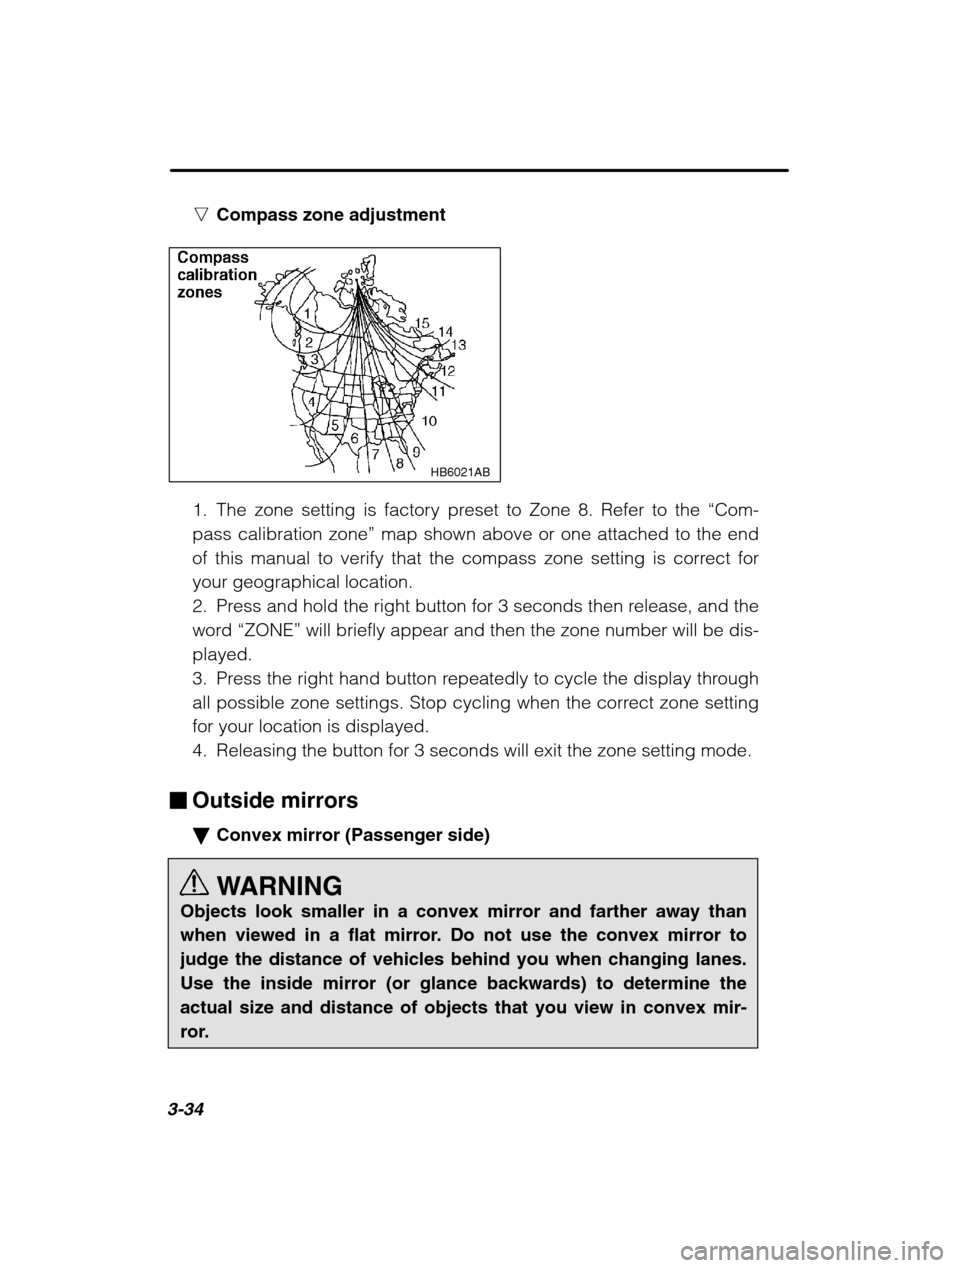
nCompass zone adjustment
HB6021AB
1. The zone setting is factory preset to Zone 8. Refer to the “Com-
pass calibration zone ” map shown above or one attached to the end
of this manual to verify that the compass zone setting is correct for your geographical location.
2. Press and hold the right button for 3 seconds then release, and the
word “ZONE” will briefly appear and then the zone number will be dis-
played.
3. Press the right hand button repeatedly to cycle the display through
all possible zone settings. Stop cycling when the correct zone settingfor your location is displayed.
4. Releasing the button for 3 seconds will exit the zone setting mode.
� Outside mirrors �Convex mirror (Passenger side)
WARNING
Objects look smaller in a convex mirror and farther away than
when viewed in a flat mirror. Do not use the convex mirror tojudge the distance of vehicles behind you when changing lanes.
Use the inside mirror (or glance backwards) to determine theactual size and distance of objects that you view in convex mir-
ror.
Page 179 of 466
5-8
Type A and B audio set (if equipped)
Type A: Without weather band
Type B: With weather band
The audio set will operate only when the ignition switch is in the “ACC” or
“ON” position.
Radio operation
HB5041BC
1 Power switch/Volume, Tone,
Balance, Fader control dial
2 AUDIO button
3 BAND button 4
Tuning buttons
5 Preset buttons
6 SCAN button
�Power switch and volume/bass/treble/fader/balance control
n Power switch and volume control (PWR/VOL)
The dial 1 is used for both power (ON/OFF) and volume control. The
radio is turned ON and OFF by pushing the dial and the volume is
controlled by turning the dial.
Page 182 of 466

Audio5-11
–
CONTINUED –
Press the “SCAN” button again to cancel the SCAN mode and to stop
on any displayed frequency.
When the “SCAN” button is pressed for automatic tuning, stations are
scanned in the direction of low frequencies to high frequencies only.
Automatic tuning may not function properly if the station reception is
weakened by distance from the station or proximity to tall buildingsand hills. � Selecting preset stations
Presetting a station with a “preset button ”
5 allows you to select that
station in a single operation. Up to six WB (if equipped), AM, FM1 and
FM2 stations each may be preset. � How to preset stations
1. Press the “BAND” button 3 to select FM1, FM2, AM or WB (if
equipped) reception.
2. Press the “SCAN” button or tune the radio manually until the
desired station frequency is displayed.
3. Press one of the preset buttons for more than 2 seconds to store
the frequency. At this time, there will momentarily be no sound from
the radio. If the button is pressed for less than 2 seconds, the preced-
ing selection will remain in memory.
NOTE If the connection between the radio and battery is broken for any
reason such as vehicle maintenance or radio removal, all stationsstored in the preset buttons are cleared. If this occurs, it is neces-sary to reset the preset buttons.
Page 191 of 466
5-20
Type C audio set (if equipped) The radio will operate only when the ignition switch is in the “ACC” or
“ON” position.
Radio operation
HB5042BB
1 FM/AM selection button
2 SCAN button
3 WB (weather band) button
4 Tuning buttons
5 Preset buttons 6
Fader/Balance selection button
7 Power switch, Volume control,
Bass/Middle/Treble control and
Fader/Balance control dial
8 AUDIO (audio mode) button
�Power switch and volume/bass/treble/fader/balance control (PWR/VOL)
The dial 7 is used for both power (ON/OFF) and volume control. The
radio is turned ON and OFF by pushing the dial and the volume is
controlled by turning the dial.
Page 195 of 466

5-24
band has been scanned from the low end to the high end.
Press the “SCAN” button again to cancel the SCAN mode and to stop
on any displayed frequency.
When the “SCAN” button is pressed for automatic tuning, stations are
scanned in the direction of low frequencies to high frequencies only.
Automatic tuning may not function properly if the station reception is
weakened by distance from the station or proximity to tall buildings and
hills. � Selecting preset stations
Presetting a station with a preset button 5 allows you to select that
station in a single operation. Up to six AM, FM1, FM2 and WB stations
each may be preset. � How to preset stations
1. Press the “FM/AM” selection button to select AM, FM1 or FM2 re-
ception.
OR
Press the “WB” button
3 to select the weather band.
2. Press the “SCAN” button 2 or tune the radio manually until the de-
sired station frequency is displayed.
3. Press one of the preset buttons 5 for at least 1.5 seconds to store
the frequency. The frequency of the station will flash once on the dis-
play at this time. If the button is pressed for less than 1.5 seconds, the
preceding selection will remain in memory. NOTE If the connection between the radio and battery is broken for any
reason such as vehicle maintenance or radio removal, all stationsstored in the preset buttons are cleared. If this occurs, it is neces-sary to reset the preset buttons.
Page 205 of 466
5-34
Type D and E audio set (if equipped)
Type D: Without weather band
Type E: With weather band
The audio set will operate only when the ignition switch is in the “ACC” or
“ON” position.
Radio operation
HB5052BB
1 Power switch/Volume, Tone,
Balance, Fader control dial
2 BAND button
3 Tuning buttons 4
Preset buttons
5 AUDIO button
6 SCAN button
�Power switch and volume/bass/treble/fader/balance control
n Power switch and volume control (PWR/VOL)
The dial 1 is used for both power (ON/OFF) and volume control. The
radio is turned ON and OFF by pushing the dial and the volume is
controlled by turning the dial.
Page 208 of 466

Audio5-37
–
CONTINUED –
Press the “SCAN” button again to cancel the SCAN mode and to stop
on any displayed frequency.
When the “SCAN” button is pressed for automatic tuning, stations are
scanned in the direction of low frequencies to high frequencies only.
Automatic tuning may not function properly if the station reception is
weakened by distance from the station or proximity to tall buildingsand hills. � Selecting preset stations
Presetting a station with a “preset button ”
4 allows you to select that
station in a single operation. Up to six WB (if equipped), AM, FM1 and
FM2 stations each may be preset. � How to preset stations
1. Press the “BAND” button 2 to select FM1, FM2, AM or WB (if
equipped) reception.
2. Press the “SCAN” button or tune the radio manually until the
desired station frequency is displayed.
3. Press one of the preset buttons for more than 2 seconds to store
the frequency. At this time, there will momentarily be no sound from
the radio. If the button is pressed for less than 2 seconds, the preced-
ing selection will remain in memory.
NOTE If the connection between the radio and battery is broken for any
reason such as vehicle maintenance or radio removal, all stationsstored in the preset buttons are cleared. If this occurs, it is neces-sary to reset the preset buttons.