Page 367 of 466

10-4
wax to restore the original luster. Frequent polishing with a compound or
an incorrect polishing technique will result in removing the paint layer
and exposing the undercoat. When in doubt, it is always best to contactyour SUBARU dealer or an auto paint specialist. �Cleaning aluminum wheels
� Promptly wipe the aluminum wheels clean of any kind of grime or
agent. If dirt is left on too long, it may be difficult to clean off. � Do not use soap containing grit to clean the wheels. Be sure to use a
neutral cleaning agent, and later rinse thoroughly with water. Do not
clean the wheels with a stiff brush or expose them to a high-speed wash-ing device.� Clean the vehicle (including the aluminum wheels) with water as soon
as possible when it has been splashed with sea water, exposed to sea
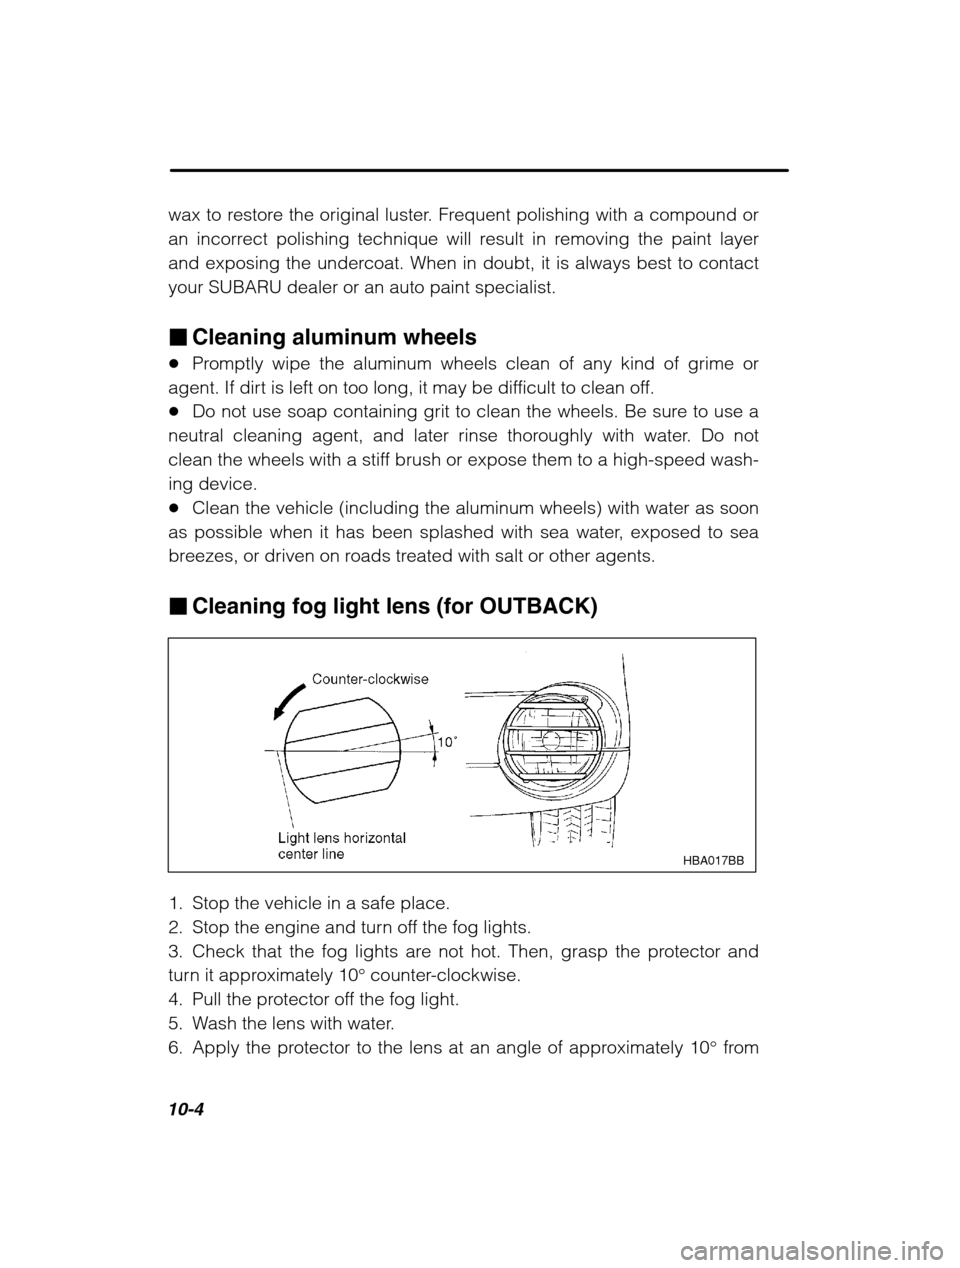
breezes, or driven on roads treated with salt or other agents. � Cleaning fog light lens (for OUTBACK)
HBA017BB
1. Stop the vehicle in a safe place.
2. Stop the engine and turn off the fog lights.
3. Check that the fog lights are not hot. Then, grasp the protector and
turn it approximately 10 ° counter-clockwise.
4. Pull the protector off the fog light.
5. Wash the lens with water.
6. Apply the protector to the lens at an angle of approximately 10 ° from
Page 368 of 466

Appearance care10-5
–
CONTINUED –
the fog light’s horizontal center line. Then, turn the protector clockwise
until it stops. Finally, check that the protector ’s horizontal bars are parallel
with the fog light ’s horizontal center line.
Corrosion protection
Your SUBARU has been designed and built to resist corrosion. Special
materials and protective finishes have been used on most parts of the
vehicle to help maintain fine appearance, strength, and reliable opera-tion. �Most common causes of corrosion
The most common causes of corrosion are:
1. The accumulation of moisture retaining dirt and debris in body
panel sections, cavities, and other areas.
2. Damage to paint and other protective coatings caused by graveland stone chips or minor accidents.
Corrosion is accelerated on the vehicle when:
1. It is exposed to road salt or dust control chemicals, or used in
coastal areas where there is more salt in the air, or in areas where
there is considerable industrial pollution.
2. It is driven in areas of high humidity, especially when temperatures
range just above freezing.
3. Dampness in certain parts of the vehicle remains for a long time,
even though other parts of the vehicle may be dry.
4. High temperatures will cause corrosion to parts of the vehicle
which cannot dry quickly due to lack of proper ventilation. � To help prevent corrosion
Wash the vehicle frequently. If you drive on salted roads in the winter
or if you live in a coastal area, you should flush the underbody with
fresh water frequently.
After the winter has ended, it is recommended that the underbody be
given a very thorough washing.
Page 427 of 466
Maintenance and service11-57
–
CONTINUED –
�Headlight
CAUTION
Halogen headlight bulbs become very hot while in use. If you touch the bulb surface with bare hands or greasy gloves, fingerprints or grease on the bulb surface develop into hot spots, caus-ing the bulb to break. If there are finger prints or grease on thebulb surface, wipe them away with a soft cloth moistened with al-cohol.
NOTE If headlight aiming is required, consult your SUBARU dealer for proper adjustment of the headlight aim. �For GT and OUTBACK models
HBB040BB
HBB039BA
Remove the headlight bulb cover, by turning it counterclockwise.
Page 428 of 466
11-58
nLow beam light bulbs
HBB042BA
HBB041BB
1. Disconnect the electrical connector for the black cable.
2. Remove the retainer spring.
3. Replace the bulb, then set the retainer spring securely.
4. Reconnect the electrical connector for black cable.
5. Install the headlight bulb cover. n High beam light bulbs
HBB044BB
HBB043BA
1. Disconnect the electrical connector from the bulb.
2. Remove the bulb from the headlight assembly by turning it coun-
terclockwise.
3. Replace the bulb with new one.
4. Reconnect the electrical connector. At this time, use care not to
touch the bulb surface.
Page 429 of 466

Maintenance and service11-59
–
CONTINUED –
5. To install the bulb to the headlight assembly, turn it clockwise until it clicks.
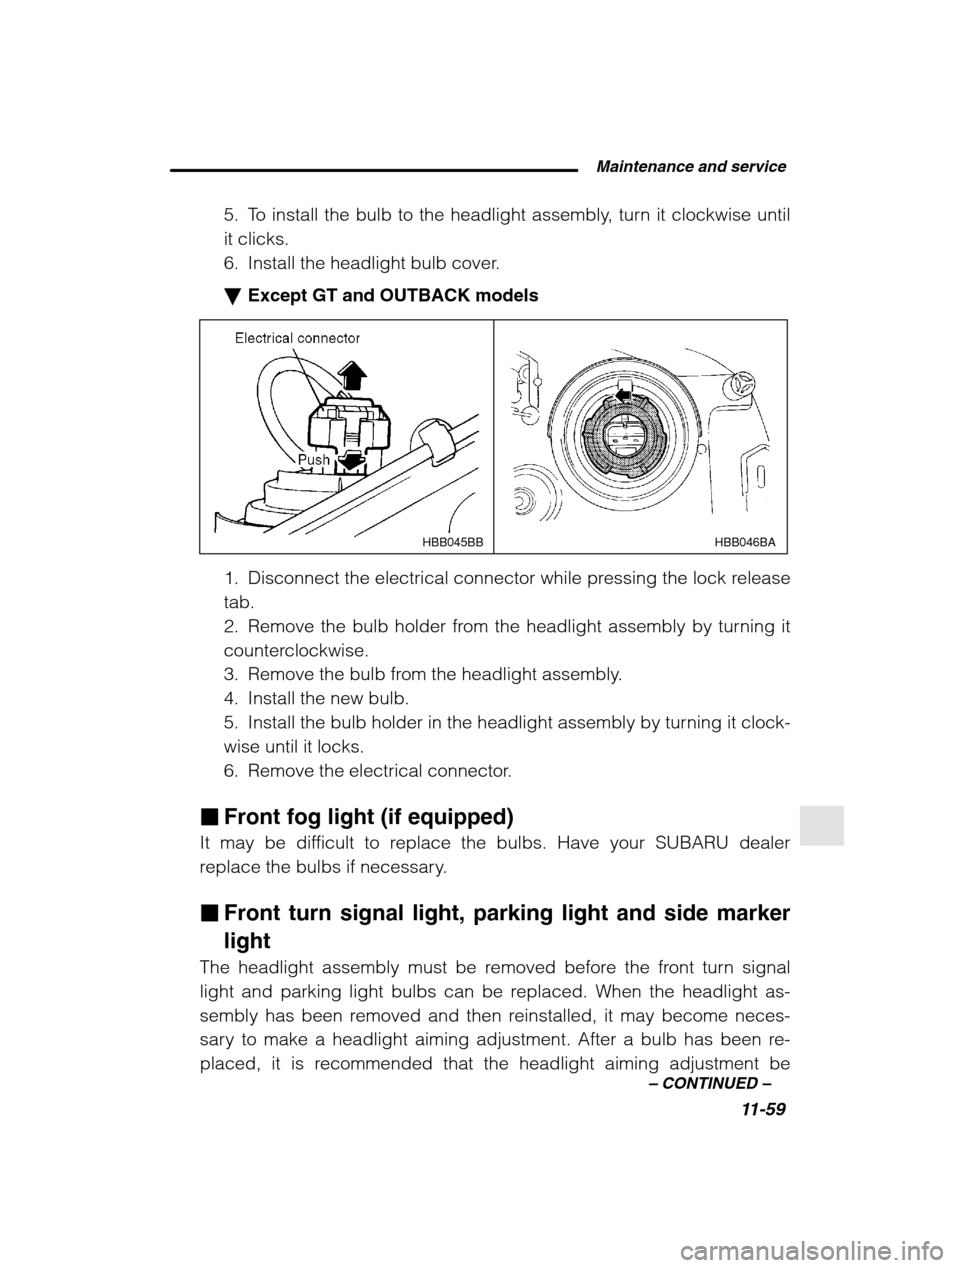
6. Install the headlight bulb cover. �Except GT and OUTBACK models
HBB046BAHBB045BB
1. Disconnect the electrical connector while pressing the lock release tab.
2. Remove the bulb holder from the headlight assembly by turning it
counterclockwise.
3. Remove the bulb from the headlight assembly.
4. Install the new bulb.
5. Install the bulb holder in the headlight assembly by turning it clock-wise until it locks.
6. Remove the electrical connector.
� Front fog light (if equipped)
It may be difficult to replace the bulbs. Have your SUBARU dealer
replace the bulbs if necessary. � Front turn signal light, parking light and side marker light
The headlight assembly must be removed before the front turn signal
light and parking light bulbs can be replaced. When the headlight as-
sembly has been removed and then reinstalled, it may become neces-
sary to make a headlight aiming adjustment. After a bulb has been re-
placed, it is recommended that the headlight aiming adjustment be
Page 430 of 466
11-60
made at a SUBARU dealer.
HBB016BA
1. Remove the headlight assembly mounting screws located at the top
of and the front of the headlight assembly using a phillips screwdriver or
an open-end wrench.
2. Move the headlight assembly forward.
HBB039CBHBB020BA
3. Remove the bulb socket from the headlight assembly by turning it
counterclockwise.
4. Remove the bulb from the socket by pushing it and turning counter-clockwise. Install a new bulb in the socket.
5. Set the bulb socket into the headlight assembly and turn it clockwise
until it locks.
6. Set the headlight assembly into the vehicle body. Tighten the mount-
ing screws.
Page 431 of 466
Maintenance and service11-61
–
CONTINUED –
�Rear combination lights �Sedan
HBB034BCHBF014DA
HBB035BB
1. Open the trunk lid.
2. Open the rear combination light cover. For covers on the trunk lid:
Unlatch the cover by pushing the knob and open the cover.For covers on the trunk wall:
Unlatch the cover by moving the knob upward and open the cover.
3. Remove the bulb socket from the light assembly by turning it coun-
terclockwise.
4. Remove the bulb from the socket.Rear turn signal light: Remove the bulb from the socket by pushing
it and turning it counterclockwise.Others: Pull the bulb out of the socket.
Page 432 of 466
11-62
5. Install a new bulb in the socket.
6. Set the bulb socket into the rear combination light assembly and
turn it clockwise until it locks.
7. Close the cover and latch the clock. �Station wagon
n Brake/tail and rear turn signal light bulbs
It may be difficult to replace the bulbs. It is recommended that you
have the bulbs replaced by your SUBARU dealer.
HBB022BB
HBB021BB
1. Remove the light bulb replacement service hole covers at two
places by prying the edge of the cover with a regular screwdriver.
2. Remove the upper and lower nuts. Then, slide the rear combina-
tion lamp assembly to the rear and remove it from the vehicle.
HBB070BB