Page 9 of 359

1-3 Four-Way Manual Seats
There are two levers located on the front of the seat.
The left lever adjusts the seat forward and rearward.
The right lever adjusts the angle of the seat cushion.
To adjust the seats forward and rearward, lift the lever on
the left. Slide the seat to where you want it. Then release
the lever and try to move the seat with your body to make
sure the seat is locked into place.
Lift the lever on the right and lean forward or backward
to adjust the angle of the seat cushion. Release the lever
to lock the seat into place.
Six-Way Power Seat (If Equipped)
If your vehicle has this option, the driver's seat has
three power seat controls located on the outboard side.
A: Moving the front control up or down raises or lowers
the front of the seat cushion.
B: Moving the center control up or down raises or
lowers the whole seat. Moving it toward the front
or rear of the vehicle moves the whole seat toward
the front or rear of the vehicle.
C: Moving the third control up or down moves the
seatback up or down.
Page 32 of 359

1-26
What makes an air bag inflate?
In an impact of sufficient severity, the air bag sensing
system detects that the vehicle is in a crash. The sensing
system triggers a release of gas from the inflator, which
inflates the air bag. The inflator, air bag and related
hardware are all part of the air bag modules inside the
steering wheel and in the instrument panel in front of
the right front passenger.
How does an air bag restrain?
In moderate to severe frontal or near
-frontal collisions,
even belted occupants can contact the steering wheel or
the instrument panel. Air bags supplement the protection
provided by safety belts. Air bags distribute the force of
the impact more evenly over the occupant's upper body,
stopping the occupant more gradually. But air bags
would not help you in many types of collisions,
including rollovers, rear impacts and many side impacts,
primarily because an occupant's motion is not toward
those air bags. Air bags should never be regarded as
anything more than a supplement to safety belts,
and then only in moderate to severe frontal or
near
-frontal collisions.What will you see after an air bag inflates?
After an air bag inflates, it quickly deflates, so quickly that
some people may not even realize the air bag inflated.
Some components of the air bag module
-- the steering
wheel hub for the driver's air bag, or the instrument panel
for the right front passenger's bag
-- will be hot for a short
time. The parts of the bag that come into contact with you
may be warm, but not too hot to touch. There will be
some smoke and dust coming from vents in the deflated
air bags. Air bag inflation doesn't prevent the driver from
seeing or from being able to steer the vehicle, nor does it
stop people from leaving the vehicle.
CAUTION:
When an air bag inflates, there is dust in the air.
This dust could cause breathing problems for
people with a history of asthma or other
breathing trouble. To avoid this, everyone in the
vehicle should get out as soon as it is safe to do so.
If you have breathing problems but can't get out
of the vehicle after an air bag inflates, then get
fresh air by opening a window or door.
Page 42 of 359
1-36
Restraint Systems for Children
An infant car bed (A), a special bed made for use in a
motor vehicle, is an infant restraint system designed to
restrain or position a child on a continuous flat surface.
Make sure that the infant's head rests toward the center
of the vehicle.
A rear-facing infant seat (B) provides restraint with
the seating surface against the back of the infant.
The harness system holds the infant in place and,
in a crash, acts to keep the infant positioned in
the restraint.
Page 54 of 359
1-48
CAUTION:
Never do this.
Here two children are wearing the same belt.
The belt can't properly spread the impact forces.
In a crash, the two children can be crushed
together and seriously injured. A belt must be
used by only one person at a time.
Q:What if a child is wearing a lap-shoulder belt,
but the child is so small that the shoulder belt is
very close to the child's face or neck?
A:Move the child toward the center of the vehicle,
but be sure that the shoulder belt still is on the
child's shoulder, so that in a crash the child's upper
body would have the restraint that belts provide.
Page 77 of 359

2-21
Entering Programming Mode
To program any feature, your vehicle must be in the
programming mode. Follow these steps:
1. Put your key in the ignition.
2. Turn the ignition to RUN to disarm the content
theft
-deterrent/alarm system.
3. Turn the ignition to OFF.
4. Remove the RADIO fuse. This fuse is in the
main fuse block, located on the left side of your
instrument panel. See ªFuses and Circuit Breakersº
in the Index.
5. Turn the ignition toward you to ACCESSORY.
6. Count the number of chimes you hear. You will
hear one or two chimes depending on the features
your vehicle is equipped with. Refer to the chart
shown previously.
You can now program your choices.
To exit the programming mode, follow the steps
listed under ªLeaving Programming Modeº later in
this section.Exit Lighting and Delayed Illumination
With exit lighting, your interior lamps will come on
for up to 25 seconds when the key is removed from
the ignition.
With delayed illumination, your interior lamps will
come on and stay on for up to 25 seconds when
entering your vehicle and up to five seconds when
leaving your vehicle.
Programmable Modes
Mode 1: Both Off
Mode 2: Delayed Illumination Only
Mode 3: Exit Lighting Only
Mode 4: Both On
Page 85 of 359
2-29
New Vehicle ªBreak-Inº
NOTICE:
Your vehicle doesn't need an elaborate
ªbreak
-in.º But it will perform better in
the long run if you follow these guidelines:
�Keep your speed at 55 mph (88 km/h) or
less for the first 500 miles (805 km).
�Don't drive at any one speed
-- fast or
slow
-- for the first 500 miles (805 km).
Don't make full
-throttle starts.
�Avoid making hard stops for the first
200 miles (322 km) or so. During this time
your new brake linings aren't yet broken
in. Hard stops with new linings can mean
premature wear and earlier replacement.
Follow this breaking
-in guideline every
time you get new brake linings.
�Don't tow a trailer during break
-in.
See ªTowing a Trailerº in the Index for
more information.
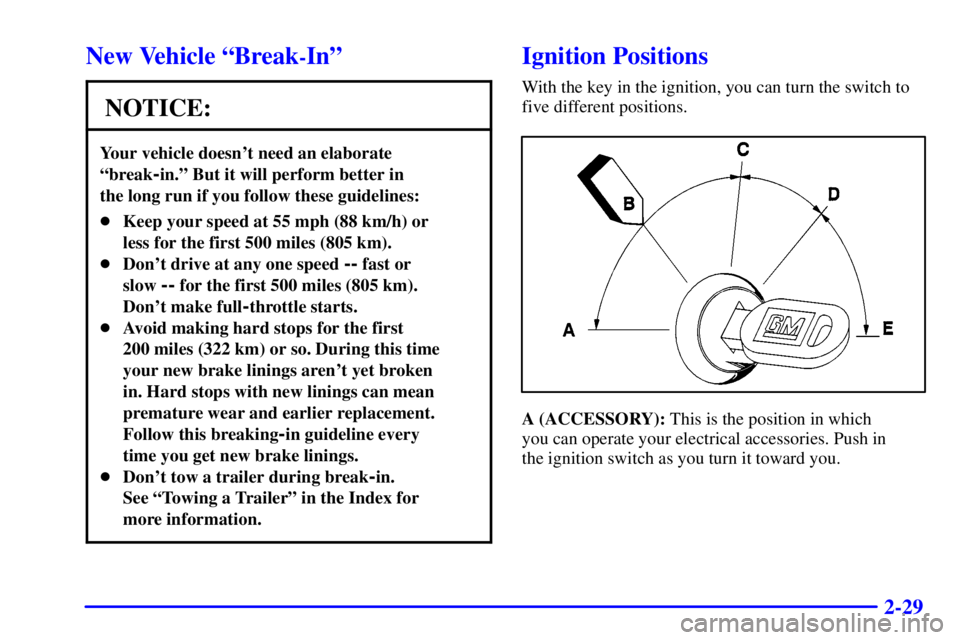
Ignition Positions
With the key in the ignition, you can turn the switch to
five different positions.
A (ACCESSORY): This is the position in which
you can operate your electrical accessories. Push in
the ignition switch as you turn it toward you.
Page 86 of 359
: This is the only position from which you
can remove the key. This position locks your steering
wheel, ignition and automatic transmission.
If you have an automatic transmission, the ign")
2-30
B (LOCK): This is the only position from which you
can remove the key. This position locks your steering
wheel, ignition and automatic transmission.
If you have an automatic transmission, the ignition
switch can't be turned to LOCK unless the shift lever
is in PARK (P).
CAUTION:
On manual transmission vehicles, turning the key
to LOCK will lock the steering column and result
in a loss of ability to steer the vehicle. This could
cause a collision. If you need to turn the engine
off while the vehicle is moving, turn the key only
to OFF. Don't press the key release button while
the vehicle is moving.
NOTICE:
If your key seems stuck in LOCK and you can't
turn it, be sure you are using the correct key;
if so, is it all the way in? If it is, then turn the
steering wheel left and right while you turn the
key hard. Turn the key only with your hand.
Using a tool to force it could break the key or the
ignition switch. If none of this works, then your
vehicle needs service.
C (OFF): This position unlocks the steering wheel,
ignition and automatic transmission, but does not send
electrical power to any accessories. Use this position
if your vehicle must be pushed or towed. A warning
tone will sound if you open the driver's door when the
ignition is off and the key is in the ignition.
D (RUN): This is the position the switch returns to after
you start your engine and release the switch. The switch
stays in RUN when the engine is running. But even
when the engine is not running, you can use RUN to
operate your electrical power accessories and to display
some instrument panel warning and indicator lights.
Page 92 of 359
2-36
Automatic Transmission Operation
There are several different positions for your shift lever.PARK (P): This position locks your rear wheels. It's the
best position to use when you start your engine because
your vehicle can't move easily.
CAUTION:
It is dangerous to get out of your vehicle if the
shift lever is not fully in PARK (P) with the
parking brake firmly set. Your vehicle can roll.
Don't leave your vehicle when the engine is
running unless you have to. If you have left the
engine running, the vehicle can move suddenly.
You or others could be injured. To be sure your
vehicle won't move, even when you're on fairly
level ground, always set your parking brake and
move the shift lever to PARK (P).
See ªShifting Into PARK (P)º in the Index.
If you're pulling a trailer, see ªTowing a Trailerº
in the Index.
, a special bed made for use in a
motor vehicle, is an infant restraint system designed to
restrain or position a child on a continuous flat su")

: This position locks your rear wheels. Its the
best position to use when you start your engin")