2002 Peugeot 307 Break heating
[x] Cancel search: heatingPage 2 of 128

3YOUR 307 AT A GLANCE
1. Speaker (tweeter) location.
2. Side window demisting vent.
3. Windscreen demisting vents.
4. Passenger air bag.
5. Brightness sensor.
6. Multifunction display.
7. Alarm button.
8. Central locking button.
9. Hazard warning lights switch.
10. ESP/ASR switch*.
11. Lights and direction indicators stalk.
12. Instrument dials.
13. Steering wheel adjustment control. 14. Windscreen wash/wipe
stalk.
Trip computer stalk.
15. Driver's air bag. Horn.
16. Radio remote control stalk.
17. Headlamp height adjustment.
18. Electric mirror controls. Window controls. Rear window lockingcontrol.
19. Steering lock and ignition.
20. Cruise control switch.
21. 12 V accessories socket
22. Passenger air bag disarming switch.
23. Rubbish container.
24. Cup / can holder.
25. Handbrake. 26. Rear footwell heating vent.
27. Gear lever.
28. Front ash tray.
29. Heating / air conditioning
controls.
30. CD changer.
31. RB3 / RD3 audio equipment.
32. Central adjustable heating / ventilation vent and air flow regulation.
33. Side adjustable heating / ventilation vent and airflow regulation.
34. Fuse box.
35. Glove box.
36. Opening the bonnet.
37. Heated seat controls.
* During the year.
Page 11 of 128

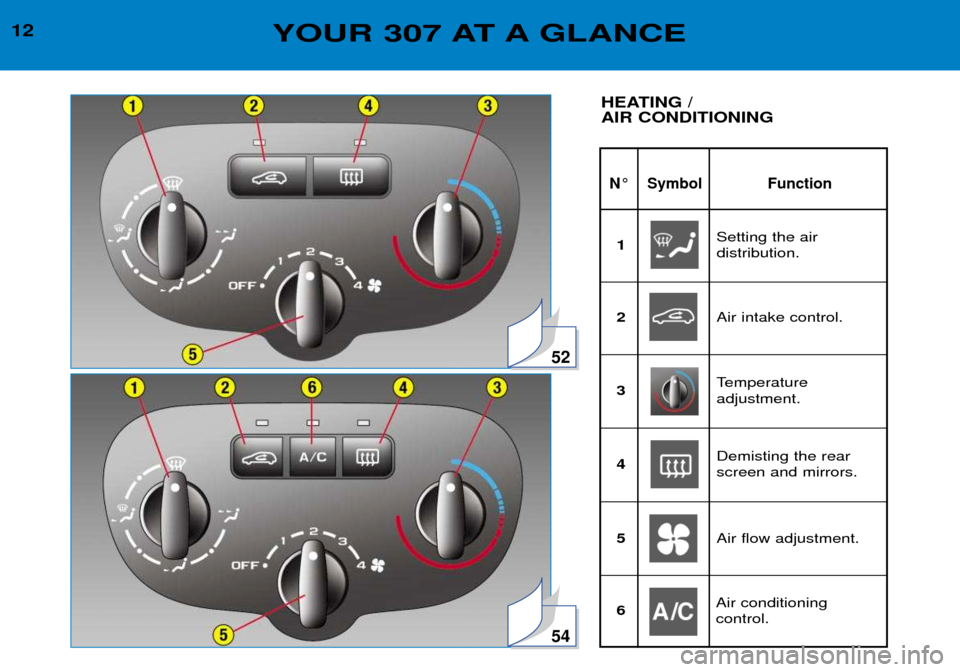
12YOUR 307 AT A GLANCE
N¡ Symbol Function
HEATING / AIR CONDITIONING
52
54
Setting the air distribution.
1
Air intake control.
2
Temperature adjustment.
3
Demisting the rearscreen and mirrors.
4
Air flow adjustment.
5
Air conditioning control.
6
Page 52 of 128

YOUR 307 IN DETAIL
52
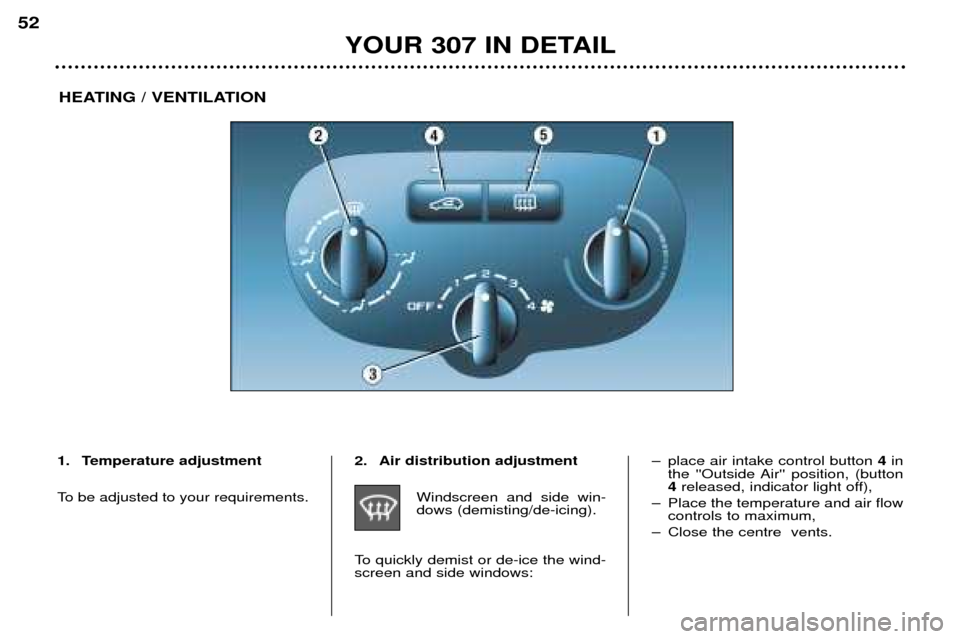
HEATING / VENTILATION
1. Temperature adjustment
To be adjusted to your requirements. 2. Air distribution adjustment
Windscreen and side win- dows (demisting/de-icing).
To quickly demist or de-ice the wind-screen and side windows: Ð place air intake control button
4in
the ''Outside Air'' position, (button4 released, indicator light off),
Ð Place the temperature and air flow controls to maximum,
Ð Close the centre vents.
Page 55 of 128

4. Air flow adjustmentTurn the control from posi- tion 1to position 4to obtain
an air flow sufficient toensure your comfort.
5. Air intake Pressing button 5permits
recirculation of the interior
air. Recirculation, indicatedby illumination of the indica-
tor light, prevents exterior odoursand smoke from entering the pas-senger compartment. Used simultaneously with the air conditioning, recirculation enablesheating and cooling performance tobe improved. Used in a humid climate, recircula- tion may result in misting of the win-dows. As soon as possible, place button 5
in the outside air position, to prevent
deterioration of the air quality. The
indicator light switches off.3. Air distribution adjustment
Windscreen and side win- dows (demisting-de-icing).
To quickly demist or de-ice the wind-screen and side windows:
Ð Place the temperature and air flow controls to maximum,
Ð Close the centre and side vents.
Ð Place air intake control 5in the
"Outside Air" position (button 5
released, indicator light off),
Ð Start the air conditioning by pres- sing the AC button.
Windscreen, side windows and footwells.
Footwells.
Centre and side vents. Important precaution Operate the air conditioning system for 5 to 10 minutes, once or twice amonth, to keep it in perfect working
order. If the system does not produce cold
air, do not activate it and contact a
PEUGEOT dealer.
6. Rear screen demisting
With the engine running, pressing the button oncedemists the rear screen andthe mirrors*.
This switches off automati-
cally after approximately twelve minutes. Pressing again activatesdemisting for a further twelveminutes. It is possible to stop demisting by pressing the button again before theend of the twelve minutes. Note: it is quite normal that the
condensation created by the air conditioning results in a flow of water
under the vehicle when it is stationary.
* According to specification.
YOUR 307 IN DETAIL 55
Page 59 of 128

Never drive with the head restraints remo-ved; they should be inplace and correctlyadjusted.
5. Front heated seats switch*Press the switch. The temperatu-
re is controlled automatically. Pressing the switch again stops operation. Note : the command for activation
of the heating of the seat(s) remains memorised for twominutes after the ignition has been
switched off.
6. Front armrests* These can be folded down andare removable.
To remove the armrest, press the button located between the arm-rest and the side of the seat andpull it.
7. Front head restraint height and angle* adjustment
To raise or lower the restraint, pull it forwards, sliding it at thesame time. The angle of the head restraint can also be adjusted*.
To remove the head restraint, place it in the top position, lift thelug using a coin and pull it for-wards and upwards at the sametime. To put it back in position, locatethe stems of the restraint in theholes, taking care to keep themin line with the seat back.
Active seat back (front seat) This possesses a device to prevent 'whiplash'. When there is an impact from the
rear, the action of the body on theseat back forces the head restraintforwards and upwards, preventingthe head being thrown backwards.
8. Storage drawers* There is a storage drawer under each front seat.
Ð To open it, lift and pull.
Ð To take it out, open it to its full extent, press the ends of the slides
and lift it, then remove it completely.
Do not place heavy objects in thedrawers. Under the seat on the passenger side, the layout of the floor allows forstorage of a first aid kit and a war-ning triangle (small version).
* According to specification. REAR HEAD RESTRAINTS These have a high position for when they are in use and a low position forwhen they are stored.
To lower the head restraints, press the lug. The head restraints are removable.
To remove them, pull upwards as far as the stop then press the lug.
YOUR 307 IN DETAIL
59
The adjustment is correct when the upper edge of thehead restraint is level withthe top of the head.
Page 60 of 128

Never drive with the head restraints remo-ved; they should be inplace and correctlyadjusted.
5. Front heated seats switch*Press the switch. The temperatu-
re is controlled automatically. Pressing the switch again stops operation. Note : the command for activation
of the heating of the seat(s) remains memorised for twominutes after the ignition has been
switched off.
6. Front armrests* These can be folded down andare removable.
To remove the armrest, press the button located between the arm-rest and the side of the seat andpull it.
7. Front head restraint height and angle* adjustment
To raise or lower the restraint, pull it forwards, sliding it at thesame time. The angle of the head restraint can also be adjusted*.
To remove the head restraint, place it in the top position, lift thelug using a coin and pull it for-wards and upwards at the sametime. To put it back in position, locatethe stems of the restraint in theholes, taking care to keep themin line with the seat back.
Active seat back (front seat) This possesses a device to prevent 'whiplash'. When there is an impact from the
rear, the action of the body on theseat back forces the head restraintforwards and upwards, preventingthe head being thrown backwards.
8. Storage drawers* There is a storage drawer under each front seat.
Ð To open it, lift and pull.
Ð To take it out, open it to its full extent, press the ends of the slides
and lift it, then remove it completely.
Do not place heavy objects in thedrawers. Under the seat on the passenger side, the layout of the floor allows forstorage of a first aid kit and a war-ning triangle (small version).
* According to specification. REAR HEAD RESTRAINTS These have a high position for when they are in use and a low position forwhen they are stored.
To lower the head restraints, press the lug. The head restraints are removable.
To remove them, pull upwards as far as the stop then press the lug.
YOUR 307 IN DETAIL
59
The adjustment is correct when the upper edge of thehead restraint is level withthe top of the head.
Page 114 of 128

PRACTICAL INFORMATION109
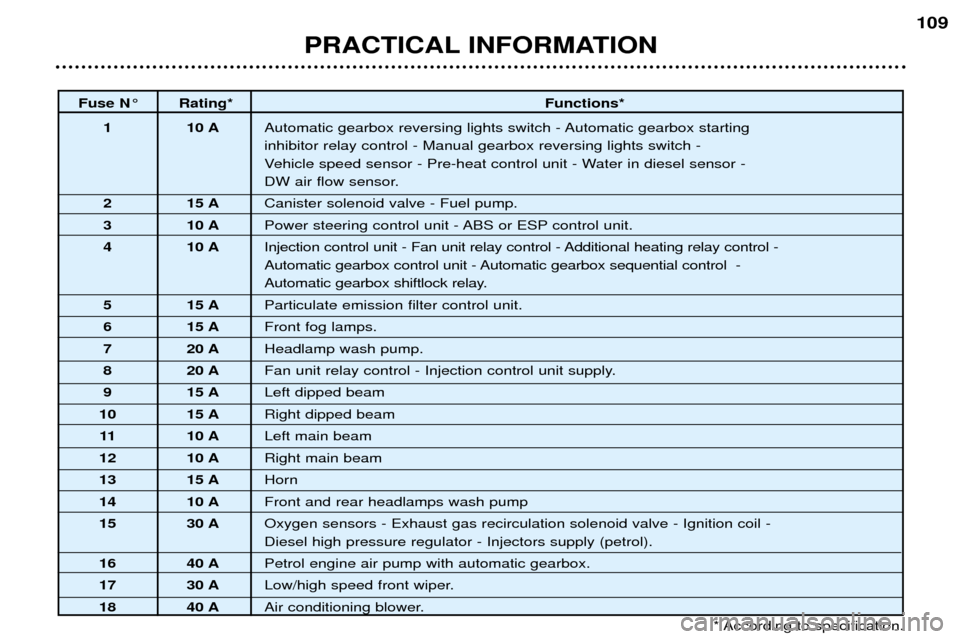
Fuse N¡ Rating*
Functions*
1 10 A Automatic gearbox reversing lights switch - Automatic gearbox starting inhibitor relay control - Manual gearbox reversing lights switch -
Vehicle speed sensor - Pre-heat control unit - Water in diesel sensor -
DW air flow sensor.
2 15 A Canister solenoid valve - Fuel pump.
3 10 A Power steering control unit - ABS or ESP control unit.
4 10 A Injection control unit - Fan unit relay control - Additional heating relay control -
Automatic gearbox control unit - Automatic gearbox sequential control -
Automatic gearbox shiftlock relay.
5 15 A Particulate emission filter control unit.
6 15 A Front fog lamps.
7 20 A Headlamp wash pump.
8 20 A Fan unit relay control - Injection control unit supply.
9 15 A Left dipped beam
10 15 A Right dipped beam
11 10 A Left main beam
12 10 A Right main beam
13 15 A Horn
14 10 A Front and rear headlamps wash pump
15 30 A Oxygen sensors - Exhaust gas recirculation solenoid valve - Ignition coil - Diesel high pressure regulator - Injectors supply (petrol).
16 40 A Petrol engine air pump with automatic gearbox.
17 30 A Low/high speed front wiper.
18 40 A Air conditioning blower.
* According to specification.
Page 117 of 128

CHANGING A WINDSCREEN WIPER BLADE Placing the wiper blades in the maintenance position �Within one minute of switching
off the ignition, activate the wind-screen wiper stalk to position theblades in the centre of the wind-screen (maintenance position).
Replacing a blade � Lift the arm, then unclip the blade and remove it.
� Fit the new blade and fold downthe arm.
Note: the shortest blade is fitted to
the wiper arm on the right side of thevehicle.
To park the blades, switch on the ignition and operate the wind-screen wiper stalk. ECONOMY MODE FUNCTION After the engine has stopped, certain
functions (windscreen wiper, electricwindows, sunroof*, courtesy lights,audio equipment etc.) can only beused for a total time of thirty minutes,
to prevent discharging the battery.
Once the thirty minutes are over, the message
"Economy mode active"
appears on the multifunction displayand the active functions are put on
standby.
To resume use of these functions, start the engine and allow it to run fora few seconds.
WARNING: a flat battery will prevent
the engine from starting. LOAD REDUCTION When driving, certain functions (air conditioning*, heated rear screen,heating system for passenger com-partment of diesel vehicles, etc.)
may be switched off temporarily,depending on the level of batterycharge. Reactivation of these functions is automatic, once the battery charge is
sufficient. Note:
at the risk of discharging the
battery, the functions switched off
may be reactivated manually.
* According to specification.
PRACTICAL INFORMATION
110