2002 NISSAN XTERRA Interval
[x] Cancel search: IntervalPage 124 of 263

CD Loading
Press the LOAD button to start CD loading
mode.
The following sequence will occur:
1. Thegreenindicator on the lowest avail-
able disc select button will start blinking.
(Same as preset memory button). The
display showsªPlease Waitº.
2. The display changes toªInsert Discºfor
a maximum of 15 seconds.3. During the 15 second interval, insert the
disc. The display changes toªLoading
Discº.
4. The CD will play after the disc is set to a
play position.
5. The indicator changes fromblinking
greentosolid greenand the display
changes to show the Disc number icon,
Disc number, Track number and Elapsed
time.
All disc loading
1. Press and hold the LOAD button until the
radio beeps (>1.5 seconds).
2. Thegreenindicator on the lowest avail-
able disc select button will start blinking.
(Same as preset memory button). The
display showsªPlease Waitº.
3. The display changes toªInsert Discºfor
a maximum of 15 seconds.
4. During the 15 second interval, insert the
disc. The display changes toªLoading
Discº.
5. The indicator changes fromblinking
greentosolid green.
6. The disc number icon is turned on.7. Steps 2-5 are repeated until all discs are
loaded, then the last loaded disc will
begin to play. The display shows the Disc
number, Track number and Elapsed
Time.
Selected disc loading
1. Press a disc select button whose indica-
tor is off. The display showsªPlease
Waitº.
2. Thegreenindicator starts blinking and
the display showsªInsert Discºfor 15
seconds.
3. Insert the CD. The display showsªLoad-
ing Discº.
4. The CD will play after the disc is set to a
play position.
5. The indicator color changes fromblink-
ing greentosolid greenand the display
shows the Disc icon, Disc number, Track
number and Elapsed Time.
If a disc is not inserted within 15 seconds or
if the load button is pressed during load
sequence, the entire disc load sequence will
be canceled.
LHA0075
Heater, air conditioner and audio systems4-25
ZX
Page 168 of 263

ONever jack up the vehicle more than
necessary.
ONever use blocks on or under the
jack.
ONever use the tool tray as a jacking
surface.
ODo not allow passengers to stay in
the vehicle while it is on the jack.
ODo not start or run engine while
vehicle is on the jack. It may cause
the vehicle to move. This is espe-
cially true for vehicles with limited
slip differential carriers.
WARNING
OIncorrect wheel nuts or improperly
tightened wheel nuts can cause the
wheel to become loose or come off.
This could cause an accident.
ODo not use oil or grease on the wheel
studs or nuts. This could cause the
nuts to become loose.
Installing the spare tire
1. Clean any mud or dirt from the surface
between the wheel and hub.
2. Carefully put the spare tire on and tighten
the wheel nuts finger tight.
3. With the wheel nut wrench, tighten the
wheel nuts alternately and evenly until
they are tight.
4. Lower the vehicle slowly until the tire
touches the ground. Then, with the wheel
nut wrench, tighten the wheel nuts se-
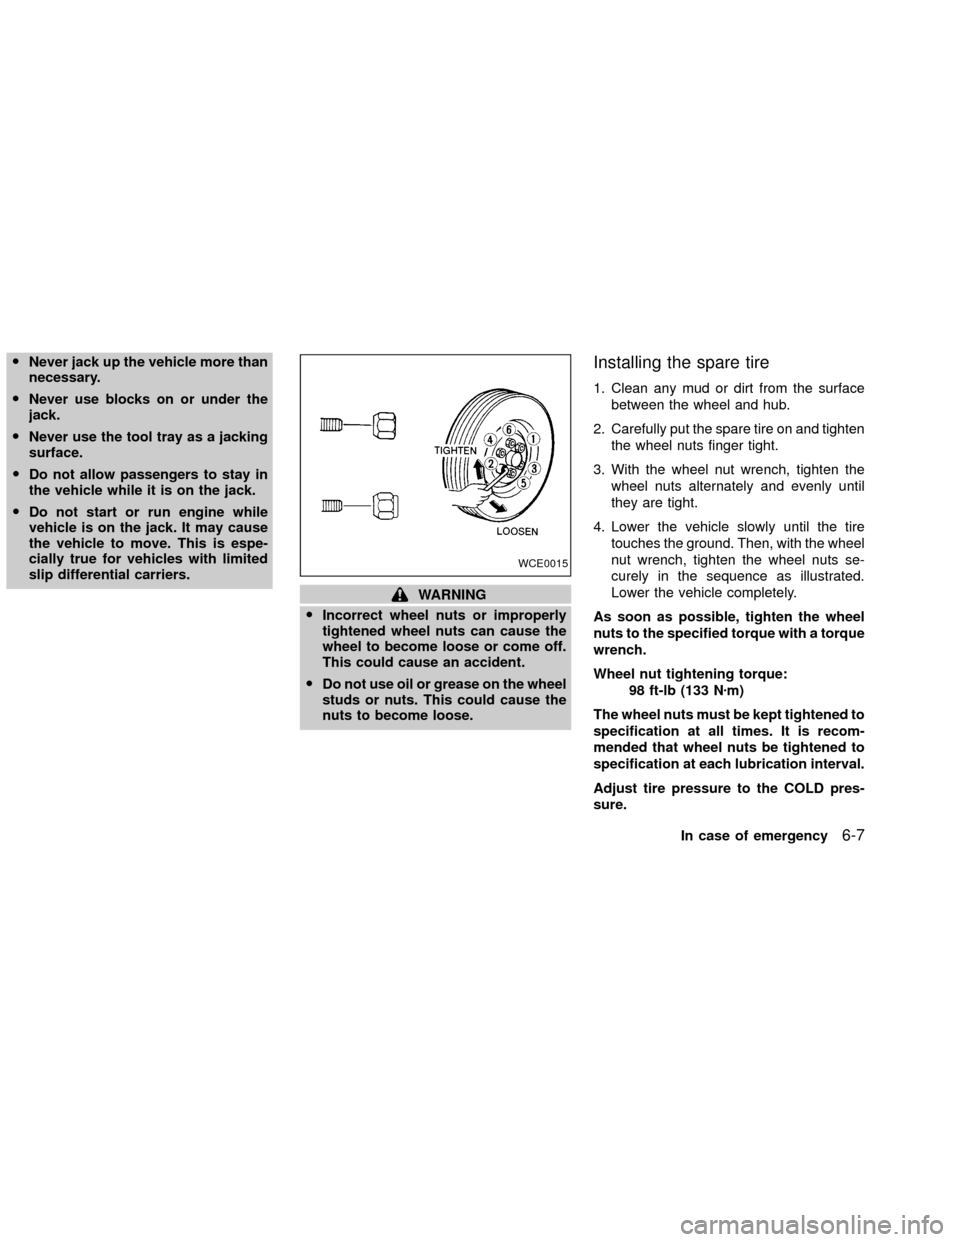
curely in the sequence as illustrated.
Lower the vehicle completely.
As soon as possible, tighten the wheel
nuts to the specified torque with a torque
wrench.
Wheel nut tightening torque:
98 ft-lb (133 Nzm)
The wheel nuts must be kept tightened to
specification at all times. It is recom-
mended that wheel nuts be tightened to
specification at each lubrication interval.
Adjust tire pressure to the COLD pres-
sure.
WCE0015
In case of emergency6-7
ZX
Page 185 of 263

Your new NISSAN has been designed to
have minimum maintenance requirements
with longer service intervals to save you
both time and money. However, some day-
to-day and regular maintenance is essential
to maintain your NISSAN's good mechani-
cal condition, as well as its emission and
engine performance.
It is the owner's responsibility to make sure
that the scheduled maintenance, as well as
general maintenance, is performed.
As the vehicle owner, you are the only one
who can ensure that your vehicle receives
proper maintenance. You are a vital link in
the maintenance chain.
Scheduled maintenance
For your convenience, both required and
optional scheduled maintenance items are
described and listed in your ``NISSAN Ser-
vice and Maintenance Guide.'' You must
refer to that guide to ensure that necessary
maintenance is performed on your NISSAN
at regular intervals.
General maintenance
General maintenance includes those items
which should be checked during normalday-to-day operation of the vehicle. They
are essential if your vehicle is to continue to
operate properly. It is your responsibility to
perform these maintenance procedures
regularly as prescribed.
Performing general maintenance checks re-
quires minimal mechanical skill and only a
few general automotive tools.
These checks or inspections can be done
by yourself, a qualified technician or, if you
prefer, an authorized NISSAN dealer.
Where to go for service
If maintenance service is required or your
vehicle appears to malfunction, have the
systems checked and tuned by an autho-
rized NISSAN dealer.
NISSAN technicians are well-trained spe-
cialists who and are kept up-to-date with the
latest service information through technical
bulletins, service tips, and in-dealership
training programs. They are completely
qualified to work on NISSAN vehicles
beforethey work on your vehicle, rather
than after they have worked on it.
You can be confident that an authorized
NISSAN dealer's service department per-forms the best job to meet the maintenance
requirements on your vehicle Ð in a reliable
and economic way.
MAINTENANCE
REQUIREMENTS
8-2Maintenance and do-it-yourself
ZX
Page 195 of 263

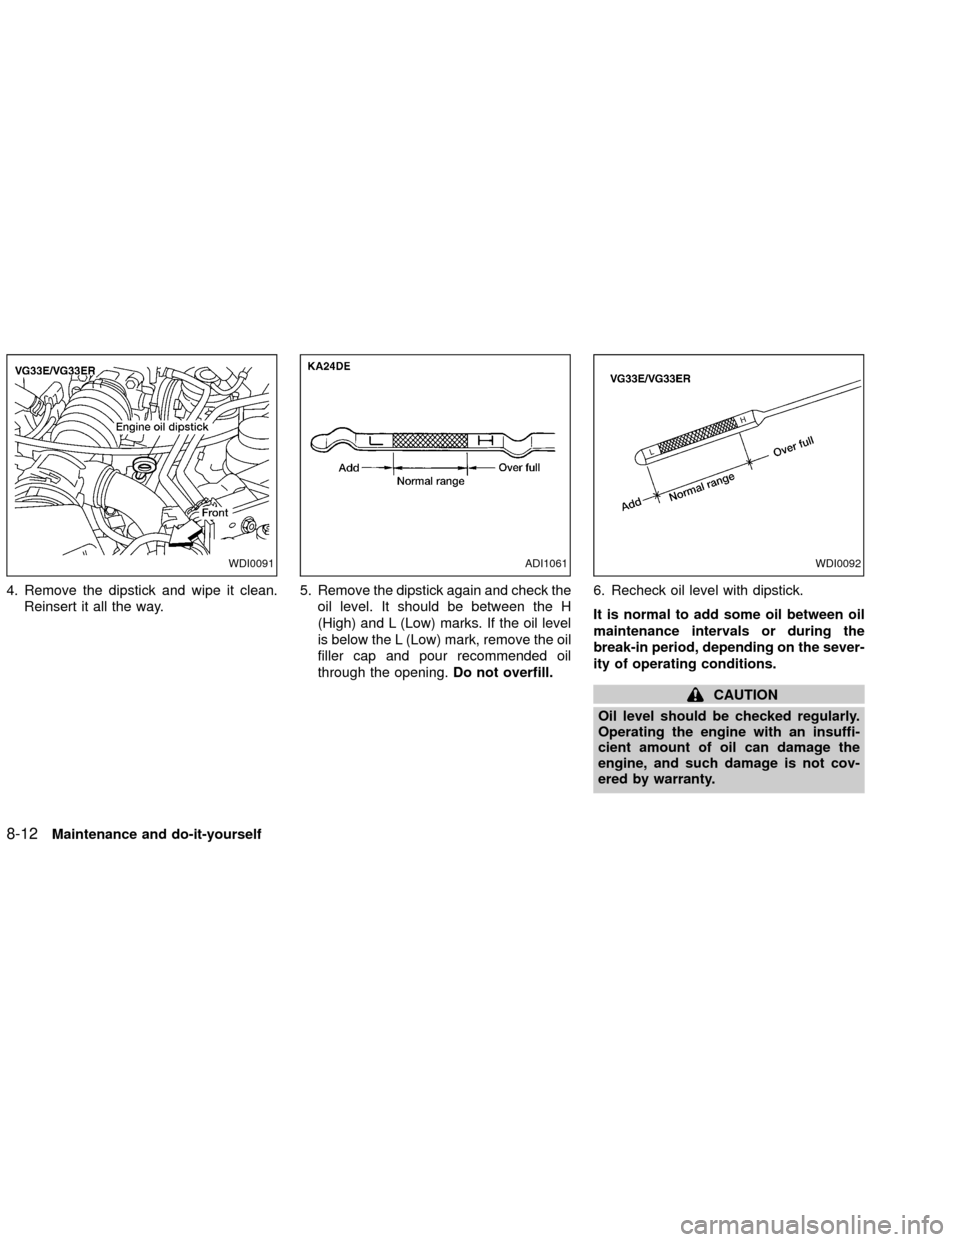
4. Remove the dipstick and wipe it clean.
Reinsert it all the way.5. Remove the dipstick again and check the
oil level. It should be between the H
(High) and L (Low) marks. If the oil level
is below the L (Low) mark, remove the oil
filler cap and pour recommended oil
through the opening.Do not overfill.6. Recheck oil level with dipstick.
It is normal to add some oil between oil
maintenance intervals or during the
break-in period, depending on the sever-
ity of operating conditions.
CAUTION
Oil level should be checked regularly.
Operating the engine with an insuffi-
cient amount of oil can damage the
engine, and such damage is not cov-
ered by warranty.
WDI0091ADI1061WDI0092
8-12Maintenance and do-it-yourself
ZX
Page 206 of 263

Spark plug tightening torque:
14 to 22 ft-lb (20 to 29 Nzm)
4. Reconnect the spark plug cables to their
original positions.
REPLACING SPARK PLUGS (with
supercharger)
Please see your authorized NISSAN dealer
for assistance.
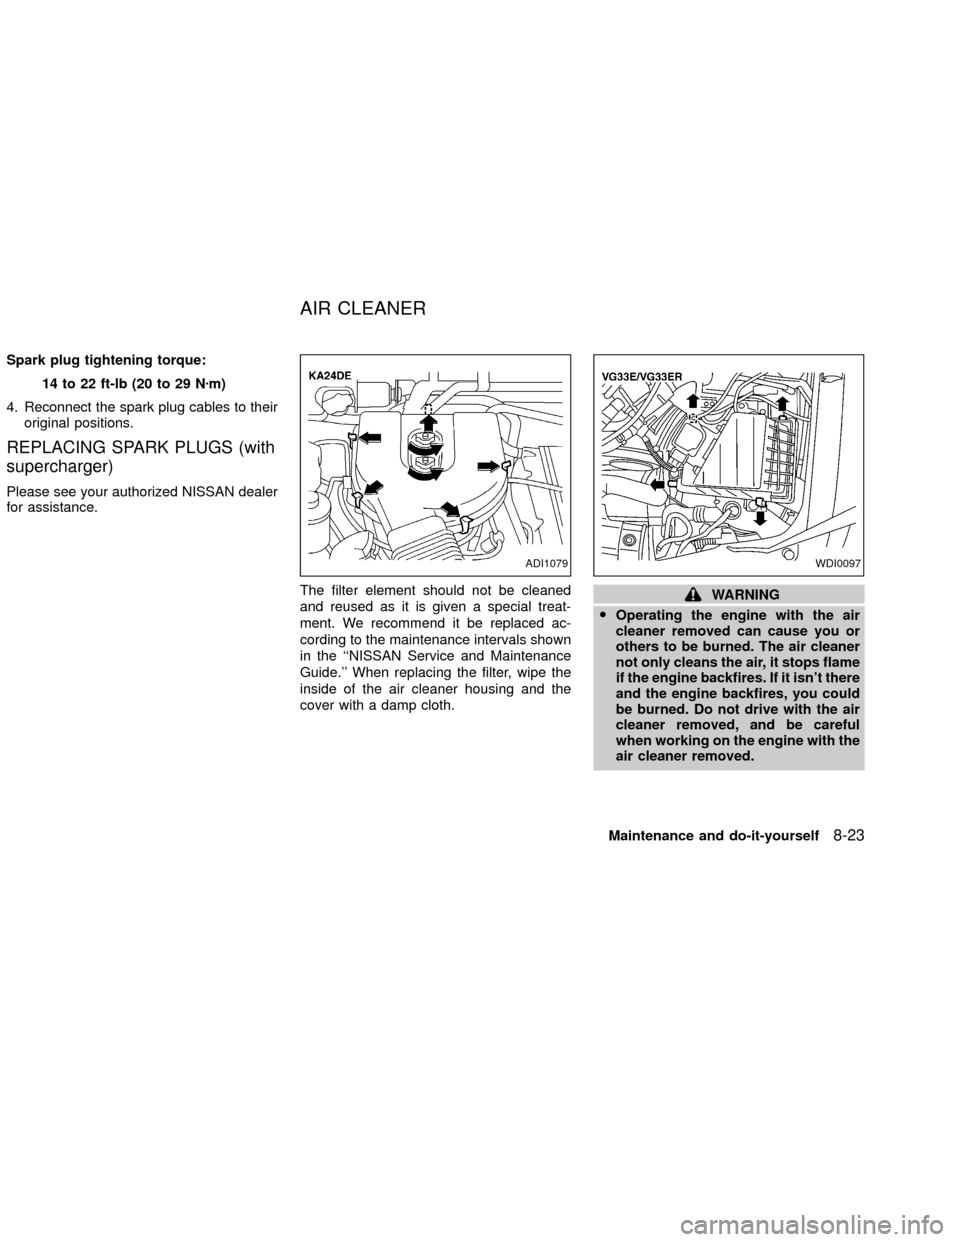
The filter element should not be cleaned
and reused as it is given a special treat-
ment. We recommend it be replaced ac-
cording to the maintenance intervals shown
in the ``NISSAN Service and Maintenance
Guide.'' When replacing the filter, wipe the
inside of the air cleaner housing and the
cover with a damp cloth.
WARNING
OOperating the engine with the air
cleaner removed can cause you or
others to be burned. The air cleaner
not only cleans the air, it stops flame
if the engine backfires. If it isn't there
and the engine backfires, you could
be burned. Do not drive with the air
cleaner removed, and be careful
when working on the engine with the
air cleaner removed.
ADI1079WDI0097
AIR CLEANER
Maintenance and do-it-yourself8-23
ZX
Page 211 of 263

Self-adjusting brakes
Your vehicle is equipped with self-adjusting
brakes.
The front disc-type brakes self-adjust every
time the brake pedal is applied. The rear
drum-type brakes on two-wheel drive trucks
self-adjust every time the parking brake is
applied. The rear drum-type brakes on four-
wheel drive trucks self-adjust every time the
brake pedal is applied. If the brake pedal
goes down farther than normal, it may be
due to a lack of adjustment of the rear drum
brakes. Apply the parking brake several
times.
WARNING
If the brake pedal height does not re-
turn to normal, see an authorized NIS-
SAN dealer and have it checked.
Brake pad wear indicators
The disc brake pads on your vehicle have
audible wear indicators. When a brake pad
requires replacement, it will make a high
pitched scraping or screeching sound when
the vehicle is in motion whether or not the
brake pedal is depressed. Have the brakeschecked as soon as possible if the wear
indicator sound is heard.
Under some driving or climate conditions,
occasional brake squeak, squeal or other
noise may be heard. Occasional brake
noise during light to moderate stops is nor-
mal and does not affect the function or
performance of the brake system.
The rear drum brakes (if so equipped) do
not have audible wear indicators. Should
you ever hear an unusually loud noise from
the rear drum brakes, have them inspected
as soon as possible by an authorized NIS-
SAN dealer.
Proper brake inspection intervals should
be followed.For more information regard-
ing brake inspections, see the appropriate
maintenance schedule information in the
``NISSAN Service and Maintenance Guide.''
BRAKE BOOSTER
Check the brake booster function with the
following steps:
1. With the engine off, press and release
the brake pedal several times. When
brake pedal movement (distance of
travel) remains the same from one pedalapplication to the next, continue on to
next step.
2. While depressing the brake pedal, start
the engine. The pedal height should drop
a little.
3. With the brake pedal depressed, stop the
engine. Keeping the pedal depressed for
about 30 seconds, the pedal height
should not change.
4. Run the engine for one minute without
depressing the brake pedal, then turn it
off. Depress the brake pedal several
times. The pedal travel distance will de-
crease gradually with each depression
as the vacuum is released from the
booster.
If the brakes do not operate properly, have
the brakes checked by an authorized
NISSAN dealer.
8-28Maintenance and do-it-yourself
ZX
Page 231 of 263

ENGINE OIL AND OIL FILTER
RECOMMENDATION
Selecting the correct oil
It is essential to choose engine oil with the
correct quality and viscosity to ensure sat-
isfactory engine life and performance.
NISSAN recommends the use of a low
friction oil (energy conserving oil) in order to
improve fuel economy and conserve en-
ergy. Oils which do not have the specified
quality label should not be used as they
could cause engine damage.Only those engine oils with the American
Petroleum Institute (API) CERTIFICATION
MARK on the front of the container should
be used. This type of oil supersedes the
existing API SG, SH or SJ and Energy
ConservingI&IIcategories.
If you cannot find engine oil with the API
CERTIFICATION MARK, use an API grade
SG/SH, Energy ConservingI&IIorAPI
grade SJ, Energy Conserving oil. An oil with
a single designation SG or SH, or in combi-
nation with other categories (for example,
SG/CC or SG/CD) may also be used if one
with the API CERTIFICATION MARK cannotbe found. An ISLAC grade GF-I & GF-II oil
can also be used.
Mineral based or synthetic type oils may be
used in your NISSAN vehicle. These oils
must however, meet the API quality and
SAE viscosity ratings specified for your ve-
hicle. Do not mix mineral based and syn-
thetic type oils in the engine.
Oil additives
NISSAN does not recommend the use of oil
additives. The use of an oil additive is not
necessary when the proper oil type is used
and maintenance intervals are followed.
Oil which may contain foreign matter or has
been previously used should not be used.
Oil viscosity
The engine oil viscosity or thickness
changes with temperature. Because of this,
it is important that the engine oil viscosity be
selected based on the temperatures at
which the vehicle will be operated before
the next oil change. The chart ``Recom-
mended SAE viscosity number'' shows the
recommended oil viscosities for the ex-
pected ambient temperatures. Choosing an
oil viscosity other than that recommended
WTI0033
9-6Technical and consumer information
ZX
Page 232 of 263

could cause serious engine damage.
Selecting the correct oil filter
Your new NISSAN vehicle is equipped with
a high-quality genuine NISSAN oil filter.
When replacing, use a genuine NISSAN oil
filter or its equivalent for the reason de-
scribed in ``Change intervals''.
Change intervals
The oil and oil filter change intervals for your
engine are based on the use of the specified
quality oils and filters. Oil and filter other
than the specified quality, or oil and filter
change intervals longer than recommended
could reduce engine life. Damage to the
engine caused by improper maintenance or
use of incorrect oil and filter quality and/or
viscosity is not covered by the new NISSAN
vehicle warranties.
Your engine was filled with a high quality
engine oil when it was built. You do not have
to change the oil before the first recom-
mended change interval. Oil and filter
change intervals depend upon how you use
your vehicle. Operation under the following
conditions may require more frequent oil
and filter changes:Ð repeated short distance driving at cold
outside temperatures,
Ð driving in dusty conditions,
Ð extensive idling,
Ð towing a trailer.
RECOMMENDED SAE
VISCOSITY NUMBER
OSAE 5W-30 viscosity oil is preferred
for all temperatures. SAE 10W-30, SAE
10W-40 viscosity oils may be used if
the ambient temperature is above 0ÉF
(-18ÉC).
ATI1028
Technical and consumer information9-7
ZX