Page 125 of 263
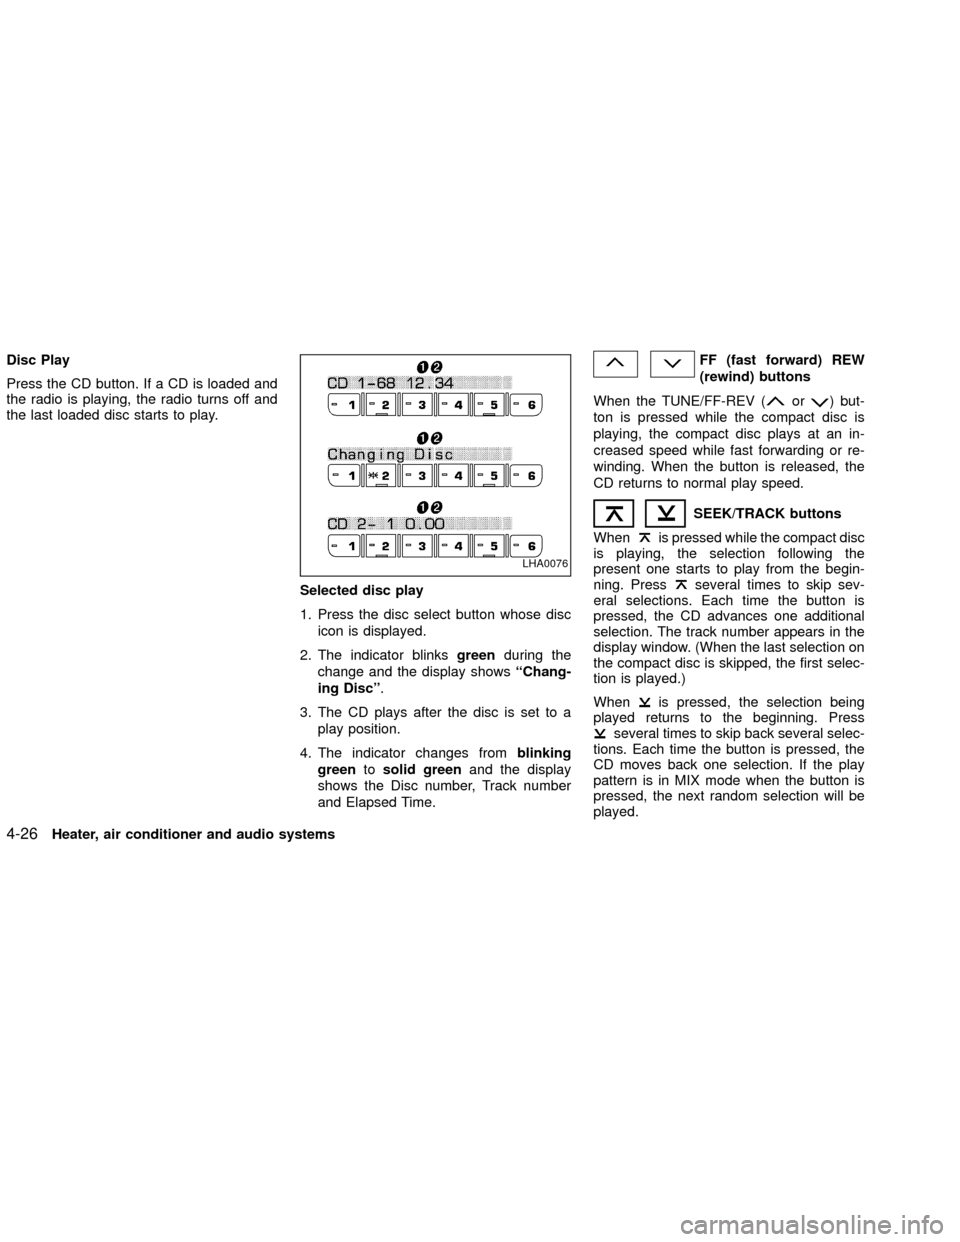
Disc Play
Press the CD button. If a CD is loaded and
the radio is playing, the radio turns off and
the last loaded disc starts to play.
Selected disc play
1. Press the disc select button whose disc
icon is displayed.
2. The indicator blinksgreenduring the
change and the display showsªChang-
ing Discº.
3. The CD plays after the disc is set to a
play position.
4. The indicator changes fromblinking
greentosolid greenand the display
shows the Disc number, Track number
and Elapsed Time.FF (fast forward) REW
(rewind) buttons
When the TUNE/FF-REV (
or) but-
ton is pressed while the compact disc is
playing, the compact disc plays at an in-
creased speed while fast forwarding or re-
winding. When the button is released, the
CD returns to normal play speed.
SEEK/TRACK buttons
When
is pressed while the compact disc
is playing, the selection following the
present one starts to play from the begin-
ning. Press
several times to skip sev-
eral selections. Each time the button is
pressed, the CD advances one additional
selection. The track number appears in the
display window. (When the last selection on
the compact disc is skipped, the first selec-
tion is played.)
When
is pressed, the selection being
played returns to the beginning. Press
several times to skip back several selec-
tions. Each time the button is pressed, the
CD moves back one selection. If the play
pattern is in MIX mode when the button is
pressed, the next random selection will be
played.
LHA0076
4-26Heater, air conditioner and audio systems
ZX
Page 126 of 263
Repeat/Mix
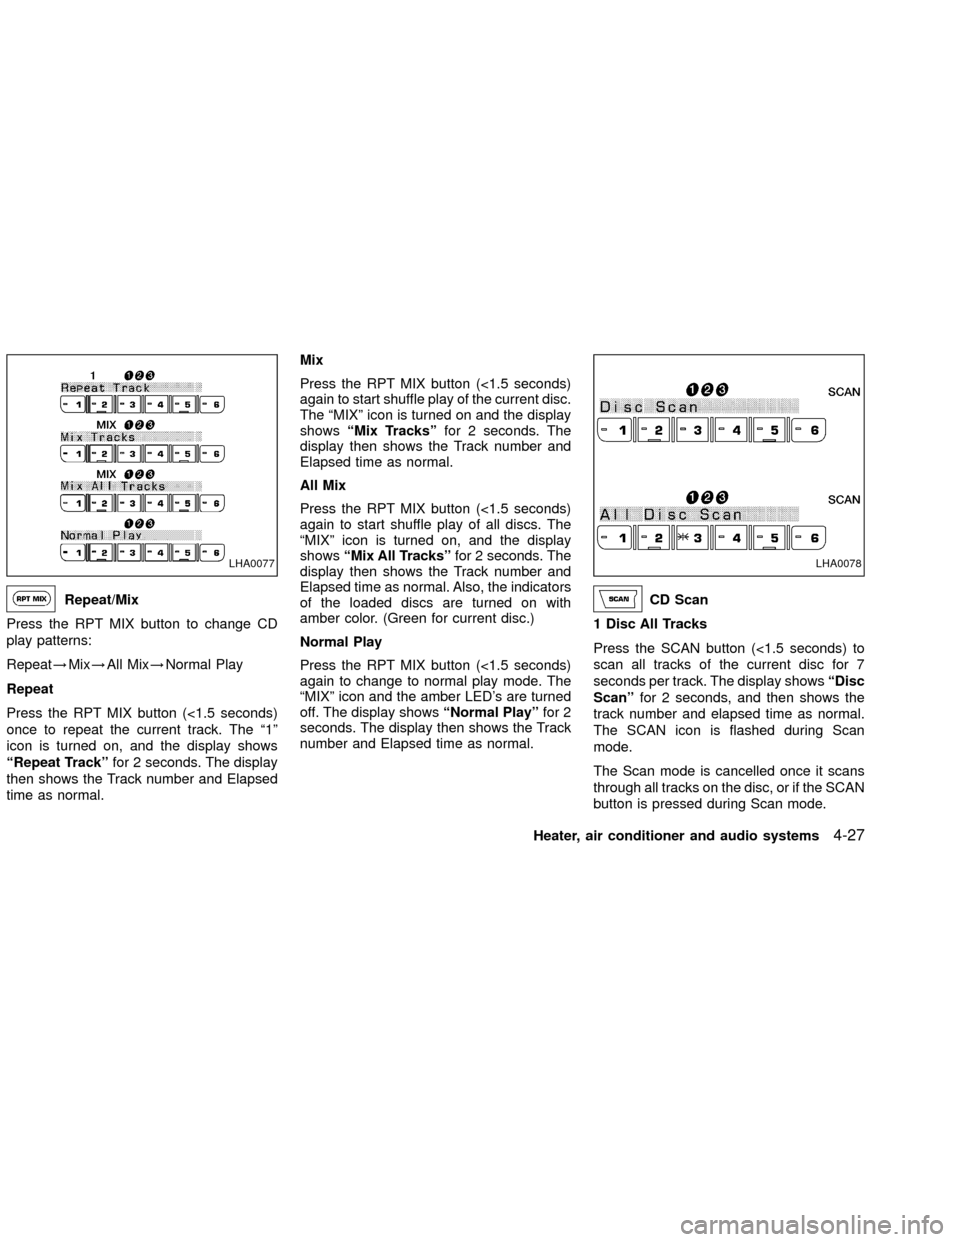
Press the RPT MIX button to change CD
play patterns:
Repeat!Mix!All Mix!Normal Play
Repeat
Press the RPT MIX button (<1.5 seconds)
once to repeat the current track. The ª1º
icon is turned on, and the display shows
ªRepeat Trackºfor 2 seconds. The display
then shows the Track number and Elapsed
time as normal.Mix
Press the RPT MIX button (<1.5 seconds)
again to start shuffle play of the current disc.
The ªMIXº icon is turned on and the display
showsªMix Tracksºfor 2 seconds. The
display then shows the Track number and
Elapsed time as normal.
All Mix
Press the RPT MIX button (<1.5 seconds)
again to start shuffle play of all discs. The
ªMIXº icon is turned on, and the display
showsªMix All Tracksºfor 2 seconds. The
display then shows the Track number and
Elapsed time as normal. Also, the indicators
of the loaded discs are turned on with
amber color. (Green for current disc.)
Normal Play
Press the RPT MIX button (<1.5 seconds)
again to change to normal play mode. The
ªMIXº icon and the amber LED's are turned
off. The display showsªNormal Playºfor 2
seconds. The display then shows the Track
number and Elapsed time as normal.CD Scan
1 Disc All Tracks
Press the SCAN button (<1.5 seconds) to
scan all tracks of the current disc for 7
seconds per track. The display showsªDisc
Scanºfor 2 seconds, and then shows the
track number and elapsed time as normal.
The SCAN icon is flashed during Scan
mode.
The Scan mode is cancelled once it scans
through all tracks on the disc, or if the SCAN
button is pressed during Scan mode.
LHA0077LHA0078
Heater, air conditioner and audio systems4-27
ZX
Page 127 of 263
All Discs, 1 Track
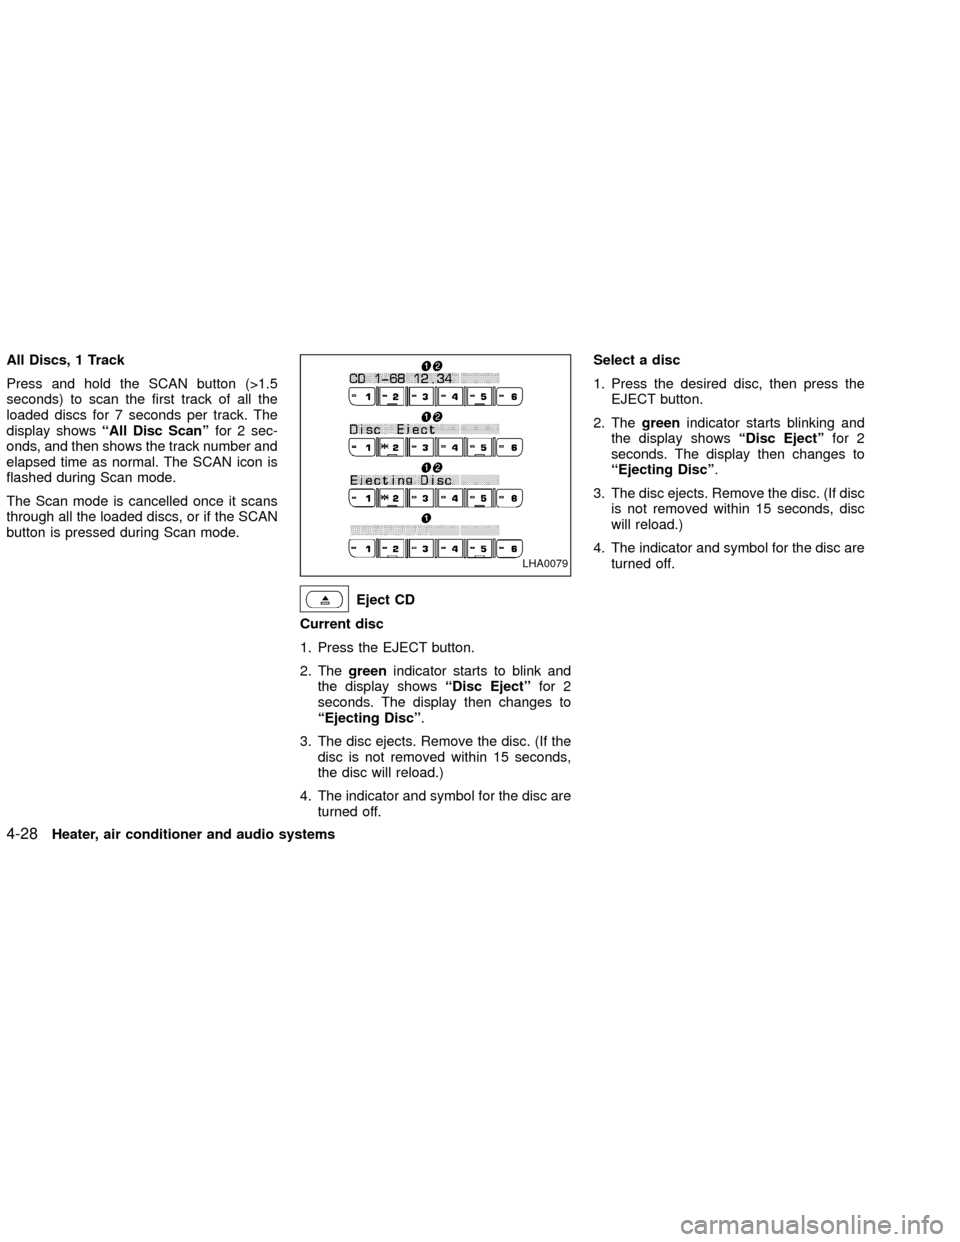
Press and hold the SCAN button (>1.5
seconds) to scan the first track of all the
loaded discs for 7 seconds per track. The
display showsªAll Disc Scanºfor 2 sec-
onds, and then shows the track number and
elapsed time as normal. The SCAN icon is
flashed during Scan mode.
The Scan mode is cancelled once it scans
through all the loaded discs, or if the SCAN
button is pressed during Scan mode.
Eject CD
Current disc
1. Press the EJECT button.
2. Thegreenindicator starts to blink and
the display showsªDisc Ejectºfor 2
seconds. The display then changes to
ªEjecting Discº.
3. The disc ejects. Remove the disc. (If the
disc is not removed within 15 seconds,
the disc will reload.)
4. The indicator and symbol for the disc are
turned off.Select a disc
1. Press the desired disc, then press the
EJECT button.
2. Thegreenindicator starts blinking and
the display showsªDisc Ejectºfor 2
seconds. The display then changes to
ªEjecting Discº.
3. The disc ejects. Remove the disc. (If disc
is not removed within 15 seconds, disc
will reload.)
4. The indicator and symbol for the disc are
turned off.
LHA0079
4-28Heater, air conditioner and audio systems
ZX
Page 128 of 263

All discs
1. Press and hold the EJECT button until it
beeps (>1.5 seconds).
2. Lowest used disc number indicator blinks
greenand display showsªAll DiscEjectºfor 2 seconds. The display then
changes toªEjecting Discº.
3. When a disc is removed, the indicator
and disc icon will be turned off, and then
the next disc will emerge, and so on.
4. The display will be turned off after all
discs are ejected and removed.
If a disc is not removed within 15 seconds,
or if the EJECT button is pressed again
during the Eject sequence, the entire disc
Eject sequence will be canceled.
CD CARE AND CLEANING
OHandle a CD by its edges. Never touch the
surface of the disc. Do not bend the disc.
OAlways place the discs in the storage
case when they are not being used.
OTo clean a disc, wipe the surface from the
center to the outer edge using a clean,
soft cloth. Do not wipe the disc using a
circular motion.
Do not use a conventional record cleaner
or alcohol intended for industrial use.
OA new disc may be rough on the inner
and outer edges. Remove the rough
LHA0080
LHA0049
Heater, air conditioner and audio systems4-29
ZX
Page 129 of 263
edges by rubbing the inner and outer
edges with the side of a pen or pencil as
illustrated.
STEERING WHEEL SWITCH FOR
AUDIO CONTROLS (if so
equipped)
The steering wheel switch for audio controls
is mounted on the left side of the steering
wheel.
Press the MODE button to switch between
the Radio presets (A, B or C) and CD Mode.
A!B!C!CD MODE
The last CD that was loaded starts to play
when in CD Mode. If there is no CD loaded,
the CD changer enters Disc Loading Mode.If in Radio presets A, B or C:
OPress
orto advance to the
next preset station or to return to the
previous preset station.
OHold down
orfor more than
1.5 seconds. The radio will seek up or
down to the next radio station.
If in CD Mode:
OPress
orto advance to the
next selection on the CD or return to the
previous selection on the CD.
Volume control is located on the side of the
WHA0128
4-30Heater, air conditioner and audio systems
ZX
Page 130 of 263
audio control switch. Press the top of the
volume control to increase volume. Press
the bottom of the volume control to de-
crease volume.
ANTENNA
The antenna cannot be shortened, but it can
be removed. When you need to remove the
antenna, turn the antenna rod counterclock-
wise.
To install the antenna rod, turn the antenna
clockwise. Tighten the antenna rod to speci-
fication using a suitable tool such as a
open-end wrench. The antenna rod tighten-
ing specification is 2.0 - 2.6 Nzm(18-23
in-lb). Do not use pliers to tighten the an-
tenna as they can leave marks on the
antenna surface. The antenna rod can not
be hand tightened to the proper specifica-
tion.
CAUTION
Always properly tighten the antenna
rod during installation or the antenna
rod may break during vehicle opera-
tion.When installing a CB, ham radio or car
phone in your NISSAN, be sure to observe
the following cautions, otherwise the new
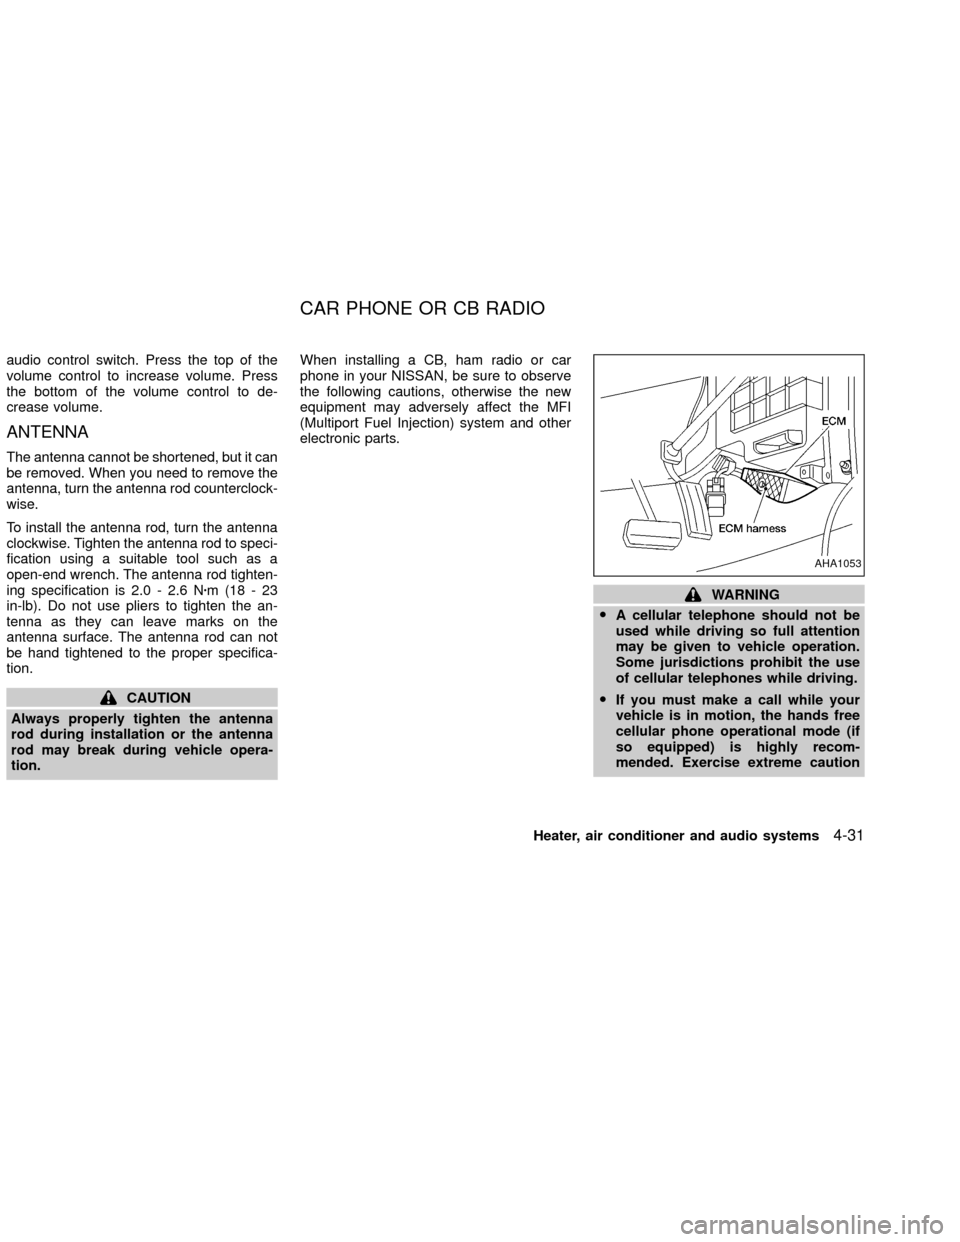
equipment may adversely affect the MFI
(Multiport Fuel Injection) system and other
electronic parts.
WARNING
OA cellular telephone should not be
used while driving so full attention
may be given to vehicle operation.
Some jurisdictions prohibit the use
of cellular telephones while driving.
OIf you must make a call while your
vehicle is in motion, the hands free
cellular phone operational mode (if
so equipped) is highly recom-
mended. Exercise extreme caution
AHA1053
CAR PHONE OR CB RADIO
Heater, air conditioner and audio systems4-31
ZX
Page 131 of 263
at all times so full attention may be
given to vehicle operation.
OIf a conversation in a moving vehicle
requires you to take notes, pull off
the road to a safe location and stop
your vehicle before doing so.
CAUTION
OKeep the antenna as far as possible
away from the Engine Control Mod-
ule (ECM).
OKeep the antenna wire more than 8 in
(20 cm) away from the Multiport Fuel
Injection harness. Do not route the
antenna wire next to any harness.
OAdjust the antenna standing-wave
ratio as recommended by the manu-
facturer.
OConnect the ground wire from the
CB radio chassis to the body.
OFor details, consult an authorized
NISSAN dealer.
4-32Heater, air conditioner and audio systems
ZX
Page 135 of 263
practices could cause you to lose control of
your vehicle.As with any vehicle, a loss
of control could result in a collision with
other vehicles or objects, or cause the
vehicle to rollover, particularly if the loss
of control causes the vehicle to slide
sideways.Be attentive at all times, and
avoid driving when tired. Never drive when
under the influence of alcohol or drugs
(including prescription or over-the-counter
drugs which may cause drowsiness). Al-
ways wear your seat belt as outlined in the
``Seats, restraints and supplemental air bag
systems'' section of this manual, and in-
struct your passengers to do so.
Seat belts help reduce the risk of injury in
collisions and rollovers.In a rollover crash,
an unbelted person is significantly more
likely to die than a person wearing a seat
belt.
DRINKING ALCOHOL/DRUGS
AND DRIVING
WARNING
Never drive under the influence of alco-
hol or drugs. Alcohol in the blood-
stream reduces coordination, delaysreaction time and impairs judgement.
Driving after drinking alcohol increases
the likelihood of being involved in an
accident injuring yourself and others.
Additionally, if you are injured in the
accident, alcohol can increase the se-
verity of injury.
Nissan is committed to safe driving. But,
you must choose not to drive under the
influence of alcohol. Every year thousands
of people are injured or killed in alcohol
related accidents. Although the local laws
vary on what is considered to be legally
intoxicated, the fact is that alcohol affects all
people differently and most people underes-
timate the effects of alcohol.
Remember, drinking and driving don't mix!
And that's true for drugs too (over the
counter, prescription, and illegal drugs).
Don't drive if your ability to operate your
vehicle is impaired by alcohol, drugs, or
some other physical condition.
DRIVING SAFETY PRECAUTIONS
Your NISSAN is designed for both normal
and off-road use. However, avoid driving indeep water or mud as your NISSAN is
mainly designed for leisure use, unlike a
conventional offroad vehicle.
Remember that two-wheel drive models are
less capable than four-wheel drive models
for rough road driving and extrication when
stuck in deep snow or mud, or the like.
Please observe the following precautions:
WARNING
O
Drive carefully when off the road and
avoid dangerous areas. Every person
who drives or rides in this vehicle
should be seated with their seat belt
fastened. This will keep you and your
passengers in position when driving
over rough terrain.
ODo not drive across steep slopes. In-
stead drive either straight up or
straight down the slopes. Off-road ve-
hicles can tip over sideways much
more easily than they can forward or
backward.
5-4Starting and driving
ZX