2002 NISSAN XTERRA ECO mode
[x] Cancel search: ECO modePage 152 of 263

TO SHIFT
TRANSFER CASE:SHIFT PROCEDURE FOR AUTO-LOCK FREE-RUNNING HUBS
From 2H to 4HMove the transfer case shift lever to 4H at speeds below 25 MPH (40 km/h). It is not necessary to depress the clutch pedal. Perform
this operation when driving straight, not while cornering.
From 4H to 2H1. Move the transfer case shift lever to 2H. This can be done at any speed, and it is not necessary to depress the clutch pedal. Per-
form this operation when driving straight, not while cornering.
2. Disengage the AUTO-LOCK hubs following the procedure outlined below.
NOTE:
The 4WD indicator light may not turn off immediately under certain driving conditions, such as when the vehicle is driven
uphill. This is normal and it will shut off as the vehicle is driven further.
AUTO-LOCK HUB DISENGAGEMENT (FREE MODE)
The AUTO-LOCK hubs will not disengage until the vehicle is completely stopped and is then moved in a straight line, approximately
7-10 feet (2-3 m), in the opposite direction of travel. For example:
If you were driving the vehicle forward, stop and move the vehicle 7-10 feet (2-3 m) backward.
If you were driving the vehicle in reverse, stop and move the vehicle 7-10 feet (2-3 m) forward.
It is not necessary to immediately return the AUTO-LOCK hubs to FREE MODE when shifting from 4H to 2H. The vehicle may be
operated under normal 2H conditions with the AUTO-LOCK hubs engaged. However, disengaging the AUTO-LOCK hubs will allow
for better fuel economy, quieter ride and less component wear. Leaving the hubs locked while driving in 2H may be desirable so that
you can easily shift to 4H at speeds greater than 25 MPH (40 km/h).
From 4H to 4L or 4L to
4H1. Stop the vehicle.
2. Depress the clutch pedal, or place the transmission selector lever in the N (Neutral) position.
3. Depress the transfer case shift lever and move it to the 4L or 4H position. Change gears quickly and smoothly.
From 2H to 4L1. Stop the vehicle.
2. Depress the clutch pedal, or place the transmission selector lever in the N (Neutral) position.
3. Depress the transfer case shift lever and move it to the 4L position. Change gears quickly and smoothly.
From 4L to 2H1. Stop the vehicle.
2. Depress the clutch pedal, or place the transmission selector lever in the N (Neutral) position.
3. Depress the transfer case shift lever and move it to the 2H position. Change gears quickly and smoothly.
4. Disengage the AUTO-LOCK hubs following the procedure outlined above.
Starting and driving5-21
ZX
Page 155 of 263
WARNING
ODo not park the vehicle over flam-
mable materials such as dry grass,
waste paper or rags. They may ignite
and cause a fire.
O
The transfer control lever
must be in the 2H, 4H or 4L position
and the parking brake set to prevent
the vehicle from rolling.
ONever place the transfer control le-
ver in the N (Neutral) position. Oth-
erwise, the vehicle could roll unex-pectedly even if the manual trans-
mission is in gear or the automatic
transmission is in the P (Park) posi-
tion. This could result in serious in-
jury or property damage.
OSafe parking procedures require that
both the parking brake be set and
the transmission placed into P (Park)
for automatic transmission models
or in an appropriate gear for manual
transmission models. Failure to do
so could cause the vehicle to move
unexpectedly or roll away and resultin an accident. Make sure the shift
lever has been pushed as far forward
as it can go and cannot be moved
without depressing the foot brake
pedal.
ONever leave the engine running while
the vehicle is left unattended.
O
Do not leave children unattended in-
side the vehicle. They could unknow-
ingly activate switches or controls.
Unattended children could become
involved in serious accidents.
OIf the ATP lamp is ON, this indicates
that the automatic transmission P
(park) position will not function and
the transfer control lever is in the N
(neutral) position. Failure to engage
the transfer control lever in the 2H,
4H or 4L position could result in the
vehicle moving unexpectedly, result-
ing in serious personal injury or
property damage.
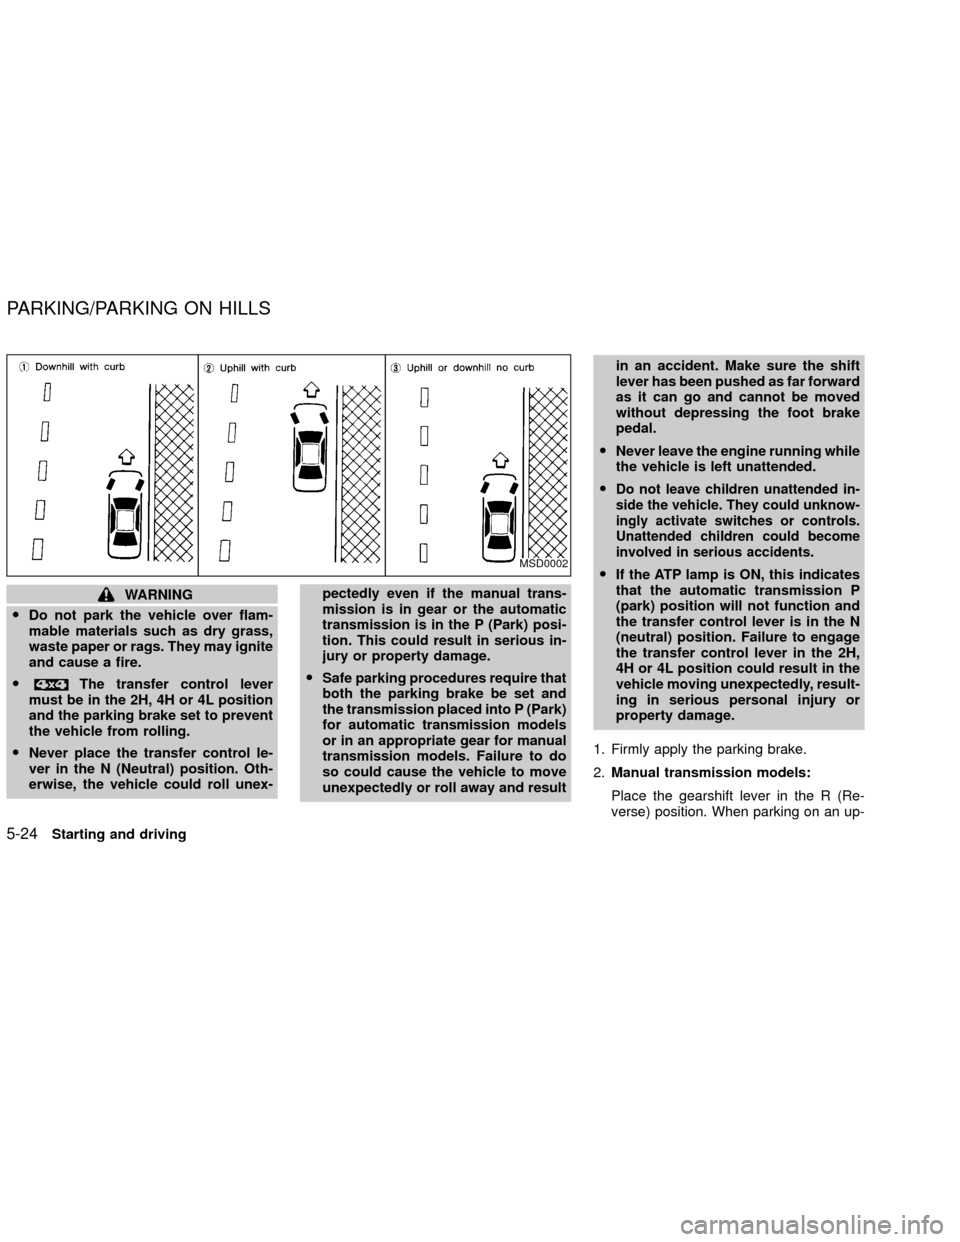
1. Firmly apply the parking brake.
2.Manual transmission models:
Place the gearshift lever in the R (Re-
verse) position. When parking on an up-MSD0002
PARKING/PARKING ON HILLS
5-24Starting and driving
ZX
Page 170 of 263
matic transmission models, move the
lever to P (Park)). Switch off all unneces-
sary electrical systems (lights, heater, air
conditioner, etc.).
3. Remove vent caps on the battery (if so
equipped). Cover the battery with an old
cloth to reduce explosion hazard.
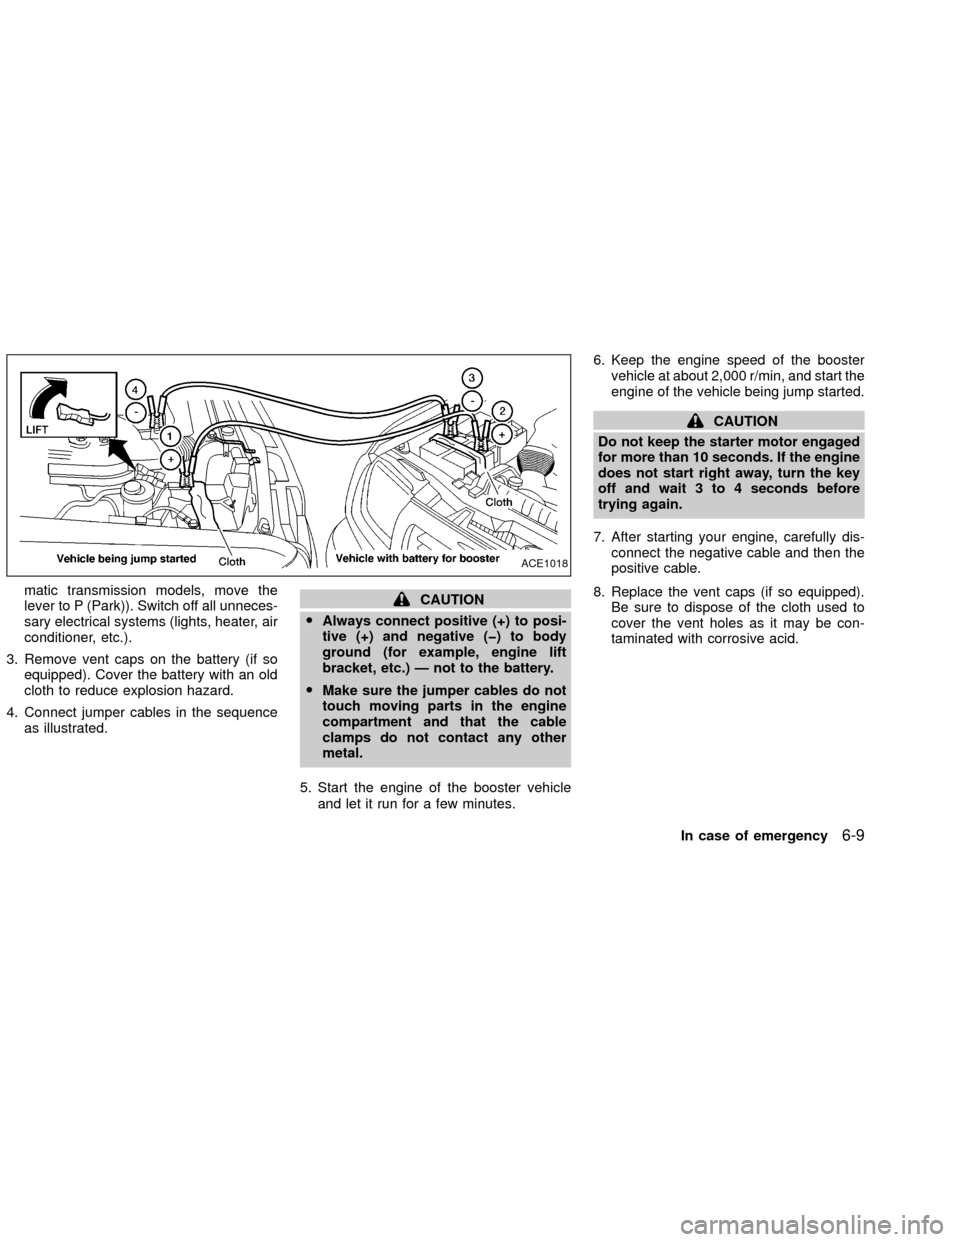
4. Connect jumper cables in the sequence
as illustrated.CAUTION
OAlways connect positive (+) to posi-
tive (+) and negative (þ) to body
ground (for example, engine lift
bracket, etc.) Ð not to the battery.
OMake sure the jumper cables do not
touch moving parts in the engine
compartment and that the cable
clamps do not contact any other
metal.
5. Start the engine of the booster vehicle
and let it run for a few minutes.6. Keep the engine speed of the booster
vehicle at about 2,000 r/min, and start the
engine of the vehicle being jump started.
CAUTION
Do not keep the starter motor engaged
for more than 10 seconds. If the engine
does not start right away, turn the key
off and wait 3 to 4 seconds before
trying again.
7. After starting your engine, carefully dis-
connect the negative cable and then the
positive cable.
8. Replace the vent caps (if so equipped).
Be sure to dispose of the cloth used to
cover the vent holes as it may be con-
taminated with corrosive acid.
ACE1018
In case of emergency6-9
ZX
Page 173 of 263
TOWING RECOMMENDED BY
NISSAN
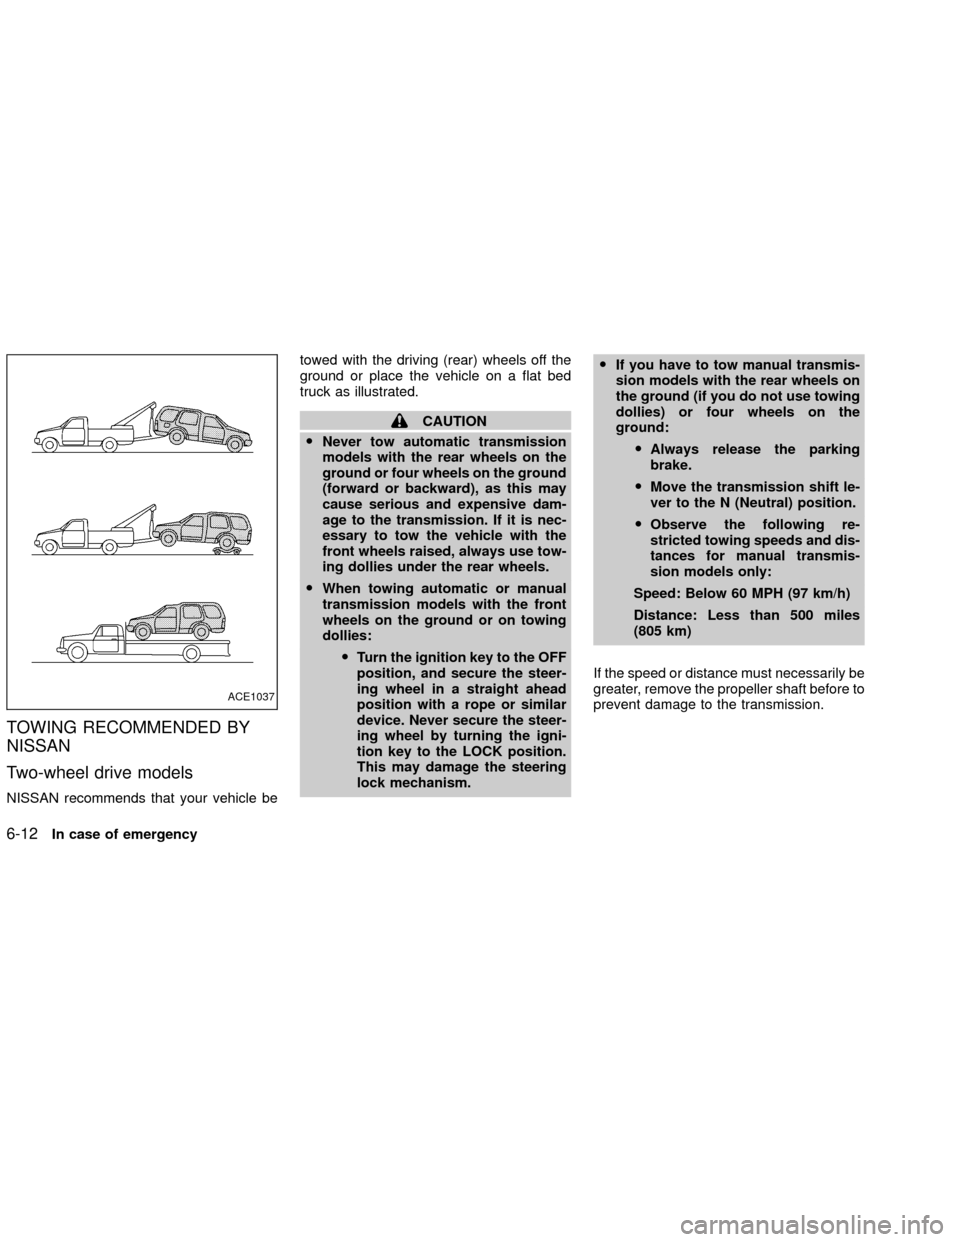
Two-wheel drive models
NISSAN recommends that your vehicle betowed with the driving (rear) wheels off the
ground or place the vehicle on a flat bed
truck as illustrated.
CAUTION
ONever tow automatic transmission
models with the rear wheels on the
ground or four wheels on the ground
(forward or backward), as this may
cause serious and expensive dam-
age to the transmission. If it is nec-
essary to tow the vehicle with the
front wheels raised, always use tow-
ing dollies under the rear wheels.
OWhen towing automatic or manual
transmission models with the front
wheels on the ground or on towing
dollies:
OTurn the ignition key to the OFF
position, and secure the steer-
ing wheel in a straight ahead
position with a rope or similar
device. Never secure the steer-
ing wheel by turning the igni-
tion key to the LOCK position.
This may damage the steering
lock mechanism.OIf you have to tow manual transmis-
sion models with the rear wheels on
the ground (if you do not use towing
dollies) or four wheels on the
ground:
OAlways release the parking
brake.
OMove the transmission shift le-
ver to the N (Neutral) position.
OObserve the following re-
stricted towing speeds and dis-
tances for manual transmis-
sion models only:
Speed: Below 60 MPH (97 km/h)
Distance: Less than 500 miles
(805 km)
If the speed or distance must necessarily be
greater, remove the propeller shaft before to
prevent damage to the transmission.
ACE1037
6-12In case of emergency
ZX
Page 174 of 263
Four-wheel drive models
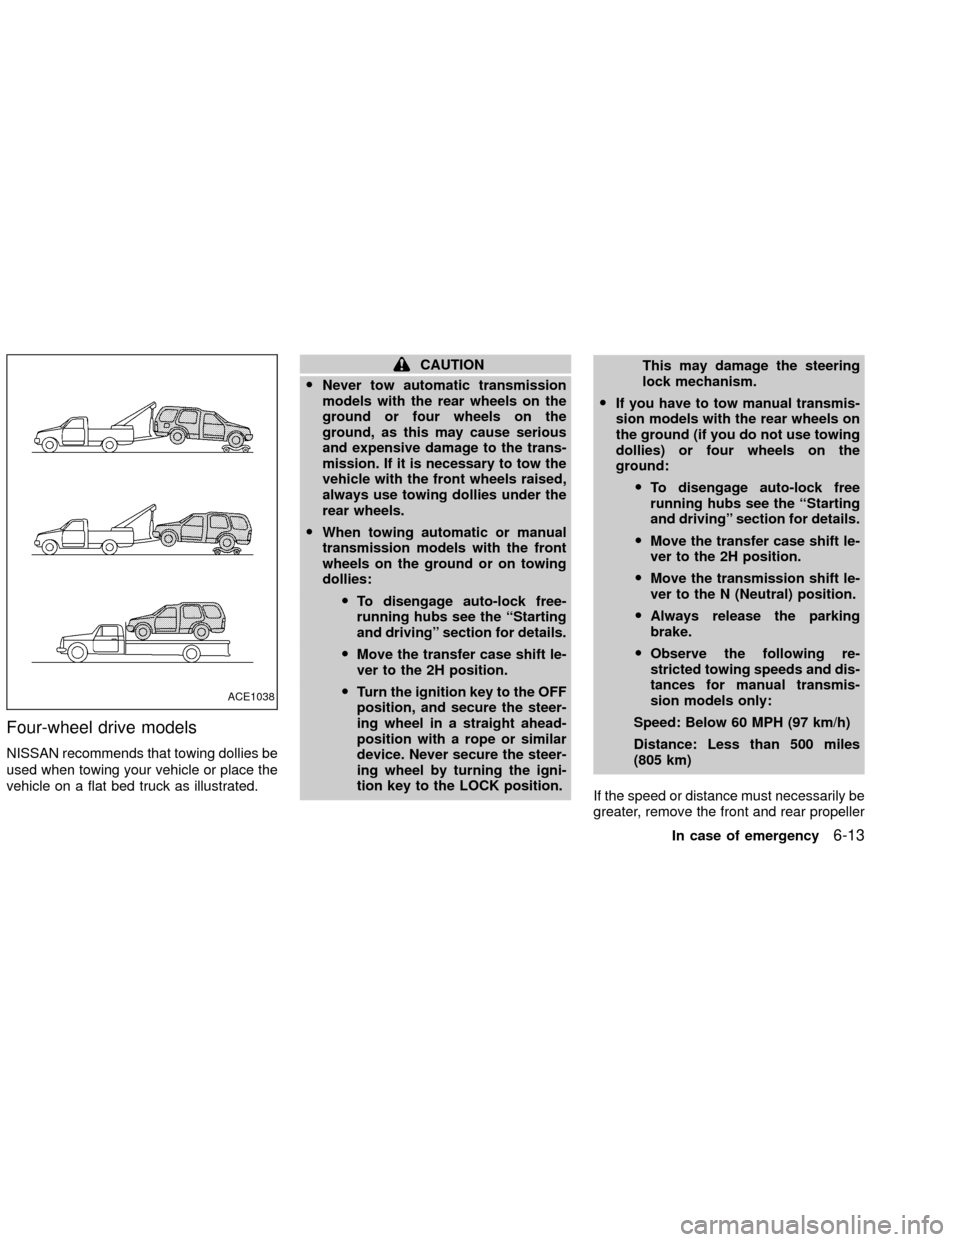
NISSAN recommends that towing dollies be
used when towing your vehicle or place the
vehicle on a flat bed truck as illustrated.
CAUTION
ONever tow automatic transmission
models with the rear wheels on the
ground or four wheels on the
ground, as this may cause serious
and expensive damage to the trans-
mission. If it is necessary to tow the
vehicle with the front wheels raised,
always use towing dollies under the
rear wheels.
OWhen towing automatic or manual
transmission models with the front
wheels on the ground or on towing
dollies:
OTo disengage auto-lock free-
running hubs see the ``Starting
and driving'' section for details.
OMove the transfer case shift le-
ver to the 2H position.
OTurn the ignition key to the OFF
position, and secure the steer-
ing wheel in a straight ahead-
position with a rope or similar
device. Never secure the steer-
ing wheel by turning the igni-
tion key to the LOCK position.This may damage the steering
lock mechanism.
OIf you have to tow manual transmis-
sion models with the rear wheels on
the ground (if you do not use towing
dollies) or four wheels on the
ground:
OTo disengage auto-lock free
running hubs see the ``Starting
and driving'' section for details.
OMove the transfer case shift le-
ver to the 2H position.
OMove the transmission shift le-
ver to the N (Neutral) position.
OAlways release the parking
brake.
OObserve the following re-
stricted towing speeds and dis-
tances for manual transmis-
sion models only:
Speed: Below 60 MPH (97 km/h)
Distance: Less than 500 miles
(805 km)
If the speed or distance must necessarily be
greater, remove the front and rear propeller
ACE1038
In case of emergency6-13
ZX
Page 179 of 263
Occasionally remove loose dust from the
interior trim, plastic parts and seats using a
vacuum cleaner or soft brush. Wipe the
vinyl and leather surfaces with a clean, soft
cloth dampened in mild soap solution, then
wipe clean with a dry soft cloth. Before
using any fabric protector, read the manu-
facturer's recommendations. Some fabric
protectors contain chemicals that stain or
bleach the seat material.
Use a cloth dampened only with water, to
clean the meter and gauge lens.
CAUTION
ONever use benzine, thinner or any
similar material.
ONever use fabric protectors unless
recommended by the manufacturer.
ODo not use glass or plastic cleaner
on meter or gauge lens covers. It
may damage the lens cover.
FLOOR MATS
The use of genuine NISSAN floor mats can
extend the life of your vehicle carpet and
make it easier to clean the interior.No
matter what mats are used, be sure they
are fitted for your vehicle and are prop-
erly positioned in the footwell to prevent
interference with pedal operation.Mats
should be maintained with regular cleaning
and replaced if they become excessively
worn.
Floor mat positioning aid
(Driver side only)
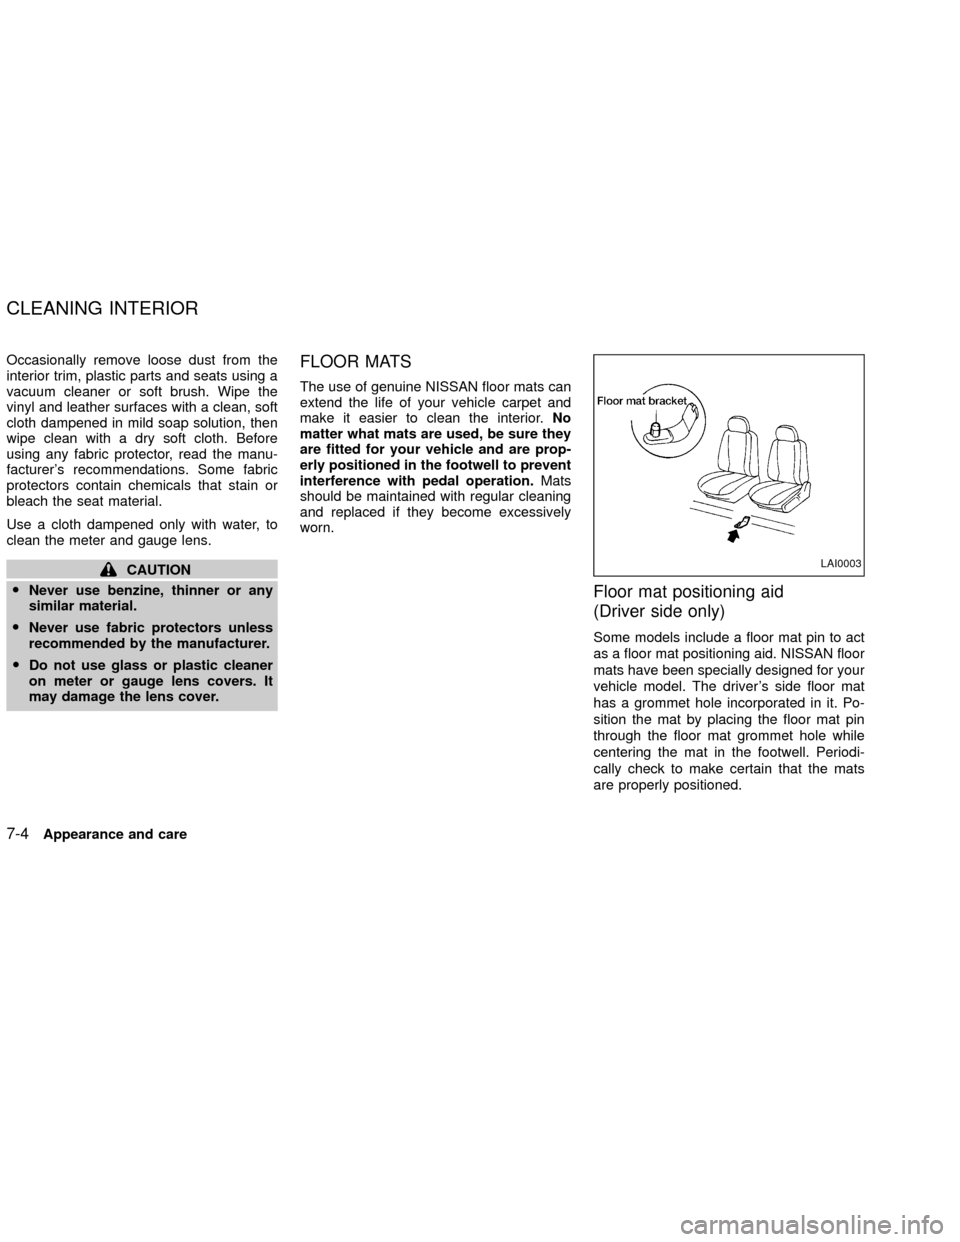
Some models include a floor mat pin to act
as a floor mat positioning aid. NISSAN floor
mats have been specially designed for your
vehicle model. The driver's side floor mat
has a grommet hole incorporated in it. Po-
sition the mat by placing the floor mat pin
through the floor mat grommet hole while
centering the mat in the footwell. Periodi-
cally check to make certain that the mats
are properly positioned.
LAI0003
CLEANING INTERIOR
7-4Appearance and care
ZX
Page 211 of 263
Self-adjusting brakes
Your vehicle is equipped with self-adjusting
brakes.
The front disc-type brakes self-adjust every
time the brake pedal is applied. The rear
drum-type brakes on two-wheel drive trucks
self-adjust every time the parking brake is
applied. The rear drum-type brakes on four-
wheel drive trucks self-adjust every time the
brake pedal is applied. If the brake pedal
goes down farther than normal, it may be
due to a lack of adjustment of the rear drum
brakes. Apply the parking brake several
times.
WARNING
If the brake pedal height does not re-
turn to normal, see an authorized NIS-
SAN dealer and have it checked.
Brake pad wear indicators
The disc brake pads on your vehicle have
audible wear indicators. When a brake pad
requires replacement, it will make a high
pitched scraping or screeching sound when
the vehicle is in motion whether or not the
brake pedal is depressed. Have the brakeschecked as soon as possible if the wear
indicator sound is heard.
Under some driving or climate conditions,
occasional brake squeak, squeal or other
noise may be heard. Occasional brake
noise during light to moderate stops is nor-
mal and does not affect the function or
performance of the brake system.
The rear drum brakes (if so equipped) do
not have audible wear indicators. Should
you ever hear an unusually loud noise from
the rear drum brakes, have them inspected
as soon as possible by an authorized NIS-
SAN dealer.
Proper brake inspection intervals should
be followed.For more information regard-
ing brake inspections, see the appropriate
maintenance schedule information in the
``NISSAN Service and Maintenance Guide.''
BRAKE BOOSTER
Check the brake booster function with the
following steps:
1. With the engine off, press and release
the brake pedal several times. When
brake pedal movement (distance of
travel) remains the same from one pedalapplication to the next, continue on to
next step.
2. While depressing the brake pedal, start
the engine. The pedal height should drop
a little.
3. With the brake pedal depressed, stop the
engine. Keeping the pedal depressed for
about 30 seconds, the pedal height
should not change.
4. Run the engine for one minute without
depressing the brake pedal, then turn it
off. Depress the brake pedal several
times. The pedal travel distance will de-
crease gradually with each depression
as the vacuum is released from the
booster.
If the brakes do not operate properly, have
the brakes checked by an authorized
NISSAN dealer.
8-28Maintenance and do-it-yourself
ZX
Page 221 of 263
TYPES OF TIRES
WARNING
When changing or replacing tires, be
sure all four tires are of the same type
(i.e., Summer, All Season or Snow) and
construction. An authorized NISSAN
dealer may be able to help you with
information about tire type, size, speed
rating and availability. Replacement
tires may have a lower speed rating
than the factory equipped tires, and
may not match the potential maximum
vehicle speed. Never exceed the maxi-
mum speed rating of the tire.
OFor additional information regarding
tires, refer to ``Important Tire Safety
Information'' in the Warranty Infor-
mation Booklet (US) or ``Tire Safety
Information'' in the Warranty and
Roadside Assistance information
booklet (Canada).
All season tires
NISSAN specifies All Season tires on some
models to provide good performance for
use all year around, including snowy and icy
road conditions. All Season Tires are iden-tified by ``ALL SEASON'' and/or ``M&S'' on
the tire sidewall. Snow tires have better
snow traction than All Season tires and may
be more appropriate in some areas.
Summer tires
NISSAN specifies summer tires on some
models to provide superior performance on
dry roads. Summer tire performance in
snow and ice will be substantially reduced.
Summer tires do not have the tire traction
rating ``M&S'' on the tire sidewall.
If you plan to operate your vehicle in snowy
or icy conditions, NISSAN recommends the
use of ``SNOW'' or ``ALL SEASON'' tires on
all four wheels.
Snow tires
If snow tires are needed, it is necessary to
select tires equivalent in size and load rating
to the original equipment tires. If you do not,
it can adversely affect the safety and han-
dling of your vehicle.
If you install snow tires, they must be the
same size, brand, construction and tread
pattern on all four wheels.
Generally, snow tires will have lower speed
ratings than factory equipped tires and maynot match the potential maximum vehicle
speed. Never exceed the maximum speed
rating of the tire.
For additional traction on icy roads, studded
tires may be used. However, some U.S.
States and Canadian provinces prohibit
their use. Check local, state and provincial
laws before installing studded tires. Skid
and traction capabilities of studded snow
tires on wet or dry surfaces may be poorer
than that of non-studded snow tires.
TIRE CHAINS
Use of tire chains may be prohibited accord-
ing to location. Check the local laws before
installing tire chains. When installing tire
chains, make sure they are the proper size
for the tires on your vehicle and are installed
according to the chain manufacturer's sug-
gestions.Use only SAE class ``S'' chains.
Other types may damage your vehicle. Use
chain tensioners when recommended by
the tire chain manufacturer to ensure a tight
fit. Loose end links of the tire chain must be
secured or removed to prevent the possibil-
ity of whipping action damage to the fenders
or undercarriage. If possible, avoid fully
loading your vehicle when using tire chains.
In addition, drive at a reduced speed. Oth-
8-38Maintenance and do-it-yourself
ZX