Page 7 of 1767

Service Notice or Precautions
FAIL-SAFE
The TCM has an electronic Fail-Safe (limp home mode). This allows the vehicle to be driven even if a major
electrical input/output device circuit is damaged.
Under Fail-Safe, the vehicle always runs in third gear even with a shift lever position of ª1º, ª2º or ªDº. Cus-
tomer may complain of ªsluggish or poor accelerationº.
When the Fail-Safe operation occurs the next time the key is turned to the ªONº position, the SPORT indica-
tor lamp will blink for about 8 seconds. (For diagnosis, refer to AT-33.)
Fail-Safe may activate without electrical circuit damages if the vehicle is driven under extreme conditions (such
as excessive wheel spins and emergency braking immediately afterwards). In this case, turn the ignition key
ªOFFº for 5 seconds and then ªONº to recover normal shift pattern.
The blinking of the SPORT indicator lamp for about 8 seconds will appear only once and be cleared. The cus-
tomer may resume normal driving conditions by chance.
Always follow the ªWORK FLOWº (Refer to AT-26).
The SELF-DIAGNOSIS results will be as follows:
The first SELF-DIAGNOSIS will indicate the damage of the vehicle speed sensor or the revolution sensor.
During the next SELF-DIAGNOSIS performed after checking the sensor, no damages will be indicated.
PREPARATION AND PRECAUTIONS
AT- 5
Page 17 of 1767
SELF-DIAGNOSTIC PROCEDURE (Without
CONSULT-II)
DIAGNOSIS START
1. Start engine and warm it up to normal
engine operating temperature.
2. Turn ignition switch to ªOFFº position.
Wait at least 5 seconds.
1. Set A/T mode switch to ªAUTOº posi-
tion.
2. Set overdrive control switch in ªONº
position.
3. Move selector lever to ªPº position.
4. Turn ignition switch to ªONº position.
(Do not start engine.)
5. Does SPORT indicator lamp come on
for about 2 seconds?
Ye s
ENo
Go to 1. SPORT Indicator
Lamp Does Not Come On,
AT-92.
1. Turn ignition switch to ªACCº position.
2. Move selector lever to ªDº position.
qA
NAT309
SAT879E
SAT244I
H
H
H
H
ON BOARD DIAGNOSTIC SYSTEM DESCRIPTION
Self-diagnosis (Cont'd)
AT-15
Page 18 of 1767
qA
1. Set overdrive control switch in ªOFFº
position.
2. Depress accelerator pedal fully and
release it.
3. Turn ignition switch ªONº.
(Do not start engine.)
1. Move selector lever to ª2º position.
2. Set overdrive control switch in ªONº
position.
1. Move selector lever to ª1º position.
2. Set overdrive control switch in ªOFFº
position.
Depress accelerator pedal fully and
release it.
Check SPORT indicator lamp.
Refer to JUDGEMENT OF SELF-
DIAGNOSIS CODE, AT-17.
DIAGNOSIS END
SAT881E
FAT245I
SAT246I
SAT981F
NAT309
H
H
H
H
H
H
ON BOARD DIAGNOSTIC SYSTEM DESCRIPTION
Self-diagnosis (Cont'd)
AT-16
Page 21 of 1767
HOW TO ERASE SELF-DIAGNOSTIC RESULTS
(With CONSULT-II)
1. If the ignition switch stays ªONº after repair work, be sure to turn
ignition switch ªOFFº once. Wait for at least 5 seconds and then
turn it ªONº again.
2. Turn CONSULT-II ªONº, and touch ªA/Tº.
3. Touch ªSELF-DIAG RESULTSº.
4. Touch ªERASEº. (The self-diagnostic results will be erased.)
HOW TO ERASE SELF-DIAGNOSTIC RESULTS
(Without CONSULT-II)
1. If the ignition switch stays ªONº after repair work, be sure to turn
ignition switch ªOFFº once. Wait for at least 5 seconds and then
turn it ªONº again.
2. Perform ªSELF-DIAGNOSTIC PROCEDURE (Without CON-
SULT-II)º. Refer to AT-15.
3. Turn ignition switch ªOFFº. (The self-diagnostic results will be
erased.)
SAT014K
SEF949Y
SAT970J
ON BOARD DIAGNOSTIC SYSTEM DESCRIPTION
Self-diagnosis (Cont'd)
AT-19
Page 35 of 1767
1. CHECK BEFORE ENGINE IS STARTED
1. Park vehicle on flat surface.
2. Turn ignition switch to ªOFFº position.
1. Set A/T mode switch to ªAUTOº posi-
tion.
2. Move selector lever to ªPº position.
3. Turn ignition switch to ªONº position.
(Do not start engine.)
4. Does SPORT indicator lamp come on
for about 2 seconds?
Ye s
ENo
Go to 1. SPORT Indicator
Lamp Does Not Come On,
AT-92.
Does SPORT indicator lamp flicker for
about 8 seconds?
No
EYe s
Perform self-diagnosis.
Refer to SELF-DIAGNO-
SIS PROCEDURE, AT-14.
1. Set A/T mode switch to ªSPORTº posi-
tion.
2. Does SPORT indicator lamp come on?
Ye s
ENo
Go to 2. SPORT or SNOW
(*) Indicator Lamp Does
Not Come On, AT-95.
Set overdrive control switch to ªOFFº posi-
tion.
Does O/D OFF indicator lamp come on?
Ye s
ENo
Go to 3. O/D OFF Indica-
tor Lamp Does Not Come
On, AT-95.
qA
(Go to next page.)
NAT309
SAT853E
NAT309
SAT857E
NAT232
H
H
H
H
H
H
TROUBLE DIAGNOSIS Ð Basic Inspection
Road Test (Cont'd)
AT-33
Page 36 of 1767
qA
Depress brake pedal and move selector
lever to ªDº position.
1. Set A/T mode switch to ªAUTOº posi-
tion.
2. Depress and release accelerator pedal
quickly.
Does SPORT indicator lamp come on for
about 3 seconds after accelerator pedal is
depressed?
Ye s
ENo
Go to 4. SPORT Indicator
Lamp Does Not Come On,
AT-96.
Turn ignition switch to ªOFFº position.
Perform self-diagnosis and note NG
items:
Refer to SELF-DIAGNOSIS
PROCEDURE, AT-14.
Go to ª2. Check at idleº, AT-35.
SAT869E
SAT754A
NAT309
H
H
H
H
H
H
TROUBLE DIAGNOSIS Ð Basic Inspection
Road Test (Cont'd)
AT-34
Page 37 of 1767

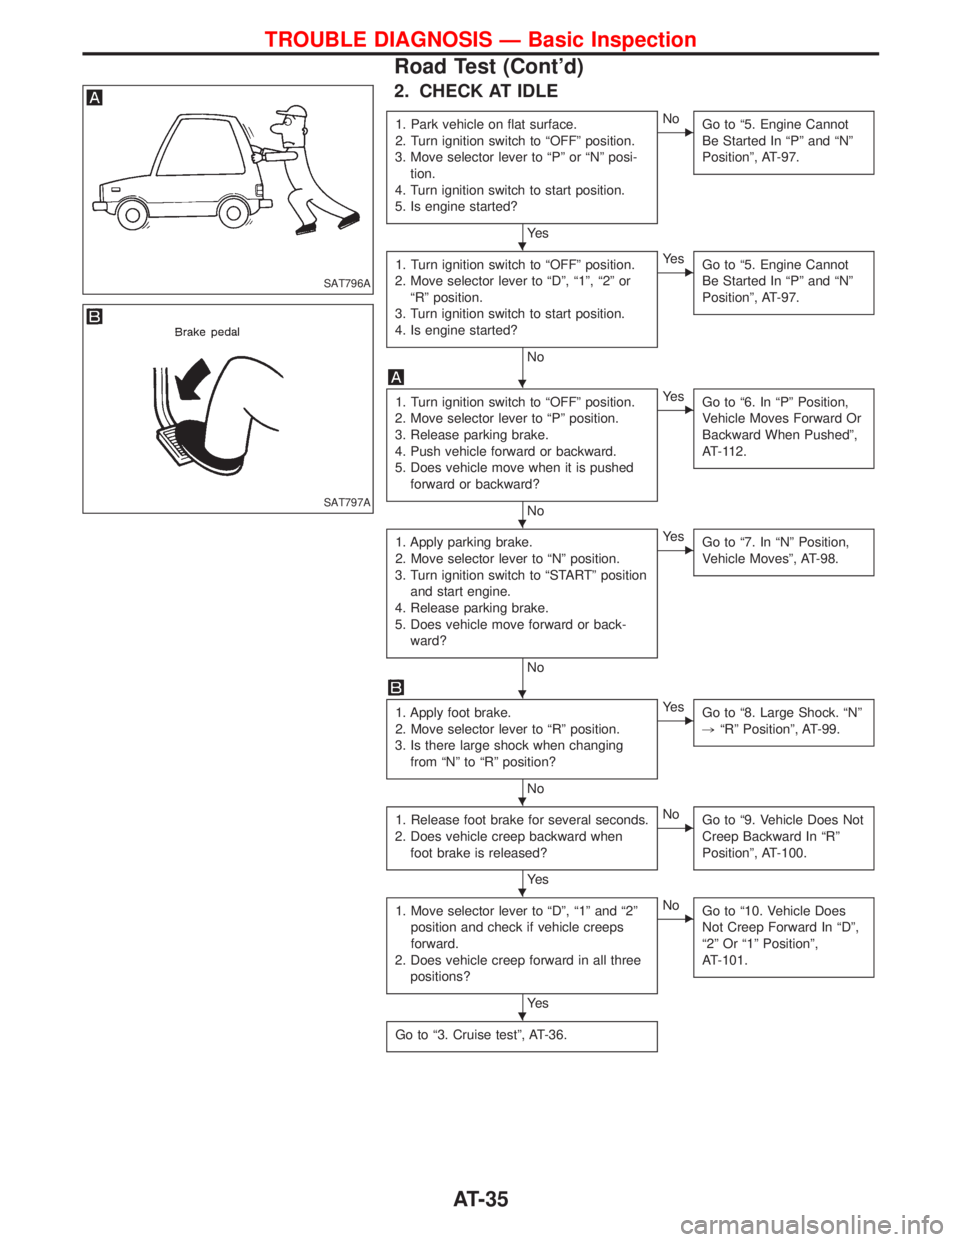
2. CHECK AT IDLE
1. Park vehicle on flat surface.
2. Turn ignition switch to ªOFFº position.
3. Move selector lever to ªPº or ªNº posi-
tion.
4. Turn ignition switch to start position.
5. Is engine started?
Ye s
ENo
Go to ª5. Engine Cannot
Be Started In ªPº and ªNº
Positionº, AT-97.
1. Turn ignition switch to ªOFFº position.
2. Move selector lever to ªDº, ª1º, ª2º or
ªRº position.
3. Turn ignition switch to start position.
4. Is engine started?
No
EYe s
Go to ª5. Engine Cannot
Be Started In ªPº and ªNº
Positionº, AT-97.
1. Turn ignition switch to ªOFFº position.
2. Move selector lever to ªPº position.
3. Release parking brake.
4. Push vehicle forward or backward.
5. Does vehicle move when it is pushed
forward or backward?
No
EYe s
Go to ª6. In ªPº Position,
Vehicle Moves Forward Or
Backward When Pushedº,
AT-112.
1. Apply parking brake.
2. Move selector lever to ªNº position.
3. Turn ignition switch to ªSTARTº position
and start engine.
4. Release parking brake.
5. Does vehicle move forward or back-
ward?
No
EYe s
Go to ª7. In ªNº Position,
Vehicle Movesº, AT-98.
1. Apply foot brake.
2. Move selector lever to ªRº position.
3. Is there large shock when changing
from ªNº to ªRº position?
No
EYe s
Go to ª8. Large Shock. ªNº
,ªRº Positionº, AT-99.
1. Release foot brake for several seconds.
2. Does vehicle creep backward when
foot brake is released?
Ye s
ENo
Go to ª9. Vehicle Does Not
Creep Backward In ªRº
Positionº, AT-100.
1. Move selector lever to ªDº, ª1º and ª2º
position and check if vehicle creeps
forward.
2. Does vehicle creep forward in all three
positions?
Ye s
ENo
Go to ª10. Vehicle Does
Not Creep Forward In ªDº,
ª2º Or ª1º Positionº,
AT-101.
Go to ª3. Cruise testº, AT-36.
SAT796A
SAT797A
H
H
H
H
H
H
H
TROUBLE DIAGNOSIS Ð Basic Inspection
Road Test (Cont'd)
AT-35
Page 38 of 1767
3. CRUISE TEST
ICheck all items listed in Parts 1 through 3.
With CONSULT-II
IUsing CONSULT-II, conduct a cruise test and record the result.
IPrint the result and ensure that shifts and lock-ups take place
as per ªShift Scheduleº.
CONSULT-II setting procedure
1. Turn off ignition switch.
2. Connect ªCONSULT-IIº to Data link connector for CONSULT-II.
Data link connector for CONSULT-II is located in instrument
lower panel on driver side.
3. Turn on ignition switch.
4. Touch ªSTARTº.
5. Touch ªA/Tº.
SAT601J
NAT233
NAT234
SAT586J
SAT250J
TROUBLE DIAGNOSIS Ð Basic Inspection
Road Test (Cont'd)
AT-36